Help with manifold removal - steering & UJ’s
Discussion


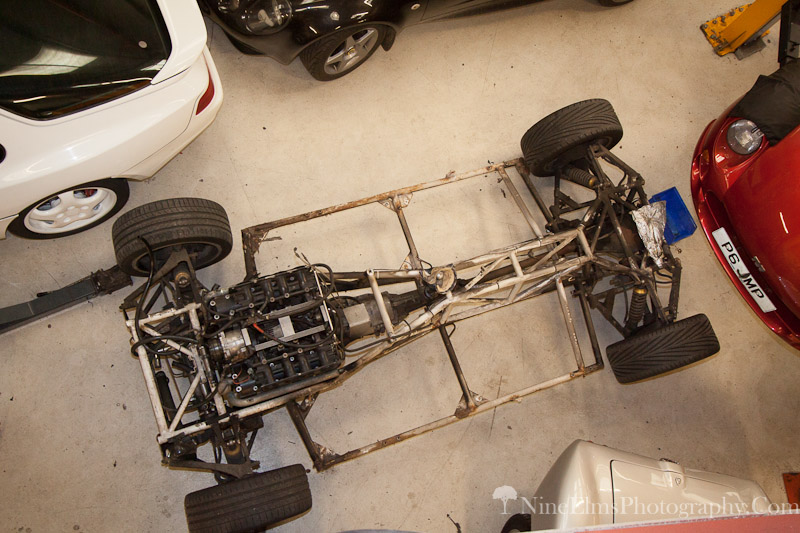
Decided I’d tackle the rusty bits over winter... it was much easier to pretend they weren’t there! I’m not doing a body lift and am just trying to get to all the ‘easily accessible’ bits...
I’m stuck removing the drivers side manifold so I can give the top rail a decent paint. I have read some other posts advising pushing the engine to the passenger side but I’m finding it impossible to create a gap big enough, I can’t seem to jack it high and across as the steering rod between the uj’s is in the way of the engine mount. I have tried removing this engine mount before and it’s also pretty impossible without unplumbing the oil pipe which I’d rather not do.
Unless there is a way I haven’t found to get the manifold out easily it looks like I need to remove this rod. Has anyone managed this without rod removal?
If I really need to disconnect the steering this is a first for me and I’d appreciate any advice please, how do I remove this rod and then replace it without buggering up the direction on the steering? Is it a case of marking the positions somehow before unbolting or is there a trick to getting it right? And when I manage this is there a safe point on the engine to use a jack to push it sideways?
Also the Powder coat has burned off in the top rail and a bit down the frame - what is the recommended solution going forward, I’m using POR, will it take the heat? Will reflective tape help? Would ceramic coating the manifolds stop the POR burning off? I’d like to get it right first time as I’m really not in a hurry to go through this again...
Thanks and sorry for the ramble and too many questions (it helps ease the frustration)!!
pmessling said:
Undo both engine mounts 12mm bolt on the rubber mount and put a jack on the sump with a bit of wood between it. You'll be about to push it over then.
What your doing is a mine field. Once you start it's hard to stop as you find something else to paint or replace. But worth it.
Yeah, that's kinda how mine started...I'll just touch that bit up, then before you know it...What your doing is a mine field. Once you start it's hard to stop as you find something else to paint or replace. But worth it.


I feel your pain.
I had to:
1) remove engine mount bolts both sides
2) take the exhaust off
3) unbolt the gearbox mount bolts
4) undid the oil filter bracket but not really necessary
The passenger side is easier - still needed to raise the engine with a jack AND wedge a bar between the chassis and chassis side and pull as hard as I could! The passenger side came out with a twist.
The driver’s side is an absolute nightmare. Same procedure but the gap is thinner and it took me a whole day to get it out. Then it took me another day to get it back in!
Perseverance and a few choice words are the go!
Thanks wolves!!
Got it out this evening... The rubber engine mount was in the way I had to jack up the engine up till it touched the steering rod, unwind the ‘hockey puck’ as much as I could & hacksaw the top of the bolt off that got it free! I couldn’t get any further last night so thanks for your post I didn’t think of the gearbox mount, Undid the drivers side, one manly shove of the engine across the bay and it popped right out - easy when you know how!
Good news is no holes in the top rail and so it should paint up nicely, and I can get to the heat shields as they need patching definitely worth the pain as I would never have got in there.
Great news!
As stated, I found getting them back in just as hard, made worse by the heat wrap making them thicker. I found twisting the manifold from underneath finally got it in.
I then found the driver’s side manifold face to be warped outwards as a result of the weld repairs. Aligning the bottom bolts with the 4 manifold “grooves” became impossible. More “choice” words” as the firewall bolt kept coming out/ off due to the warpage (?).
I ended up only using the two firewall bolts (most inaccessible bolts ever devised) to locate the manifold and squeezing the other two on later. The top bolts were easy once the manifold is located.
I recommend the exhaust manifold gasket from ACT as it fits perfectly. They slide down into the gap once the manifold is being held in place by the bottom, locator bolts.
I’m also going to get my exhaust “mounted” to the chassis just after the bottom of the manifold join. I feel this would alleviate any further undue stress on the manifolds themselves. Iirc someone else has already done this?
Good luck!
Luckily mine aren’t warped but I have a tear in the bottom bracket that bolts the 1 pipes together that will need welding.
Strangely mine have no gaskets or sealant, it doesn’t look like they were leaking though as I can’t see any soot bold up so when it’s going back together I’m not sure if I should gasket, seal or leave bare??
Was thinking about ceramic coating them to help stop the chassis burn, heat soak and using reflect-a-gold on the tubes to help stop paint peel. Is this enough to stop the heat damage? Otherwise I was considering fabricating an ally shield - bent over the top rail and diagonal down by the exhaust route. Has anyone done this Is it worthwhile or overkill??
Gassing Station | Cerbera | Top of Page | What's New | My Stuff