Headlight Condensation
Discussion


Just a quick question to anyone who has fitted Ian’s kit themselves. Is it absolutely necessary to remove the front wheel or can the headlight inspection hatch in the wheel arch be accessed with the steering on full lock? My car is at the dealer at the moment so I can’t check it myself. The kit sounds like a really good solution to the problem, and it looks pretty straightforward to fit too.
Best Regards
Minglar
Best Regards
Minglar
Hi bogie and The V12 Way
Thanks for the replies guys. I would prefer to do it without removing the wheels as that’s less hassle at home. But as you both said, taking the wheels off will make access easier, and Ian said the same too. I’ve ordered the kit and will post a progress update when I can.
Best Regards
Minglar
Thanks for the replies guys. I would prefer to do it without removing the wheels as that’s less hassle at home. But as you both said, taking the wheels off will make access easier, and Ian said the same too. I’ve ordered the kit and will post a progress update when I can.
Best Regards
Minglar
BlackV8 said:
I installed the kit today and it was perfectly described and done in one hour ... but as answered before, removing the wheels keeps all work and cleaning for sealing easier.
Cheers
What method of sealing are you using - I take it you're talking about sealing the hatch on the wheel arch liner, rather than the actual panel with the fans on ?Cheers
There is a small strip of foam on the arch liner hatch, which to my mind is useless and I've therefore used a slighthly thicker, wider, neoprene seal. Still reckon it's a bobbins solution though, so would be interested in alternatives to keep the water out.
I fitted the kit without removing the wheels, jack up the car to get maximum body height (using the correct jacking point) and there is plenty of room to remove the panel and replace the headlamp rear cover. To my surprise my MY18 V12S had an expanded aluminium mesh cover, so Ian kindly made a 'vented chimney' to ensure moisture wasn't drawn into the lamp. So far very pleased. 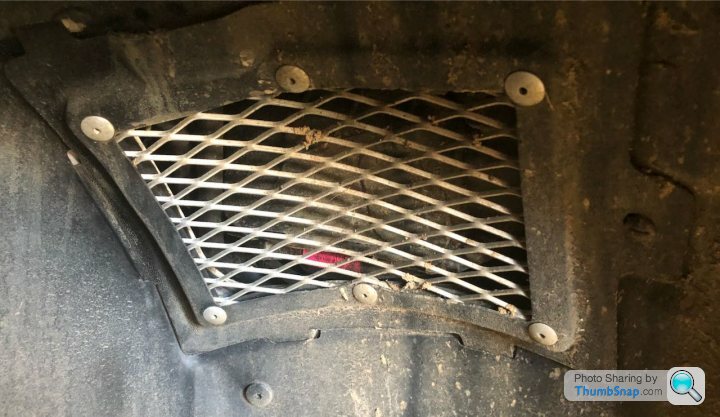
callevascm said:
I fitted the kit without removing the wheels, jack up the car to get maximum body height (using the correct jacking point) and there is plenty of room to remove the panel and replace the headlamp rear cover. To my surprise my MY18 V12S had an expanded aluminium mesh cover, so Ian kindly made a 'vented chimney' to ensure moisture wasn't drawn into the lamp. So far very pleased.
Not sure I understand the reasoning behind the expanded metal - surely it’s opening the back of the headlights and all the stuff behind the liner to the elements. Given the volume of water that can be chucked up in that area surely it’s a recipe for disaster further down the line.I’m probably missing something very obvious, but my philosophy would be to keep all of the headlight area as dry as possible ?
I can't be sure of the reason for the expanded mesh cover but assume it is to improve the airflow to the engine. I did discuss with Ian returning to a sold, waterproof panel but as the car still has warranty cover I decided best to keep it original. Someone else may know better of course.
JonnyCJ said:
BlackV8 said:
I installed the kit today and it was perfectly described and done in one hour ... but as answered before, removing the wheels keeps all work and cleaning for sealing easier.
Cheers
What method of sealing are you using - I take it you're talking about sealing the hatch on the wheel arch liner, rather than the actual panel with the fans on ?Cheers
There is a small strip of foam on the arch liner hatch, which to my mind is useless and I've therefore used a slighthly thicker, wider, neoprene seal. Still reckon it's a bobbins solution though, so would be interested in alternatives to keep the water out.
I have cleaned this area yesterday properly and will squirt the sealant on next.
Cheers

Bit of an update....
Got the rear of the light covers all built up with the fan and “exhaust” units and have been giving some thought to the whole design of the wheel arch liner access panel.
To my mind it was a disaster waiting to happen (if you can call headlight condensation a disaster). Effectively you have a ton of water being chucked at the access panel and this will leak into the light unit area due to the poor design.
I’ve used a very simple solution to pretty much totally obviate this happening by using some heavy gauge plastic sheet.
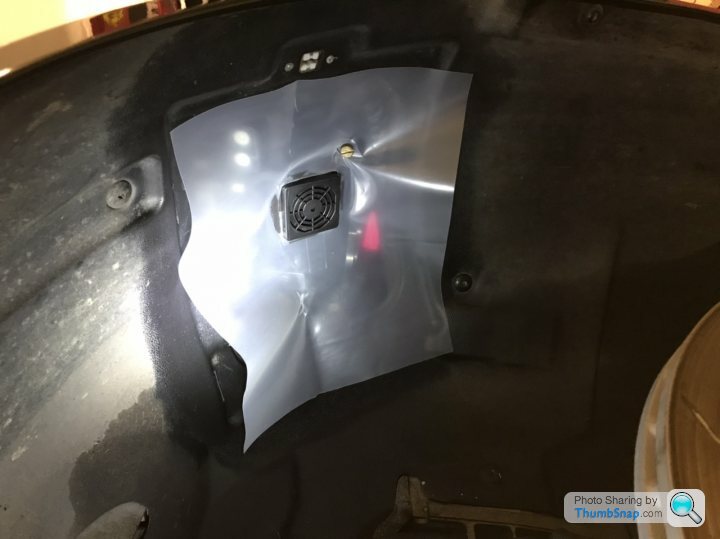
This will prevent any water that does get past the access panel from getting to the headlight unit.
You’ll see from the pics that the large fan filter is poking through the plastic. This is so that the moist vented air is separated from what hopefully is less moist air being sucked in from the engine bay area.

The plastic is then tucked inside the wheel arch liner leaving a nice neat barrier to any water from the access panel.
One thing that does concern me though, is the elliptical hole in the wheel arch liner. This provides a direct route for water/mud etc from under the arch into the engine bay. There must be a reason for it ?
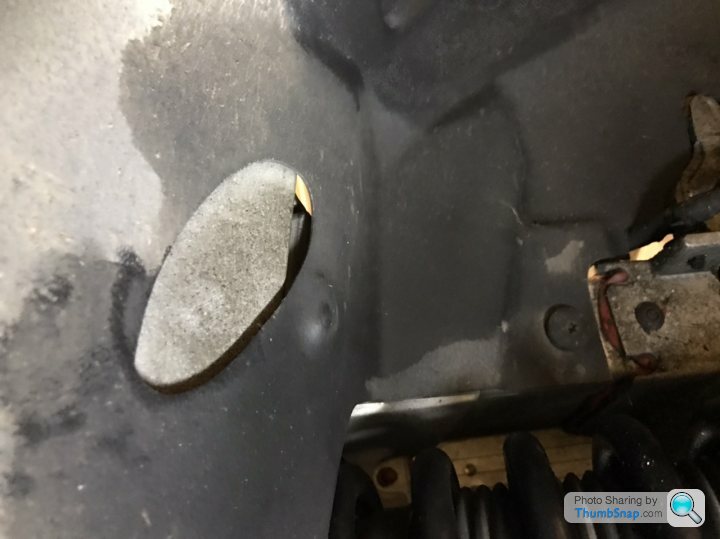
For now I’ve tucked some heavy gauge plastic sheeting between the liner and the body to seal off the hole until I find out what it’s for.
The access panels are now back in place whilst I consider what to do about sealing them up. May have to go for the silicone option, although it’s not ideal.
Got the rear of the light covers all built up with the fan and “exhaust” units and have been giving some thought to the whole design of the wheel arch liner access panel.
To my mind it was a disaster waiting to happen (if you can call headlight condensation a disaster). Effectively you have a ton of water being chucked at the access panel and this will leak into the light unit area due to the poor design.
I’ve used a very simple solution to pretty much totally obviate this happening by using some heavy gauge plastic sheet.
This will prevent any water that does get past the access panel from getting to the headlight unit.
You’ll see from the pics that the large fan filter is poking through the plastic. This is so that the moist vented air is separated from what hopefully is less moist air being sucked in from the engine bay area.
The plastic is then tucked inside the wheel arch liner leaving a nice neat barrier to any water from the access panel.
One thing that does concern me though, is the elliptical hole in the wheel arch liner. This provides a direct route for water/mud etc from under the arch into the engine bay. There must be a reason for it ?
For now I’ve tucked some heavy gauge plastic sheeting between the liner and the body to seal off the hole until I find out what it’s for.
The access panels are now back in place whilst I consider what to do about sealing them up. May have to go for the silicone option, although it’s not ideal.
Edited by JonnyCJ on Thursday 30th April 11:32
BlackV8 said:
JonnyCJ, I have used a slightly thicker neoprene seal as well. Thereafter you should seal the area around the hatch with silicone like shown in the manual.
I have cleaned this area yesterday properly and will squirt the sealant on next.
Cheers
If one used silicone to seal the hatch means the hatch is glued onto the liner, what if a bulb breaks in the future?I have cleaned this area yesterday properly and will squirt the sealant on next.
Cheers
Remove the whole liner to replace the bulb?
TR-Spider said:
If one used silicone to seal the hatch means the hatch is glued onto the liner, what if a bulb breaks in the future?
Remove the whole liner to replace the bulb?
That's my current head scratcher. I'm thinking of using something like gorilla tape on the liner and access panel, then siliconing to that. that way you have a removable option without actually getting silicone on the liner or access panel. Remove the whole liner to replace the bulb?
Need to check whether the Gorilla tape will stick to the plastic long term. If so, could be the solution.
You could try to fit new foam around the edge of the flaps. That would keep the water away from the light units.
Its almost impossible to keep moisture away from the front lights, unless you fit the vent kits.
Mines a DB9 and doesn't have the moisture problem but would seriously consider purchasing a vent kit once it gets developed as you can only get it for the vantage.
Its almost impossible to keep moisture away from the front lights, unless you fit the vent kits.
Mines a DB9 and doesn't have the moisture problem but would seriously consider purchasing a vent kit once it gets developed as you can only get it for the vantage.
paulrog1 said:
You could try to fit new foam around the edge of the flaps. That would keep the water away from the light units.
Its almost impossible to keep moisture away from the front lights, unless you fit the vent kits.
Mines a DB9 and doesn't have the moisture problem but would seriously consider purchasing a vent kit once it gets developed as you can only get it for the vantage.
Have a read through the full thread Paul. I’ve installed a vent kit, but am trying to limit the water ingress to the bacon the light unit.Its almost impossible to keep moisture away from the front lights, unless you fit the vent kits.
Mines a DB9 and doesn't have the moisture problem but would seriously consider purchasing a vent kit once it gets developed as you can only get it for the vantage.
Gav on here has built his own vent kit for a DB9, which is where I got the inspiration for mine.
Cheers
Jonny
Finally finished installing my home made vent kit. It works with a temperature controller to switch the fans on and off at a certain temp. I’ve set it at 40 deg c just for now. The idea being that the fan will continue to run as the engine cools down.
The thermocouple for the temp sensing is run along the top of the rad, tucked down the side of the long piece of foam, so that will give a modest but controlled heat output to the thermocouple. No point having it on any really hot parts.
Not tested it yet, need to take the car out in the rain !

The thermocouple for the temp sensing is run along the top of the rad, tucked down the side of the long piece of foam, so that will give a modest but controlled heat output to the thermocouple. No point having it on any really hot parts.
Not tested it yet, need to take the car out in the rain !
Gassing Station | Aston Martin | Top of Page | What's New | My Stuff