Headlight Condensation
Discussion


The factory solution above is for the rear lights, the venting kit is for the front.
With regards to pricing, if you are in the AMOC or car club (Including Pistonheads), you can get 15% discount so it drops the price to £287 + £12 UK carriage (About £50 discount) a bargain.
With regards to pricing, if you are in the AMOC or car club (Including Pistonheads), you can get 15% discount so it drops the price to £287 + £12 UK carriage (About £50 discount) a bargain.
Edited by vantagev8v on Tuesday 30th April 23:14
Hi TR-Spider, there is a vent for air to enter the chamber and a high speed fan to extract, the system works well, it draws the cooler air from the outer side and blows the hot air to the engine side. Looking at what you get especially the wiring loom and venting caps, I think the price is a bargain, well worth fitting and easy too.
It does seem like a well engineered solution and good VFM considering. It does seem a little crazy how you can buy a new car then have to go and spend £400 on some aftermarket solution to stop the lights misting up.
Imagine that down the Ford or Honda garage. "oh yes, misty headlights, they all do that sir, but you can solve it with this gizmo, only £200 per headlight"
I guess its no different to having to sort the paint bubbles out every few years....I was told today my 7 year old car paintwork might be covered by factory corrosion warranty when the dealer has sent pics to the factory of the bubbling paint on the door. However the wing mirror corrosion not covered. I will have to pay for that to be painted myself. 7 year old wing mirrors, totally bubbled and paint just dropping off them down to bare aluminium.
Gotta love good old British car quality.... after tens of thousands of miles in MGBs, TVRs, Lotus, and Astons they are all just the same....Aston just have posher showrooms these days
Mine's in at Cambridge for the ol' misty headlight thang. One day in the winter it was bad enough that the main beam was useless. They'd already tried bags of silica gel (short-term fix) and now they are plumbing some pipework in from the heater box to the lamps. Warm air will be fed in when the engine is on. What cossetted front lights Astons have.
I'll be getting the front headlights converted next week. Looks like a nice piece of kit.
For a rear lamp fix, I would think the addition of a single small fan at the rear of each lamp unit casing should be enough.
Warm(er) air can then be drawn from the cabin compartment.
Maybe that'll be Ian's next project.
For a rear lamp fix, I would think the addition of a single small fan at the rear of each lamp unit casing should be enough.
Warm(er) air can then be drawn from the cabin compartment.
Maybe that'll be Ian's next project.
Just saw this on the AMOC site.
The install is very simple, the pictures below show much of the story.
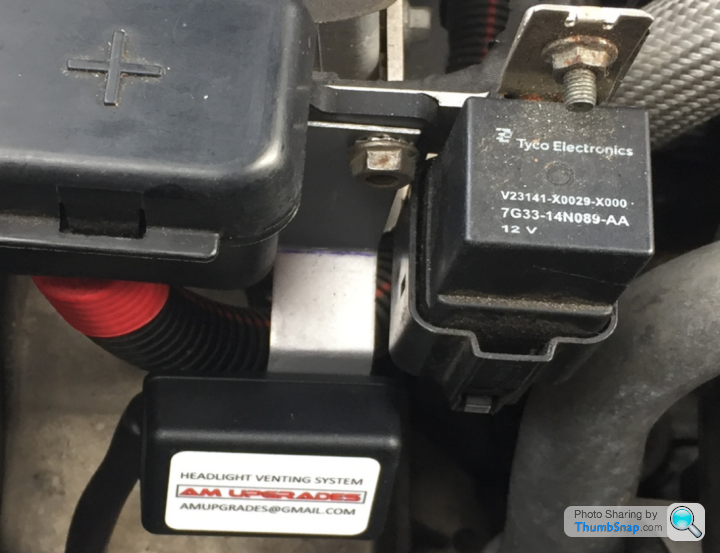
Fit the wire loom bracket to the existing battery jump start bracket as shown.
Fit the power lead to the 12V power jump block on the left of the bracket.
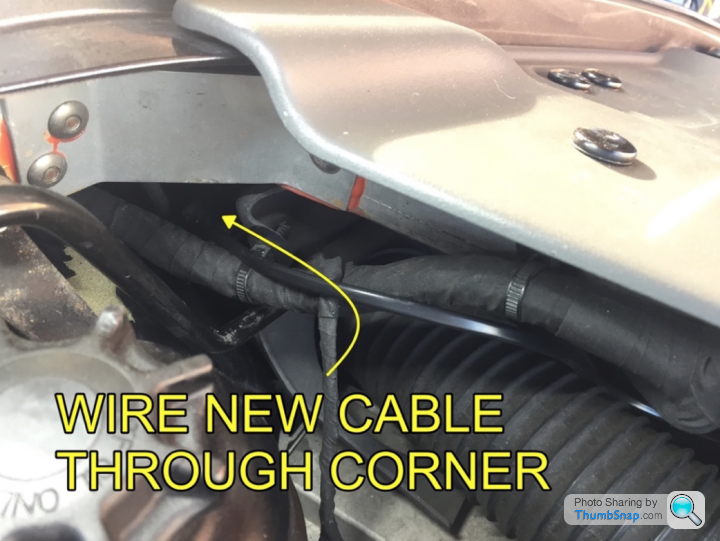
Feed the two main venting cap wires to the front two corners of the engine bay where the headlights are, as shown.
Connect the sensor to the radiator pipe, ties included.
Remove the existing headlight caps and fit the new.
Connect the “push fit” wires which you have fed through the two corners.
Fit the inline fuse.
Test drive the car to operating temp.
Check venting fans are operating.
Done...
Even spare nuts, ties and an eleven page, colour picture operation manual is included, all items are made ready to fit.
Hope it helps.

The install is very simple, the pictures below show much of the story.
Fit the wire loom bracket to the existing battery jump start bracket as shown.
Fit the power lead to the 12V power jump block on the left of the bracket.
Feed the two main venting cap wires to the front two corners of the engine bay where the headlights are, as shown.
Connect the sensor to the radiator pipe, ties included.
Remove the existing headlight caps and fit the new.
Connect the “push fit” wires which you have fed through the two corners.
Fit the inline fuse.
Test drive the car to operating temp.
Check venting fans are operating.
Done...
Even spare nuts, ties and an eleven page, colour picture operation manual is included, all items are made ready to fit.
Hope it helps.
Dave Aston said:
Just saw this on the AMOC site.
The install is very simple, the pictures below show much of the story.
Fit the wire loom bracket to the existing battery jump start bracket as shown.
Fit the power lead to the 12V power jump block on the left of the bracket.
Feed the two main venting cap wires to the front two corners of the engine bay where the headlights are, as shown.
Connect the sensor to the radiator pipe, ties included.
Remove the existing headlight caps and fit the new.
Connect the “push fit” wires which you have fed through the two corners.
Fit the inline fuse.
Test drive the car to operating temp.
Check venting fans are operating.
Done...
Even spare nuts, ties and an eleven page, colour picture operation manual is included, all items are made ready to fit.
Hope it helps.
Perfect summary, I fitted one of these last year, best thing I ever did. I have had two Vantages over the past 7 years, love them but the headlight condensation is a pain, I like to use the car in the winter (On the nice days), pop to the pub for a Coke and as soon as you return to the car, the lights have misted up. Not anymore.The install is very simple, the pictures below show much of the story.
Fit the wire loom bracket to the existing battery jump start bracket as shown.
Fit the power lead to the 12V power jump block on the left of the bracket.
Feed the two main venting cap wires to the front two corners of the engine bay where the headlights are, as shown.
Connect the sensor to the radiator pipe, ties included.
Remove the existing headlight caps and fit the new.
Connect the “push fit” wires which you have fed through the two corners.
Fit the inline fuse.
Test drive the car to operating temp.
Check venting fans are operating.
Done...
Even spare nuts, ties and an eleven page, colour picture operation manual is included, all items are made ready to fit.
Hope it helps.

vantagev8v said:
Thank god I have a venting kit, I have been using the Aston the last couple of days hoping the weather will brighten up but no, constant pouring rain. The good thing, no condensation, clear headlights, "living the dream"
Ditto! The venting kit AM Cambridge installed last week seems to be doing the trick.At last clear weather, glad to say the Venting kit kept my lights clear, the rain has been so bad the last couple of days, it also stops people pointing at the car having a laugh about headlights full of condensation, there are always a minority of people who want to put a fab car down.
Dave Aston said:
At last clear weather, glad to say the Venting kit kept my lights clear, the rain has been so bad the last couple of days, it also stops people pointing at the car having a laugh about headlights full of condensation, there are always a minority of people who want to put a fab car down.
I know what you mean, many times at shows especially early mornings, the topic was “why have your lights got condensation” but now it is “why have the other cars got condensation and yours are clear, are your lights new”. No, I have a Venting Kit fitted and the story starts all over again, love it.I've just had my front lamp replaced. On that note - i have the original that could probably be repaired. I was going to stick it on eBay but if anyone wants to make me an offer I'm open. The LED strip intermittently goes so will need some investigation. Just want rid of it.
Cheers
Chris
Cheers
Chris
Gassing Station | Aston Martin | Top of Page | What's New | My Stuff