DB7 Rear Lights - modifications
Discussion


Well one thing is for sure...
I have more respect for car designers now.. ;-) where they spend months perfecting one little thing.. hehe
I also understand what you mean about the lens for #6
As for adhesives.. what about the double sided stuff they use for number plates.
Obviously stays stuck on and doesn't damage anything and is ultimately removable.
I bought some this week to re-attach my scuttle panel back on below the windscreen, worked a treat.
I think the body coloured light strip does look a little lost on your tinted lens. The alloy works better. I asked my metal finisher and he said that aluminium will buff and can be spray laq'd clear, or e.p.c'd, but wont stand a nickel/chrome finish and setting up for mild steel in these shapes would cost too much for the numbers who'll end up having them. So for me, I'll be sending them out electro powdercoated in a mid colour primer, ready to receive the buyers paint finish.
Spoke to my paint guy and he said the variances in the paint colours and even the age of the paint on the car would make matching the strips via a factory code nearly impossible, so I can make 'em, prime 'em and post 'em, but the final finish will have to be left to someone else.
As for adhesives, Tony Hall as kindly offered a professional waterproof tape that he uses on external signage called VHB. He'll let me have a sample and I'll try it on my car. I think the worst case scenario is a below freezing night, then driving for a few hours with all lights on including fogs, a few more hours of driving sleet and a sudden freeze, a bit like last winter. These trims weigh about 70 to 100 grams each, so they're going to be asking a lot of whatever tape can cope with the temperature changes, expansion/contraction and the weight.
An update for those who were interested. I fitted the large set(set 6) on my car a couple of weeks ago. I got them sprayed and found the right adhesive tape. No issues so far. The car will be in the members area at the Concours at Chatsworth on Sunday. I'll get some pictures there, hopefully surrounded by other Astons and post them up.
DB7 pilot said:
455mm long, 25mm at the boot tapering to 15mm bullnosed end, 6mm thick aluminium.
I like both of these and there's no complicated curves in them, so once I've cleared up some safety issues and checked the adhesives, I'll knock out a few sets if anyone's interested.
Number 6 does indeed look good - just out of interest what made you choose 6mm thickness - I would have thought 3-4mm would have done the job and then not give the tape so much weight to support?I like both of these and there's no complicated curves in them, so once I've cleared up some safety issues and checked the adhesives, I'll knock out a few sets if anyone's interested.
Either way a good looking mod


3-4mm thick aluminium would have been great to use, it would make life a little easier for forming them around the light body, but I tried various thicknesses from 1.2mm, 2mm, 3.2mm and 4mm and they looked too thin from this angle:
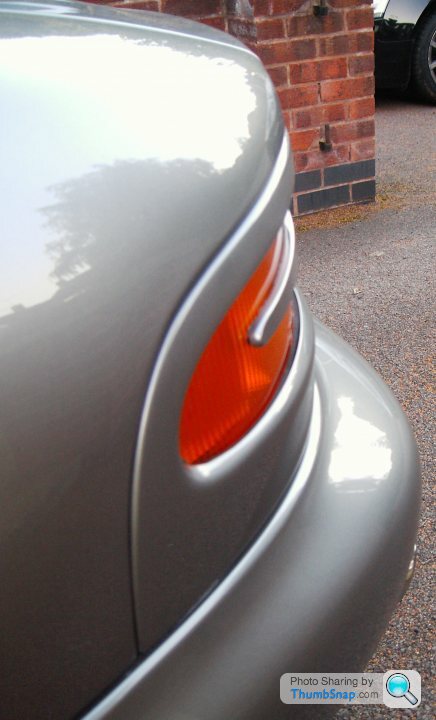
It didn't matter until I started to buff them up and the light started to reflect off them like it does on the painted panels. The 6mm reflection matched the light cowl contour and the small visible flat on the bumper. In addition, the boot edge is about 9-10mm away from the light body and even with the 6mm blades it still looks as if it could do with being a little thicker. I admit that's something of a compromise.
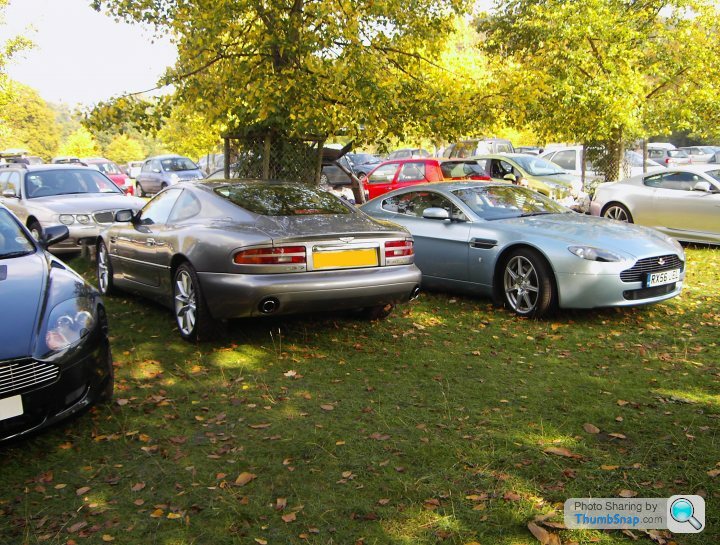
The new images I have are from the AMOC concourse event at Chatsworth House yesterday. Got a lot of double-takes and sidewards glances, as you'd expect, but also some favourable comments and one chap asked for a set. He also asked if I could post some images of the lights on here to show how intrusive they might be:
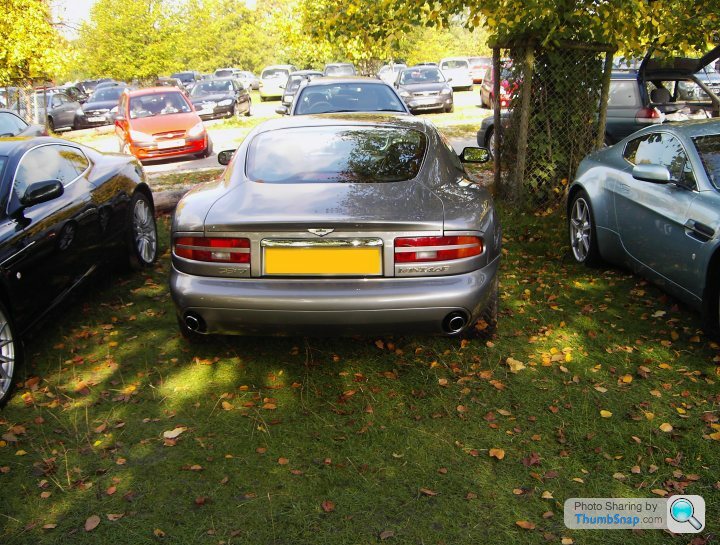
Sorry, I got a bit wrapped up in takin shots of the concourse cars, I didn't realise I'd only taken two shots of mine(and not very good at that).
Here's some with the lights on:


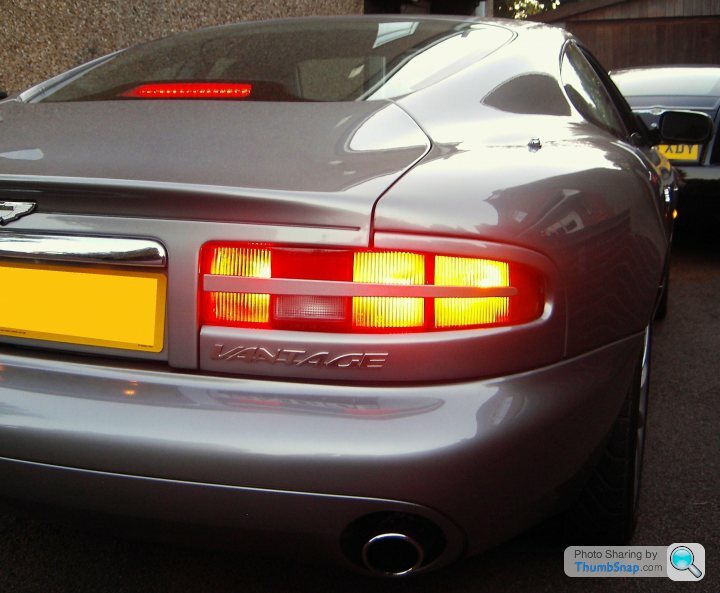
This last shot has fogs, side & brake lights and the indicator's on.
It didn't matter until I started to buff them up and the light started to reflect off them like it does on the painted panels. The 6mm reflection matched the light cowl contour and the small visible flat on the bumper. In addition, the boot edge is about 9-10mm away from the light body and even with the 6mm blades it still looks as if it could do with being a little thicker. I admit that's something of a compromise.
The new images I have are from the AMOC concourse event at Chatsworth House yesterday. Got a lot of double-takes and sidewards glances, as you'd expect, but also some favourable comments and one chap asked for a set. He also asked if I could post some images of the lights on here to show how intrusive they might be:
Sorry, I got a bit wrapped up in takin shots of the concourse cars, I didn't realise I'd only taken two shots of mine(and not very good at that).
Here's some with the lights on:
This last shot has fogs, side & brake lights and the indicator's on.
I want to try some LED lamps in the rear lights, as I think they would suit the strips better over standard filament bulbs.
Also it could be possible to open up the actual lenses themselves and position a horizontal divider in there to further split the top from the bottom.
Of course LED's would better suit the split Lenses internally.
The good things with LED's is that you are no longer dependent on the reflector to magnify the light as the LED's are much more directional.
It could be theoretically possible to obtain some spare Mazda Light clusters, and drill / mount LED's directly onto the rear of the light clusters, this would give a more modern look along with the alloy strip would be a good improvement over the 80's style lights.
These are all ideas which I am sharing in case others might wish to give anything a go.
Phil,
I have to admit at looking closely at the internals of the light body to see if I could inlay some aluminium strips flush with the outer surface like the new models and I have to say that it looks like a can of worms.
Each section i.e. fogs, reflector, reversing light, side/brake and the indicator are very well compartmentalised to avoid light 'bleed' from one to the other, therefore any cutting tool would have to be very precisely depth set to avoid taking too much out of these dividers.
The expansion rate of different materials would mean that anything being inlaid needs an allowance to move, albeit a nominal amount. This would mean that the inevitable gap created between the lens and the 'new' material would need to be capped to avoid water/condensation ingress into the bulb area.
Finally, the prismatic effect you see on the outside of the lens is moulded on the inside making this surface very irregular and difficult to bond anything to, unless you add an adhesive of some thickness that absorbs these contours. I imagine that this may leave a visible line from the back of the car, which may look worse once the lights are on.
Of course, anything's possible, but that job's for a braver man than I.
Sorry I should have been clearer in my previous description.
I was meaning for the strips to remain on the outside as you have them now, however using plastic or card etc.. make some internal dividers to fit snug without the need for any machining of the internals.
Then with a little more effort and no doubt patience fit or mount LED's in place of the bulbs in the upper and lower compartments, so you would effectively have a split rear lens using LEDs and the Alloy outer strip would nicely cover the edge of the internal divider.
This would retain the weather proofing of the original lens.
It might be very possible to fabricate some PCB's to fit perfectly within the lenses using the existing bulb socket as a mounting... I have the means to make PCB's here I just don't have a spare rear light to work with (yet).
I'm not an AM owner, but dark tinting your lights always looks a little "chav" to me.
When I had a Corrado I used some red tint spray (http://www.extremeautoaccessories.co.uk/products.php?section=1193) to hide the orange indicators. This looks more OE than dark tint and would fit on the DB7 as the later cars have all red rears. Also does not affect the brightness of brake lights!
For Corrados you can get overlay sticker instead of using spray: http://www.empiregfx.com/shop/product.php?producti... This would be better as a) its less likely to fade over time like tint spray would, and b) you can just peel it off. Perhaps you can get a sheet of the stuff and cut your own templates. You do hoever need LED Orange indicator bulbs to make the indicators shine properly orange rather than red.
I think all red rears with the stripe add on would look great on an DB7!
EDIT: I did a mock up for you:
Edited by was8v on Tuesday 12th October 10:39
Edited by was8v on Tuesday 12th October 10:41
Thanks for that I see what you mean.
Mine are already tinted although the photo's I took show them as being darker than they really are.
The colours can still be seen through the tint, I'll try to get better photo's, just need some decent light onto the lens.
As a footnote I noted in the Factory Video's for the GT model the lenses appear to be tinted ;-)
Prophetic words Glyn. It looks like a few busy weekends with the ones people want at the minute. I think they're appealing more now to those who'd like the option of removing them at a later date without any trace of them on the original design at all.
So for those who asked, please e-mail me and I'll sort out the details with you.
Mark.
So for those who asked, please e-mail me and I'll sort out the details with you.
Mark.
Edited by DB7 pilot on Wednesday 20th October 21:05
DB7 pilot said:
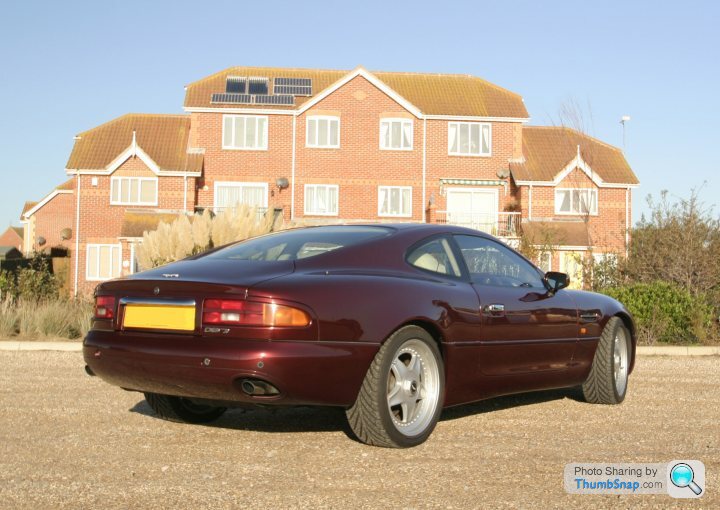
Here's the first picture of set 5 on a cheviot red DB7:

Many thanks Phil. Very subtle colour combination.
Thanks Mark and Phil. My own car is in Dubonnet Rosso and I was concerned that a dark red "blade" would not give a good contrast against the lenses but on Phil's car it looks superb - tastefully understated. I was thinking about silver / chrome for my "blades" but I think I will go for body colour now.Many thanks Phil. Very subtle colour combination.
Thanks again for all your efforts Mark
LBS

Gassing Station | Aston Martin | Top of Page | What's New | My Stuff