The friendly "dumb" bike questions thread
Discussion


gareth_r said:
Art Keller said:
A motorcycle (with or without a sidecar) must have a rear position lamp. If a sidecar is fitted then the sidecar must be fitted with a rear position lamp
Rizzo was talking about the front position lamp, which isn't required if there is a headlamp.Speed addicted said:
LosingGrip said:
I've got my MOT in a couple of weeks on the GS.
Other than lights, tyres, horn is there anything I can check before hand? Also just checking the spotlights on the side don't count in the MOT as some cut the wire a few months ago.
That’s pretty much it! Other than lights, tyres, horn is there anything I can check before hand? Also just checking the spotlights on the side don't count in the MOT as some
cut the wire a few months ago. Check suspension for leaks possibly?
Not sure about the fog lights, you get solder seal connectors that could be used to quickly and permanently fix the wires though
shoestring7 said:
Speed addicted said:
LosingGrip said:
I've got my MOT in a couple of weeks on the GS.
Other than lights, tyres, horn is there anything I can check before hand? Also just checking the spotlights on the side don't count in the MOT as some cut the wire a few months ago.
That’s pretty much it! Other than lights, tyres, horn is there anything I can check before hand? Also just checking the spotlights on the side don't count in the MOT as some
cut the wire a few months ago. Check suspension for leaks possibly?
Not sure about the fog lights, you get solder seal connectors that could be used to quickly and permanently fix the wires though
Speaking about MOT time, I’ve just had mine done and some play was noted in the front fork bushes.
The bike is now 8 years old with 23k miles, I take it this is just a strip down and service?
Any suggestions on where to get the work done? I live near Aberdeen so I’ve accepted that posting them is likely.
The bike is now 8 years old with 23k miles, I take it this is just a strip down and service?
Any suggestions on where to get the work done? I live near Aberdeen so I’ve accepted that posting them is likely.
airsafari87 said:
Sorry, I should have mentioned in my previous post that peening the frame would be option 1 as the gouge doesn’t appear to be too deep.
Should it end up being too deep to peen then welding would be used as a last resort.
The bike will not be getting stripped, and I don’t want carbon frame covers to hide it either.
I rode in to work on it this morning and it rode and shifted beautifully so it doesn’t appear as though it has bent any of the rods going in to the QS. The treads in the shift lever itself were undamaged as well so I’ve loctited the screw in to it this time.
Bringing this one to a close.Should it end up being too deep to peen then welding would be used as a last resort.
The bike will not be getting stripped, and I don’t want carbon frame covers to hide it either.
I rode in to work on it this morning and it rode and shifted beautifully so it doesn’t appear as though it has bent any of the rods going in to the QS. The treads in the shift lever itself were undamaged as well so I’ve loctited the screw in to it this time.
I took the bike back to the dealer on Friday and the owner came out and inspected it with me.
As I mentioned previously, the gouge isn’t really that bad, it’s more of a deep scratch than anything and only a cosmetic issue.
To my surprise a brand new frame had already arrived for it from Italy. Considering the warranty claim had only been submitted a week prior that was a hell of a turn around from Aprilia. Although they did send it without any frame numbers being stamped in to it.
I really didn’t want a new frame, nor to reject the bike and have a replacement. All I wanted was to have the scratch either removed or hidden in some way. Didn’t want the carbon frame covers as I prefer the bare Ali look to the frame.
So the agreement we came to was. The dealer gave me a set of R&G frame guards which will hide the scratch, and he also gave me a healthy lump of in store credit to spend on whatever I want. I’d have been happy with just the frame guards, so the credit was a nice little bonus.
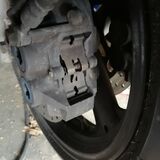
This is a 2 pronged question
1st is how do I tell without removing the brake pads whether they need replacing or is there a way
2nd one is looking at the photo is it a case of removing the pins and sliding out the old pads and putting new ones in without having to take off the whole brake system.
Cheers !
1st is how do I tell without removing the brake pads whether they need replacing or is there a way
2nd one is looking at the photo is it a case of removing the pins and sliding out the old pads and putting new ones in without having to take off the whole brake system.
Cheers !
HybridTheory said:
This is a 2 pronged question
1st is how do I tell without removing the brake pads whether they need replacing or is there a way
2nd one is looking at the photo is it a case of removing the pins and sliding out the old pads and putting new ones in without having to take off the whole brake system.
Cheers !
1, you can see how much meat is left on the pads by looking from the front when you can see the discs and the pads touching them.1st is how do I tell without removing the brake pads whether they need replacing or is there a way
2nd one is looking at the photo is it a case of removing the pins and sliding out the old pads and putting new ones in without having to take off the whole brake system.
Cheers !
2, usually either undo one of the caliper securing bolts and pivot it up out of the way or undo both securing bolts and remove the caliper from the disc. Then remove the pins and the pads should come out. Watch out for the pressure spring and make sure it goes back exactly as it was before disassembly.
Amused2death said:
HybridTheory said:
This is a 2 pronged question
1st is how do I tell without removing the brake pads whether they need replacing or is there a way
2nd one is looking at the photo is it a case of removing the pins and sliding out the old pads and putting new ones in without having to take off the whole brake system.
Cheers !
1, you can see how much meat is left on the pads by looking from the front when you can see the discs and the pads touching them.1st is how do I tell without removing the brake pads whether they need replacing or is there a way
2nd one is looking at the photo is it a case of removing the pins and sliding out the old pads and putting new ones in without having to take off the whole brake system.
Cheers !
2, usually either undo one of the caliper securing bolts and pivot it up out of the way or undo both securing bolts and remove the caliper from the disc. Then remove the pins and the pads should come out. Watch out for the pressure spring and make sure it goes back exactly as it was before disassembly.
tvrolet said:
Why would you have to remove the caliper? Just undo the allen bolt thingy that goes through the anti-rattle spring (usually with the thread is at the head, if these bolts/pins not the bottom) and the pads will pull out. Than push the pistons back before putting in the new pads. If you don't have a piston spreader tool then use the old pads and lever then back gently against the pistons....and do it one at a time otherwise the other piston can sometime push out as you push the other back in. And watch the fluid level in the master cylinder as it will go back up as you push the pistons back and if you've been topping it up.
They might come out from the rear, the devil is in the specific type. Some pads can only be removed from the front. Anyway, poster asked and I answered to the best of my knowledge. You may know different/better in which case I bow down to your greater knowledge. 
tvrolet said:
Why would you have to remove the caliper? Just undo the allen bolt thingy that goes through the anti-rattle spring (usually with the thread is at the head, if these bolts/pins not the bottom) and the pads will pull out. Than push the pistons back before putting in the new pads. If you don't have a piston spreader tool then use the old pads and lever then back gently against the pistons....and do it one at a time otherwise the other piston can sometime push out as you push the other back in. And watch the fluid level in the master cylinder as it will go back up as you push the pistons back and if you've been topping it up.
Think I just watched a YouTube video and that’s what they did !Anyone who knows anything about wind noise/buffeting/screens?
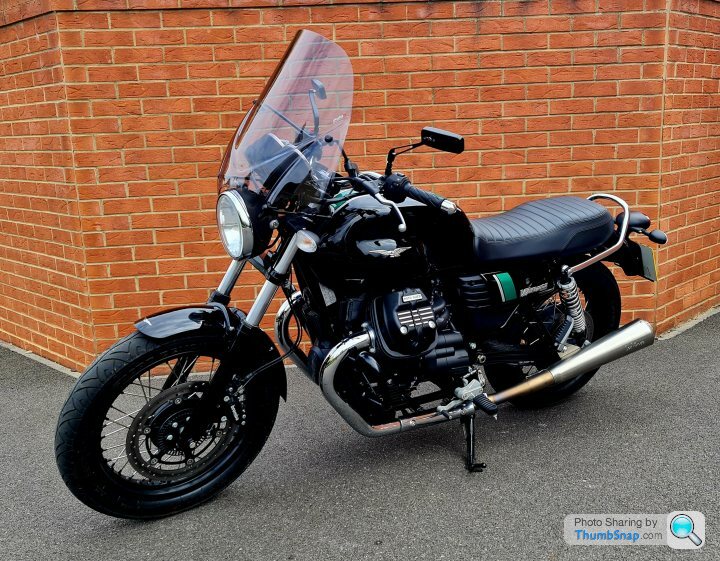
Run my V7 with a fly screen usually and wear ear plugs, works fine for most of what I do, which is, and always has been pootling around doing under 1k miles a year. I'm vaguely planning a first Euro or Scotland trip soon, and so have bought a Puig Ranger screen to try and quiet things down and keep some weather off.
I'm 174cm tall, or about 5'8", so slightly under average height, screen sits about level with my eyeline. It's eliminated most of the wind noise, but now my head is getting knocked about. I've seen some attachments to add to the top of the screen but have no idea what works, any advice?
On a lot of bikes with barn-door screens (like mine) you'd be surprised where the wind is actually coming from. Take a ride with a piece of wool/string or just a bare hand and see what the wind is doing. On mine and lots of similar bikes the problem is not what's coming over the top or round the sides, but air coming up from under the screen. You can get some really strange things like raindrops going upwards between you and the screen, and this upward air mixing with everything else can cause buffeting.
On mine, and similar 'mercan bikes the solution is wind deflectors below the screen on the fork legs. Here's mine queuing for the Santander ferry and you can see them on the forks. With them, 700 miles a day with no wind, helmet visor open and no need ear plugs. Without, it's buffet-central. Your bike may be different, but this is what cures the issue on lots of other big-screen bikes that buffet.

On mine, and similar 'mercan bikes the solution is wind deflectors below the screen on the fork legs. Here's mine queuing for the Santander ferry and you can see them on the forks. With them, 700 miles a day with no wind, helmet visor open and no need ear plugs. Without, it's buffet-central. Your bike may be different, but this is what cures the issue on lots of other big-screen bikes that buffet.
Pebbles167 said:
Anyone who knows anything about wind noise/buffeting/screens?
Ask here also: https://www.advrider.com/f/threads/anybody-have-a-...
Pebbles167 said:
I've seen some attachments to add to the top of the screen but have no idea what works, any advice?
MRA Vario. Get one that attaches to your existing screen (they sell screens with them already attached or the clip on ones for existing screens).They're adjustable so you can tweak them up/down in/out until the you're comfortable, great bits of kit.
Gassing Station | Biker Banter | Top of Page | What's New | My Stuff