Big hole in aluminium oil drain plug
Discussion


I have this issue all the time; aluminium plugs work well the first time but any more and they round (especially the allen key variety). The load bearing flat area above the washer will be the issue - very rarely is the thread tight.
Use a hole cutter that matches the size of the washer - one with a drill to centre it is best until the cutter has begun to cut (then move the cutter down lower so the drill doesn't go through the bung) if you go careful there'll be no damage as the washer is between the bung and the casing protecting it. As soon as the load bearing portion is gone the bung will wind out by hand.
Use a hole cutter that matches the size of the washer - one with a drill to centre it is best until the cutter has begun to cut (then move the cutter down lower so the drill doesn't go through the bung) if you go careful there'll be no damage as the washer is between the bung and the casing protecting it. As soon as the load bearing portion is gone the bung will wind out by hand.
KTMsm said:
Drill the hole until you're into the thicker alloy
Then find a suitable size torx and drill the hole slightly smaller than the torx, hammer the torx in
The hole that’s there due to the hex shape ripping out is pretty big. Due to the effort I put into trying to undo the plug, I’m not sure if a torx will just grind the remaining metal away.Then find a suitable size torx and drill the hole slightly smaller than the torx, hammer the torx in
trickywoo said:
Irwin style bolt extractor, if it will fit over the big bit and between the raised flange bit.
The big bit got ripped off, there’s just a hole in the plug now.Steve Bass said:
tvrolet said:
Plan A, drill 2 holes either side and make up a bar with to 'pins' in it (like the sort of thing you'd undo a grinder disk with), put pins in holes and use bar to undo the plug.
Plan B, drill 2 holes either side and tap them; put to holes in a bar and bolt the bar to the plug then undo.
^^^^ This.Plan B, drill 2 holes either side and tap them; put to holes in a bar and bolt the bar to the plug then undo.
Drill & tap the flat bar with decent sized bolts (M6/8) into it, drill corresponding holes in the plug, insert and turn.
But definitely apply heat to the plug in the first instance and a bit of judicious tapping...
God luck
ReverendCounter said:
Thing is, there's nothing for the centre drill to cut into, to act as a central guide - the hex part has torn out leaving a finger diameter hole.
If there's a finger sized hole I'd try to cover the back of the plug with some thick grease if you're drilling it. It might just catch any swarf that gets through....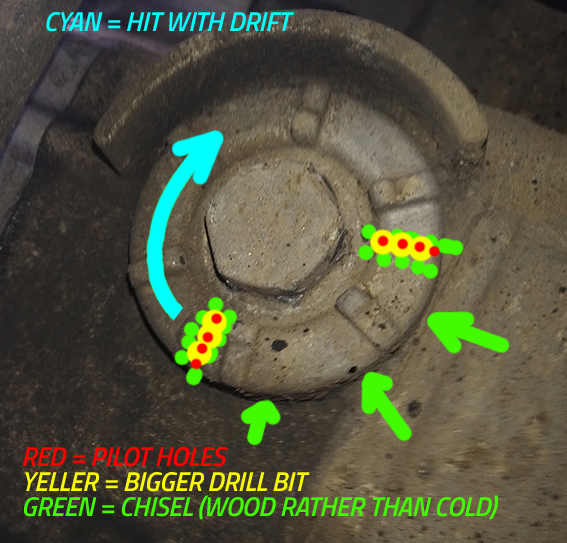
Just to update this, used a slightly different approach:
- drilled pilot holes as indicated, red
- enlarged the holes with a bigger bit, yellow
- removed about 1/3rd of the flange with a standard 1" sharp wood chisel I had to hand, green
- used a drift and a decent sized hammer to rotate + unscrew, cyan
Didn't need to use any heat but that could well have done the trick in the first place, as advised.
Didn't put grease on the threads/o-ring which probably led to the seizing.
Didn't put grease on the threads/o-ring this time round either due to the excitement.
What will I do differently next time? grease the threads/o-ring and not drill into the engine casing when I'm trying to un-seize it next oil change.
_Fayaz said:
Had this issue a few years ago with the same bolt. An Irwin bolt extractor set saved the day eventually, they're definitely worth keeping around.
Iirc a replacement sump plug was something daft like 27 quid when I checked!
I nearly paid something similar but they're universal for the following (£8)Iirc a replacement sump plug was something daft like 27 quid when I checked!
Oil Drain Plug 4HC-15351-00-00 For Yamaha Kodiak Wolverine Grizzly Rhino 450 4WD
"Fitment:
Fits for Yamaha models as following:
For 1998 Yamaha ATV GRIZZLY 4X4 YFM600FWAK (4WV1)
For 1999 Yamaha ATV GRIZZLY 4WD YFM600FWAL (5GT1)
For 1999 Yamaha ATV GRIZZLY 4WD YFM600FWALC CALIFORNIA (5GT2)
For 2000 Yamaha ATV GRIZZLY HUNTING YFM600HM (5GT9)
For 2000 Yamaha ATV GRIZZLY HUNTING YFM600HMC CALIFORNIA (5GT92) CAL
For 2000 Yamaha ATV GRIZZLY YFM600FWAM (5GT6)
For 2000 Yamaha ATV GRIZZLY YFM600FWAMC CALIFORNIA (5GT62)
For 2000 Yamaha ATV KODIAK 2WD YFM400AM (5HA1)
For 2000 Yamaha ATV KODIAK 2WD YFM400AMC CALIFORNIA (5HA2)
For 2000 Yamaha ATV KODIAK 4WD AUTOMATIC YFM400FAM (5GH1)
For 2000 Yamaha ATV KODIAK 4WD AUTOMATIC YFM400FAMC CALIFORNIA (5GH2)
For 2000 Yamaha ATV KODIAK 4WD REALTREE X-TRA YFM400FAHM (5GH6) U49
For 2000 Yamaha ATV KODIAK 4WD REALTREE X-TRA YFM400FAHMC CALIFORNIA (5GH7)
For 2001 Yamaha ATV GRIZZLY HUNTER EDITION YFM600FWAHN (5GTK)
For 2001 Yamaha ATV GRIZZLY YFM600FWAN (5GTE)
For 2001 Yamaha ATV KODIAK 2WD YFM400AN (5HA7)
For 2001 Yamaha ATV KODIAK 4X4 HUNTER EDITION YFM400FAHN (5GHF)
For 2001 Yamaha ATV KODIAK 4X4 YFM400AN (5GH9)
For 2002 Yamaha ATV KODIAK 4X4 HUNTER YFM400FAHP (5GHR)
For 2002 Yamaha ATV KODIAK 4X4 YFM400FAP (5GHK)
For 2002 Yamaha Street Bike XV 250 VIRAGO CALIFORNIA
For 2002 Yamaha Street Bike XV 250 VIRAGO
For 2003 Yamaha ATV KODIAK 400 4X4 YFM400FAR (5TE1)
For 2003 Yamaha ATV KODIAK 400 YFM400AR (5VH1)
For 2003 Yamaha ATV KODIAK 450 4WD YFM450FAR (5ND1)
For 2004 Yamaha ATV KODIAK 400 4X4 HARDWOODS YFM400FAHS
For 2004 Yamaha ATV KODIAK 400 4X4 YFM400FAS
For 2004 Yamaha ATV KODIAK 400 YFM400AS
For 2004 Yamaha ATV KODIAK 450 4X4 HARDWOODS YFM450FAHS
For 2004 Yamaha ATV KODIAK 450 4X4 YFM450FAS
For 2005 Yamaha ATV KODIAK 400 4x4 YFM4FAT
For 2005 Yamaha ATV KODIAK 450 4X4 BLACK/CARBON YFM45FSET
For 2005 Yamaha ATV KODIAK 450 4X4 YFM45FAT
For 2005 Yamaha ATV KODIAK 450 4x4 HUNTER YFM45FAHT
For 2006 Yamaha ATV KODIAK 400 4WD YFM4FAV
For 2006 Yamaha ATV KODIAK 400 4x4 YFM4FAHV
For 2006 Yamaha ATV KODIAK 450 4WD HUNTER YFM45FAHV
For 2006 Yamaha ATV KODIAK 450 4WD YFM45FAV
For 2006 Yamaha ATV WOLVERINE 450 4x4 SPORT YFM45FXV
For 2006 Yamaha Utility RHINO 450 4WD
For 2007 Yamaha ATV GRIZZLY 400 HUNTER 4x4
For 2007 Yamaha ATV GRIZZLY 400
For 2007 Yamaha ATV GRIZZLY 450 HUNTER
For 2007 Yamaha ATV GRIZZLY 450 OUTDOORSMAN EDITION
For 2007 Yamaha ATV GRIZZLY 450 SPECIAL SILVER EDITION
For 2007 Yamaha ATV GRIZZLY 450
For 2007 Yamaha ATV WOLVERINE 450 4x4 SPORT
For 2007 Yamaha ATV WOLVERINE 450 SPORT SE
For 2007 Yamaha Utility RHINO 450 HUNTER
For 2007 Yamaha Utility RHINO 450 SE-BLUE
For 2007 Yamaha Utility RHINO 450
For 2008 Yamaha ATV GRIZZLY 450 4WD
For 2008 Yamaha ATV WOLVERINE 450 4WD
For 2008 Yamaha Utility RHINO 450 HUNTER
For 2008 Yamaha Utility RHINO 450 SPECIAL EDITION
For 2008 Yamaha Utility RHINO 450
For 2009 Yamaha ATV GRIZZLY 450 4X4 HUNTER
For 2009 Yamaha ATV GRIZZLY 450 4X4
For 2009 Yamaha ATV WOLVERINE 450 4X4 AUTO
For 2009 Yamaha Utility RHINO 450 HUNTER
For 2009 Yamaha Utility RHINO 450
For 2010 Yamaha ATV BIG BEAR 400 4WD
For 2010 Yamaha ATV GRIZZLY 450 4WD HUNTER
For 2010 Yamaha ATV GRIZZLY 450 4WD
For 2010 Yamaha ATV WOLVERINE 450 4WD
For 2011 Yamaha ATV GRIZZLY 450 4WD HUNTER
For 2011 Yamaha ATV GRIZZLY 450 4WD
For 2011 Yamaha ATV GRIZZLY 450 EPS 4WD HUNTER
For 2011 Yamaha ATV GRIZZLY 450 EPS 4WD
For 2012 Yamaha ATV GRIZZLY 450 4WD HUNTER
For 2012 Yamaha ATV GRIZZLY 450 4WD
For 2012 Yamaha ATV GRIZZLY 450 EPS 4WD (DARK PURPLISH BLUE)
For 2012 Yamaha ATV GRIZZLY 450 EPS 4WD (PASTEL DEEP GREEN)
For 2013 Yamaha ATV GRIZZLY 450 4WD HUNTER
For 2013 Yamaha ATV GRIZZLY 450 4WD
For 2013 Yamaha ATV GRIZZLY 450 EPS 4WD HUNTER
For 2013 Yamaha ATV GRIZZLY 450 EPS 4WD
For 2014 Yamaha ATV GRIZZLY 450 EPS HUNTING
For 2014 Yamaha ATV GRIZZLY 450 EPS
For 2014 Yamaha ATV GRIZZLY 450 HUNTING
For 2014 Yamaha ATV GRIZZLY 450
For YAMAHA KODIAK 450 4WD 2018
For YAMAHA KODIAK 450 4WD HUNTER 2018
For YAMAHA KODIAK 450 EPS 2018
For YAMAHA XV250 2018
For YAMAHA XV250 - XV250HCS (CA) 2017
For YAMAHA XV250 - XV250HS 2017
For YAMAHA V STAR 1300 DELUXE - XVS13CTFGC (CA) 2016
For YAMAHA XV250 - XV250GCR (CA) 2016
For YAMAHA XV250 - XV250GR 2016
For YAMAHA V STAR 250 - XV250FCL (CA) 2015
For YAMAHA V STAR 250 - XV250FL 2015
For YAMAHA GRIZZLY 450 2014
For YAMAHA GRIZZLY 450 EPS 2014
For YAMAHA GRIZZLY 450 EPS HUNTING 2014
For YAMAHA GRIZZLY 450 HUNTING 2014
For YAMAHA V STAR 250 - XV250ER 2014
For YAMAHA GRIZZLY 125 2013
For YAMAHA GRIZZLY 450 4WD 2013
For YAMAHA GRIZZLY 450 4WD HUNTER 2013
For YAMAHA GRIZZLY 450 EPS 4WD 2013
For YAMAHA GRIZZLY 450 EPS 4WD HUNTER 2013
For YAMAHA RAPTOR 350 2004-2013
For YAMAHA V STAR 250 - XV250D 2013
For YAMAHA BIG BEAR 400 4WD 2012
For YAMAHA GRIZZLY 125 2012
For YAMAHA GRIZZLY 450 4X4 2007-2012
For YAMAHA GRIZZLY 450 4X4 HUNTER 2012
For YAMAHA GRIZZLY 450 4X4 HUNTER POWER STEERING 2012
For YAMAHA GRIZZLY 450 4X4 POWER STEERING 2011-2012
For YAMAHA V STAR 250 - XV250BB 2012
For YAMAHA BIGBEAR 400 4X4 2000-2011
For YAMAHA GRIZZLY 125 2x4 2004-2011
For YAMAHA V Star 250 - XV250STAR 2008-2010
For YAMAHA WOLVERINE 450 4X4 2006 2008-2010
For YAMAHA RHINO 450 2006-2009
For YAMAHA GRIZZLY 400 4X4 2007-2008
For YAMAHA WOLVERINE 450 4X4 SPORT SE 2007-2008
For YAMAHA WOLVERINE 450 4X4 SPORT 2007
For YAMAHA KODIAK 400 4X4 1993-1994 1996-2006
For YAMAHA KODIAK 450 4X4 2003-2006
For YAMAHA Virago 250 - XV250 1995-2006
For YAMAHA WOLVERINE 350 1995-2005
For YAMAHA BIGBEAR 400 2X4 2000-2004
For YAMAHA KODIAK 400 2X4 2000-2004
For YAMAHA WARRIOR 1987-2004
For YAMAHA YFA125 BREEZE 1989-2004
For YAMAHA GRIZZLY 600 4X4 1998-2001
For YAMAHA XT350 1985-2000
For YAMAHA BIGBEAR 350 2X4 1996-1997 1999
For YAMAHA BIGBEAR 350 4X4 1987-1997 1999
For YAMAHA YFM350ER MOTO-4 1987-1990 1992-1995
For YAMAHA Route 66 - XV250 1988-1990
For YAMAHA SRX250T 1987
For YAMAHA SRX250T (CA)1987
For YAMAHA TT350T 1987
For YAMAHA TT350S 1986
For YAMAHA BREEZE YFA125 1989-2004
For YAMAHA GRIZZLY 125 (YFM125) 2004-2013"
anonymous said:
[redacted]
I actually thought you were!Yes, it was eventually as simple as drilling, a bit of chiselling and drifting (the boring kind).
I think it all could have been avoided if I'd greased the threads and o-ring, maybe. I'm not going to say live and learn because I forgot to grease it this time round as well (in my defence I did say I was a cack-handed baboon at times).
anonymous said:
[redacted]
The pics don't show the silicon o-ring but there's a channel where it sits. The problem seems to be the two faces between the engine case and the face of the flange, once I got rid of about a third of the flenge it was possible to overcome the friction with the drift and hammer.I haven't tightened the new plug as much this time, but as PHer Pope says above, he sees this a lot so it must be easy to overdo it.
Edited by ReverendCounter on Friday 16th April 10:52
I think the trick is to tighten this plug only to the point where the rubber O-ring is squished flat,
but the flange of the plug is not even touching the case.
Of course, it is almost natural instinct to overdo the tightness on this one
as no-one likes to slip & crash on their own spilled oil.
I seems that the aluminium surfaces of plug & case welded themselves chemically, or so,
by being pressed tightly together and 1000s of hot/cold cycles.
What torque does the manufacturer recommend, do you have a torque wrench ( or access to a workshop that has one ) ?
Gassing Station | Biker Banter | Top of Page | What's New | My Stuff