Starter/Battery Cable (How Long?)
Discussion


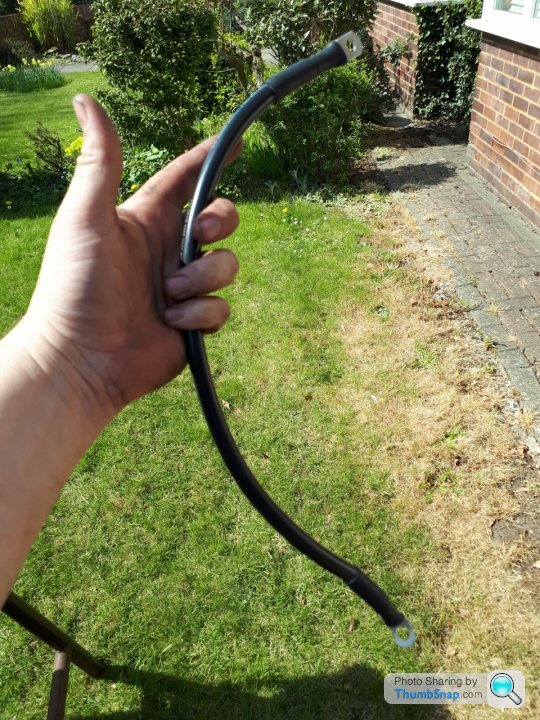
Thought I would post up my battery neg - too ground engine block direct mod seeing as car came out of hibernation today , like I say easy to carry out then from block to chassis leaving in place TVR fitted grounds also, hope this helps , Ground cable cable comes from battery towards and through wheel arch along lower chassis and onto engine block  ..
.. 
.. Edited by Zener on Monday 18th May 14:21
FoxTVR430 said:
I agree Dave.
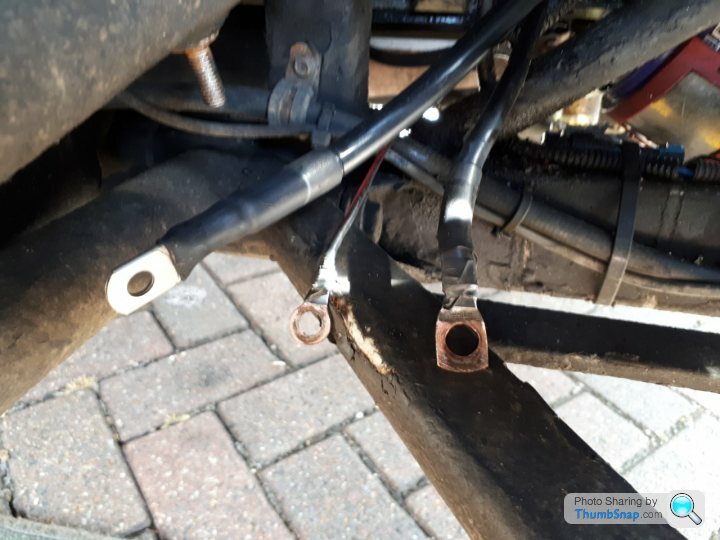
I should have included a better photo showing the return (negative) cable.
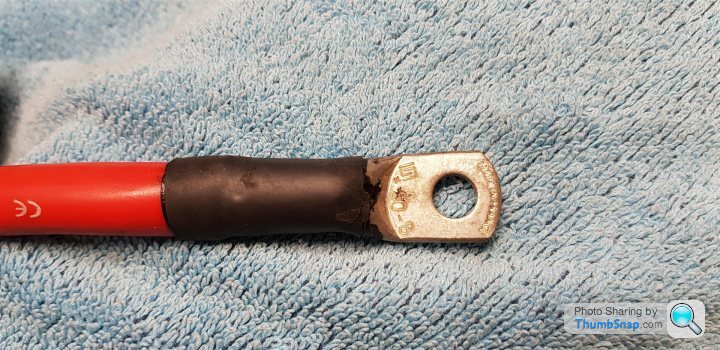
I have made a 50mm² -ve cable to go from the starter motor directly to the battery. (it is a tight fit through the bulk head).
Then from the alternator to the chassis bolt as you described above.
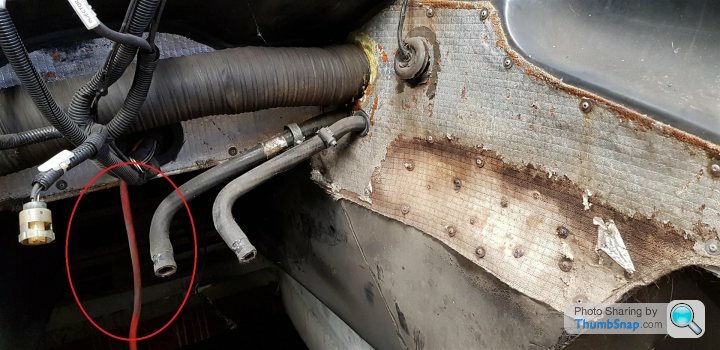
The OLD situation.
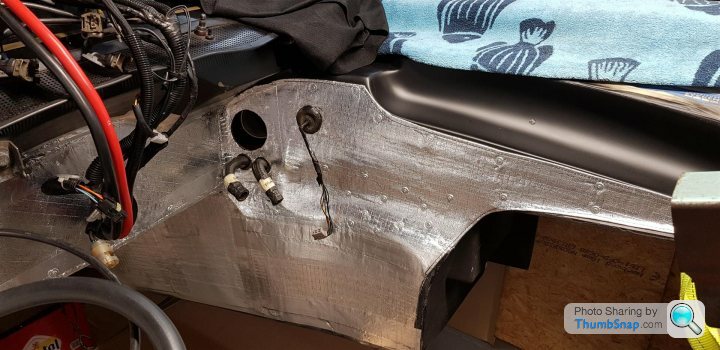
As it is now. not the best photo, but this is all I have at the moment.
For the other points you mention, I'm not that far yet.
Thanks Dave. I should have included a better photo showing the return (negative) cable.
I have made a 50mm² -ve cable to go from the starter motor directly to the battery. (it is a tight fit through the bulk head).
Then from the alternator to the chassis bolt as you described above.
The OLD situation.
As it is now. not the best photo, but this is all I have at the moment.
For the other points you mention, I'm not that far yet.
Edited by FoxTVR430 on Friday 5th April 12:43
So I have finished the Battery cables + & -ve to the starter and the engine block.
So I thought I would post up some pictures.

Edited by FoxTVR430 on Thursday 25th April 16:05
I started this post on the 17th January 2012, my starter cable upgrade made a massive improvement to the way the car cranked and started but to get the full effect my work didn't just end with that one cable.
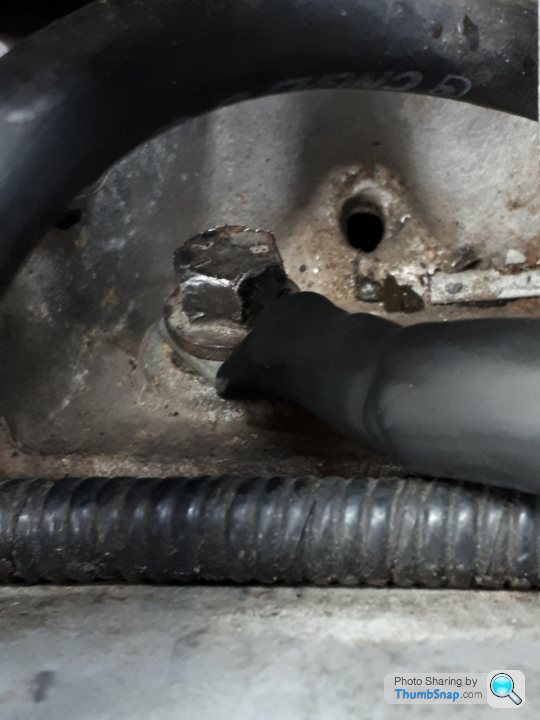
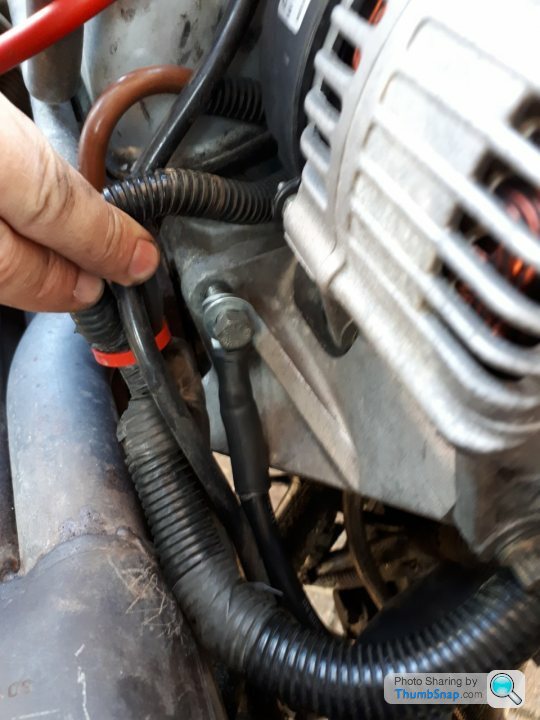
For example here's my direct from battery negative terminal to engine earth where I secured the thick marine tinned 35mm2 cable to a stout inlet manifold bolt.
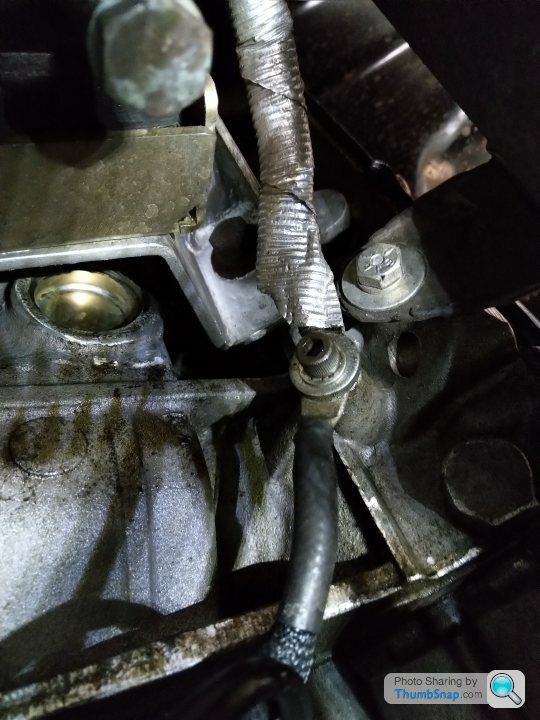
I also found and corrected this mess recently...

It's the main alternator output cable which TVR wrapped up in a nice EMI inducing bundle of engine bay wires....
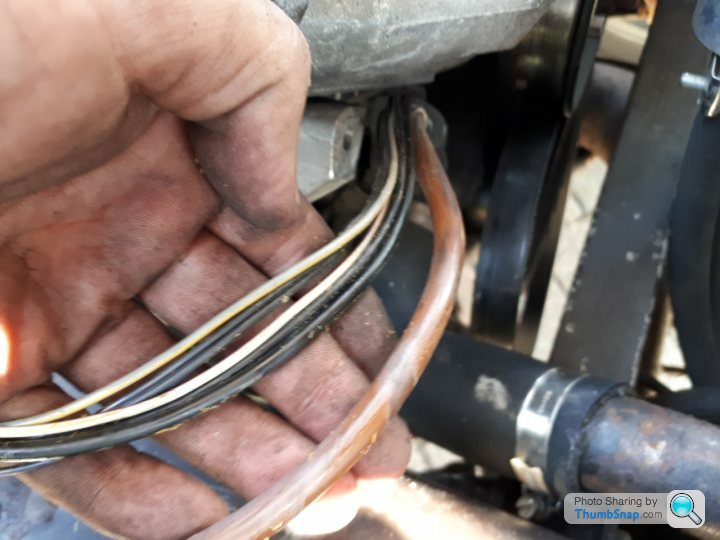
The above five wires had been literately wound around the charge cable like a vine to create a nice electrical coil
I completed the job by replacing the charge cable with something new and beefier, then gave those five wires a new path away from my new heavier charge cable.

Check out the old TVR (brown) cable with the new one I fitted.

The chassis outrigger stud and the main engine earth cable looked a bit ropey too.

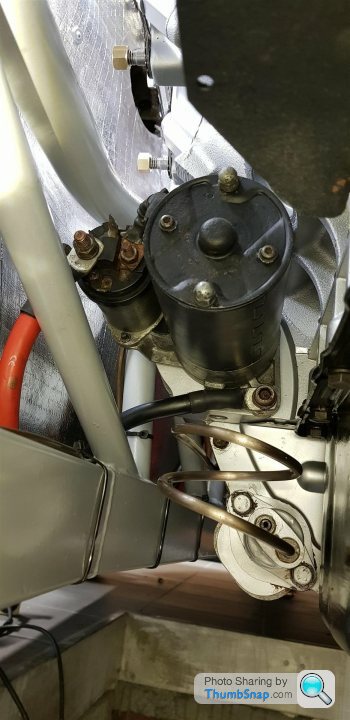
So I made up a new block to chassis earth.
I left the old one in place with my oil pressure sender earth, cleaned up the ring connectors and the stud itself then added my new beefier engine block to chassis earth cable.
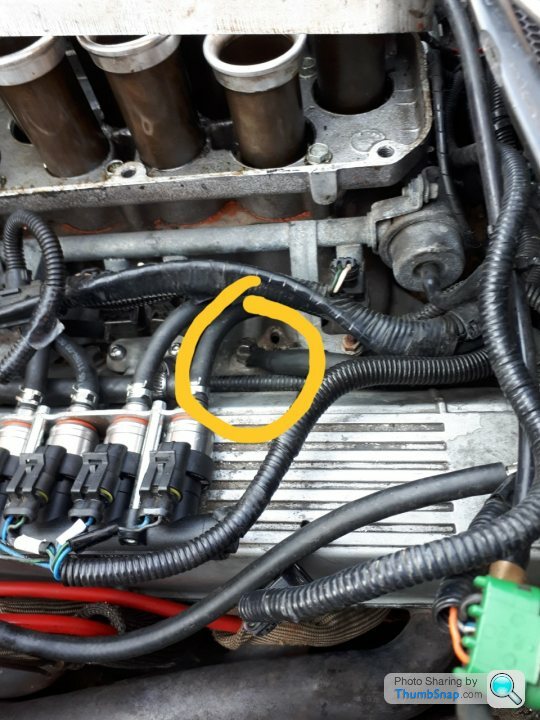
And finally finished by connecting the other end of my new beefier engine block to chassis earth cable to a stout bolt that secures my JE alternator bracket to the O/S cylinder head which is nice and close to my Denso/Marrelli 120amp alternator to give its rectifier an easier life.
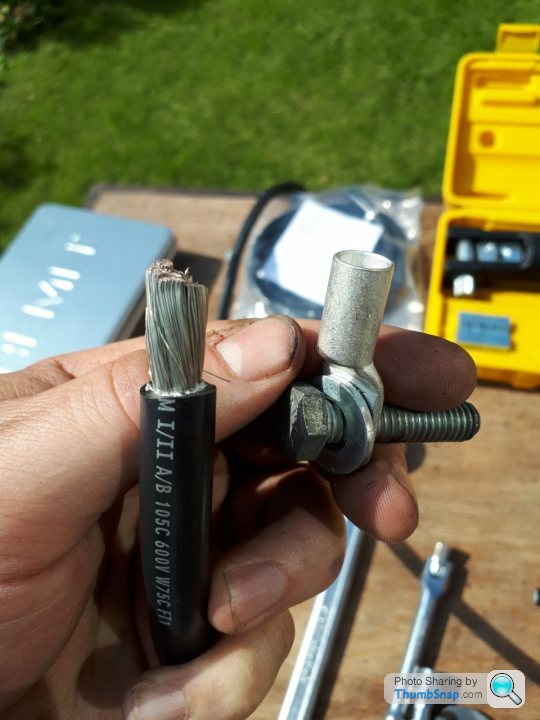
I've got to say my hydraulic crimping tool has proved an invaluable purchase, some quality tube connectors and proper glue lined heat shrink complete the recipe for perfect connectors.

Just that pesky corrosion prone front chassis earth point to go which I'm certain will need a good clean up but I need to whip the rad out to do that properly so I'll have a go at it in a few weeks.
For example here's my direct from battery negative terminal to engine earth where I secured the thick marine tinned 35mm2 cable to a stout inlet manifold bolt.
I also found and corrected this mess recently...
It's the main alternator output cable which TVR wrapped up in a nice EMI inducing bundle of engine bay wires....
The above five wires had been literately wound around the charge cable like a vine to create a nice electrical coil
I completed the job by replacing the charge cable with something new and beefier, then gave those five wires a new path away from my new heavier charge cable.
Check out the old TVR (brown) cable with the new one I fitted.
The chassis outrigger stud and the main engine earth cable looked a bit ropey too.
So I made up a new block to chassis earth.
I left the old one in place with my oil pressure sender earth, cleaned up the ring connectors and the stud itself then added my new beefier engine block to chassis earth cable.
And finally finished by connecting the other end of my new beefier engine block to chassis earth cable to a stout bolt that secures my JE alternator bracket to the O/S cylinder head which is nice and close to my Denso/Marrelli 120amp alternator to give its rectifier an easier life.
I've got to say my hydraulic crimping tool has proved an invaluable purchase, some quality tube connectors and proper glue lined heat shrink complete the recipe for perfect connectors.
Just that pesky corrosion prone front chassis earth point to go which I'm certain will need a good clean up but I need to whip the rad out to do that properly so I'll have a go at it in a few weeks.

phillpot said:
ChimpOnGas said:
Check out the old TVR (brown) cable with the new one I fitted.
Just how many Amps can your alternator generate? 
When replacing cables there is no harm in going larger, but there are certainly disadvantages running a 22 year old internally corroded cable. So lets say I decide to replace my old cable thats had its day (which is a good idea), there is absolutely no harm whatsoever is using the cable stock I have on the shelf..... even if it is 35mm2.
Does that answer your question?
Question about hot start mod. I have '99 Chim 400, currently with no starting problems hot or cold, but going by the history of the car it has had them in the past. I have found something that v much looks like the hot start mod, ie a small relay, fuse, obviously taped by hand, in the passenger footwell loom. My main question - is this mod a form of adding a relay to the starter solenoid circuit, as recommended by so many? At first I was pleased to find it, now I'm not so sure.Should I replace with a higher amp rating item, and is there a recognised method of wiring it in nicely? For the record, car has had the Meta immob replaced by a Gemini item, with little use since. I have fitted an AGM battery. I will be upgrading the starter and earth cables as many have, in the hope having something that WILL start after filling up on a rainy night in Belgium, when running late for the ferry.
There is nothing new about wiring a relay into the starter crank cable to take the load off the ignition switch or starter button if fitted
What matters is the size of relay used and obviously heavy enough cable
When using the word fail below, contact failure is what's meant, any relay actuator coil could fail at any time but they do tend to be very reliable
The below small type of relay will definitely fail

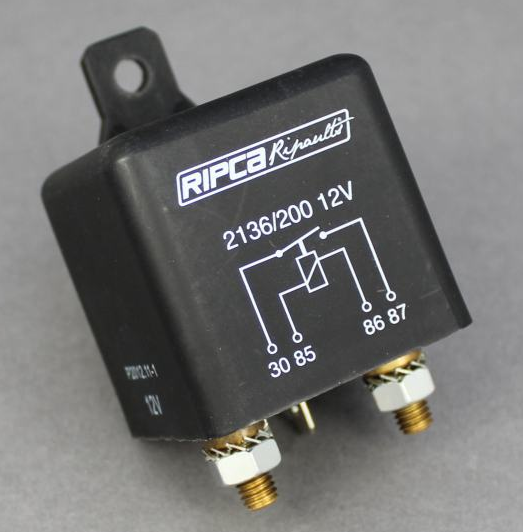
A standard size relay 30/40 Amp will work but could fail

Bigger terminal and possibly bigger contacts 70 Amp relay will definitely last longer than the above standard relay but could fail
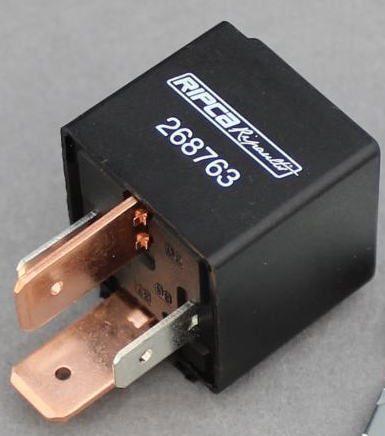
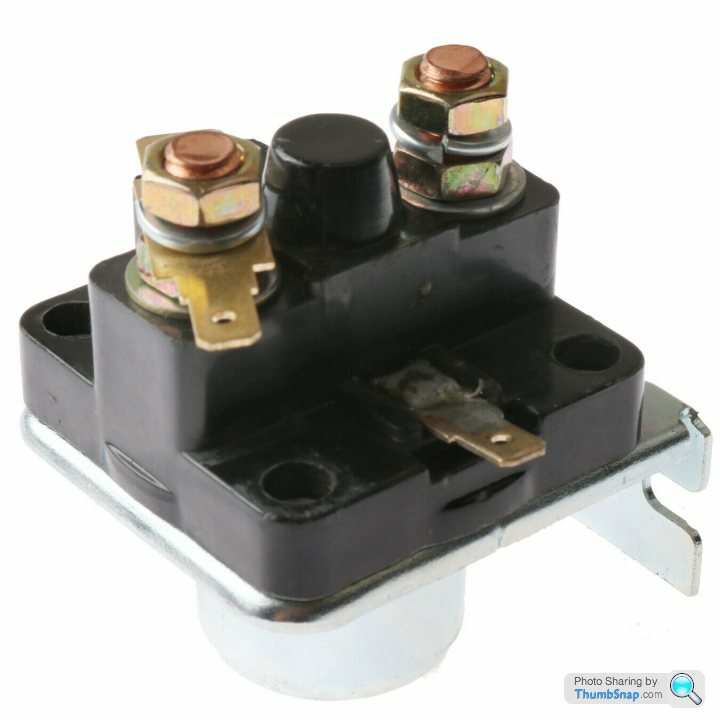
Going bigger the 100/200 Amp relay will outlast all the above relays but could fail
This following relay (commonly known as a solenoid) and those of similar design with heavy contacts are never going to fail
What matters is the size of relay used and obviously heavy enough cable
When using the word fail below, contact failure is what's meant, any relay actuator coil could fail at any time but they do tend to be very reliable
The below small type of relay will definitely fail
A standard size relay 30/40 Amp will work but could fail
Bigger terminal and possibly bigger contacts 70 Amp relay will definitely last longer than the above standard relay but could fail
Going bigger the 100/200 Amp relay will outlast all the above relays but could fail
This following relay (commonly known as a solenoid) and those of similar design with heavy contacts are never going to fail
Many thanks for your reply, understood it is not new to fit a relay in the circuit, just concerned now because TVR did not fit one. Question. To fit a higher rated, say 70A, and more reliable relay in the starter engagement solenoid circuit, could i simply replace the hot start mod item with the better relay and maybe better connectors, or is there another recognised method and location for doing this? Understood the last two items are v rugged but maybe overkill for this application, am just looking for 'normal car' starting on this light usage vehicle.
A few comments on the starting issues.
Steve
- The exhaust system is too close and enclosed which overheats the starter and in particular the solenoid. The heat both degrades the workings of the solenoid and dries out any lubricant. The result being the solenoid now draws more current than it should.
- The wire between the passenger footwell and the solenoid was never heavy enough from day one. (Pedant mode on-- It's also the wrong colour -- Pedant mode off)
- TVR used the wrong input/output from the immobiliser.
- The gauge of cable from the battery to the starter is OK for the most part but is quite long so would benefit from being larger.
Steve
I believe the hot start mod cuts the original small gauge cable going to the starter solenoid, the relay is then fitted to take the load off the immobiliser contact which was wired incorrectly.
If your alarm has been replaced it should have been wired correctly.
I originally put a 30 amp relay with correct base under the dash and ran a new heavier gauge cable to the solenoid. I have since added a starter relay to the fusebox.
The dash top takes less than 5 minutes to remove with practice so the location isn’t really an issue and you can keep a spare relay in the boot.

Agree with what Steve just said but when I measured amp draw from many moons ago of the starter solenoid I measured around 10 amps IIRC although there is a spike considerably higher for a fraction , i have in place a 30 amp branded relay and 20a fuse & never had any issues, I dont use a Meta security system but one of my immobiliser break's catches the trigger wire direct from ign switch to relay rather than the loaded part of the circuit solenoid trigger and hence a really easy life , never had one single issue but suggest always to have this so called hot start relay in place its removes the load from the Meta relay contacts or should and also the the 4 cylinder rated GM/Vauxhall column mounted ign switch
and hence a really easy life , never had one single issue but suggest always to have this so called hot start relay in place its removes the load from the Meta relay contacts or should and also the the 4 cylinder rated GM/Vauxhall column mounted ign switch Putting this
together with this
There is a pull-in coil as well as a hold-in coil in the starter solenoid, the pull-in coil draws current up until the main solenoid contacts make, once the contacts are made the solenoids current draw is much lower due to the hold in coil working on its own
If the solenoid lubricant dries out it will take longer for the solenoid plunger to travel up the solenoids core and the higher current draw fraction of a second will become greater, over time it is the greater fraction of a second current draw that burns or overheats any contacts and connections in the starter crank wire circuit
Dry starter solenoid plungers also sometimes stick inside the solenoid core for higher fractions of a second and cause far greater damage through the circuit as the high current draw travels throughout the crank wire circuit for too long a period
Good points made above by Steve_D and Zener, many people don't realise what takes place when turning the ignition key to crank or hitting the start button
Recently requested a list of starter solenoids pull-in and hold-in current draws for all models of starter motors from Bosch
Current draws do vary
Bosch asked me to explain what was meant by pull-in and hold-in current draw
Needless to say, didn't bother after that response
Steve_D said:
- The exhaust system is too close and enclosed which overheats the starter and in particular the solenoid. The heat both degrades the workings of the solenoid and dries out any lubricant. The result being the solenoid now draws more current than it should.
Zener said:
when I measured amp draw from many moons ago of the starter solenoid I measured around 10 amps IIRC although there is a spike considerably higher for a fraction
does highlight the problemThere is a pull-in coil as well as a hold-in coil in the starter solenoid, the pull-in coil draws current up until the main solenoid contacts make, once the contacts are made the solenoids current draw is much lower due to the hold in coil working on its own
If the solenoid lubricant dries out it will take longer for the solenoid plunger to travel up the solenoids core and the higher current draw fraction of a second will become greater, over time it is the greater fraction of a second current draw that burns or overheats any contacts and connections in the starter crank wire circuit
Dry starter solenoid plungers also sometimes stick inside the solenoid core for higher fractions of a second and cause far greater damage through the circuit as the high current draw travels throughout the crank wire circuit for too long a period
Good points made above by Steve_D and Zener, many people don't realise what takes place when turning the ignition key to crank or hitting the start button
Recently requested a list of starter solenoids pull-in and hold-in current draws for all models of starter motors from Bosch
Current draws do vary
Bosch asked me to explain what was meant by pull-in and hold-in current draw
Needless to say, didn't bother after that response
Many thanks all for your replies. So it would seem that the hot start mod relay i have was probably fitted when the original Meta started to malfunction due to being incorrectly wired. Since then the Meta has been replaced with a Gemini 7590,before my time, which has two immob circuits, both rated at 8A max. So my concern is to not repeat the Meta burnout trick because it can't handle the starter solenoid pull-in spike or hold currents. So to be clear, the hot start mod I have is in some ways a 'halfway-house' starter solenoid engagement relay fix, to reduce the load on the immobiliser, but it could really do with being upgraded and installed more professionally on a blank space on the fuseboard as a 'proper' cranking circuit relay, and maybe also bypassing the immobiliser on that circuit?
mateypeeps1 said:
Many thanks all for your replies. So it would seem that the hot start mod relay i have was probably fitted when the original Meta started to malfunction due to being incorrectly wired. Since then the Meta has been replaced with a Gemini 7590,before my time, which has two immob circuits, both rated at 8A max. So my concern is to not repeat the Meta burnout trick because it can't handle the starter solenoid pull-in spike or hold currents. So to be clear, the hot start mod I have is in some ways a 'halfway-house' starter solenoid engagement relay fix, to reduce the load on the immobiliser, but it could really do with being upgraded and installed more professionally on a blank space on the fuseboard as a 'proper' cranking circuit relay, and maybe also bypassing the immobiliser on that circuit?
You will benefit from a relay having heavy enough terminals and current carrying capacity fitted and wired away from the fuseboxmateypeeps1 said:
Wouldn't say no to that steve_d, thanks very much. Why do some say to avoid installing near fusebox?
Send me a PM for the cct diag.The fusebox is not a very clever design and not well made plus being 20 years old is not the most reliable.
However replacing it is not a simple task.
Steve
Gassing Station | Chimaera | Top of Page | What's New | My Stuff