What did you do in the garage yesterday?
Discussion


phazed said:
That is weird.
Do you mean plenum to trumpet base?
Sort of, the leak was between the trumpet base and the mounting plate for the carbon plenum. There doesn’t seem to be any issue with the seal between the mounting plate and the plenum where the cork gasket fits.Do you mean plenum to trumpet base?
It’s back on now. Going to give it plenty of curing time before I start the engine again. Might just leave it tomorrow and get on with brake upgrades.
Must remember to order some replacement cork gaskets on Monday just in case.
phazed said:
My reflectors were replaced about 20k miles ago when the previous owner fitted the faired in lights. They are in great condition.
I will try a pair of uprated bulbs/lamps.
Hi Peter, have you checked the volts to the headlights? I would have thought full volts and new reflectors would be ok?I will try a pair of uprated bulbs/lamps.
TV8 said:
Hi Peter, have you checked the volts to the headlights? I would have thought full volts and new reflectors would be ok?
Agreed, I managed to save my reflectors by gentle cleaning, Osram Nightbreakers and a power boost kit off eBay made them plenty bright enoughhttps://rover.ebay.com/rover/0/0/0?mpre=https%3A%2...
Edited by bobfather on Sunday 22 April 08:01
phazed said:
I’ll stick it on the ramp later and check voltage etc.
Just to state the obvious, check voltage with the lamps on. If you need proof that it's a voltage issue just run a temporary +ve wire from the alternator or chassis fuse direct to one of your lamps. That way you'll see the difference in brightness between unrestricted feed and TVR wiring
Well discovered that the alternator bearing have had it. The drive here seems to have finished them off and alternator is getting very hot. So disconnected the battery over night. Reconnected it this morning to find that now the red LED lamps on the dash neither of them illuminate now even with the system all connected again. One of these lamps stopped working on the drive down and I thought one of the was for the immobiliser/alarm?
Have checked all the fuses in the board and found none blown and with engine running battery is showing 12.5-12.7 volts which seems a little low. While checking the battery noticed that the door catch passenger side was catching the body and has damaged the new paint ............................... Not happy about that!!! So had a look and removed two of the spacers behind the striker plate and now it misses the body and door shuts tight. Had to adjust the drivers door striker too a bit to make closing the door easier it no longer requires a hard slam. Be even better once we can get the plastic hinge bushes replaced.
Also had a look to see where that nut fell down onto my foot from. Found it and refitted it with a shake proof washer to help keep it tight. While down there noticed that the wiring really needs tieing together and up out of the way it's just hanging down onto the bonnet release cable. Also moved the wipers arms slightly on their splines as the passenger side was actually coming down low enough to touch the bodywork.
While looking for the 100 fuse holder, mine does not seem to have one that I can see, noticed that the spade connector had come off the oil pressure switch, Mat fitted a new switch as the original was leaking and it seems the connector had popped off. Will keep and eye on it and tighten the spade up is needed.
So Monday is try ans see if we can either get alternator rebuilt or get a replacement and get it fitted and see how things are then.
Annoting as really wanted to take her out for a spin but cannot with the alternator like this.
Alls being going well with tinkering with the Chim. So i got round to fitting the full smooth bore induction kit. What could possibly go wrong. The alarm unit had been placed on top of the induction hose & a sound bomb near the air filter. So on the floor to remove the air filter & Argh. Some thing has eaten my radiator. Got a new copper one coming. £30 more than a recore.
With short arms & deep pockets its another hit.

With short arms & deep pockets its another hit.
Well, it would be rude not to......
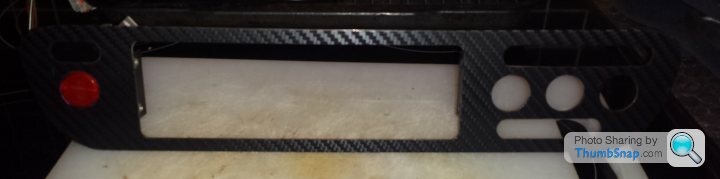
On hearing that I was planning on changing my dash from cracked walnut to carbon fibre, my good friend Classic Chim gave me his old dash. So I thought why not make a start.
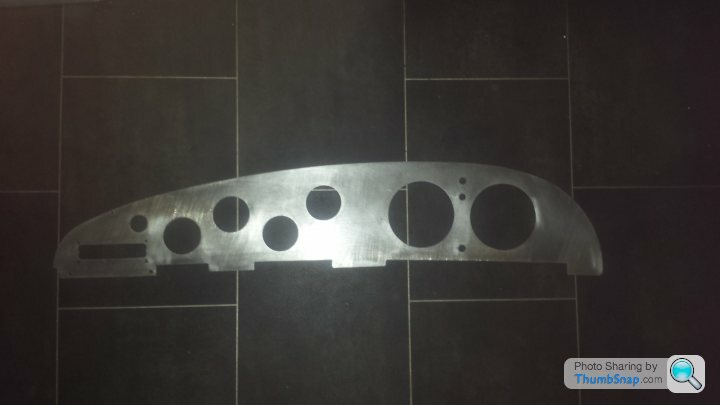
So out came the angle grinder and the dash panel was de-rusted and de glued in no time.
Then I remembered that one of my clients has serious skills in this department, as well as a CNC machine, so I popped in there this morning and Lazlo cut me the holes for the extra dials.

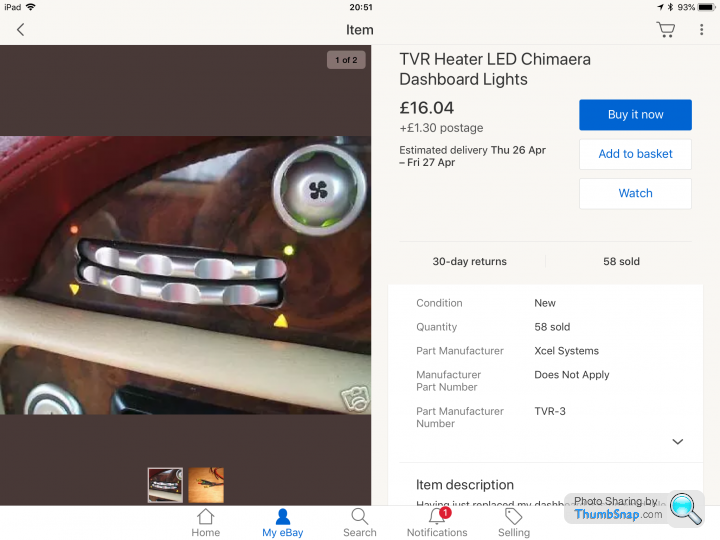
A set of new heater LEDs have been ordered, should arrive Wednesday,
The carbon fibre wrap arrived at the weekend from these people, as recommended by another TVR owner

Then it’s back to my client to have a skilled model maker wrap the dash and fit the glue in LEDs. That way the imperfections I would leave won’t be there and I can swap over my instruments and lights.
On hearing that I was planning on changing my dash from cracked walnut to carbon fibre, my good friend Classic Chim gave me his old dash. So I thought why not make a start.
So out came the angle grinder and the dash panel was de-rusted and de glued in no time.
Then I remembered that one of my clients has serious skills in this department, as well as a CNC machine, so I popped in there this morning and Lazlo cut me the holes for the extra dials.
A set of new heater LEDs have been ordered, should arrive Wednesday,
The carbon fibre wrap arrived at the weekend from these people, as recommended by another TVR owner
Then it’s back to my client to have a skilled model maker wrap the dash and fit the glue in LEDs. That way the imperfections I would leave won’t be there and I can swap over my instruments and lights.


QBee said:
Then it’s back to my client to have a skilled model maker wrap the dash and fit the glue in LEDs. That way the imperfections I would leave won’t be there and I can swap over my instruments and lights.
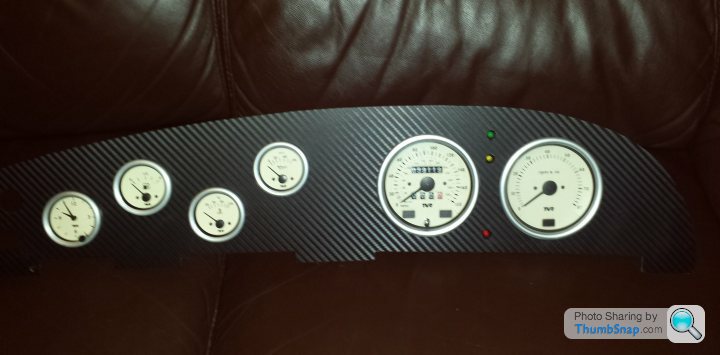
Fortunately, my heater diodes survived the process of a dash strip and when I put the dash back together they are such a tight fit, I didn't use any glue.I used 3M wrap on mine. The edges were slightly imperfect around the instrument holes but the instrument bezels cover them. Pleased with it:
Vinyl wrap is quite thick and the surface, in my experience anyway, doesn't have to be machine flat. Scraping off all the old glue was the hardest part!
Thanks Ian - I will show them your photos to help them understand what it will look like. I only have one working LED out of four, so a new set are needed.
My angle grinder, with a worn flap type grinding wheel, made short work of the rust, old veneer and glue, without damaging anything. Man-cave’s best friend!
My angle grinder, with a worn flap type grinding wheel, made short work of the rust, old veneer and glue, without damaging anything. Man-cave’s best friend!
Edited by QBee on Tuesday 24th April 07:52
Gassing Station | Chimaera | Top of Page | What's New | My Stuff