3M Walnut wrap radio panel
Discussion


ProjectChimaera said:
Dash top back on and LED bulbs installed.
A few photos of the finished look.
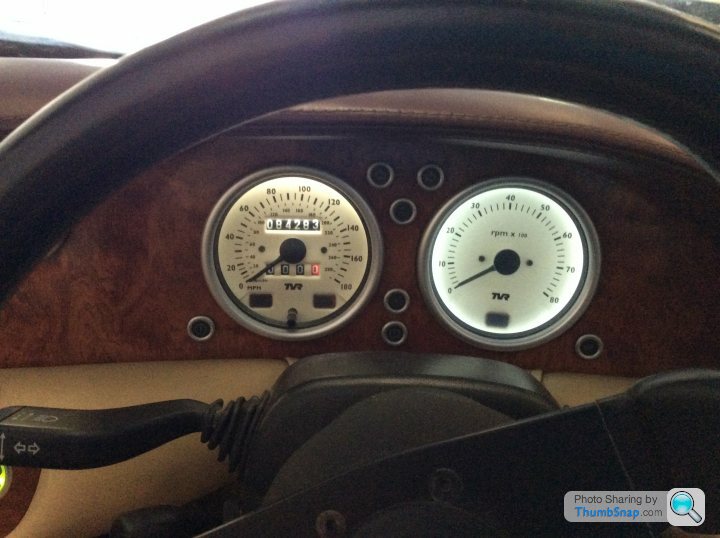
If you go back in there I'd suggest you do as I did and fit a double wattage lamp to the speedo to compensate for the amount of internal mechanism deflecting light from reaching the frontA few photos of the finished look.
[quote=caduceus]Did you get the bulbs off eBay? Linky?[/http://www.ebay.co.uk/itm/292071181006?_trksid=p2057872.m2749.l2649&ssPageName=STRK%3AMEBIDX%3AIT
http://www.ebay.co.uk/itm/201472333944?_trksid=p20...
Steve D kindly advised changing all of the bulb holders to capless in addition to the two in the rev counter that already are. The links are for the bulb holders and bulbs used. Mine already had spade terminals so crimping on the male terminals to the holders wiring made it really easy.My chip is a 98 vintage so the clocks may be different in earlier models. The bulb holders are a snug fit in the clocks but are ok. All of my attempts at buying leds for bayonet fitting were useless with many too big hence the capless fittings. Bobfathers suggestion of a higher out put bulb in the speedo is well worth considering as it is slightly duller due to the density of the instrumentation. Overall well chuffed!
ProjectChimaera]aduceus said:
Did you get the bulbs off eBay? Linky?[/http://www.ebay.co.uk/itm/292071181006?_trksid=p2057872.m2749.l2649&ssPageName=STRK%3AMEBIDX%3AIT
http://www.ebay.co.uk/itm/201472333944?_trksid=p20...
Steve D kindly advised changing all of the bulb holders to capless in addition to the two in the rev counter that already are. The links are for the bulb holders and bulbs used. Mine already had spade terminals so crimping on the male terminals to the holders wiring made it really easy.My chip is a 98 vintage so the clocks may be different in earlier models. The bulb holders are a snug fit in the clocks but are ok. All of my attempts at buying leds for bayonet fitting were useless with many too big hence the capless fittings. Bobfathers suggestion of a higher out put bulb in the speedo is well worth considering as it is slightly duller due to the density of the instrumentation. Overall well chuffed!
http://www.ebay.co.uk/itm/292071181006?_trksid=p2057872.m2749.l2649&ssPageName=STRK%3AMEBIDX%3AIThttp://www.ebay.co.uk/itm/201472333944?_trksid=p20...
Steve D kindly advised changing all of the bulb holders to capless in addition to the two in the rev counter that already are. The links are for the bulb holders and bulbs used. Mine already had spade terminals so crimping on the male terminals to the holders wiring made it really easy.My chip is a 98 vintage so the clocks may be different in earlier models. The bulb holders are a snug fit in the clocks but are ok. All of my attempts at buying leds for bayonet fitting were useless with many too big hence the capless fittings. Bobfathers suggestion of a higher out put bulb in the speedo is well worth considering as it is slightly duller due to the density of the instrumentation. Overall well chuffed!
Link 1 corrected, hopefully!
I bought these LEDs
http://www.ebay.co.uk/itm/2-X-501-W5W-WIDE-ANGLE-1...
They are more diffused so are not as bright.
I actually bought blue but that may not be to your liking.
Steve
http://www.ebay.co.uk/itm/2-X-501-W5W-WIDE-ANGLE-1...
They are more diffused so are not as bright.
I actually bought blue but that may not be to your liking.
Steve
Hi OP
A few questions on applying the Di-noc stuff:
1. Any clever tricks on removing all glue from the metal dash? I've read a few techniques using acetone or IPA (not beer).
2. Did you need any glue to attach the Di-noc - if so, which one?
3. Did you wrap around the holes or just cut flush and let the instruments do the rest?
4. Same again for the edge of the dashboard - flush or wrapped around the edge?
I have most of the instruments out, haven't attacked the LED's or lower dash yet. Can't wait..
Ta in advance
Topper_Harley said:
......1. Any clever tricks on removing all glue from the metal dash? I've read a few techniques using acetone or IPA (not beer).........
The existing veneer will likely fall straight off.The dash is steel so a flap wheel in an angle grinder will do the job nicely with light pressure.
Steve
Thanks Steve and Chimp, both things happened.
Veneer fell off, seemed to be held on by instruments more than anything else. Only broke one triangular LED.... :-(
Light rust came away with a sanding block, only took a few minutes with an electric sander.
Lower dash was held in place with silicone which I think I'm going to have to use as well because I can't see those 4 screws holding it vertical and level for very long.
In terms of glue and overlap, I tested a bit last night. The Di-noc adhesion seems more than strong enough and gladly wrapped around the edges so that's what I'll do.
For anyone else considering this, I will upload a photo contrasting the colour with some of the old veneer. There is a difference but I don't see it being a problem with my light interior.

Where there are gauges or lamps fitted from the front then a wrap may work well.
Where things like the heater controls and LEDs come through you may find you need to do some brown paint on the edge of the steel where the control levers come through.
The triangular LEDs are available from one of the TVR suppliers.
Steve
Where things like the heater controls and LEDs come through you may find you need to do some brown paint on the edge of the steel where the control levers come through.
The triangular LEDs are available from one of the TVR suppliers.
Steve

Topper_Harley said:
... Only broke one triangular LED.... :-(
I'm just fitting a new dash at the moment so I was watching out for breaking the LEDs I think NOT 100% that these may be the ones you need.As far as the screws holding the lower dash in I was sceptical but I screwed in the l brackets and smeared a small quantity of 10 minute epoxy to the fronts of them. I then held the new dash in place while it set. it looks a good bond and the screws hold securely. Just be careful with the epoxy as if you get it on the vinyl you might get a permanent bond.
Gassing Station | Chimaera | Top of Page | What's New | My Stuff