Another body off thread.
Discussion


TJC46 said:
This could be very useful, also page 35 has a diagram of all the chassis bolt locations.
https://tvrcarclub.de/wp-content/uploads/2016/12/T...
Excellent and thanks. https://tvrcarclub.de/wp-content/uploads/2016/12/T...
The more info the merrier.
I’m trying to keep things simple and only removing what I need to, I nip any clips back onto hoses etc so they are the same ones going back on, I can’t be doing with a box of odd bits months down the line.
ETA putting your clips back on the way they came off means there orientation is close to correct when re installing, lining up hose clips so you can get a spanner on them takes ages and then you realise another hose blocks the one you’ve just put on,, keep the clips the right way round and nipped on their hoses your half way there

I’ve also taken the advice in using plastic containers and a marker pen to store all bolts and anything that’s loose.
I’m going to get some labels for engine wiring harness, decided I’ll forget what goes where so it’s mostly disconnected but before I remove anything I’ll mark it all up.
Such fun
Edited by Classic Chim on Thursday 5th December 00:00
Edited by Classic Chim on Thursday 5th December 00:01
motul1974 said:
Yeah, bodies on with only 4 bolts though, and 'most' of gems loom is attached....except for the complicated bits! 
Ah I see, I forgot your going Gems,, mega  I thank my lucky stars I’ve got a new loom, easy to detach and so far seems very straight forward.
 I’m not sure what to do with my RR coil packs, or how to take them off even, I’ll seek advice off the pro’s at Powers
still look on the bright side, no dizzy or ign module/ coil wiring to untangle let alone no Stepper motor to consider Tomorrow I try and finish engine bay area off so will investigate a bit closer once heater and fuel pipes are detached.
I’m going to remove plenum base and fuel rail, I have a semi ported inlet manifold I might start looking at,,,Jacko
 ( racing joke between friends )
 I’ve got a fabulous garage to work in, miles from anyone, stream running past and so peaceful, I concentrate really well there, it’s a dream to be doing this if I’m honest.
My chassis looks much better than one might think,, I’m really undecided as to how or what I coat it with, or even if most of it needs doing at all, the Centre section is sound other than bottom rails, but maybe there’s rust above which is underneath powder coat. Hopefully it won’t be to long before we find out.
Edited by Classic Chim on Wednesday 4th December 20:12
Edited by Classic Chim on Wednesday 4th December 20:14
Edited by Classic Chim on Wednesday 4th December 20:38
Classic Chim said:
I’ve also taken the advice in using plastic containers and a marker pen to store all bolts and anything that’s loose.
Classic Chim said:
I’m going to get some labels for engine wiring harness, decided I’ll forget what goes where so it’s mostly disconnected but before I remove anything I’ll mark it all up.
Masking tape folded around the wires and back onto itself - use the blue stuff and its really obvious - loads of room to write info on rather than little tags Tyre Tread said:
Masking tape folded around the wires and back onto itself - use the blue stuff and its really obvious - loads of room to write info on rather than little tags
Written on my list this evening was masking tape,,,,, labels with a ? Exactly that, masking tape I can write a list of instructions for install later
My friend who owns the garage completely leaves me to get on with it but is also invaluable as he’s built loads of nice cars from scratch, proper wrecks so he’s not phased by anything, gives me confidence so it does.
Sunday as I was getting on he was playing with this baby. Race car. From dust off the floor this thing came back to life, incredible,,,,,, except the picture won’t load up, grrrr
Mk1 Lotus Cortina with all the trimmings, it’s taken some time as it’s a friends car he’s building on their behalf. Brand new really, the cost of a race engine rebuild io one of these,,,,,,,, more than my TVR is worth

I’ll try adding pic another time as it’s a special car.
Stuff for your list.
- Disconnect the handbrake cable at the base of the lever.
- Remove the gear knob and pull the gaiter up the shaft so it wont catch when you lift.
- Disconnect the handbrake switch.
- Disconnect the reverse switch.
- Disconnect the speedo drive.
- Drain the fluid from the brakes and disconnect the pipes where they connect through the bulkhead into the footwell. + clutch.
- Remove the steering shaft. Not an easy one this as they can be a beggar to shift. You may end up having the unbolt the rack in order to get the shaft apart.
I’ve unplugged what I assume is the reverse switch from the side of the gearbox,, big black round rubber cover.
I’ve done steering joints in the past, both quite new, I’ve always had to loosen the rack to get shaft free Steve
I have to loosen it anyway as I routed the front nose wiring back the wrong side ( purposefully ) some time ago , it looks tidy but I can’t pull it through as the gaps to tight
lesson learnt. Brakes clutch I’m ok with.
Handbrake, hmmm, from underneath the car? I’m doing it last or when I’m feeling in a good mood, not looking forward to that for some reason.
Thanks that list is great mate
Kind regards Al
Edited by Classic Chim on Thursday 5th December 00:03
TV8 said:
I have t seen any really bad rust yet Al, hopefully it stays that way.
Hi Graham Plan for the worst, hope for the best.
Good from far but far from good

This is the best fun I’ve had in ages,, I must get out more,,,
I know for a fact the front offside out rigger has a hole, a small hole but it’s paper thin around it.
It’s simply a case of my body sitting so close to the outriggers crud has been up there 20 years, you can’t get at it so it just sits there. The out tubes and diagonals are all solid steel as I’ve rubbed them back before,,, if the riggers had better protection from day one they would still be solid.
My car had done 38,000 miles with one owner over 10 years so around 3000 odd a year, but in Scotland I believe ( I never met him) I’ve had it 10 years and hammered it
 all weathers, it’s now on 75,000 miles, other than riggers it’s newer than at 38,000 miles
 It’s such a joy to do this.
New life in the old girl.
Edited by Classic Chim on Thursday 5th December 00:34
Classic Chim said:
Hi Graham
Plan for the worst, hope for the best.
Good from far but far from good
This is the best fun I’ve had in ages,, I must get out more,,,
Great attitude as always! Good luck my friend. Not sure if anyone has asked the question on here (seen it on Facebook) about the reverse inhibitor switch. Plan for the worst, hope for the best.
Good from far but far from good
This is the best fun I’ve had in ages,, I must get out more,,,
Edited by Classic Chim on Thursday 5th December 00:34
TV8 said:
Great attitude as always! Good luck my friend. Not sure if anyone has asked the question on here (seen it on Facebook) about the reverse inhibitor switch.
Funniest thing in ages
Thanks mate, not yesterday, feeling a bit dicky so I was, in view of that Frank and I only removed water heater pipes, fuel pipes at rail, plenum base/ fuel rail ( which coil packs are mounted to so those as well ) labelled up wiring harness and pulled both left and right harness sides back so basically ready to go in a bag per Steve’s advice.
The weather has closed in and I’m not feeling great so I’m throwing a sicky
Question,
1. if I’ve freed off handbrake adjusters can I simply loosen cable and release it off the handbrake that way?
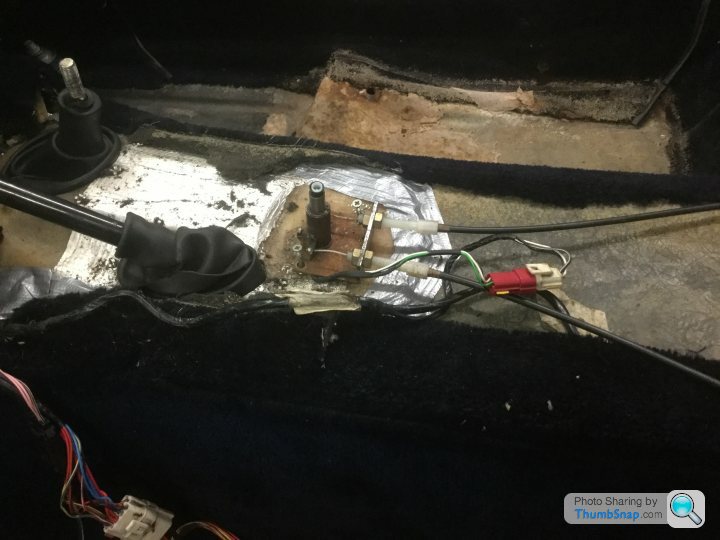
2 . Speed signal wiring from diff,,, I assume I just disconnect it there and jobs a good un? ETA that’s pretty pointless?
2a . Where does the speed transducer (black box ) behind speedo wiring come into the car and how do I disconnect it from chassis. Hang on,, cut cable ties along chassis to connector at Dif and lift body with that free to go with it..
 I think I’ve answered my own question, it’s difficult when I’m not near the car to just check!
 3 . Has anyone tried bungs on 4 way connector block when disconnecting to trap fluid in both master Cylinders I’d love to avoid bleeding these cyl from dry if possible
Another important task was to remove an MGB body off trolley so again thanks to Frank coming over made that possible
About 20 hours in total working time ( but I do know the car after 10 years ownership so not a total beginner but you can factor in plenty of head scratching time )
I’ve got big axle stands, lift and a trolley waiting,,,, it’s very exciting if a bit stressful
Just a bit more going round checking what I’ve done then
Steering disconnect PS remove pipes off rack and drain
Brakes and clutch drain and disconnect from o/s body 4 way junction
got to be nearly there then
Edited by Classic Chim on Friday 6th December 10:18
Edited by Classic Chim on Friday 6th December 12:21
Edited by Classic Chim on Friday 6th December 13:42
Regarding the hydraulics, Alun, I always pop bleed screws in, but more to keep dirt out than anything else. If you prop the pedals part way down first, just enough to close off the fill ports in the masters, then release the pressure at any nipple or fitting, and you'll get no further leakage anyway.
HTH
Rik
HTH
Rik


Classic Chim said:
3 . Has anyone tried bungs on 4 way connector block when disconnecting to trap fluid in both master Cylinders I’d love to avoid bleeding these cyl from dry if possible
Or you could use the opportunity to completely drain the system, flush it out and fill with silicone fluid - no more boiled brake fluid.and its not hygroscopic or corrosive to paint. Done it on the P5 and will probably do it on the Chim when I eventually do the body off refurb.
Classic Chim said:
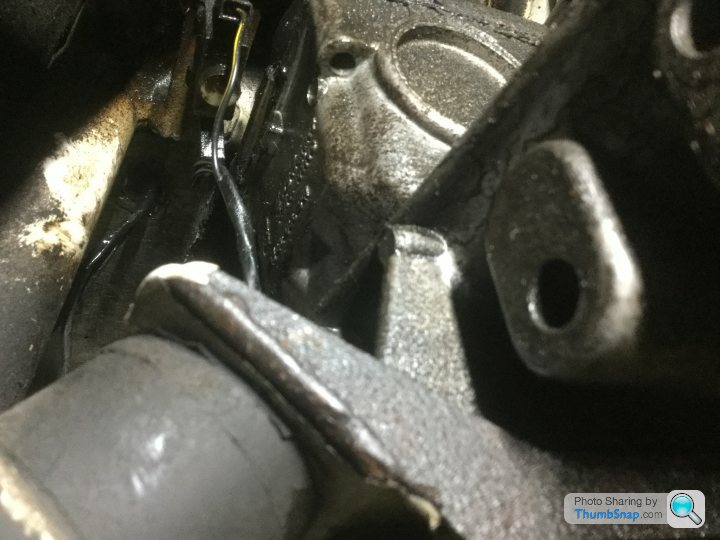
.......1. if I’ve freed off handbrake adjusters can I simply loosen cable and release it off the handbrake that way?
Where the cable joins the lever it passes around a steel yolk but is captive in it so cannot be lifted off. There is a clevis pin secured with a split-pin which secures the yolk to the lever you simply remove these.
Classic Chim said:
.......2 . Speed signal wiring from diff,,, I assume I just disconnect it there and jobs a good un? ETA that’s pretty pointless?
The sender has about 300mm of cable to a connector. Undo the connector. The cable goes up through the body above the chassis so just leave it hanging down but in a position where it will not snag as the body comes off.Steve
Steve_D said:
Classic Chim said:
.......1. if I’ve freed off handbrake adjusters can I simply loosen cable and release it off the handbrake that way?
Where the cable joins the lever it passes around a steel yolk but is captive in it so cannot be lifted off. There is a clevis pin secured with a split-pin which secures the yolk to the lever you simply remove these.
Classic Chim said:
.......2 . Speed signal wiring from diff,,, I assume I just disconnect it there and jobs a good un? ETA that’s pretty pointless?
The sender has about 300mm of cable to a connector. Undo the connector. The cable goes up through the body above the chassis so just leave it hanging down but in a position where it will not snag as the body comes off.Steve

Same with speed sender, I eventually worked the obvious out
thanks again for your input. Ric, love that trick with the brake pedal,, that’s never going to be forgotten.
And Alan, yes I’ve decided to drain brakes fully before undoing connector block. Gravity over night should do the trick. Same when refilling.
Hi Simon, yep well on the way
Dom rebuilding engine, Peter’s number 3 son
doing clutch and between Peter and myself the diff,,, ive not come across anything to tight, I’ve been lucky. Doing this on a 20 year old car that had never been pulled apart would be slightly more challenging I imagine. It’s been very good to work on, great car indeed
Edited by Classic Chim on Friday 6th December 18:13
TwinKam said:
'That trick with the brake pedal' also comes in real handy when you want to eg remove a caliper but have (unclampable) Aeroquip type flexis...
This is exactly what I took from this snippet of information, (pro’s trick ) if ever I’ve heard one. Saves a lot of bleeding if as you say your removing just one caliper only for maintanance or whatever.
I really appreciate this advice.
Gassing Station | Chimaera | Top of Page | What's New | My Stuff