Body Off - The Naked Truth
Discussion


crosseyedlion said:
JPW231 said:
Thanks CoG.
Do you know if you can still buy the outrigger protectors? My car is with Alex at the moment too.
I should start distributing for Mr essling! Do you know if you can still buy the outrigger protectors? My car is with Alex at the moment too.

To answer your question JPW231.... Peter Essling can be found on Facebook.
He's in the process of making up rear sets too as he currently only has templates for front outrigger protectors.
I believe he'll have the rear templates drawn up by the end of this weekend as he's just located a local Chimaera to do the measuring up on.
Hung out to dry....


Today my wishbones received their first coat of epoxy mastic with a slight red tint added to the paint, this tint will help ensure full coverage when the second un-tinted coat is applied, at which point we'll see just how well Jotunmastic 90 Aluminum matches the original TVR silver/grey
Application notes from Alex are this Jotun epoxy mastic paint covers really well, however he found the mix needs to be 4:1 with a little thinners as at the recommended 3.5:1 ratio pot life is very short. This short 15 minute pot life at the prescribed 3.5:1 mix ratio will only be because we went with winter grade which you can apply down to -5c, this and the fact that Alex clearly likes a nice warm workshop
As predicted its goopy old stuff, our primary focus being achieving the ultimate in durability and longevity performance.
I bet that’s your outrigger aswell 
I’m trying to work out an effective way to protect bush rubbers when spraying. Some Vaseline or such but it only takes an accidental smear onto the bare metal to contaminate the surface! Difficult one.
All I can say is new front wishbones in 2014 and powder coated but not protected had a lot of rust on them by 2018.
You won’t have to wait 10 years to find out if that’s anything to go by.
If your wishbones are still like your pics in 3 years time it’s been a success.
2014

2020

Pics are poor but really powder coat did’t last 5 minutes in the scheme of things
I’m trying to work out an effective way to protect bush rubbers when spraying. Some Vaseline or such but it only takes an accidental smear onto the bare metal to contaminate the surface! Difficult one.
All I can say is new front wishbones in 2014 and powder coated but not protected had a lot of rust on them by 2018.
You won’t have to wait 10 years to find out if that’s anything to go by.
If your wishbones are still like your pics in 3 years time it’s been a success.
2014
2020
Pics are poor but really powder coat did’t last 5 minutes in the scheme of things
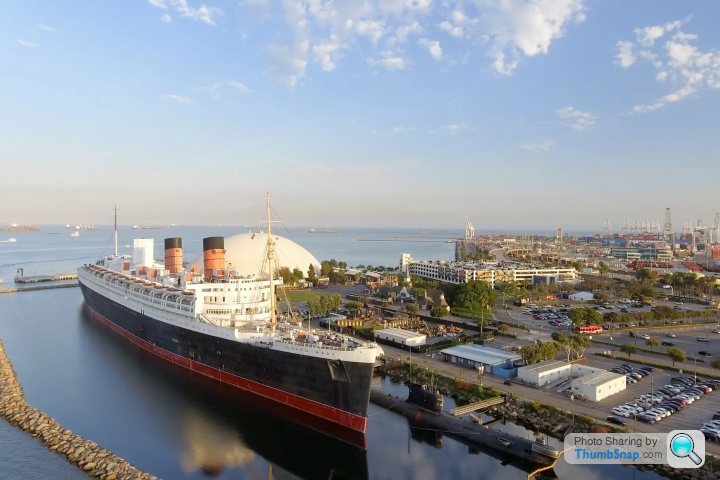
Well heres proof of how well Jotun paints perform in the super harsh salt laded corrosion promoting marine environments they were designed for, back in 2003 the ancient steel hull of the 1936 built Queen Mary was protected with Jotamastic 87 Aluminium epoxy mastic, the Jotamastic 90 Aluminium we're using on my car is Jotun's new improved formula of the 87.
https://www.boatingbusiness.com/news101/boatbuildi...
At the time the Jotun paint was applied it was coating 67 year old steel and for the next 14 years the ship sat stationary in salt water in Long Beach California serving as a hotel, fast forward to 2017 and a report on the ship's condition was issued which noted the hull was just starting to corrode. Not surprising really as such old steel sat without moving while submerged in brine is the absolute perfect recipe for rapid and aggressive corrosion, the 14 years the ship sat in this environment is likely equal to what a car would see over 50 years of all year round road use.
In the same heavy saline marine environment powder coat would have probably lasted 3 weeks at best
ChimpOnGas said:
Hung out to dry....
Today my wishbones received their first coat of epoxy mastic with a slight red tint added to the paint, this tint will help ensure full coverage when the second un-tinted coat is applied, at which point we'll see just how well Jotunmastic 90 Aluminum matches the original TVR silver/grey
Application notes from Alex are this Jotun epoxy mastic paint covers really well, however he found the mix needs to be 4:1 with a little thinners as at the recommended 3.5:1 ratio pot life is very short. This short 15 minute pot life at the prescribed 3.5:1 mix ratio will only be because we went with winter grade which you can apply down to -5c, this and the fact that Alex clearly likes a nice warm workshop
As predicted its goopy old stuff, our primary focus being achieving the ultimate in durability and longevity performance.
Looks good. Two coats with the spray gun or brush? Stripe coat on the edges? I really like the idea of the red tint, just the job. Today my wishbones received their first coat of epoxy mastic with a slight red tint added to the paint, this tint will help ensure full coverage when the second un-tinted coat is applied, at which point we'll see just how well Jotunmastic 90 Aluminum matches the original TVR silver/grey
Application notes from Alex are this Jotun epoxy mastic paint covers really well, however he found the mix needs to be 4:1 with a little thinners as at the recommended 3.5:1 ratio pot life is very short. This short 15 minute pot life at the prescribed 3.5:1 mix ratio will only be because we went with winter grade which you can apply down to -5c, this and the fact that Alex clearly likes a nice warm workshop
As predicted its goopy old stuff, our primary focus being achieving the ultimate in durability and longevity performance.
Not sure I would advise messing with the ratios. As I understand it the hardener being the other half, not just a catalyst, you don't end up with the same end product. Obviously it's tolerant of a bit of deviation, but I wouldn't be deliberately trying to miss-mix it.
If you have the winterfast version as be are painting in a heated workshop you will help the situation by keeping the paint cool, before and during mixing. Else you might be able to swap hardener to the standard rate stuff.
Daniel
At the end of the day I'm not applying the stuff Alex Wheatley is, and its all happening 160 miles away so I'm really just passing on Alex's words and images sent to me daily via WhatsApp, saying that having used epoxy mastic paints in the past I do know it can be pretty goopy old stuff (technical term ).
I'm pretty confident a 4:1 mix will be fine, like you say there a tolerance built in and a small ratio adjustment is certainly preferable to pot life that's too short as it becomes a pain to work with if it starts turning solid too soon and you'll certainly struggle to lay it out smooth. Even under optimal conditions you'll never get a silky smooth finish with epoxy mastic like you see with all the powder coated chassis restorations, I did warn Alex of this but as I've said many times my primary focus is durability and longevity.
Last night I suggested to Alex that perhaps along with the 4:1 mix ratio it's possible being a bit more ambitions with thinners will help, it'll slow the reaction extending the pot life further and make the paint easier to lay out for a smoother result. Anyway I have to stop myself micromanaging Alex, he knows what he's doing and is doing a superb job, on Wednesday he removed the body from another Chimaera start to finish in just 6 hours which is truly remarkable!
).I'm pretty confident a 4:1 mix will be fine, like you say there a tolerance built in and a small ratio adjustment is certainly preferable to pot life that's too short as it becomes a pain to work with if it starts turning solid too soon and you'll certainly struggle to lay it out smooth. Even under optimal conditions you'll never get a silky smooth finish with epoxy mastic like you see with all the powder coated chassis restorations, I did warn Alex of this but as I've said many times my primary focus is durability and longevity.
Last night I suggested to Alex that perhaps along with the 4:1 mix ratio it's possible being a bit more ambitions with thinners will help, it'll slow the reaction extending the pot life further and make the paint easier to lay out for a smoother result. Anyway I have to stop myself micromanaging Alex, he knows what he's doing and is doing a superb job, on Wednesday he removed the body from another Chimaera start to finish in just 6 hours which is truly remarkable!
Hi all. The concern about mixing ratios is valid, to an extent. But there's so many variables. Yesterday's had hardened up really well and today we had the workshop a little cooler to extend the life.
It's pretty labour intensive application being honest but the coverage is incredible.
It's pretty labour intensive application being honest but the coverage is incredible.

First coat down, and again with that red tint applied so when the second and final top coat goes on perfect coverage can be achieved.


Alex and Ben are doing an amazing job with the Jotun 90 as I've always conceded epoxy mastic is not the easiest paint to work with and achieve a factory smooth finish, they're applying in a cooler workshop environment today which apparently helps a lot.
I'm being told its very labour intensive but the coverage is incredible, small batches are also the secret to success which no doubt adds to the job time, according to Alex... and in his words, "its the ultimate"

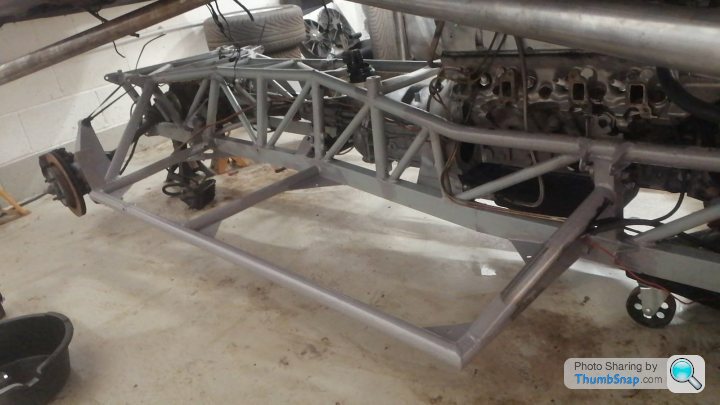
I notice that the front outriggers are unpainted, presumably awaiting mud guard brackets, but not at the rear?
I've gone with similar brackets front and rear from what seemed a good recommendation.
I'd post a picture but chassis is away at the shot blasting place, it was supposed to be ready for this weekend, but I was let down . First use of 'professional' services and first let-down
Dougal.
I've gone with similar brackets front and rear from what seemed a good recommendation.
I'd post a picture but chassis is away at the shot blasting place, it was supposed to be ready for this weekend, but I was let down
. First use of 'professional' services and first let-down Dougal.
For the fronts there was this excellent suggestion from Mark (portz)
For the rears I'm waiting for Peter Esling to take his patterns from a local chimaera which I understand has been arranged for this weekend, I've spoken with Peter and his plan is to use the existing bolt in the upright plate as shown here...
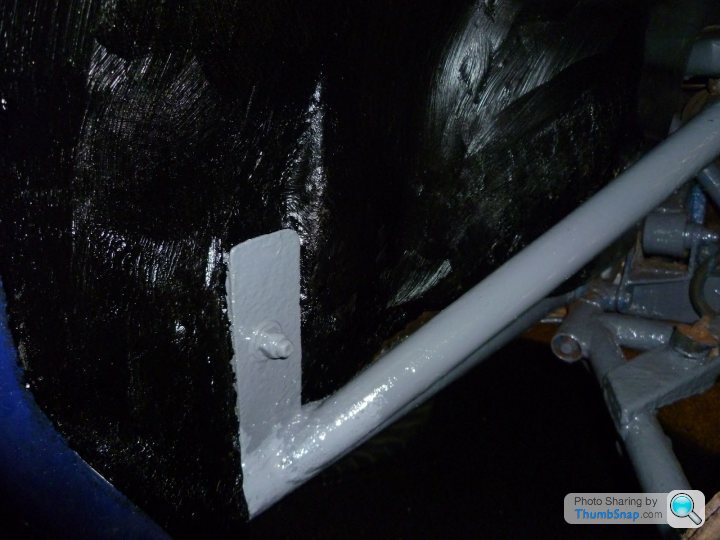
To be clear the above image is not my car or Alex's work, it's just a photo I found online to show the bolt Peter plans to make use of, lets see what he comes up with but if they're as good as his font outrigger protectors I don't think I'll be disappointed.
I'm a firm believer in shielding the vulnerable outriggers from impact damage and all the road muck that gets thrown up by the wheels, it represents the vast majority of the problem so if you can stop it at source you're going to massively extend the life of the new outriggers.
This next image of one of my rear outriggers and clearly shows what needs protecting, as we can see the tyre is only going to be covering the outer end of the outrigger tubes with spray, obviously the corner fillet corner is the most critical area to shield as it acts as a platform for road muck and the truth is it's the collection of this damp debris sat on the fillet/platform that rots the corners out .
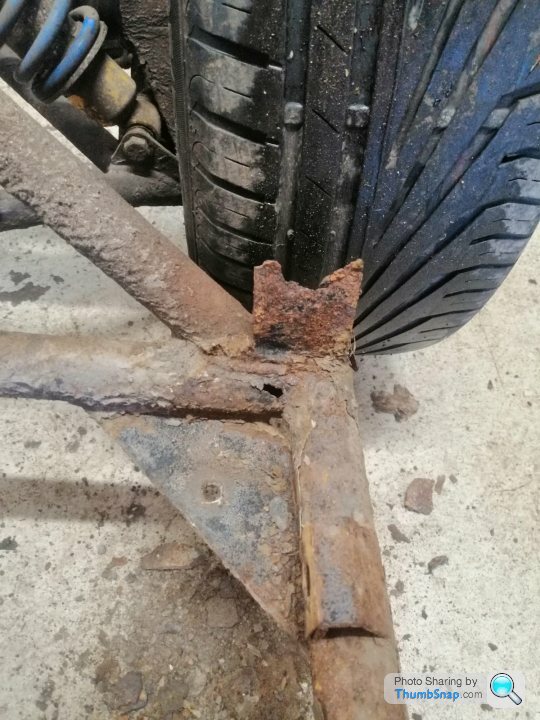
The rear situation isn't actually that different from the front, here's how the front tyre sits in relation to the front outrigger and again its really just the outer end and corner that gets peppered.
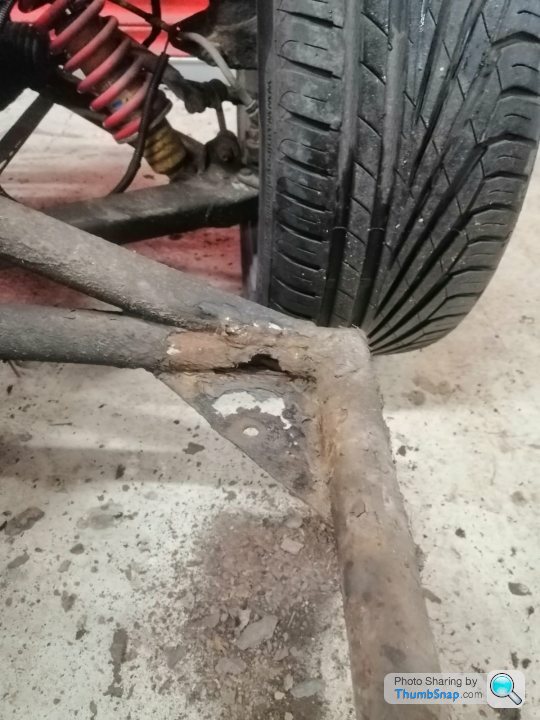
But for completeness the rear protectors should go further up the outrigger just like Peter's front ones do.
portzi said:
Hello Dave, whilst it's in the welding stage get some brackets welded onto the chassis so the outrigger protectors bolt on and off, on the front and back of the car.
Alex then popped up to say...crosseyedlion said:
Dave. You don't need to ask, this is a great idea. Will be doing it on yours
So I'd guess the areas of front outriggers Alex has left unpainted is for the outrigger brackets he's planning to weld in place For the rears I'm waiting for Peter Esling to take his patterns from a local chimaera which I understand has been arranged for this weekend, I've spoken with Peter and his plan is to use the existing bolt in the upright plate as shown here...
To be clear the above image is not my car or Alex's work, it's just a photo I found online to show the bolt Peter plans to make use of, lets see what he comes up with but if they're as good as his font outrigger protectors I don't think I'll be disappointed.
I'm a firm believer in shielding the vulnerable outriggers from impact damage and all the road muck that gets thrown up by the wheels, it represents the vast majority of the problem so if you can stop it at source you're going to massively extend the life of the new outriggers.
This next image of one of my rear outriggers and clearly shows what needs protecting, as we can see the tyre is only going to be covering the outer end of the outrigger tubes with spray, obviously the corner fillet corner is the most critical area to shield as it acts as a platform for road muck and the truth is it's the collection of this damp debris sat on the fillet/platform that rots the corners out .
The rear situation isn't actually that different from the front, here's how the front tyre sits in relation to the front outrigger and again its really just the outer end and corner that gets peppered.
But for completeness the rear protectors should go further up the outrigger just like Peter's front ones do.


dhutch said:
Looks great. Good work.
Thanks, but it's Alex Wheatley and Ben's work not mine, I'm just watching and paying the bill.I'd love to be a bit more hands on but it just makes more sense for me to use the time to earn money doing what I do for a living, then use some of it to pay Alex for what he does for a living.
As long as everyone is happy with the deal it's by far the best arrangement

Gassing Station | Chimaera | Top of Page | What's New | My Stuff