Outrigger replacement blog
Discussion


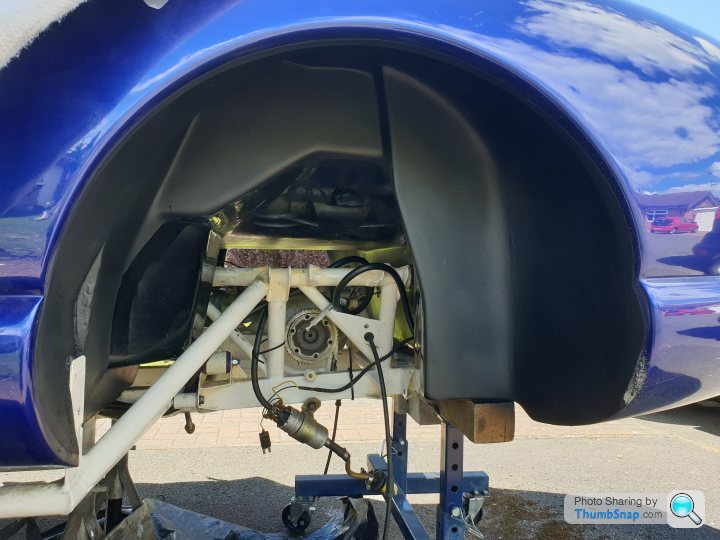
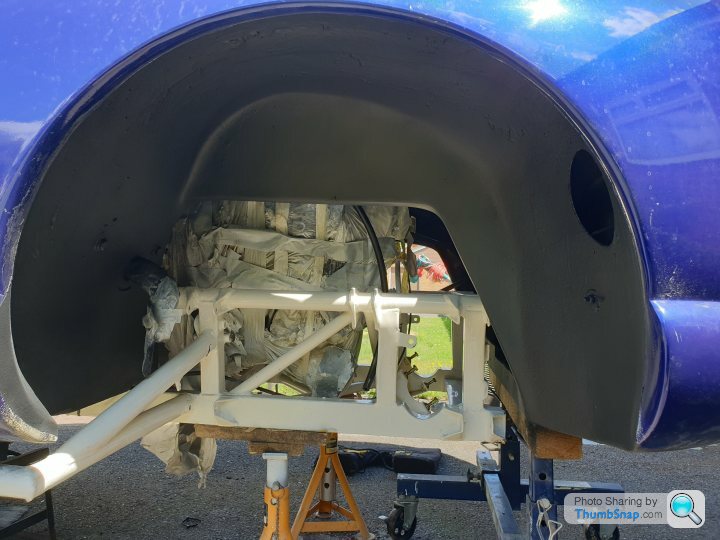
Going to attempt a body lift (2 to 6" depending) and outrigger replacement over the next couple of weekends, but got some questions.
I've tried to read through every resource I could find, but lots of the links are dead and there's a few conflicting bits of information.
Part removal
A list of the parts that I've seen mentioned in body lift with notes.
Replacement metal
Considering ordering a full set of replacements just in case any shear.
I think I've got the process down in my head, but welcome any tips. Will decide whether to cut mid tube or at the main chassis once I see the state of the metal properly.
What do we recommend?
See lots of POR15 suggestions or EM121.
Planning to just do one product, a couple of layers, but no top coat?
Probably missed some bits, so may add more, but any help appreciated.
Cheers
I've tried to read through every resource I could find, but lots of the links are dead and there's a few conflicting bits of information.
Part removal
A list of the parts that I've seen mentioned in body lift with notes.
- Battery - Self explanatory
- Centre tunnel trim - Including door release, shift knob, hand brake cover
- Handbrake adjuster - And raise handbrake to vertical
- Seats - Can stay in place, but makes bolt access easier
- Seatbelts - The bolts go into the chassis, but the top bolt that holds the runner behind your shoulder can actually stay in place as that just goes into the body?
- Steering UJ - Not sure if this needs disconnecting or not?
- Fuel pump - Not sure if this needs disconnecting or not?
- Fuel tank - 4 bolts behind it. Does it need fully disconnecting and draining or can it just be pulled out of the way slightly to make space?
- Radiator - There's 2 bolts into the chassis underneath it. Can these be accessed from below without removing the rad? Or can it just be pulled to the side without even needing to disconnect / drain?
- Exhaust - Necessary for 6" lift? Including manifolds
- Brake lines = Just cut some cable ties to give slack?
- Air intake hose - Not sure if this needs disconnecting or not?
- Wiring - Don't need to disconnect anything?
- ARB / drop links - Not sure if these need disconnecting or not?
Replacement metal
- 8 metres of pipe. 38mm OD, 1.6mm wall (1.5" 16 gauge). Can use 2" wall instead.
- 1 metre of pipe. Matching ID to sleeve inside (if cutting outriggers mid pipe rather than at chassis)
- Suspension bolt crush sleeves. Not sure on OD / wall?
- Long nut for seatbelt mount. Not sure on OD / wall?
- 3mm plate. Not sure on dimensions needed? (Depends if cutting riggers mid pipe or at chassis)
Considering ordering a full set of replacements just in case any shear.
- Manifolds bolts - 16x ?
- Front (below rad) - 2x hex M10 35mm
- Interior (footwells) - 8x hex M10
- Interior (tunnel) - 2x hex 50mm
- Interior (under-seats) - 6x hex M10 30/35mm
- Interior (seatbelt outer) - 2x hex M10 30/35mm
- Interior (seatbelt inner [buckle]) - 2x hex M10 30/35mm
- Interior (seatbelt reel) - 2x hex M10 30/35mm
- Rear (behind fuel tank [upper]) - 2x allen M10 40mm
- Rear (behind fuel tank ([lower]) - 2x hex M10 35mm
I think I've got the process down in my head, but welcome any tips. Will decide whether to cut mid tube or at the main chassis once I see the state of the metal properly.
- What's the best way to drill the holes for the crush sleeves the suspension bolts go though? Metal hole saw?
What do we recommend?
See lots of POR15 suggestions or EM121.
Planning to just do one product, a couple of layers, but no top coat?
Probably missed some bits, so may add more, but any help appreciated.
Cheers
Edited by Strudul on Monday 12th October 09:01
Edited by Strudul on Monday 12th October 09:03
Edited by Strudul on Monday 12th October 09:05
You have to disconnect pipe from fuel pump to get decent access to rear chassis bolts I feel as the pipe between tank and pump is only about 5 inches long. Might be just as easy to disconnect pipe at pump and just drain the tank into a container so you can pull it back into boot enough to get at bolts. The return pipe should be long enough to leave alone I think.
Yes steering should be disconnected at rack end.
Yes steering should be disconnected at rack end.
Strudul said:
Going to attempt a body lift (2 to 6" depending) and outrigger replacement over the next couple of weekends, but got some questions.
I've tried to read through every resource I could find, but lots of the links are dead and there's a few conflicting bits of information.
Part removal
A list of the parts that I've seen mentioned in body lift with notes.
Replacement metal
Considering ordering a full set of replacements just in case any shear.
I think I've got the process down in my head, but welcome any tips. Will decide whether to cut mid tube or at the main chassis once I see the state of the metal properly.
What do we recommend?
See lots of POR15 suggestions or EM121.
Planning to just do one product, a couple of layers, but no top coat?
Probably missed some bits, so may add more, but any help appreciated.
Cheers
Radiator, it will be easier to remove it to get at front chassis bolts and earths. I've tried to read through every resource I could find, but lots of the links are dead and there's a few conflicting bits of information.
Part removal
A list of the parts that I've seen mentioned in body lift with notes.
- Battery - Self explanatory
- Centre tunnel trim - Including door release, shift knob, hand brake cover
- Handbrake adjuster - And raise handbrake to vertical
- Seats - Can stay in place, but makes bolt access easier
- Seatbelts - The bolts go into the chassis, but the top bolt that holds the runner behind your shoulder can actually stay in place as that just goes into the body?
- Steering UJ - Not sure if this needs disconnecting or not?
- Fuel pump - Not sure if this needs disconnecting or not?
- Fuel tank - 4 bolts behind it. Does it need fully disconnecting and draining or can it just be pulled out of the way slightly to make space?
- Radiator - There's 2 bolts into the chassis underneath it. Can these be accessed from below without removing the rad? Or can it just be pulled to the side without even needing to disconnect / drain?
- Exhaust - Necessary for 6" lift? Including manifolds
- Brake lines = Just cut some cable ties to give slack?
- Air intake hose - Not sure if this needs disconnecting or not?
- Wiring - Don't need to disconnect anything?
- ARB / drop links - Not sure if these need disconnecting or not?
Replacement metal
- 8 metres of pipe. 38mm OD, 1.6mm wall (1.5" 16 gauge). Can use 2" wall instead.
- 1 metre of pipe. Matching ID to sleeve inside (if cutting outriggers mid pipe rather than at chassis)
- Suspension bolt crush sleeves. Not sure on OD / wall?
- Threaded sleeve for seat belt mount. Not sure on OD / wall?
- 3mm plate. Not sure on dimensions needed? (Depends if cutting riggers mid pipe or at chassis)
Considering ordering a full set of replacements just in case any shear.
- Manifolds bolts - 16x ?
- Front (below rad) - 2x hex M10 35mm
- Interior (footwells) - 8x hex M10
- Interior (tunnel) - 2x hex 50mm
- Interior (under-seats) - 6x hex M10 30/35mm
- Interior (seatbelt outer) - 2x hex M10 30/35mm
- Interior (seatbelt buckle) - 2x hex M10 30/35mm
- Interior (seatbelt runner) - 2x hex M10 30/35mm
- Rear (behind fuel tank [upper]) - 2x allen M10 40mm
- Rear (behind fuel tank ([lower]) - 2x hex M10 35mm
I think I've got the process down in my head, but welcome any tips. Will decide whether to cut mid tube or at the main chassis once I see the state of the metal properly.
- What's the best way to drill the holes for the crush sleeves the suspension bolts go though? Metal hole saw?
What do we recommend?
See lots of POR15 suggestions or EM121.
Planning to just do one product, a couple of layers, but no top coat?
Probably missed some bits, so may add more, but any help appreciated.
Cheers
Air pipe needs to be disconnected from plenum .
I thinkyou need to remove manifolds to lift 6 inches but 2 inch should be ok to leave them in place.
I would detach both roll bars, you will be lining up bottom wishbones with rigger to get position to tack them on Once you have tapped bottom wishbone bolt through new bush. You want free movement and roll bar will just be adding pressure on those wishbones.
I wouldn’t buy any bolts yet but I would buy plenty of penetrating fluid and start applying it now

Chassis bolts are usually so corroded they will snap off or I just ground them off, took 5 mins.
It’s a big job, but doable so well done for taking it on.
I would certainly recommend taking plenty of photos to ensure that everything goes back in the right place.
Labelling cables with masking tape also helps.
This can save a lot of headaches and time come reassembly.
Also, you haven’t stated how you’re planning to separate the body and chassis once all the relevant items are disconnected (?).
TVR Chimaera Body Off Guide - https://tvrcarclub.de/wp-content/uploads/2016/12/T...
You don’t need to remove the rad to access those bolts, yes to steering, I don’t remember having to disconnect any electrics, manifolds ok for 2”, not for 6, seats out is easy and gives good access, the back will maybe lift 3”, tank out as well as pump.
I lifted with one trolley jack and one bottle jack, a little at one end, fix with wooden spacers then go to the other end and so on, the manifolds will be your first stop point if still on
I lifted with one trolley jack and one bottle jack, a little at one end, fix with wooden spacers then go to the other end and so on, the manifolds will be your first stop point if still on
Paulprior said:
You don’t need to remove the rad to access those bolts, yes to steering, I don’t remember having to disconnect any electrics, manifolds ok for 2”, not for 6, seats out is easy and gives good access, the back will maybe lift 3”, tank out as well as pump.
I lifted with one trolley jack and one bottle jack, a little at one end, fix with wooden spacers then go to the other end and so on, the manifolds will be your first stop point if still on
Brilliant. Very concise. Cheers.I lifted with one trolley jack and one bottle jack, a little at one end, fix with wooden spacers then go to the other end and so on, the manifolds will be your first stop point if still on

 |https://thumbsnap.com/X9hEMnGz[/url]
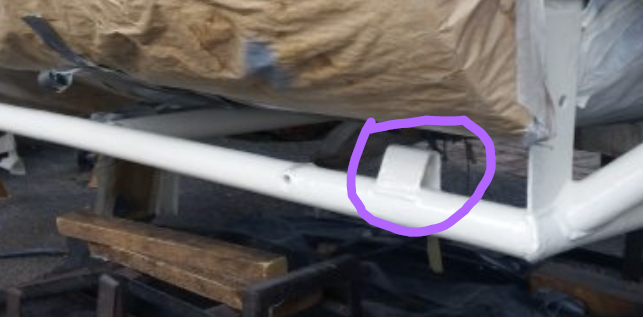
Penelope Stopit said:
TVR Chimaera Body Off Guide - https://tvrcarclub.de/wp-content/uploads/2016/12/T...
I guess most of it is the same for a Griffith but a=is there any such guide for a Griffith? I thought the body needed to come off at an angleBadgerchim said:
I used rustbuster on chassis and wishbones etc which if you read cog's posts is pretty much the same stuff.
I believe the EM121 stuff is Jotun Smart Pack, which is not really any different from their Jotamastic stuff, but gives a slightly nicer finish with a brush and mixes 1:1 so you can't mess up ratios.Jobster said:
I guess most of it is the same for a Griffith but a=is there any such guide for a Griffith? I thought the body needed to come off at an angle
Job is the same for both cars.Body comes straight up. You are mixing it with the 'S' which does have to come off at an angle and is a right pain. We had to develop a process and tooling to do the job.
Steve
Day 1

Calm before the storm

More earths than there should be(?), and not sure what the black / yellow connector is?

Even more earths.

Where did these even com from
- Seats / battery / battery mount all out
- All 22 chassis bolts removed
- Fuel pump disconnected + tank removed and drained
- Air intake disconnected
- Drivers outer seatbelt bolt sheered - will see what happens when i try lift
- Lower fuel tank mounting bolts had to be ground off
- On the centre tunnel bolts, the driver's side had an earth (for dash electrics), and passenger side had 3 different earth wires (1 for batt, not sure on other 2)
- Got 4 wires in the boot (2 green, 2 black) - not sure where they were supposed to go
- Arm / hand stings a bit and got a banging headache after some nightmares draining the fuel
- Standard scratched to f
 k hands / wrists
 - Rubber is cracked on the short 2" bit of hose that goes through the body from the fuel tank drain point
- There was a ridiculous amount of silicone around the above hose that took an hour to pick out before I could pull it through
- Loosen handbrake cable
- Disconnect lower steering UJ
- Lift car
- Start measuring / cutting / fabbing
Calm before the storm
More earths than there should be(?), and not sure what the black / yellow connector is?
Even more earths.
Where did these even com from
Edited by Strudul on Friday 16th October 22:59
Gassing Station | Chimaera | Top of Page | What's New | My Stuff