Mgb v8 sebring project
Discussion


llohcins said:
Engine all sorted turns now with no problems. I didn't realise there are lobes on the con rods to signify that they are handed and also the bearings are slightly set to one side so basically we had a few of these the wrong way round which resulted in sideways friction on the crank. All sorted now thanks Andrew.
It'll be a carb system, most probably a holly 390cfm with an offenhauser inlet.
Just purchased today the rv8 style exhaust manifolds which I am very excited about. Very immaturely I will fab up some silencers and then route these out just in front of the rear wheels.... Because quite frankly I really want to.
Splendid. Yes, some conrods and bearings are like this. Did they not have direction tags on them e.g F or an arrow? Good news re' RV8 headers...and quietly, I quite like a BV8 with side exiting exhausts...have you seen this?It'll be a carb system, most probably a holly 390cfm with an offenhauser inlet.
Just purchased today the rv8 style exhaust manifolds which I am very excited about. Very immaturely I will fab up some silencers and then route these out just in front of the rear wheels.... Because quite frankly I really want to.
https://www.youtube.com/watch?v=IUuHwg2LU5I
Nice video. That's exactly what I'm thinking, sounds amazing. The rods had little directional bulges on the base which I missed to be honest. Plus I was stupidly trying to assemble without a Haynes manual and when your doing it for the first time I guess this is not advisable. Got one now though
Thanks for the comments guys, nice to know that people read it. When I was looking to start all this threads were an invaluable resource as I've never done anything like this before. It's my first attempt at bodywork, bodykits and this much engine work (as you can probably tell). I've fixed my broken cars before but nothing this extreme. Started out with a mk1 cortina and now my daily drive is a 200tdi defender which I had a lot of problems with originally. Learning all the time though.
Flying phil I must say your thread in a huge inspiration to me to just get on and do it. I love a hotrod and it always amazes me that mgbs generally get looked over as a starting point. One day I hope to do a build as extreme as yours. I would love to see it in person one day.
Andrew your thread gives as all something to aim for when it comes to quality and finish.
Anyway I'm still waiting for my exhaust manifolds. U.K. Mail are being crap.
I'm basically just degreasing parts and starting to sort the engine bay. That will go satin black I think as it will give me scope in the future if I fancy changing the colour. Plus the engine bay spray paint from frosts should make it easy.... Hopefully.
Any advice on clutch and flywheel. Should I just get a standard flywheel and have it lightened or buy one that's already done? If that's possible. That is assuming that it's worth while?
llohcins said:
Anyway I'm still waiting for my exhaust manifolds. U.K. Mail are being crap.
I'm basically just degreasing parts and starting to sort the engine bay. That will go satin black I think as it will give me scope in the future if I fancy changing the colour. Plus the engine bay spray paint from frosts should make it easy.... Hopefully.
Any advice on clutch and flywheel. Should I just get a standard flywheel and have it lightened or buy one that's already done? If that's possible. That is assuming that it's worth while?
Hi Simon, that's good news. Have some notes/Q?'sI'm basically just degreasing parts and starting to sort the engine bay. That will go satin black I think as it will give me scope in the future if I fancy changing the colour. Plus the engine bay spray paint from frosts should make it easy.... Hopefully.
Any advice on clutch and flywheel. Should I just get a standard flywheel and have it lightened or buy one that's already done? If that's possible. That is assuming that it's worth while?
1. whose manifolds did you choose?
2. why not red, same as rest of the car? it's terribly easy to spray an engine bay nicely...
3. re' clutch, it's all down to the power output. what's your true bhp at the flywheel? 160-170bhp? If so, a standard 9.5" Range Rover clutch kit is more than fine, still using the SD1/RV8 thrust lever...be sure to fit a new/correct brass spigot to crank/flywheel and the right thrust bearing + correct slippers[there's a myriad of different types for the many many Rover applications]. You could go up to 10" for belt and braces and/or if you plan to increase power output in the future.
4. I have a preference for ARP flywheel bolts, they're not expensive and are super high quality, though do check torque settings upon installation + pre-tap the bolt threads until spotless before fitting. Test thread first, then locate flywheel and fit ARP's with a little thread lock...ARP bolts are readily available from Real Steal. Re' flywheel weight...the standard Rover V8 SD1 weighs in at 35lb, you might like to lighten a little to 27lb but I wouldn't go any lower than 25lb as the fly' will lose inertia. 27lb is good for quick spin up + the complete drive line is designed for a 2.5tonne Range Rover so won't have any issue with a 1-1.2tonne MGB. The flywheel must be re-balanced once lightened and whilst most machine shops can skim/lighten, very few know how to balance properly.
Oh, and don't forget you'll need a new set of clutch/flywheel dowels, #22 here
http://www.rimmerbros.co.uk/Item--i-GRID800028
1.Rv8 manifolds.
2. I'm not 100% sure I'll stick with the red. I suspect I might have this car for a while. I don't see changing the colour as that big a deal and am thinking in the future I might change it therefore a black engine bay gives me that freedom as I won't need to worry about changing that.
3. The original p6 v8 apparently had 161bhp.
Mine has been skimmed to +.020 so a tiny bit bigger (probably won't make much difference).
It has sd1vienese heads which have very large ports and valves (much larger than the p6 ones) and they have had a light skim.
It has a piper 270 cam which is a fast road cam and piper state gives up to a 24hp increase. Not as harsh as the ultimate road 285 cam.
The rv8 exhaust manifolds should help
The carb will most likely be a Holley 390 with an offenhauser manifold.
All in if I had 180 to 190 bhp I would be very happy but obviously 200 would be the dream.
So with all that in mind I will probably go for the heavier duty 10" one.
4. I'lol take your advice on the bolts. Got to order from real steal anyway. My car will probably be pretty bare so I'm hoping on the low end of the weight scale. Plus a far amount of it is fibreglass anyway really.
I do have an idea of one day just using the whole car a mould and making carbon fibre panels then cutting out and replacing as much as possible with the new bits to make it ultra light. Maybe once I've finished and got bored. But I guess I would be better off doing a space framed project and then doing a while carbon fibre body.
Have you seen this, probably the best mgb project out there.
http://www.speedhunters.com/2014/09/im-sorry-youre...
Wow - that Speedhunters BGT 3 is certainly a great project. Years ago I toyed with the idea of using two Dolomite Sprint 16V heads on a Rover block, having only one cam per head would have made the cam drive a bit less complex but I never actually got any heads to play with - then I moved on to other projects.
llohcins said:
Ah yes, like the idea but why use a steel body. CF is the way to go for this scale of project. And with modern 3D modelling it's much easier to make very accurate bucks for light weight and super strong CF panels.Flying Phil said:
Wow - that Speedhunters BGT 3 is certainly a great project. Years ago I toyed with the idea of using two Dolomite Sprint 16V heads on a Rover block, having only one cam per head would have made the cam drive a bit less complex but I never actually got any heads to play with - then I moved on to other projects.
I question the sense with some folk today who still try to make a mixed bag of nails work [no reflection to you Phil]. These days it's simply crazy to try and 'blend' engines as there are so many lightweight tightly packaged high output production engines readily available. Crated LS series are pumping out huge power straight out of the box. The cost/£££:bhp ratio trying to make an RV8 perform as well as the modern all alloy LS units is shocking...it's hugely expensive. It may be a little mad but it's great engineering and I think one of his main aims is that it's all British. I can't help but admire the effort. If he had just dropped an ls in it wouldn't be anywhere near as impressive. It also looks like he's not really got any budget issues. Good on him I say. He may be running close to the wind of insanity but it can take that to make something of real genius.
v8250 said:
Flying Phil said:
Wow - that Speedhunters BGT 3 is certainly a great project. Years ago I toyed with the idea of using two Dolomite Sprint 16V heads on a Rover block, having only one cam per head would have made the cam drive a bit less complex but I never actually got any heads to play with - then I moved on to other projects.
I question the sense with some folk today who still try to make a mixed bag of nails work [no reflection to you Phil]. These days it's simply crazy to try and 'blend' engines as there are so many lightweight tightly packaged high output production engines readily available. Crated LS series are pumping out huge power straight out of the box. The cost/£££:bhp ratio trying to make an RV8 perform as well as the modern all alloy LS units is shocking...it's hugely expensive. its been a while since my last post. I have still been gradually getting little bits of the enging sorted. Still have a few jobs to do on it but its getting there.
Here it is so far
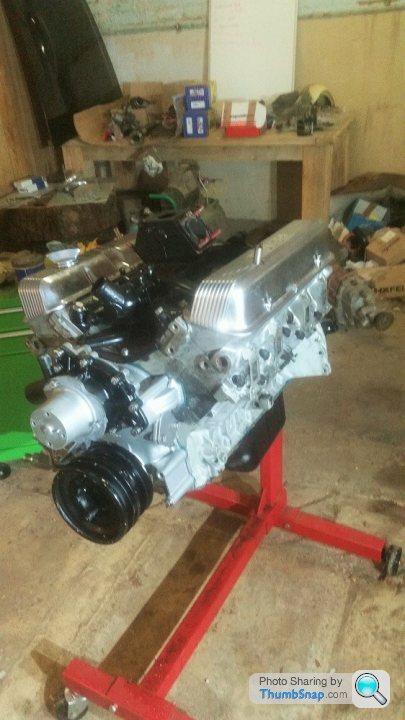
All shiney with chrome rocker covers.
I have a super lightweight flywheel from V8 Tuner and full clutch kit to install.
A friend of mine has been helping with the engine build as he has loads of experience with old engines. Here is John gas welding. We had to modify the oil pickup so that it worked with the sd1 sump. John did a great job.

I have also been making progress with cutting the holes for the rv8 exhausts and the lt77 gearbox. Great fun chopping. Soon I will offer the engine and box in for the first time to make sure all of the holes are big enough and in the right places. Fingers crossed.
Today I started to modify the gearbox cross member, and by started I mean chopped the old mounts off and cleaned the thing up. I will be ordering form 10 gauge mild sheet to make the new mounts.
Here it is so far
All shiney with chrome rocker covers.
I have a super lightweight flywheel from V8 Tuner and full clutch kit to install.
A friend of mine has been helping with the engine build as he has loads of experience with old engines. Here is John gas welding. We had to modify the oil pickup so that it worked with the sd1 sump. John did a great job.
I have also been making progress with cutting the holes for the rv8 exhausts and the lt77 gearbox. Great fun chopping. Soon I will offer the engine and box in for the first time to make sure all of the holes are big enough and in the right places. Fingers crossed.
Today I started to modify the gearbox cross member, and by started I mean chopped the old mounts off and cleaned the thing up. I will be ordering form 10 gauge mild sheet to make the new mounts.
Simon...woohoo...that looks great. Have a note for you...if you've yet to buy the full RV8 exhaust I've got some MGOC Supersoprts exhaust components left over where I'm running IRS, this includes the over rear axle pipes. pm me if interested. Here's an update pic of mine for extra V8 loveliness...
Wow that's looking amazing Andrew.
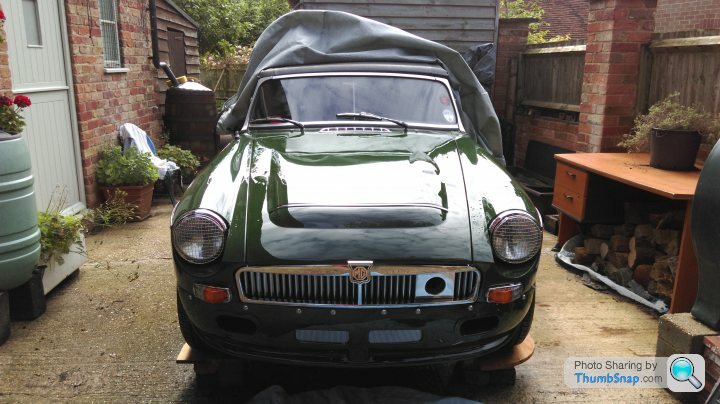
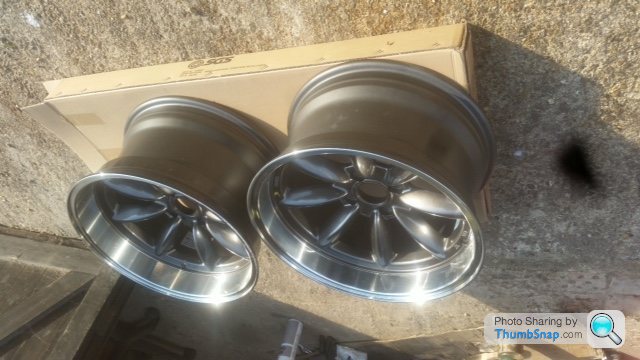
This evening I have won some new wheels on eBay. I wasn't happy with the look of the white rota grid alloys so now I will be trying some rota Rbx wheels, dark grey with a chrome outer. We'll see If they work. Good offset and width for the arches but they may be a little too large in diameter at 17".
Test fitted the engine for the first time the other day, very exciting. I need to enlarge the exhaust holes a bit I think. Very difficult to get in with the bend lower down. I'm not sure of the best method of putting them in. Surely it can't be that they need to go in before the engine? Does anyone know?
Spent two hours today removing the auto pilot bush from the crank. Real pain to get out but done now. Another day of tinkering over.
My engine hoist exploded and shot hydraulic fluid everywhere. A replacement Jack was ordered and now all is working much better.
Will post some pics of the new wheels later in the week.
llohcins said:
Wow that's looking amazing Andrew.
This evening I have won some new wheels on eBay. I wasn't happy with the look of the white rota grid alloys so now I will be trying some rota Rbx wheels, dark grey with a chrome outer. We'll see If they work. Good offset and width for the arches but they may be a little too large in diameter at 17".
Test fitted the engine for the first time the other day, very exciting. I need to enlarge the exhaust holes a bit I think. Very difficult to get in with the bend lower down. I'm not sure of the best method of putting them in. Surely it can't be that they need to go in before the engine? Does anyone know?
Spent two hours today removing the auto pilot bush from the crank. Real pain to get out but done now. Another day of tinkering over.
My engine hoist exploded and shot hydraulic fluid everywhere. A replacement Jack was ordered and now all is working much better.
Will post some pics of the new wheels later in the week.
Hi Simon, re' 17" wheels...do remember the size of rubber too. If you're forced to go with too low a profile tyre the ride will be quite harsh + the front kingpins weren't designed for such high loads and they have been known to break. Re' inner wing hole sizes, the RV8 hole size is tight when fitting manifolds & engine and to be frank is a pain in the a**e. Mark at Fisher Services has completed a number of V8 conversion and uses a bigger hole [I wish I had done this on mine], may be give Mark a call and have a chat with him, he's a good fellow and very helpful http://www.fisher-services.co.uk/ . It must have been exciting having an exploding hoist jack...was it under load at the time?This evening I have won some new wheels on eBay. I wasn't happy with the look of the white rota grid alloys so now I will be trying some rota Rbx wheels, dark grey with a chrome outer. We'll see If they work. Good offset and width for the arches but they may be a little too large in diameter at 17".
Test fitted the engine for the first time the other day, very exciting. I need to enlarge the exhaust holes a bit I think. Very difficult to get in with the bend lower down. I'm not sure of the best method of putting them in. Surely it can't be that they need to go in before the engine? Does anyone know?
Spent two hours today removing the auto pilot bush from the crank. Real pain to get out but done now. Another day of tinkering over.
My engine hoist exploded and shot hydraulic fluid everywhere. A replacement Jack was ordered and now all is working much better.
Will post some pics of the new wheels later in the week.
Look forward to seeing the pics

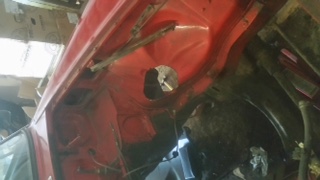
Working on the gearbox tunnel recently, lots of cutting. I found it impossible to mark up lying underneath the car to cut the tunnel, nothing worked. Tape wouldn't stick, pens wouldn't show up. I could have cleaned everything off to make masking tape stick but then I had a brain wave, I have laser levels for my day job so was able to fix the beam and set them up to map out the cutting area. Worked great.
After test fitting the engine and box I then turned my attention to making the new raised panel. The result is below, I will weld it on and fine tune it one evening in the week.
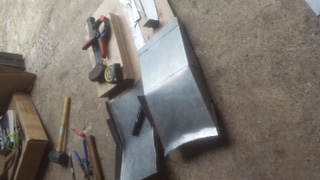
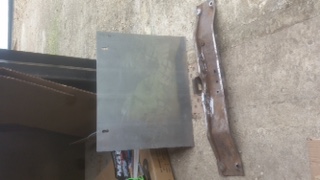
I also need to make up the mods for the gearbox crossmember. Mapped out in "how to give your mgb v8 power" (thanks Andrew for suggesting it) I have cut off the old mountings and have marked up the 10 gauge mild steel for cutting ( although it's hard to see in photos)
The holes for the exhaust still need a little enlarging but they'll be there soon
After test fitting the engine and box I then turned my attention to making the new raised panel. The result is below, I will weld it on and fine tune it one evening in the week.
I also need to make up the mods for the gearbox crossmember. Mapped out in "how to give your mgb v8 power" (thanks Andrew for suggesting it) I have cut off the old mountings and have marked up the 10 gauge mild steel for cutting ( although it's hard to see in photos)
The holes for the exhaust still need a little enlarging but they'll be there soon


The hoist Jack luckily wasn't under load when it went Andrew. I was testing it after filling it up with fluid because it wouldn't lift up. I dodged the shooting fluid as it shot past me and hit a wall across the garage. Obviously under a lot of pressure.
I will enlarge the exhaust holes as I can't be doing with the fiddle.
No idea what the tyre profile will be but I am into low cars so I will be modifying the front crossmember a bit and dropping it down. We'll see. I'm on my 4th set of wheels so the tyres will probably change at least a couple of times. I think the wheel look is so important to the overall build that it's worth a bit of buying and selling to get it right.
Practical performance car mag has an article on modding mgb's this month. They are obviously finally getting a bit of cool retro recognition. Not an amazing article but a few nice pics of the John Wilson racing mgb. Very nice race modified, I would love mine to head down a similar direction. It's a bit of a basic look at modifying them. Not quite a flying Phil epic modifying adventure but still good to see.
llohcins said:
The hoist Jack luckily wasn't under load when it went Andrew. I was testing it after filling it up with fluid because it wouldn't lift up. I dodged the shooting fluid as it shot past me and hit a wall across the garage. Obviously under a lot of pressure.
I will enlarge the exhaust holes as I can't be doing with the fiddle.
No idea what the tyre profile will be but I am into low cars so I will be modifying the front crossmember a bit and dropping it down. We'll see. I'm on my 4th set of wheels so the tyres will probably change at least a couple of times. I think the wheel look is so important to the overall build that it's worth a bit of buying and selling to get it right.
Practical performance car mag has an article on modding mgb's this month. They are obviously finally getting a bit of cool retro recognition. Not an amazing article but a few nice pics of the John Wilson racing mgb. Very nice race modified, I would love mine to head down a similar direction. It's a bit of a basic look at modifying them. Not quite a flying Phil epic modifying adventure but still good to see.
Hi Simon, very very smart wheels. Re' the crossmember could you not find a standard RV8 one? I bought mine from Brown and Gammons. The RV8's are a direct fit for the LT77/R380 and install to the last captive nut, then drill a new hole each side for the rearmost crossmember hole...followed by an over size hole in the floorpan to install the new downward facing bolt. Re' John Wilson's car...it's an absolute beast, many years in development and eats other V8's for breakfast; just brilliant. John now sells a number of his racing components direct via phone/his website. He has a set of lowered kingpins that may help with the advantage that the car doesn't suffer from bumpsteer. For ref' I've put these on the roadster...with 15" wheels and 195/65 profile tyre the front arms are near perfect horizontal, the tyres have full movement within wheel arch and the lowest point from ground is the front crossmember which gives 4" clearance.I will enlarge the exhaust holes as I can't be doing with the fiddle.
No idea what the tyre profile will be but I am into low cars so I will be modifying the front crossmember a bit and dropping it down. We'll see. I'm on my 4th set of wheels so the tyres will probably change at least a couple of times. I think the wheel look is so important to the overall build that it's worth a bit of buying and selling to get it right.
Practical performance car mag has an article on modding mgb's this month. They are obviously finally getting a bit of cool retro recognition. Not an amazing article but a few nice pics of the John Wilson racing mgb. Very nice race modified, I would love mine to head down a similar direction. It's a bit of a basic look at modifying them. Not quite a flying Phil epic modifying adventure but still good to see.
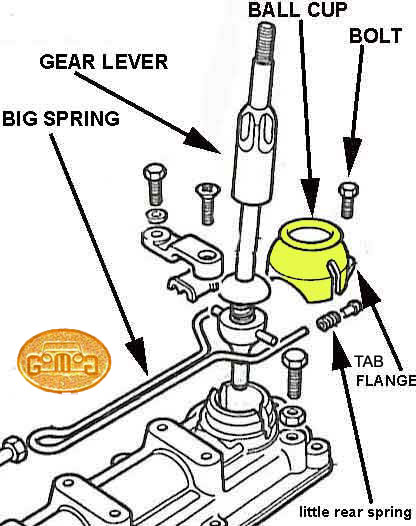
Im after some help,
I cant find a ball cup for my remote selector anywhere unless i buy a whole unit so we are going to make one. Is there anyone out there who has one who is willing to measure theirs for me? I need the lower diameter, upper hole diameter, vertical height and size of the arch but out at the front.
Or if anyone has a spare one that they are willing to sell that would also be great.
Thanks in advance
Gassing Station | MG | Top of Page | What's New | My Stuff