Riley Elf restoration dilemma.......
Discussion


The Story:
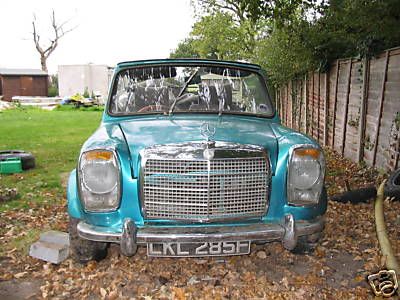
Having unexpectedly acquired the car of my boyhood dreams (a Merc fronted mini) due to some boredom initiated Ebay surfing at work one day I’m now stuck with a dilemma and thought I’d canvass opinion….
The Car:
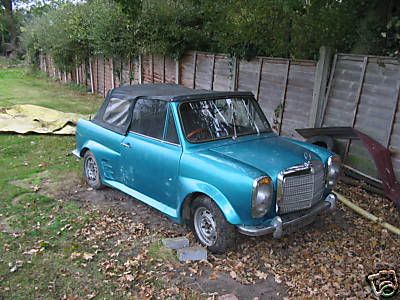
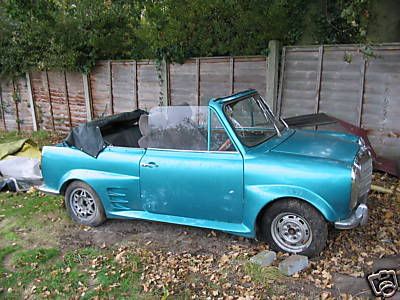
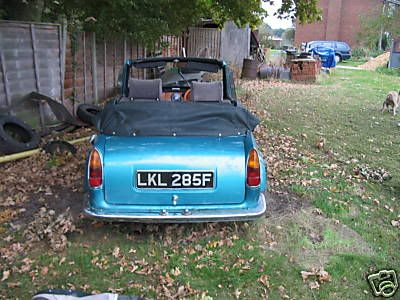
Has obviously been inspired by the old W&P “50MAR” car and other similar ones of its day, the headlight conversion looks like a good job. Despite the awful choice of kit the standard of fitting and paint finish is excellent and clearly done by someone with professional facilities / experience. The roof conversion however is a little more agricultural…….
The strengthening of the shell has been undertaken by welding 1/4 inch plate to the inner sill and first few inches of the floorpan where the door opening is, there is no strengthening at all behind the B pillar. Additionally there is a length of 1 inch box section bolted underneath the car from front to rear on each side of the tunnel midway between the tunnel and the sill.
The rear subframe mounting points have rotted through and on inspection the tin worm has worked its way into the rear pockets and started on the inner sill there as well.
The boot floor appears good up to the “Elf extension panel” and then becomes holier than swiss cheese, to get round this someone has glued a patch panel in place with fibreglass and filled under the boot board supports and any other cavity they could find in the boot with expanding foam then painted the whole lot with underseal (actually a very good cover up job – pity they didn’t spend the time doing it properly!)
So far I have extracted a bin liner full of expanding foam from the boot and rear door pockets and I can also see some round the headlight bowls, rear subframe mounting points and behind the body kit.
The Dilemma:
I love Riley Elfs and my heart really wants to get this one back on the road in time for summer BUT my garage is tiny (there’s 2 inches between the back of the car and the door when the door is closed so I can’t even walk round it!) and I’ve never taken on anything that’s quite as bad as this – Who knows how much other foam is in there!. I’ve got the tools to do the preparation work and am happy to bring in hired help for welding etc but looking at it now it feels like such a huge job I’m not really sure where to start….
Does anyone have any advice / experiences to share?
Having unexpectedly acquired the car of my boyhood dreams (a Merc fronted mini) due to some boredom initiated Ebay surfing at work one day I’m now stuck with a dilemma and thought I’d canvass opinion….
The Car:
Has obviously been inspired by the old W&P “50MAR” car and other similar ones of its day, the headlight conversion looks like a good job. Despite the awful choice of kit the standard of fitting and paint finish is excellent and clearly done by someone with professional facilities / experience. The roof conversion however is a little more agricultural…….
The strengthening of the shell has been undertaken by welding 1/4 inch plate to the inner sill and first few inches of the floorpan where the door opening is, there is no strengthening at all behind the B pillar. Additionally there is a length of 1 inch box section bolted underneath the car from front to rear on each side of the tunnel midway between the tunnel and the sill.
The rear subframe mounting points have rotted through and on inspection the tin worm has worked its way into the rear pockets and started on the inner sill there as well.
The boot floor appears good up to the “Elf extension panel” and then becomes holier than swiss cheese, to get round this someone has glued a patch panel in place with fibreglass and filled under the boot board supports and any other cavity they could find in the boot with expanding foam then painted the whole lot with underseal (actually a very good cover up job – pity they didn’t spend the time doing it properly!)
So far I have extracted a bin liner full of expanding foam from the boot and rear door pockets and I can also see some round the headlight bowls, rear subframe mounting points and behind the body kit.
The Dilemma:
I love Riley Elfs and my heart really wants to get this one back on the road in time for summer BUT my garage is tiny (there’s 2 inches between the back of the car and the door when the door is closed so I can’t even walk round it!) and I’ve never taken on anything that’s quite as bad as this – Who knows how much other foam is in there!. I’ve got the tools to do the preparation work and am happy to bring in hired help for welding etc but looking at it now it feels like such a huge job I’m not really sure where to start….
Does anyone have any advice / experiences to share?
Edited by uksurvivor on Wednesday 10th December 13:47
No advice other than good luck !
But as a point of interest i reckon that was done by Auto design in paddock wood, kent. That roof and body kit are typical of the cars they turned out back in the day, and it wouldnt surprise me if they did that to the front.
But as a point of interest i reckon that was done by Auto design in paddock wood, kent. That roof and body kit are typical of the cars they turned out back in the day, and it wouldnt surprise me if they did that to the front.
Edited by MHM on Thursday 4th December 12:58
ive always had a soft spot for merc fronted mini thanks to one that used to run round hull years ago.
the worse bits about yours (imho) are the terrible 1980's body kit and the roof. elfs just dont look right with the top chopped as it makes the whole car 'look' longer - the heinz ones got round this by making a 2cv type roof and retaining the side windows.
as for the welding its a case of getting stuck in and measuring twice cutting once!
anything is possible with rotten old minis...........

this ones 'nearly' done now.
the worse bits about yours (imho) are the terrible 1980's body kit and the roof. elfs just dont look right with the top chopped as it makes the whole car 'look' longer - the heinz ones got round this by making a 2cv type roof and retaining the side windows.
as for the welding its a case of getting stuck in and measuring twice cutting once!
anything is possible with rotten old minis...........
this ones 'nearly' done now.
guru_1071 said:
the worse bits about yours (imho) are the terrible 1980's body kit and the roof. elfs just dont look right with the top chopped as it makes the whole car 'look' longer - the heinz ones got round this by making a 2cv type roof and retaining the side windows.
as for the welding its a case of getting stuck in and measuring twice cutting once!
anything is possible with rotten old minis...........
this ones 'nearly' done now.
Guru - Thanks for the response, are you telepathic? That picture of the bracing may well be the answer to the problem that is bothering me! How to hold the bodyshell square when I remove the rear subframe.as for the welding its a case of getting stuck in and measuring twice cutting once!
anything is possible with rotten old minis...........
this ones 'nearly' done now.
One other problem you may be able to help with - I've never touched a hydro subframe before can you let them down yourself?
Totally agree on the bodykit front but semi afraid to remove it as I'm fearful of what lurks beneath.
MHM said:
No advice other than good luck !
But as a point of interest i reckon that was done by Auto design in paddock wood, kent. That roof and body kit are typical of the cars they turned out back in the day, and it wouldnt surprise me if they did that to the front.
Thanks for the tip, previous owner had no history so I'm investigating all leads....But as a point of interest i reckon that was done by Auto design in paddock wood, kent. That roof and body kit are typical of the cars they turned out back in the day, and it wouldnt surprise me if they did that to the front.
yep
just stick a thin screwdriver into the valve (on the rear frame, one each side) (like letting a tyre down) and the fluild will sprayout. it sticks and your should avoid getting it in your eyes!
then just make little blocks of wood to increase the length of the bump stops and you can push it around no problems.
the bracing in that grey shell was overkill, but both inner wings came off and the door posts where so rotton that the remains of the bulkhead box would move about 1/2" in any direction!
heres a photo of my elf - it was too far gone!
uksurvivor said:
guru_1071 said:
heres a photo of my elf - it was too far gone!
I hope you saved the chrome for the cooper boys! Boot floor looks very familiar actually 
it wasnt a good purchase........

it was worth it for all the nuts and bolts and what not though - its long gone now.
OK so I'm desperate to get going with the subframe removal but still have concerns over the floppy bodyshell I'll be left with when its gone. The bracing idea appeals for 2 reasons:
1. Having read hundreds of the posts on PH/Classic Minis it seems Guru knows his bodyshell reconstruction and if its good enough for him .....
2. I was always going to brace the shell somehow anyway because removing the roof has so obviously weakened the shell (or was it failure to strengthen it elsewhere?)
New dilemma, should I brace the shell as I intended to and add "restoration bracing" on top before removing the subframe or just go for it without the bracing?
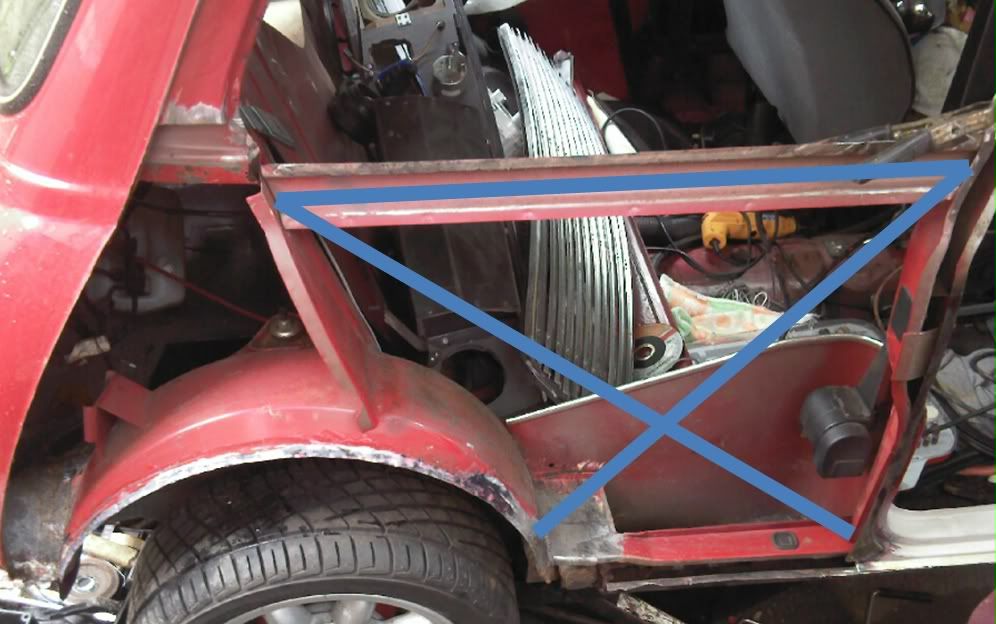
FYI I was going to brace like this (cheers for the as never normally seen picture dogfather!) using box section, then go across the back of the seat to brace across the car, this would keep everything out of sight, the disadvantage being the rear pockets would shrink a little and my rear interior panels would probably have to be custom jobs...
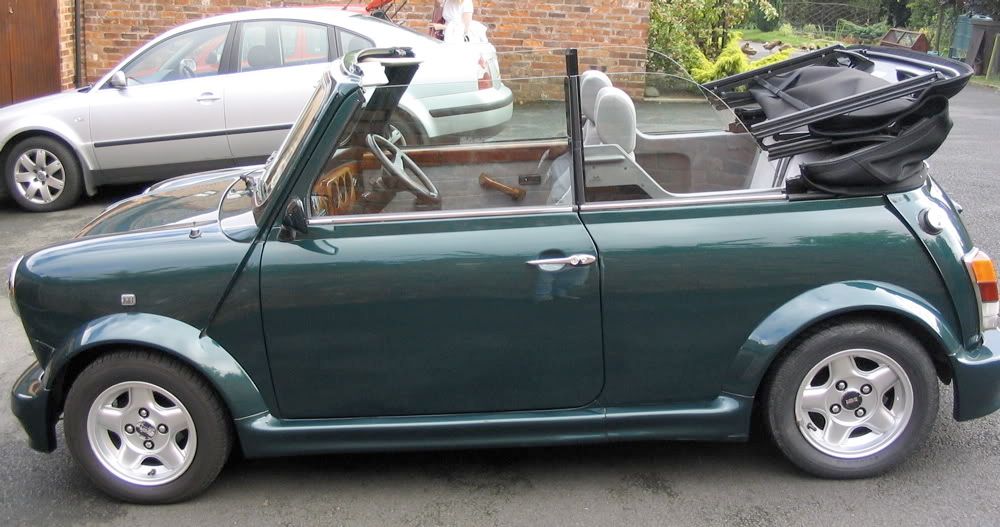
also has anyone ever seen the bracing in a real mini cabrio? What is the wierd B piller extension for? Presumably I could do worse than copy whatever strengthening they were designed with....?
1. Having read hundreds of the posts on PH/Classic Minis it seems Guru knows his bodyshell reconstruction and if its good enough for him .....
2. I was always going to brace the shell somehow anyway because removing the roof has so obviously weakened the shell (or was it failure to strengthen it elsewhere?)
New dilemma, should I brace the shell as I intended to and add "restoration bracing" on top before removing the subframe or just go for it without the bracing?
FYI I was going to brace like this (cheers for the as never normally seen picture dogfather!) using box section, then go across the back of the seat to brace across the car, this would keep everything out of sight, the disadvantage being the rear pockets would shrink a little and my rear interior panels would probably have to be custom jobs...
also has anyone ever seen the bracing in a real mini cabrio? What is the wierd B piller extension for? Presumably I could do worse than copy whatever strengthening they were designed with....?
Edited by uksurvivor on Monday 8th December 16:45
Edited by uksurvivor on Wednesday 10th December 13:44
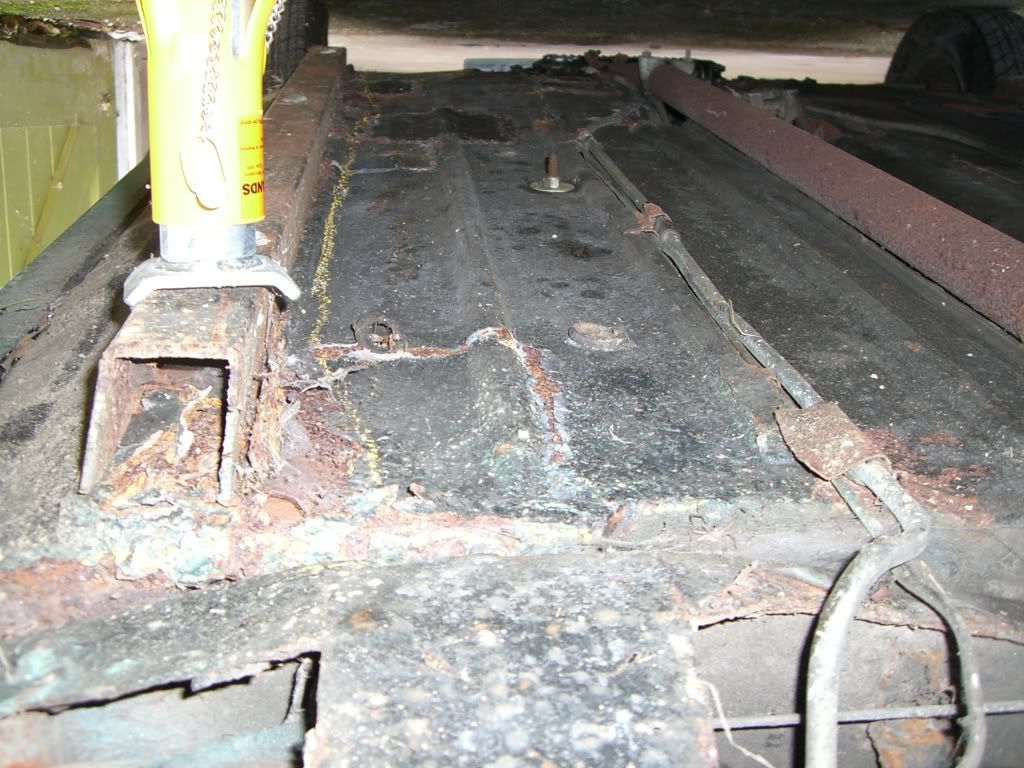
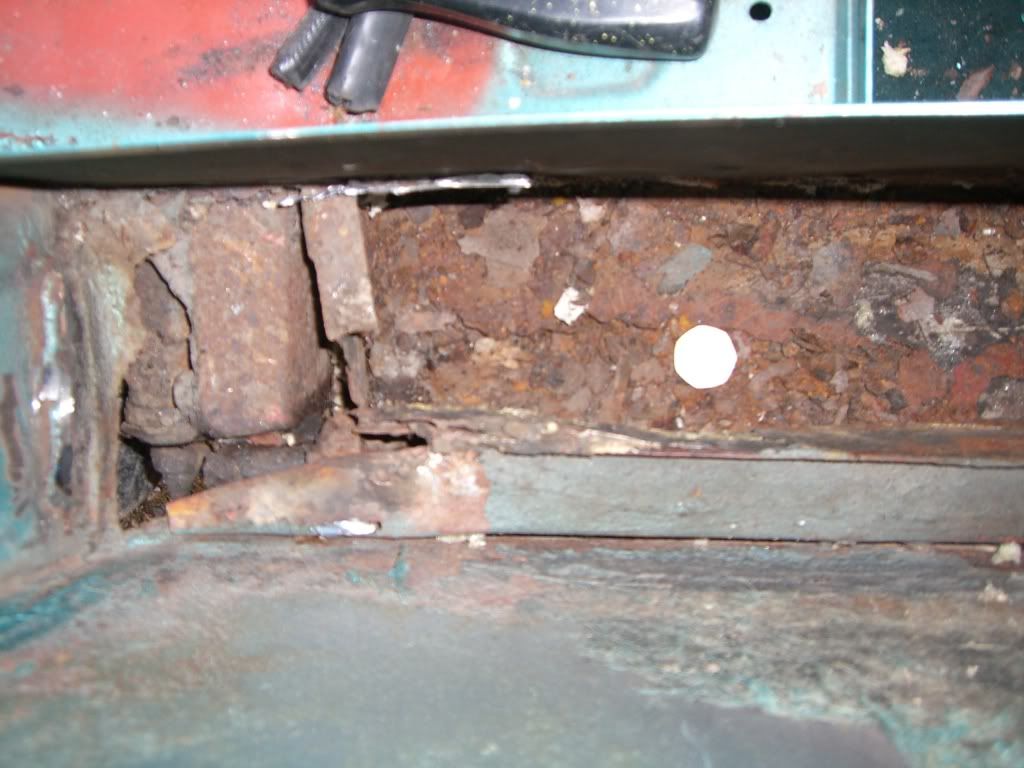
Might have to rethink that plan! I thought I'd make a start on clearing my minimalist garage today ready for the work to begin in earnest.... Pushed the car out with great difficulty and jacked her up ready for the first 'proper' look underneath. Whilst she was up in the air I removed the shoes from the nearside rear drums as the slave is siezed on (hence the less than easy pushing task!) full renovation can take place off the car later (not todays priority).
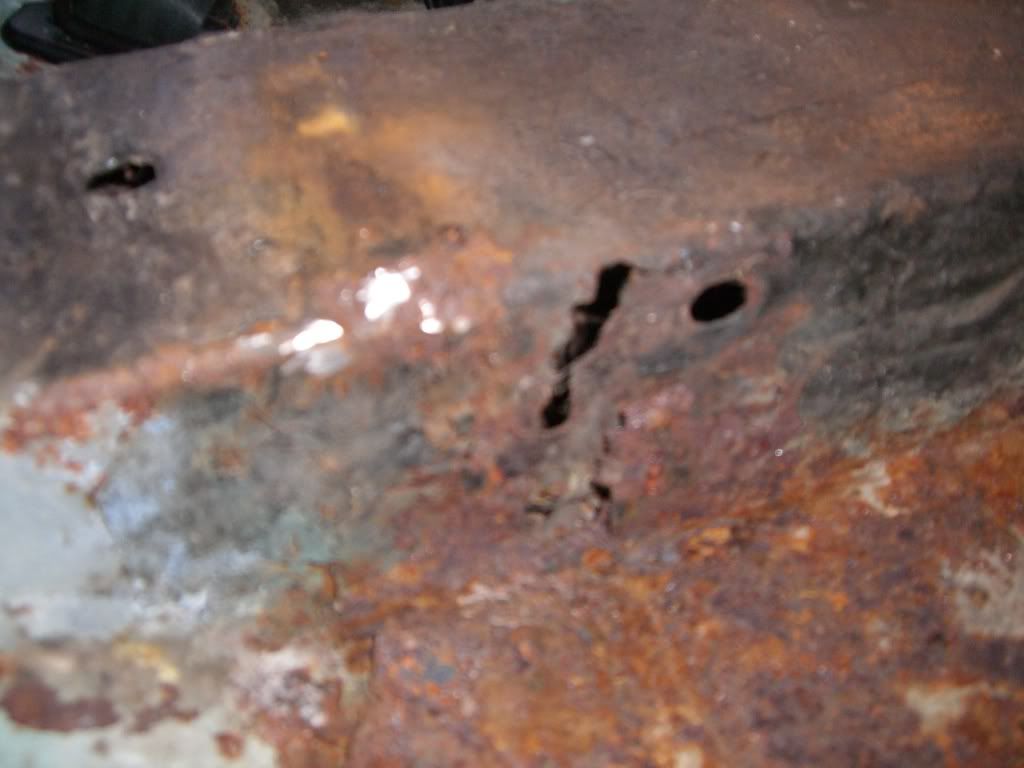
As I expected the subframe mounting panel is fully shot and the floorpans have also been repaired by Stevie Wonder at some stage , The agricultural shell strengthening can also be seen complete with MOT failure chalk!
Having already cleared the nearside bin of expanding foam I knew what to expect from the offside but even I was shocked with what I came across next.
Nearside
Offside

As you can see the offside bin looks substantially smaller......
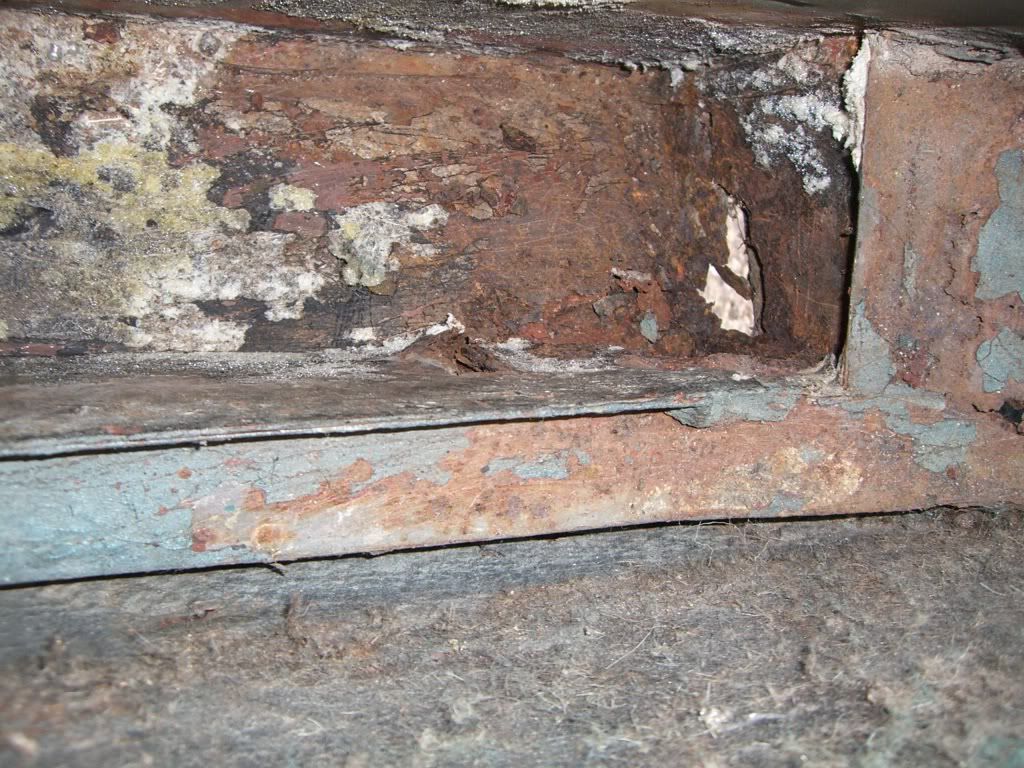
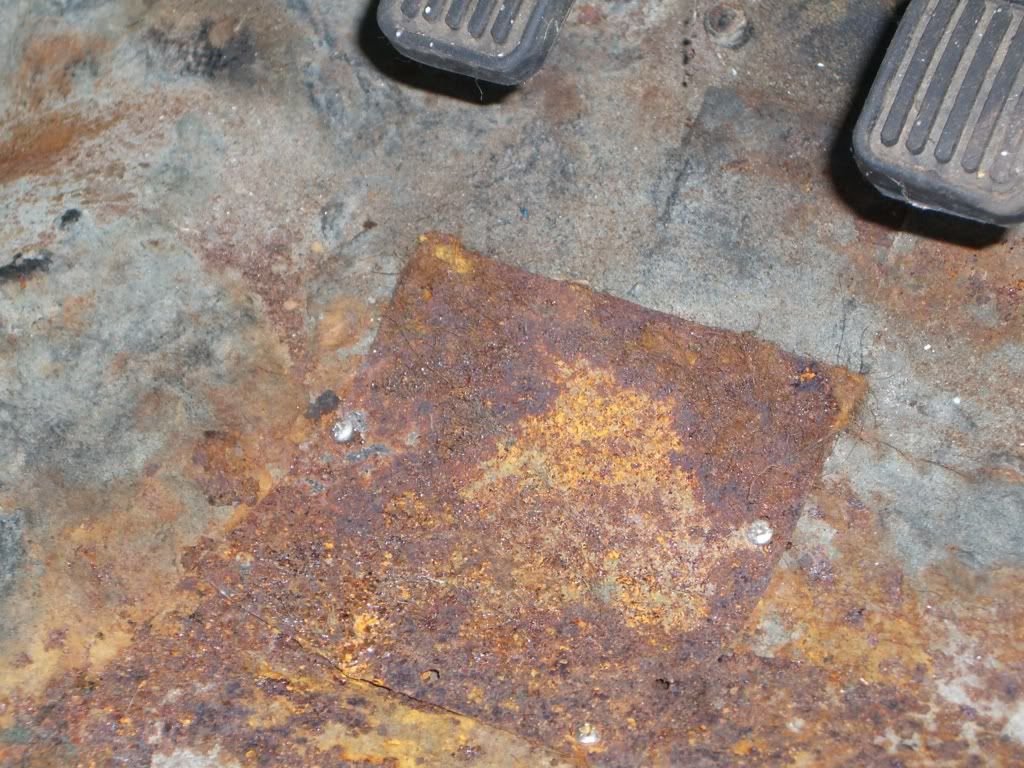
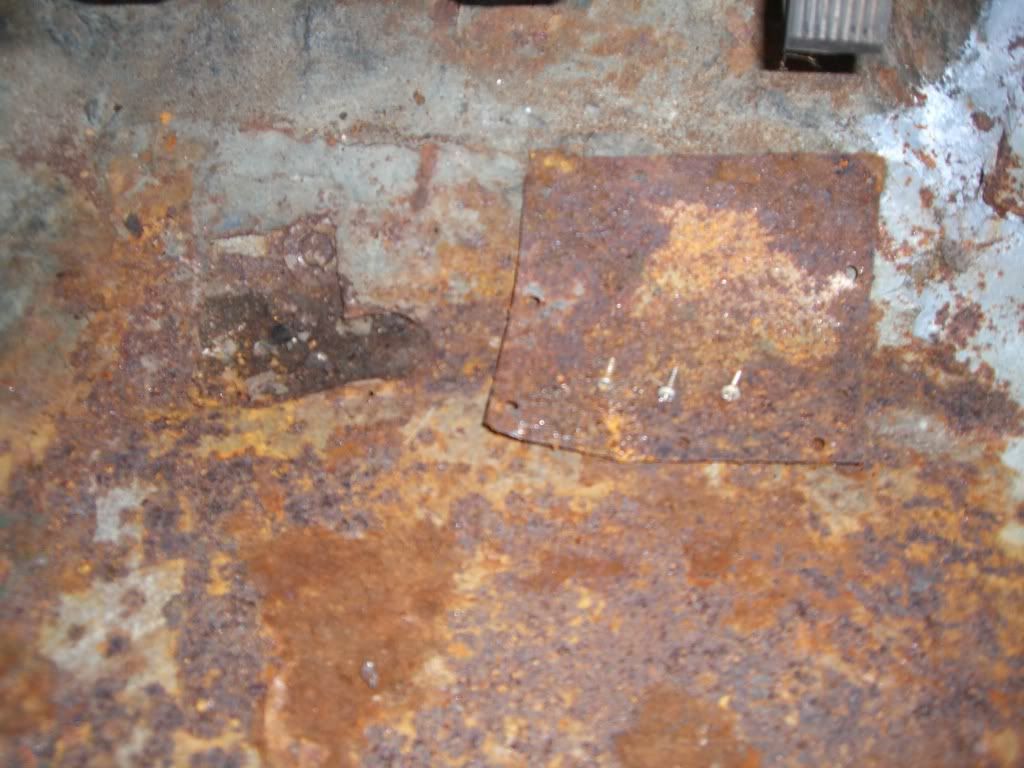
so I ground away the two 1 inch welds on either side of the plate and hey presto.... A tyre

The only other weld was two inches long and across the wheelarch - I just find it amazing that someone bodged it that badly to get it through an MOT that little plate is literally all that is preventing the rear subframe from coming through the floor! Imagine what would have happened in an accident - doesn't bear thinking about!
Oh and the shiny thing was a 50p that dropped out of the inner sill so at least the value of my investment has increased
You can't really see it from the pictures but there are also 3 lots of sills welded one on top of the other so as well as the subframe mounting panel and boot floor I'm now looking at sills and floorpans too. Can't wait to see what tomorrow will bring!
As I expected the subframe mounting panel is fully shot and the floorpans have also been repaired by Stevie Wonder at some stage
, The agricultural shell strengthening can also be seen complete with MOT failure chalk!Having already cleared the nearside bin of expanding foam I knew what to expect from the offside but even I was shocked with what I came across next.
Nearside
Offside
As you can see the offside bin looks substantially smaller......
so I ground away the two 1 inch welds on either side of the plate and hey presto.... A tyre
The only other weld was two inches long and across the wheelarch - I just find it amazing that someone bodged it that badly to get it through an MOT
that little plate is literally all that is preventing the rear subframe from coming through the floor! Imagine what would have happened in an accident - doesn't bear thinking about!Oh and the shiny thing was a 50p that dropped out of the inner sill so at least the value of my investment has increased
You can't really see it from the pictures but there are also 3 lots of sills welded one on top of the other so as well as the subframe mounting panel and boot floor I'm now looking at sills and floorpans too. Can't wait to see what tomorrow will bring!
Edited by uksurvivor on Thursday 11th December 10:52
uksurvivor said:
it seems Guru knows his bodyshell reconstruction and if its good enough for him .....
hey, im more than happy to be proved wrong, and am never afraid to listen to other peoples advice!removing the frames will make no real difference to the strength of the shell (unless its very, very rotten). obviously its a good idea to fit them before doing any lining up as they do help, particually when doing the front end - i wouldnt consider welding the front on with out the frame holding it all in place.
but, its the tunnel, cross member and inner/outer sills that provide the 'backbone' and its important to brace this lot before hacking begins.
on your shell the lack of roof wont help, but as long as the floor and sills is good it wont hinder work, again, as long as extra bracing is used.
id weld a box section across each door gap, between the b posts and another across the a posts. as long as the door gaps cannot move, the rest of the shell will stay ok for the work you want, you really need to look at the shell in three lumps, 1) the bulkhead forwards, 2) the heel board backwards annd 3) the middle bit. 1 & 2 need the frames handy as datums, but 3 only really needs the doors as any mistakes will show up in the door gaps. i dont think the stuff you show above would help at all, its certainly no help for stregnth when welding.
on the picture of the rover car the triangle thing is to mount the inertia seat belts and comply with all the laws and what not
the work i would guess that yours needs will the inner sills correctly boxing up, it might be worth hunting down info in the old kieths convertables kits as they where self build.
my best bit of advice will be to mesure all the gaps before and during, that way mistakes can be fixed before its too late!
ive done so many shells now that i know what movment will affect what gap, and what needs tugging to pull stuff back, unfortunatley, without writing a essay its impossible to get this knowledege across!!!
that box section is nasty!
id just buy floors to the first (or second) flute, they can be got with the outer sill and j/p all ready on. then its just a case of cutting back the floors frying them in and sorting the door step and bottom of the rear qtr out to suit. then the only neat unpicking you need to do is the ends of the crossmember
once its all good and new, you can then weld the extra stuff in to support the lack of roof.
whilst youve got that out its easy to do inside the companion box (id chop them out and put new ones in) and do the heel board and the small closer panels.
about a weeks worth i reckon.......
its also about the same as my new bought woody estate needs doing, that also needs a front and some round the back.
i guess mini machaine in darlington are going to be your friends, though hadrien ( i think) have started selling floor sill combos as pattern panels - im tempted to give the cheap stuff a try.
p.s
i bought a mk 1 once that had sills and floors constructed of flattened out quality street tins, i was welding a plate in it and the face of the women of the lid appeared through the paint. i thought i was having a religious experience until i craped the bloody paint off and saw the name on the tin.
i just slapped a load of underseal on it, got it motd and ran it for a year!!!!!!
guru_1071 said:
whilst youve got that out its easy to do inside the companion box (id chop them out and put new ones in) and do the heel board and the small closer panels.
I'm starting back to front (section 2 first) - When you say companion box do you mean the rear bins next to the seat? I did notice you'd done that on your picture above but just assumed it was a race shell and you were looking to loose precious kilos...That approach makes a lot of sense, my only concern with that is that the B pillars don't seem to come into contact with anything apart from the doorstep, rear quarter and the rear bins ie. they don't touch the inner sill at all, there's a rough finish to the end of both of them and I'm not sure if it left the factory like that or someone has chopped through them? Can you confirm that I should / shouldn't be able to get my fingers between the bottom of the B pillar and the inner sill?
And thanks for taking the time out to respond to my other questions - much appreciated.
guru_1071 said:
it might be worth hunting down info in the old kieths convertables kits as they where self build.
Internet searches have resulted in the opinion (from theminiforum) that they were floppy shells too... I did find a "Keiths" on Ebay Another Topless project? but the B pillars, door frames and sections of the roof have been retained so a different approach to mine.MHM said:
I reckon that was done by Auto design in paddock wood, kent. That roof and body kit are typical of the cars they turned out back in the day, and it wouldnt surprise me if they did that to the front.
Similarly internet searches have resulted in the elimination of Autodesign....  although the similarities are striking! Still can't believe anyone would choose to buy that kit!
 (apologies if any of you have it on your cars....)
Edited by uksurvivor on Wednesday 10th December 13:51
uk
i will take some photos at the weekend of what yours 'should' look like around the b post / inner sill area (as std), a photo will speak a thousand words i guess!
on the grey shell the boxes and rear seat pan where removed as its a 'spare' race shell, but often when doing complicated resto work on the floors/sills its as easy to remove them to get good access as it is to try and work around them.
Bin day today and limited "garage time" available due to work so I thought I'd clear out all the useless rubbish that is going anyway, like hessian backed carpet etc....
Today's surprise
Where are the front subframe mounting bolts??????
Oh there they are! three tiny self tappers and mounting plate on the right.....
Also got a better look at the offside crossmember today - not pretty but at least I knew about that!
so I thought I'd clear out all the useless rubbish that is going anyway, like hessian backed carpet etc....Today's surprise
Where are the front subframe mounting bolts??????
Oh there they are! three tiny self tappers and mounting plate on the right.....
Also got a better look at the offside crossmember today - not pretty but at least I knew about that!
guru_1071 said:
I will take some photos at the weekend of what yours 'should' look like around the b post / inner sill area (as std), a photo will speak a thousand words i guess!
Thanks guru much appreciatedEdited by uksurvivor on Wednesday 10th December 13:53
just strip it toa bare shell ad bracing were required and have it shot blasted to remove all the rust filler and foam.
as for bracing if it were me i try to weld some box or angle to the inside of the sill then weld the outer sill over the top if that makes sense aslo seam weld all the pannel joints.
also cool project good look
as for bracing if it were me i try to weld some box or angle to the inside of the sill then weld the outer sill over the top if that makes sense aslo seam weld all the pannel joints.
also cool project good look
robminiman said:
makes sense aslo seam weld all the pannel joints.
the trouble with seam welding all the joints is that you make it very difficult to repair in the future as there are no 'edges' to panel up to, also it makes it very very solid, almost too much for a road car.we dont even bother seaming up race cars, i think it only has its place in rallying, where the constant abuse leads to the shell tearing its self to peices.
Gassing Station | Classic Minis | Top of Page | What's New | My Stuff