CLS Suspension squeak
Discussion


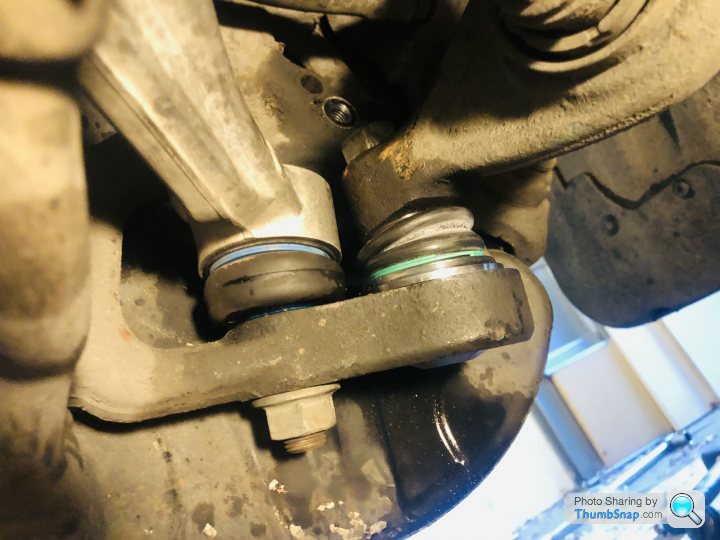
My CLS seems to generate a bit of a squeak/creak from the front passenger side when going over bumps, am guessing its the lower arm/ball joint.
Will whip a wheel off and have a look tomorrow, anyone changes one, looks easy enough, any pitfalls ? whats the sure fire way to spot the component that has gone.
The parts seem cheap enough on Ebay, £79 for a Febi Lower arm or a full kit of all three arms, like this
http://www.ebay.co.uk/itm/For-Mercedes-E-Class-Fro...
Or will they be crap ?
I have had a few joints replaced by the MB garage on my CLS (2006, owned from new, 112k miles) and on one occasion it took them three goes (the last two FOC) to locate the source of the squeak, so it is by no means straightforward diagnosing the faulty part.
I (as in DIY) have just replaced all lower arms, lower ball joints and drop links on mine, using a complete Febi kit, as I figured at this mileage all parts would be getting tired, and it certainly tightened things up to a surprising extent. First time I have done something like this, but quite straightforward really. The first side took about 6 hours, but the second, having figured out how to access bolts etc., took about 4 hours. Only perplexing part was the original lower arms simply had circular bolts with circular holes in the bushes - the replacements had bolts with grooves that allowed elongated holes with ribs to be assembled in such a way as to adjust camber; for now I have reproduced the negative camber as per the original set up, but I plan on changing the top mounts and track rod ends in the next couple of weeks at which time I will then get it set up by a specialist - a reduction in camber may prolong the life of the front tyres which lose their inner shoulders.
As to Febi quality, apparently they supply MB and the parts all seemed decent enough and similar to the old ones removed. Lemforder is one alternative, I believe they also supply MB, and there are other brands which I presume are simply pattern parts, but I don't know enough to say which is best.
ETA - I bought my kit from Mister Auto, their website rather than eBay.
Edited by Stegel on Tuesday 29th March 18:29
Was thinking this,
http://www.ebay.co.uk/itm/BRAND-NEW-Mercedes-Ball-...
For the sake of £33 its worth having, better than paying labour.
http://www.ebay.co.uk/itm/BRAND-NEW-Mercedes-Ball-...
For the sake of £33 its worth having, better than paying labour.
I used a Sealey ball joint splitter for disassembly. As you note, you need a press tool to replace the main ball joint in the base of the hub carrier; I read so many reports of the cheap copies failing I wimped out and bought the Laser press (probably made in the same factory as some of the copies, but at least someone to complain to if it failed!). It worked great, and given we have a 211 in the family too, also due a refresh, I figured it was worthwhile, particularly given the overall saving made by spending time under the car myself.
Stegel said:
I used a Sealey ball joint splitter for disassembly. As you note, you need a press tool to replace the main ball joint in the base of the hub carrier; I read so many reports of the cheap copies failing I wimped out and bought the Laser press (probably made in the same factory as some of the copies, but at least someone to complain to if it failed!). It worked great, and given we have a 211 in the family too, also due a refresh, I figured it was worthwhile, particularly given the overall saving made by spending time under the car myself.
Yeah, similar to how I do stuff, justify buying the gear on not having to pay someone else, it isnt rocket science, just can be frustrating and painfulTook, the passenger side front wheel off and had a look around, cant find anything with any play in, had a good prod round with a bar and no obvious movement, only thing I notice was the level sensor for the Airmatic was completely dry and seemed to grate when moved, took it off and cleaned it and put a bit of copper slip on.
Took it round the block and completely silent, but that fits with what happened before, have only noticed it at the end of longer journies, perhaps when there is more heat in it so perhaps something expands and lets a bit of play in.
Took it round the block and completely silent, but that fits with what happened before, have only noticed it at the end of longer journies, perhaps when there is more heat in it so perhaps something expands and lets a bit of play in.
I had a squeak/creak/tinkle sound from somewhere in front end of a W204 C63 that drove me nuts for a long time. Audible with window down, worse on corrugated roads and speed humps etc. Was convinced it must be suspension related but could not locate it and eventually gave up. Then I had a minor encounter with a high curb touching up the underside of the fromt spoiler, loosening up that tray that sits under the radiator and engine forming a floor to the engine bay. Had to given it a few whacks to fix it back in under the front spoiler and voila here was my rattle noise. So off came the tray and there was the culprit - one of those folded over metal clips that holds the engine cover in place. No doubt this had come off at an oil change service and fallen onto the tray under the radiator where it had rattled away ever since. "Suspension noise" gone, and I was able to sort out the missing clip from the engine cover all at the same time. Well pleased I was.
Cheers Jimmy, good point, perhaps look at stuff that isnt suspension !
Drove it 350 miles to Luton and back and barely a whisper from it.
Only at low speeds when manuevering, think will just live with it for now and will ask my garage what they think when I take it for MOT in a few weeks
Drove it 350 miles to Luton and back and barely a whisper from it.
Only at low speeds when manuevering, think will just live with it for now and will ask my garage what they think when I take it for MOT in a few weeks
I had the knock/clunk from the front, It went into the workshop 3 times and with different diagnosis
I ended up changing all the front suspension and the upper joints too, made a huge difference to the car. I think they are really common wear components as the cars pretty heavy anyway.
If it's getting old or done 100k ish miles, it might be better to replace it all, I just seen a kit on eBay for £150!! I'm shocked how cheap that is, and it would be cheaper in the long run labour wise
The aftermarket kits should be fine, but as someone already said, febi have the oe parts, the cars themselves are a real bargain right now too...I've had mine two and a bit years and I've spent abput to £5k on it keeping it in order, now you can buy a CLS for under £5k
Yeah, that makes sense, whilst it is apart, at that price, do the lot, apart from the Airmatic stuff, that would make it a lot more pricey !
Think I will just get the kit, and the ball joint extractor and get on with it, love the car, just done 330 miles in it today, comfoy and amazingly rapid for what it is, engine feels amazing.
Think I will just get the kit, and the ball joint extractor and get on with it, love the car, just done 330 miles in it today, comfoy and amazingly rapid for what it is, engine feels amazing.
sal 965 said:
Holy resurrection!!
I'm about to tackle a full front end refresh using one of the better kits off ebay and wondered if there was a sequence to doing this or it it a case of jump straight and work bottom to top?
I don't think it makes a difference to be honest, but personally I'd start by tackling the most difficult job which is the lower one that's pressed into the hub carrier.I'm about to tackle a full front end refresh using one of the better kits off ebay and wondered if there was a sequence to doing this or it it a case of jump straight and work bottom to top?
I did all four of the lower joints myself at home.
They're very tight by design but with the right tooling and a breaker bar it can be done at home. Simply a case of applying the right physics.

I've also recently read of people filling the new ball joints with additional grease in order to try and prolong the life of the joint. I'd not heard of doing that before but next time I change any I think I'll try doing the same.
I've also recently read of people filling the new ball joints with additional grease in order to try and prolong the life of the joint. I'd not heard of doing that before but next time I change any I think I'll try doing the same.
James Hay said:
They're very tight by design but with the right tooling and a breaker bar it can be done at home. Simply a case of applying the right physics.
I've also recently read of people filling the new ball joints with additional grease in order to try and prolong the life of the joint. I'd not heard of doing that before but next time I change any I think I'll try doing the same.
I had the kit, but couldnt budge it, got a mobile guy in and he struggled.I've also recently read of people filling the new ball joints with additional grease in order to try and prolong the life of the joint. I'd not heard of doing that before but next time I change any I think I'll try doing the same.
J4CKO said:
I had the kit, but couldnt budge it, got a mobile guy in and he struggled.
Mine was on about 120,000 miles and 12 years old at the time, not sure about yours but generally I suppose the longer they're in the more resistant they become. I did also spray them with WD40 both in the gap and below over a period of about a week every evening to let it properly soak in.James Hay said:
J4CKO said:
I had the kit, but couldnt budge it, got a mobile guy in and he struggled.
Mine was on about 120,000 miles and 12 years old at the time, not sure about yours but generally I suppose the longer they're in the more resistant they become. I did also spray them with WD40 both in the gap and below over a period of about a week every evening to let it properly soak in.Took him an hour, veins on his forehead looking fit to pop, a hydraulic truck jack and a three metre bar and when it finally moved it went with a hell of a crack and he nearly smashed the bodywork, sixty quid well spent.
I’ve pressed in new ball joints on our 211 and 219 5 times now, vindicating the purchase of a Laser tool kit (and highlighting the poor quality of Febi ball joints - Lemforder seem to be fit and forget by comparison). It’s indicated as a “don’t” in the instructions I’m sure, but an impact wrench makes short work of pressing them out and in - the bang and the whole lot coming to pieces on disassembly makes me jump every time, but it’s never been a struggle (both cars are well into 6 figure mileages now).
Gassing Station | Mercedes | Top of Page | What's New | My Stuff