BARGAIN BASEMENT ST - Building a budget race car
Discussion


INTRO
Like many people I really enjoyed the Bad Obsession Motorsport series during lockdown, showing the team building a budget race car to compete in club level motorsport. It was a brilliant guide to entering motorsport and also very entertaining.
I watched the series thinking, 'they really are making that look easy', and wondering how much more difficult it would be for someone without a fully-stocked workshop and without any experience of engineering.
I've met plenty of people around UK circuits who compete in cars that were built on their own driveways, so I knew it was perfectly possible. I just wondered how much harder it would be than the Bad Obsession guys made it look; and whether you really can build a race car for circa. £5000
So for anyone who's interested, here's a thread on my efforts as a complete novice, to build a racing car on a budget...
Edited by SparrowHawk on Tuesday 30th March 15:16
CAR CHOICE
The obvious first question was which car to build.
Having owned mostly turbo-charged and all wheel drive cars myself, I was aware that I would not be able to build and run anything like a Subaru Impreza or Mitsubishi Evo on the budget that I was setting myself.
It was always going to be a normally aspirated car, and was most likely to be a front wheel drive hatch
I once owned a Honda Civic race car which was built to a good standard (by someone else!) and I've also had an MX-5 track car so these were both closely considered.
But in the end we decided to build a Fiesta ST.
There are several reasons why, but the main reasons were:
1. They are cheap, widely available, with great spares availability and inexpensive to upgrade and maintain
2. They are eligible for a large number of club level series & championships
3. We already own another Fiesta ST trackday car (it is my dad's car), which has been in the family for about 9 years now. Having done hundreds of laps in the car I feel very confident behind the wheel; and even more useful... we have good knowledge of these cars and also a fair amount of parts already knocking around. So getting another one to use for my race car build made sense.
Anyone who has been on a trackday in the UK will have been impressed with how these cars can often keep up with some much bigger and more powerful cars. The handling is great for beginners, and they offer some really close competition with other similar cars like Clios and Civics.
So the decision was made to look for a cheap ST150 to use as our base car.
FINDING A CAR
Having decided to start with a Fiesta ST the next decision was which one to buy.
Some people advised me to use as much of my budget as I could, to get the best condition/mileage car that I could - in order to have a better base to build from. The better the car, the less remedial work or initial maintenance I would have to do.
However, the entire point behind this project for me was to build a safe and reliable race car within budget, and that would not be possible if I spent £2500 on the base car leaving only two or three thousand for the build.
So I opted to buy a cheap example of an ST, enabling me to allocate the vast majority of my budget to the build; with the view that I'd be replacing many of the components that suffer with age anyway. Components like the suspension, brakes, and some of the bushes etc, would be changed as part of the build.
What I wanted was a straight car that had a sturdy engine that I wouldn't need to change immediately. I wasn't too fussed about bodywork, colour, or spec; so I was able to look at many of the 'less desirable' Fiesta ST's out there being sold at the lower end of the market, which is where I found this...
The car was silver (not the most desirable colour) and had relatively high mileage. It had a list of things wrong with it, and was being sold as an MOT failure with just a week of ticket left on it. It was also absolutely filthy!
That would have been enough to put a lot of people off, but it also had many redeeming features. The car had lots of history, with evidence of regular servicing throughout it's life. The body was completely straight, with no crash damage and also no obvious repairs or re-sprays. It was also HPI clear. And importantly for me, the engine sounded great, ran smoothly, and I could detect absolutely nothing mechanically wrong with it.
The list of MOT failure items also sounded incredibly simple to fix, for someone who knows these Fiestas well and also has a bunch of spare parts knocking around.
So we bought it!
Thanks for the advice/encouragement Rockatansky.
The Scottish Fiesta championship has served as good inspiration, I've been looking at lots of pictures of your cars and the regulations, and I'm aiming to replicate much of the spec.
In the longer-term, I'm aware I will blaze way past my original budget as I look to upgrade the car further to match the spec of other Fiesta race cars, and add more performance.
But my initial aim is simply to build a race legal car within the £5000 budget, and then race it!
Great to hear you think it can be done
CHECKING OVER THE CAR
So what kind of car have we ended up with?
Taking possession of the vehicle from the previous owner also meant driving it the 50 miles home again. So we did a quick safety check before setting off.
One of the points on the failed MOT was the exhaust/mounting. From the back of the car it looked badly corroded but was also hanging in the wrong position. A quick crawl around under the car showed that the back box was almost detached from the rest of the exhaust. It was safer to remove it entirely than to drive home with it cable-tied on.. so we pulled it off!
A check over the rest of the car showed that the tyres were quite near the legal limit but appeared to be safe and holding air. The brakes seemed adequate, although the rear discs were in bad shape, and the suspension seemed a bit tired at the front - but seemed safe to drive.
Once home it was washed and vacuumed and we decided we had bought a pretty good car. It drove well on the way back, the engine pulled hard in every gear, power delivery was smooth, the gearbox felt reasonably tight, and there were no worrying noises apart from a question mark over the front suspension.
So a good starting base. But there were a few issues to be addressed before we started on the rest of the build. The Fiesta only had a week of MOT remaining, and we were insistent on the car remaining road legal throughout the entire process if possible.
Therefore we had a list of jobs that needed doing before we started on race car stuff!
Those initial jobs (major defects from MOT) were:
- New exhaust (or at least a temporary fix)
- Replacement fuel cap
- New drivers seat or fixed adjustment mechanism
- Replacement bulbs in headlights and indicators
- Replacement wiper blades front & rear
There were also a number of other immediate things that needed remedying so that I could confidently and safely drive the car over the coming weeks/months until the car was finished. These were:
- Passenger window stuck closed
- Rear brake discs heavily corroded
- Front suspension struts need replacement
- Oil service
- New sparkplugs
- New air filter or induction kit
- New fuel filter
- Missing washer bottle cap
- Replacement tyres
So the plan was to get all of these jobs done first, get the car MOT'd, and then begin on the race car jobs.
CHOOSING A RACE SERIES
Being based in the South East, we found it difficult to decide on a championship or series to aim for. The BRSCC Fiesta Championship meet mostly at circuits very far away from us, including a round at Croft and 2 rounds at Cadwell Park with no rounds at Brands Hatch; so it was less attractive. It would also potentially be out of budget for me to prepare a car to their regulations as they utilise the AST suspension, which has an RRP around £3.5K. It would be great to aim for this Championship in the longer term, but for budget racers like us it didn't seem the best option for 2021.
We have some experience of MSV Trackday Trophy and MSV Trackday Championship, which are both good options for novices and have a number of Fiesta ST's racing with them. There are also various CSCC series that we looked at, which all seem very well attended and well run. I've not looked into the Puma Cup but will check them out - thank you for the recommendation.
We have also been along to a number of meetings with the CMMC, they have a Southern series which races predominantly at the circuits more local to us like Brands, Snetterton, Silverstone and Lydden Hill. I know a couple of people who have raced with them in Tin Tops and it offers close, competitive but friendly racing. This is currently the plan... but we'll need to get the car finished in time first!
Edited by SparrowHawk on Thursday 1st April 16:26
SERVICE AND MOT
Getting the car road legal was first on the agenda. First up was a thorough service to replace some items and give the car a flush out. Then we also attended to the other areas that were needed to get the car through its MOT.
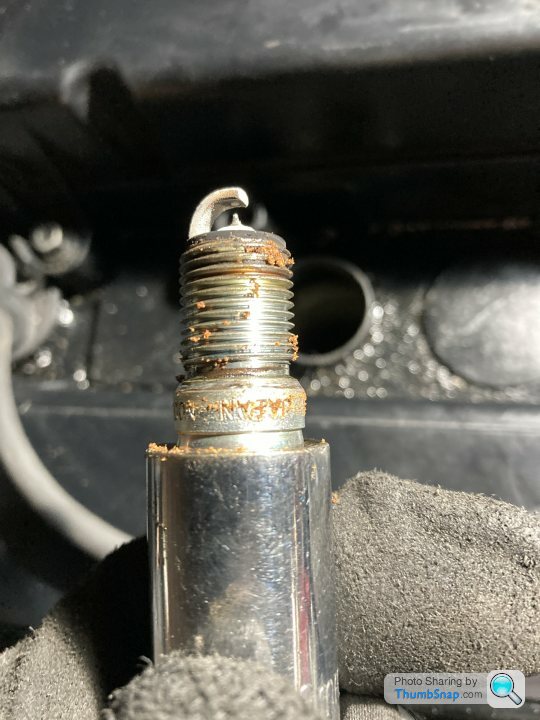
The car was treated to new oil and filter and new sparkplugs. The oil that came out wasn't too bad, and I remained fairly confident about the condition of the engine. I wasn't overly impressed with the sparkplugs that came out, but given that the car was running fine and also seeming to make good power it wasn't anything to be concerned about.
To get the car through its MOT I then replaced the entire headlight units with a much lower mileage set that I had in the garage, these already had the correct new bulbs all fitted and also reduced the shabbiness of the car by making it look less tired. I then removed the faulty front seats that had broken release clips and damaged seat runners; and replaced them with the front seats from our track car (which now has bucket seats). In addition the car also got new wipers and a new fuel cap.
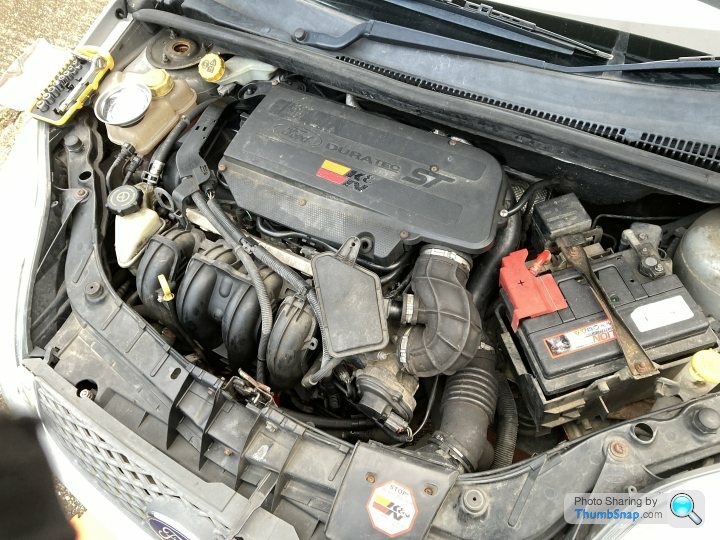
I then set about removing all of the airbox gubbins that sit on top of the Duratec engine. The Fiesta is well known for suffering from poor airflow, and a simple initial step is to remove this and replace it with an induction kit. As a placeholder I put on a simple cone filter that we had knocking around; which will later be replaced with a proper cold air feed system. We then managed to get the passenger window 'unstuck' by cleaning out the rubber seals around the window and giving a few firm thumps whilst operating the window button; no disassembly required... yet!
The final job before the MOT was to replace the missing backbox. I'd been looking online for a second hand Milltek system, but they do not come up very often. In order to stick within our budget a brand new system was out of the question (circa. £850 RRP) so the simplest solution to get the car road legal was to replace it with an OEM unit. The unit itself was about £100, but when I asked my local Autocentre for a quote it was less than £150 FITTED, so I opted for that.
Yes, it did feel like sacrilege paying someone else to fit a backbox on what is supposed to be an absolute budget build where every pound counts, but the convenience of driving the car there, having the part fitted, and driving away again was too appealing at that price so I did it. However, the joke was on me because the guy who fitted it did such a bad job that I would need to end up re-hanging it at some point anyway. Lesson learned!
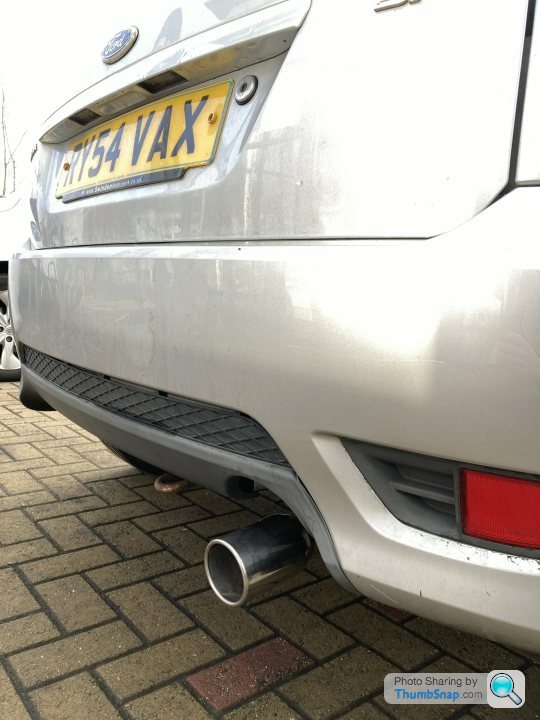
Despite the exhaust tip being about 9 miles south of where it should be, the car passed its MOT the very same day and we now had a healthy and road legal car - ready for its conversion into a race car!
Getting the car road legal was first on the agenda. First up was a thorough service to replace some items and give the car a flush out. Then we also attended to the other areas that were needed to get the car through its MOT.
The car was treated to new oil and filter and new sparkplugs. The oil that came out wasn't too bad, and I remained fairly confident about the condition of the engine. I wasn't overly impressed with the sparkplugs that came out, but given that the car was running fine and also seeming to make good power it wasn't anything to be concerned about.
To get the car through its MOT I then replaced the entire headlight units with a much lower mileage set that I had in the garage, these already had the correct new bulbs all fitted and also reduced the shabbiness of the car by making it look less tired. I then removed the faulty front seats that had broken release clips and damaged seat runners; and replaced them with the front seats from our track car (which now has bucket seats). In addition the car also got new wipers and a new fuel cap.
I then set about removing all of the airbox gubbins that sit on top of the Duratec engine. The Fiesta is well known for suffering from poor airflow, and a simple initial step is to remove this and replace it with an induction kit. As a placeholder I put on a simple cone filter that we had knocking around; which will later be replaced with a proper cold air feed system. We then managed to get the passenger window 'unstuck' by cleaning out the rubber seals around the window and giving a few firm thumps whilst operating the window button; no disassembly required... yet!
The final job before the MOT was to replace the missing backbox. I'd been looking online for a second hand Milltek system, but they do not come up very often. In order to stick within our budget a brand new system was out of the question (circa. £850 RRP) so the simplest solution to get the car road legal was to replace it with an OEM unit. The unit itself was about £100, but when I asked my local Autocentre for a quote it was less than £150 FITTED, so I opted for that.
Yes, it did feel like sacrilege paying someone else to fit a backbox on what is supposed to be an absolute budget build where every pound counts, but the convenience of driving the car there, having the part fitted, and driving away again was too appealing at that price so I did it. However, the joke was on me because the guy who fitted it did such a bad job that I would need to end up re-hanging it at some point anyway. Lesson learned!
Despite the exhaust tip being about 9 miles south of where it should be, the car passed its MOT the very same day and we now had a healthy and road legal car - ready for its conversion into a race car!
SETTING A BUDGET
Like most Pistonheaders I've spent countless hours looking at race cars for sale, and trawling the various race parts suppliers online. So I had a pretty good idea what gear I needed and how much all of those things cost in theory. And in theory you can build a car for around £3000.
But I knew this wasn't realistic. This is because, for example, I wanted a decent race seat not a £180 seat. Plus I knew I'd want to do things like put a new clutch in etc. So I set about doing some more detailed number crunching with the aim of setting a realistic budget that would bring me in under my £5000 target.
I decided that it was feasible. But only if I wrote off the money I'd already spent on the car (which really wasn't much) - and only if everything went smoothly. I also have a couple of items (for example a set of wheels and tyres) already knocking around, to help keep costs down.
Based on this number crunching, and a potentially reckless sense of optimism, I set myself a firm £5000 budget as follows:
1500 - Rollcage
450 - Seat
120 - Seat subframe + mounts
200 - Harness
165 - Extinguisher
150 - Polycarb windows
100 - Doorcards
150 - Steering wheel + boss
40 - Rain light
50 - Battery
50 - Service parts
250 - Strut brace + rear ARB
950 - Coilover suspension
150 - Geometry setup
400 - Discs, pads, + braided hoses
250 - Clutch
I knew I didn't really know how much the build would cost in total, or how much those things actually all cost when you take into account vehicle specific parts, buying additional parts you didn't know you needed, some of the forgotten costs such as electrical components, lubricants, and parts you have to buy twice because you ordered the wrong thing etc.
I also knew there were items not budgeted for that I would definitely need, such as spares, and even a few mandatory bits such as towing loops and the parts for the electrical cut off switch. But hey, it's called reckless optimism for a reason.
STRIPPING THE INTERIOR
Strangely, this is the part I'd been looking forward to. There is something satisfying about dismantling the interior, and it's such an easy way to improve the car's performance.
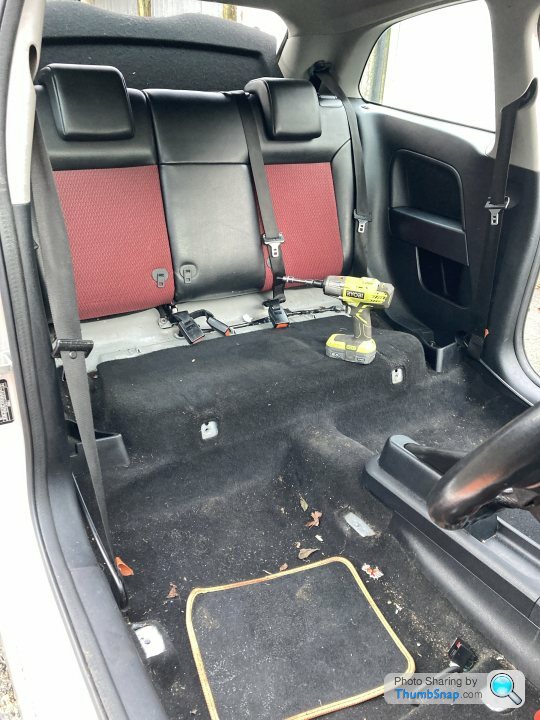
As with most things, it wasn't quite as easy as it looks on the internet. I'd intended to do almost all of it in one morning, but in reality this is more than a days work.
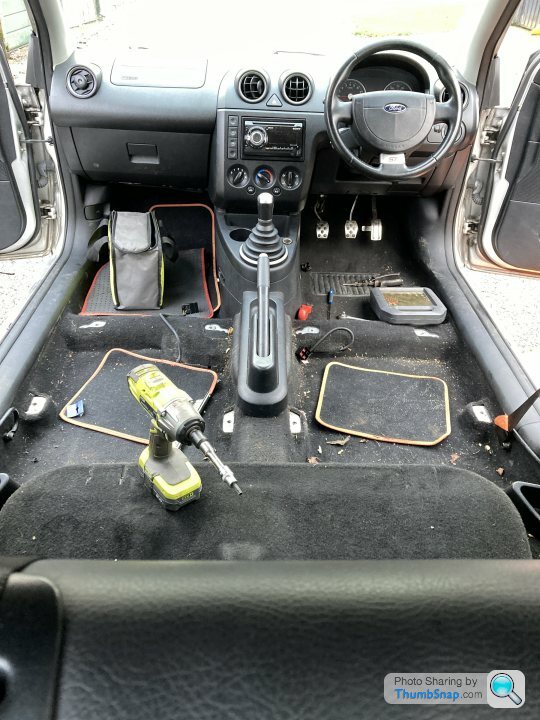
The big items like front and rear seats do come out fairly easily, items like the rear seat brackets, seatbelts, and fiddly bits like some of the plastics at the rear - these take a lot more time. I'm glad I had some specific interior trim removal tools, which made undoing some of the clips etc much easier.
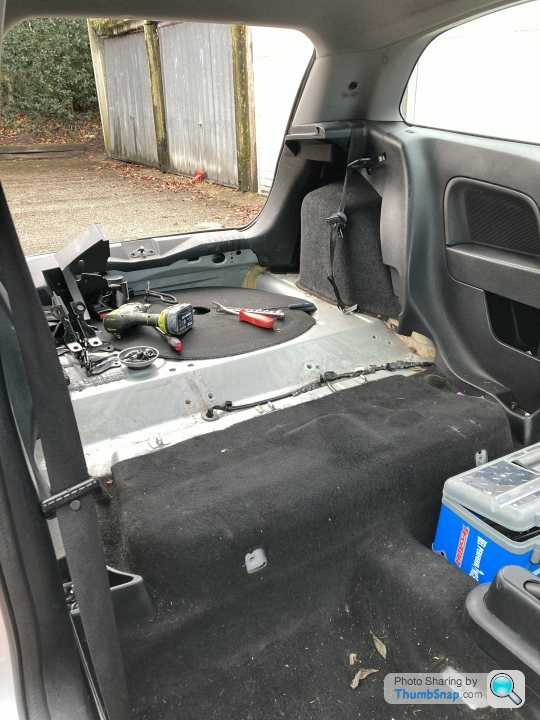
I'd also highly recommend getting hold of an impact wrench for this job. Taking out the seatbelt mounts and various other bits with a ratchet will not be much fun - even with decent tools I still ended up spending around 2-3 days in total on the entire job, including dismantling the doors and removing the dashboard. A professional, or someone who's built several race cars might laugh at that amount of time; but as a novice and a non-mechanic that is honestly how long it can take to learn how to do this for the first time.
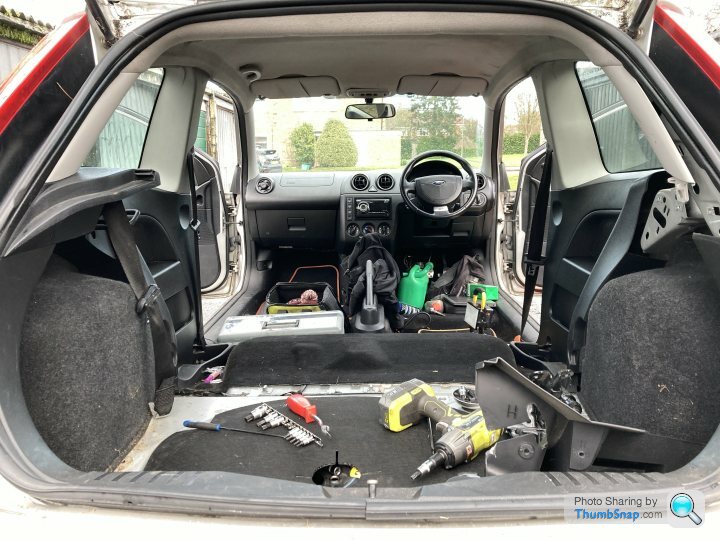
The reason this job takes so long is because there are elements that you don't realise will be tricky. Removing the carpets was not straight-forward, as they don't simply lift out; getting them out from behind/underneath the centre console is not easy. Another thing that took a long time was dismantling the doors.
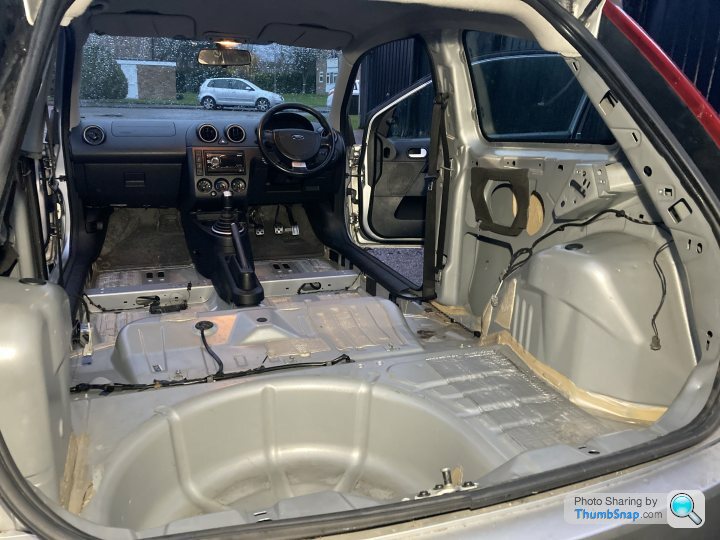
You've also got other fiddily bits to remove like the stereo, speakers, alarm, and cabling to tidy up under the seats and where the roof lining comes out.
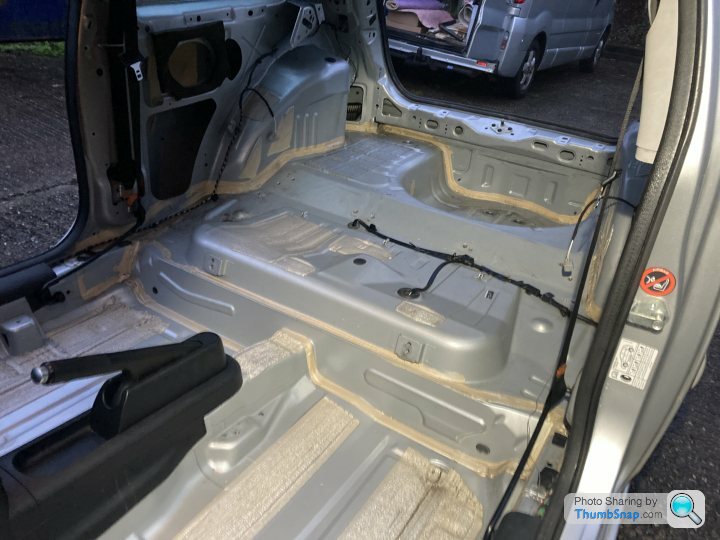
But once most of the stuff was out I realised that underneath the absolutely filthy interior was a very clean shell. The bodywork on the car really is great, with no rust and also no signs of repairs or even any dents worth mentioning.
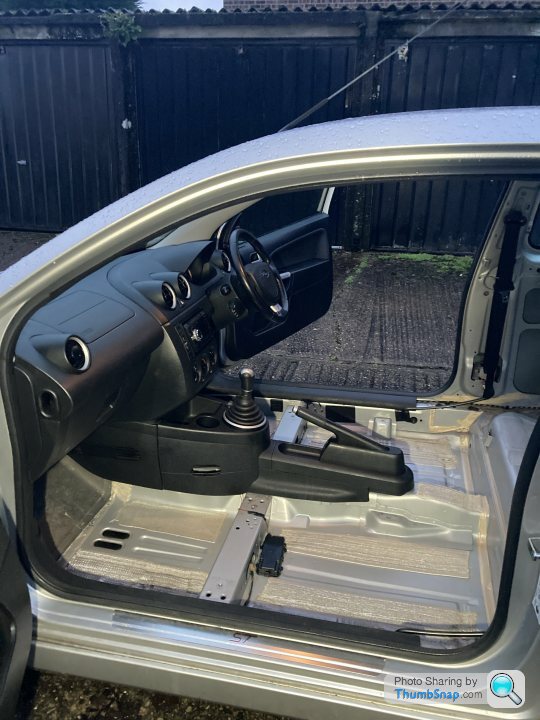
I've decided to keep some elements of the interior plastics such as the handbrake surround and lower half of the centre console. This is because they weigh virtually nothing, and I'll still be driving the car on the road so makes sense to have some tiny level of comfort - like somewhere to put my phone.
All in all this was a fun job. One thing I've had friends ribbing me about is the fact I did not remove the sound deadening. I tried. No matter what anyone tells you this is not an easy job. Whether you have your own theories on freezing it off with liquid nitrogen, or setting about it with a blow-torch and hacking it off with a chisel - it is an extremely time consuming job.
I decided very quickly that the marginal gains from removing a couple of extra kilos were not worth the investment of another day or more of my time, time which would be better spent learning how to drive quicker! So the sound insulation is staying for now. Perhaps if the build goes well, this is something I can address later down the line. This is a budget build after all!
Strangely, this is the part I'd been looking forward to. There is something satisfying about dismantling the interior, and it's such an easy way to improve the car's performance.
As with most things, it wasn't quite as easy as it looks on the internet. I'd intended to do almost all of it in one morning, but in reality this is more than a days work.
The big items like front and rear seats do come out fairly easily, items like the rear seat brackets, seatbelts, and fiddly bits like some of the plastics at the rear - these take a lot more time. I'm glad I had some specific interior trim removal tools, which made undoing some of the clips etc much easier.
I'd also highly recommend getting hold of an impact wrench for this job. Taking out the seatbelt mounts and various other bits with a ratchet will not be much fun - even with decent tools I still ended up spending around 2-3 days in total on the entire job, including dismantling the doors and removing the dashboard. A professional, or someone who's built several race cars might laugh at that amount of time; but as a novice and a non-mechanic that is honestly how long it can take to learn how to do this for the first time.
The reason this job takes so long is because there are elements that you don't realise will be tricky. Removing the carpets was not straight-forward, as they don't simply lift out; getting them out from behind/underneath the centre console is not easy. Another thing that took a long time was dismantling the doors.
You've also got other fiddily bits to remove like the stereo, speakers, alarm, and cabling to tidy up under the seats and where the roof lining comes out.
But once most of the stuff was out I realised that underneath the absolutely filthy interior was a very clean shell. The bodywork on the car really is great, with no rust and also no signs of repairs or even any dents worth mentioning.
I've decided to keep some elements of the interior plastics such as the handbrake surround and lower half of the centre console. This is because they weigh virtually nothing, and I'll still be driving the car on the road so makes sense to have some tiny level of comfort - like somewhere to put my phone.
All in all this was a fun job. One thing I've had friends ribbing me about is the fact I did not remove the sound deadening. I tried. No matter what anyone tells you this is not an easy job. Whether you have your own theories on freezing it off with liquid nitrogen, or setting about it with a blow-torch and hacking it off with a chisel - it is an extremely time consuming job.
I decided very quickly that the marginal gains from removing a couple of extra kilos were not worth the investment of another day or more of my time, time which would be better spent learning how to drive quicker! So the sound insulation is staying for now. Perhaps if the build goes well, this is something I can address later down the line. This is a budget build after all!
Thanks for the recommendation Andy97. CSCC looks really well run, and I've heard very good things about their various series. I like your idea of racing with them for just 1 or 2 races; perhaps my favourite circuits like Silverstone & Brands. I'm not sure if I can budget to join/enter two separate clubs, so I will enquire with them about how this works.
Duke Caboom you're definitely right, I need to be careful not to change anything on the car that would preclude it from entering any of the major series I might want to enter. The good thing is, with these Fiestas there aren't too many things that can trip you up on that; the main changes between series tend to be the suspension and the tyre choice. The other thing that could potentially be an issue is over-modifying the engine, but I don't have any plans for that at the moment anyway due to budget.
The aim is to get the car race ready, meaning all of the mandatory safety equipment, and key upgrades like brakes, suspension, fluids etc. More in-depth modifications like a diff, or lightweight panels etc will not be within budget.. yet!
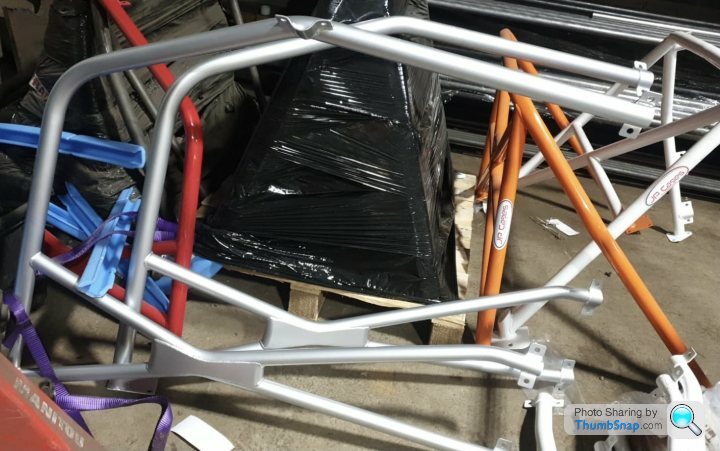
ORDERING A ROLL CAGE
In my mind the biggest job is the roll cage. It's also the one thing I definitely did not want to do myself. Many people seem to fit the roll cage themselves, which is great if you have your own workshop or even better if you work in fabrication etc.
But I've also seen some cages that have been DIY welded-in, and just do not look safe. The roll cage is probably the most important safety item and as much as I'd love to learn to weld and have a go at some fabrication at some point; the roll cage (or roll cage fitting) did not seem like a sensible place to start.
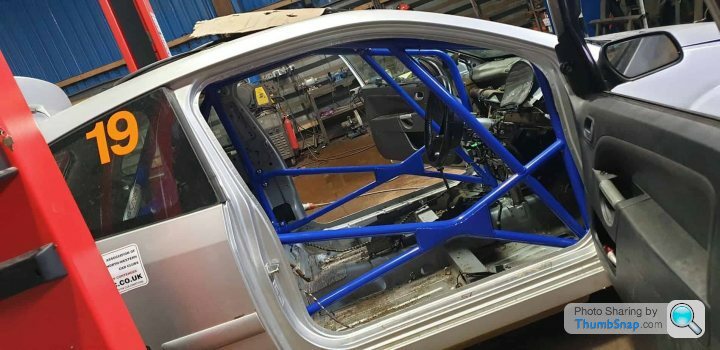
I decided to go with a JP Cages full bolt-in cage. This is because I've seen JP's handywork on another Fiesta; as they made and fitted a half-cage to our Fiesta trackday car. The welding on the cage, the powder-coating finish, and the welds on the plates and box sections on the car were superb, so I had complete confidence that JP would build a superb full cage and fit it to a very high standard.
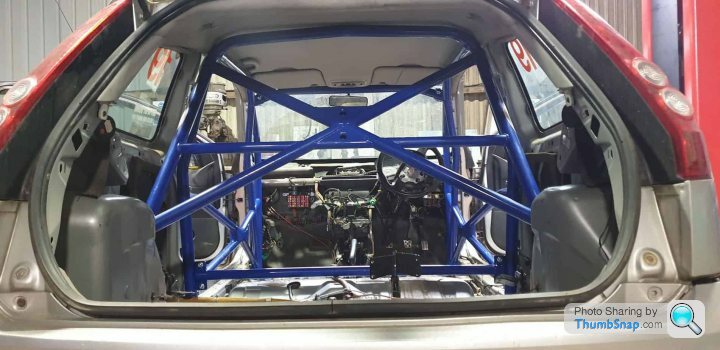
I called Josh at JP Cages and seemed to catch him on a good day, as he was offering a discount on full-cages that week. I ordered a JPC3 Full Cage, with X rear, double doorbars, harness bar, and centre brace. The full price of this cage is £1,140 +Fitting. However, with the online discount I paid £950 which I think is very reasonable. Fitting will be paid additionally at the time of fitting.
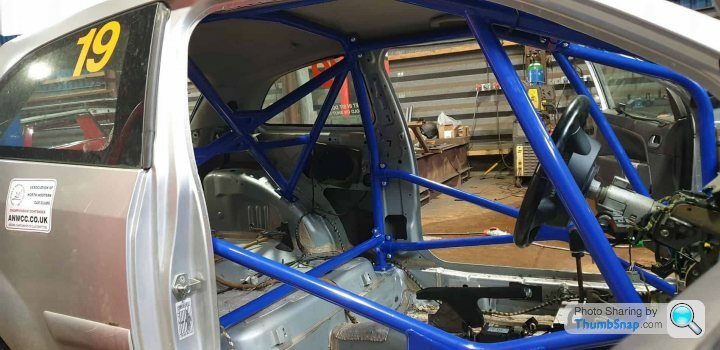
These stock images from JP's website show what the cage looks like in an ST150; however mine will differ slightly in that it will not have the additional bracing on the A-pillar (pictured above in the JPC4 cage). I opted not to have these additional bars for 2 reasons; 1. I find getting in and out of the car can be quite difficult already, especially when using a winged seat, and 2. It kept the cost down slightly without compromising on safety in my opinion. My cage will also be silver not blue.
So that was the cage ordered, it was going to take about 3-4 weeks for JP to build the cage which I am fine with as they had quite a backlog of jobs on. I would be stripping down the rest of the car (dashboard removed etc) and then taking it to them for the cage fitting.
That was the biggest job booked! Now onto the rest of the long to-do list...
In my mind the biggest job is the roll cage. It's also the one thing I definitely did not want to do myself. Many people seem to fit the roll cage themselves, which is great if you have your own workshop or even better if you work in fabrication etc.
But I've also seen some cages that have been DIY welded-in, and just do not look safe. The roll cage is probably the most important safety item and as much as I'd love to learn to weld and have a go at some fabrication at some point; the roll cage (or roll cage fitting) did not seem like a sensible place to start.
I decided to go with a JP Cages full bolt-in cage. This is because I've seen JP's handywork on another Fiesta; as they made and fitted a half-cage to our Fiesta trackday car. The welding on the cage, the powder-coating finish, and the welds on the plates and box sections on the car were superb, so I had complete confidence that JP would build a superb full cage and fit it to a very high standard.
I called Josh at JP Cages and seemed to catch him on a good day, as he was offering a discount on full-cages that week. I ordered a JPC3 Full Cage, with X rear, double doorbars, harness bar, and centre brace. The full price of this cage is £1,140 +Fitting. However, with the online discount I paid £950 which I think is very reasonable. Fitting will be paid additionally at the time of fitting.
These stock images from JP's website show what the cage looks like in an ST150; however mine will differ slightly in that it will not have the additional bracing on the A-pillar (pictured above in the JPC4 cage). I opted not to have these additional bars for 2 reasons; 1. I find getting in and out of the car can be quite difficult already, especially when using a winged seat, and 2. It kept the cost down slightly without compromising on safety in my opinion. My cage will also be silver not blue.
So that was the cage ordered, it was going to take about 3-4 weeks for JP to build the cage which I am fine with as they had quite a backlog of jobs on. I would be stripping down the rest of the car (dashboard removed etc) and then taking it to them for the cage fitting.
That was the biggest job booked! Now onto the rest of the long to-do list...
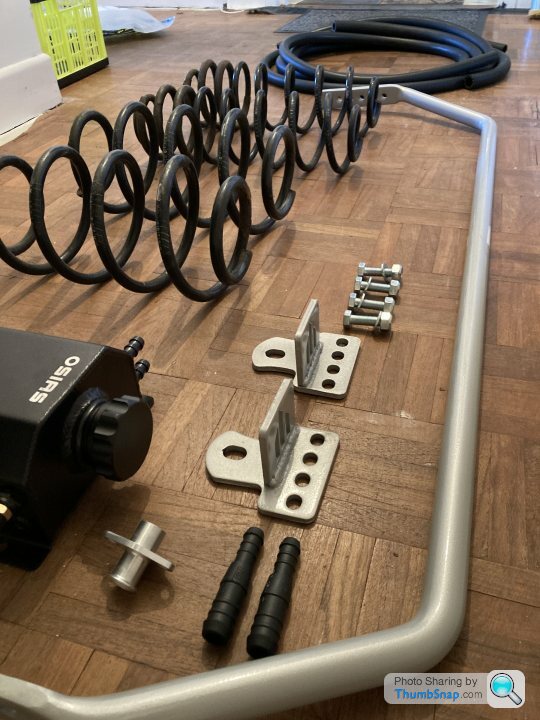
NEW SPRINGS, STRUTS & ANTI ROLL BAR
As this was a budget build, I would be staggering some of the major purchases. This meant waiting a few weeks until I ordered coilovers. This also gave me some more thinking time, as the coilovers are probably the main piece of the puzzle that I can't make up my mind about.

But in the meantime something would need to be done, as there was clearly something not quite right with the front suspension - and the whole car was sitting very high. Despite the clear and obvious need to fit race-spec coilovers imminently; I decided that a good temporary measure was to fit some Eibach lowering springs that I already had lying around in the garage; with the addition of a rear anti roll bar.
This would give the car better handling until the full setup went on the car (important in case we wanted to do a trackday) whilst also giving me an opportunity to take everything apart and give it a check over.
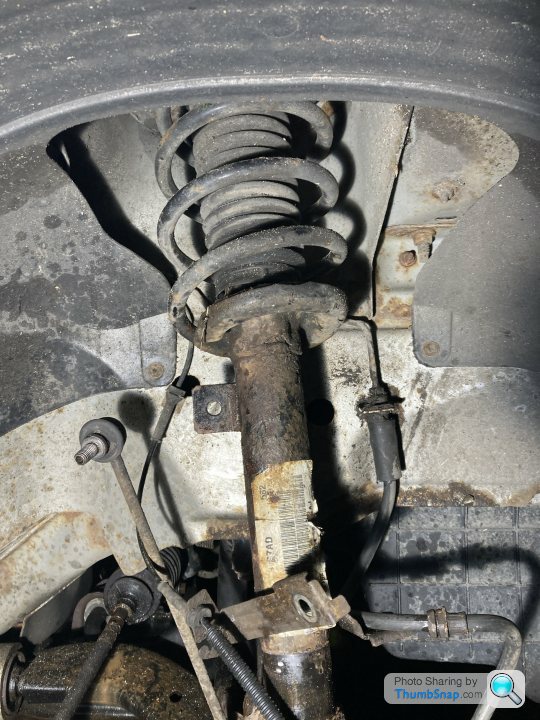
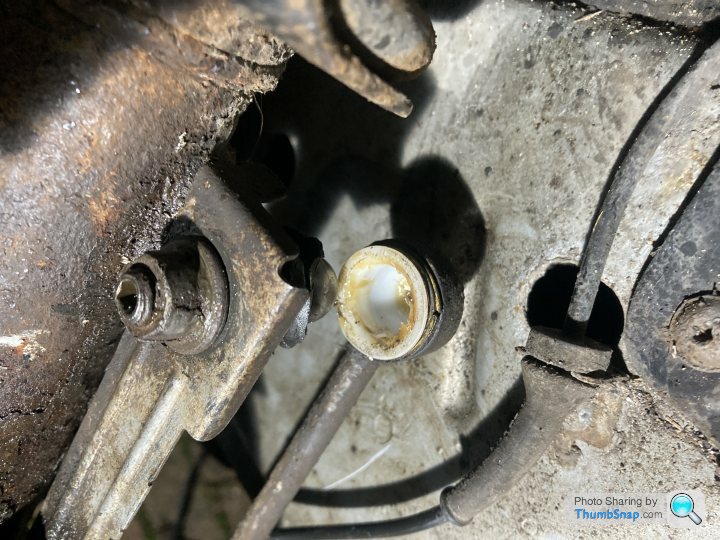
The suspension looked ok at first, if a little tired. But when I took it apart the front top mounts were completely shot! This was most likely the noise/sensation I could feel in the front end that I'd wanted to investigate.
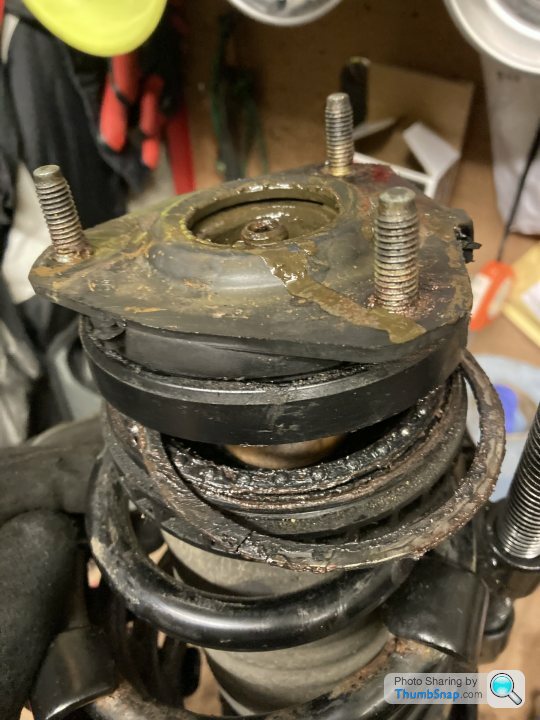
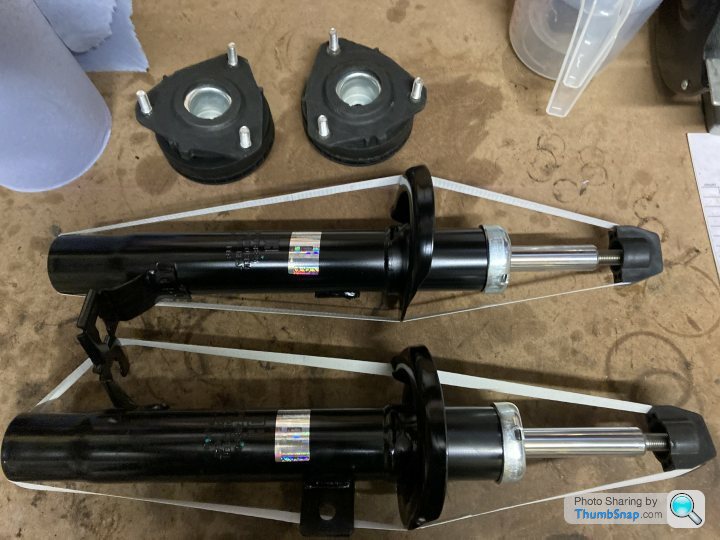
There was also a fair amount of corrosion and the struts themselves looked pretty ropey. I also found that the drop-links were past their best and would need replacing. The control arms were good, and the rest of the bushes looked ok. I had a new set of struts and top-mounts ready to go on the car, and the Eibach springs ready to go on. It was perhaps a sideways step fitting these new parts knowing full well they'd be coming off again; but I needed a temporary fix and it had given me a chance to take everything apart. It was also cheap as chips.
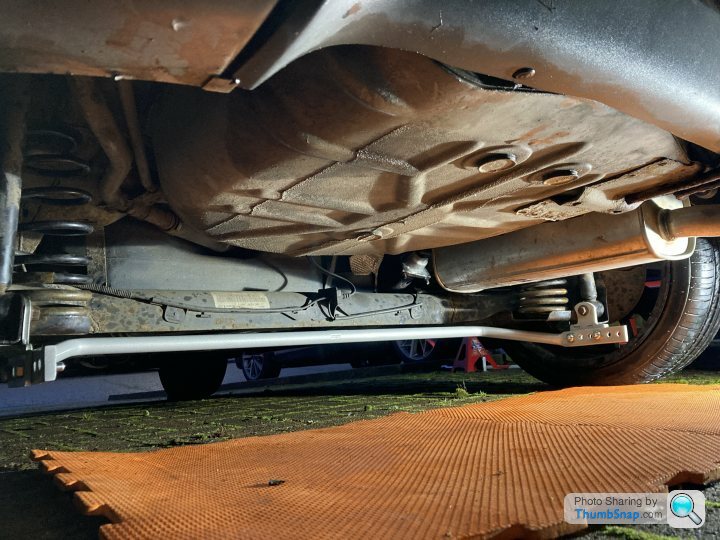
In addition whilst I was under there, I also fitted the new anti roll bar. This was from Whiteline and is a pretty essential bit of kit on these cars, making a noticeable difference to the turn-in capability of the car over a standard setup. The bar is the 24mm Heavy Duty Blade Adjustable type, and cost £175.
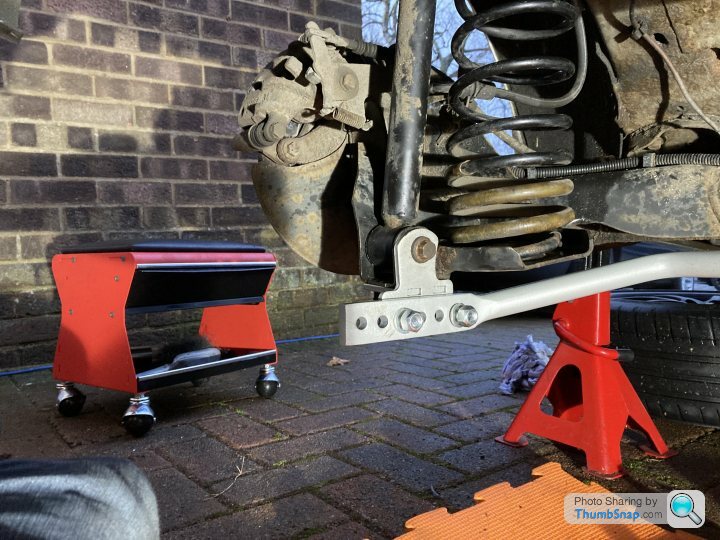
Taking the car for a road test afterwards, it immediately felt better. The handling was more crisp and responsive, and the noise at the front end had gone.
Coilovers still haven't been chosen/ordered yet so I'd welcome any input/advice from fellow Fiesta racers. I can't budget for AST so any other recommendations welcome (particularly if you have views on the Gaz Gold, BC Racing, MeisterR kits)...
As this was a budget build, I would be staggering some of the major purchases. This meant waiting a few weeks until I ordered coilovers. This also gave me some more thinking time, as the coilovers are probably the main piece of the puzzle that I can't make up my mind about.
But in the meantime something would need to be done, as there was clearly something not quite right with the front suspension - and the whole car was sitting very high. Despite the clear and obvious need to fit race-spec coilovers imminently; I decided that a good temporary measure was to fit some Eibach lowering springs that I already had lying around in the garage; with the addition of a rear anti roll bar.
This would give the car better handling until the full setup went on the car (important in case we wanted to do a trackday) whilst also giving me an opportunity to take everything apart and give it a check over.
The suspension looked ok at first, if a little tired. But when I took it apart the front top mounts were completely shot! This was most likely the noise/sensation I could feel in the front end that I'd wanted to investigate.
There was also a fair amount of corrosion and the struts themselves looked pretty ropey. I also found that the drop-links were past their best and would need replacing. The control arms were good, and the rest of the bushes looked ok. I had a new set of struts and top-mounts ready to go on the car, and the Eibach springs ready to go on. It was perhaps a sideways step fitting these new parts knowing full well they'd be coming off again; but I needed a temporary fix and it had given me a chance to take everything apart. It was also cheap as chips.
In addition whilst I was under there, I also fitted the new anti roll bar. This was from Whiteline and is a pretty essential bit of kit on these cars, making a noticeable difference to the turn-in capability of the car over a standard setup. The bar is the 24mm Heavy Duty Blade Adjustable type, and cost £175.
Taking the car for a road test afterwards, it immediately felt better. The handling was more crisp and responsive, and the noise at the front end had gone.
Coilovers still haven't been chosen/ordered yet so I'd welcome any input/advice from fellow Fiesta racers. I can't budget for AST so any other recommendations welcome (particularly if you have views on the Gaz Gold, BC Racing, MeisterR kits)...
Edited by SparrowHawk on Tuesday 6th April 14:37
Edited by SparrowHawk on Tuesday 6th April 14:40
Thanks for the feedback and encouragement. Great insight on the CSCC andy97, it would definitely be an attractive option for me. My Dad also has a race licence but is yet to get his first race under his belt. The 40min races with driver change could be a good option for us to drive together.
Interesting to hear your thoughts on the roll cage kimducati, all criticism welcome as I've not done this before. The option I've chosen fitted with my plans for the car and with the plans to build it within a specific budget. Next time around I will take into account this point about bends in the front legs.. and working with a larger budget I'd likely spec a cage where the front legs meet the suspension turrets and are also welded into the a-pillar, as I understand this gives the optimal level of safety and performance.
Interesting to hear your thoughts on the roll cage kimducati, all criticism welcome as I've not done this before. The option I've chosen fitted with my plans for the car and with the plans to build it within a specific budget. Next time around I will take into account this point about bends in the front legs.. and working with a larger budget I'd likely spec a cage where the front legs meet the suspension turrets and are also welded into the a-pillar, as I understand this gives the optimal level of safety and performance.
NEW DROP LINKS AND WHEELS
When changing and checking over the suspension I felt the drop-links needed replacing. I didn't have any to hand, so ordered a set of OEM ones from the motor factors. Unfortunately when they arrived the weather outside was absolutely horrendous. This process was about answering the question, how much harder is it to build your own race car when you don't have a fully kitted out workshop and years of engineering experience?
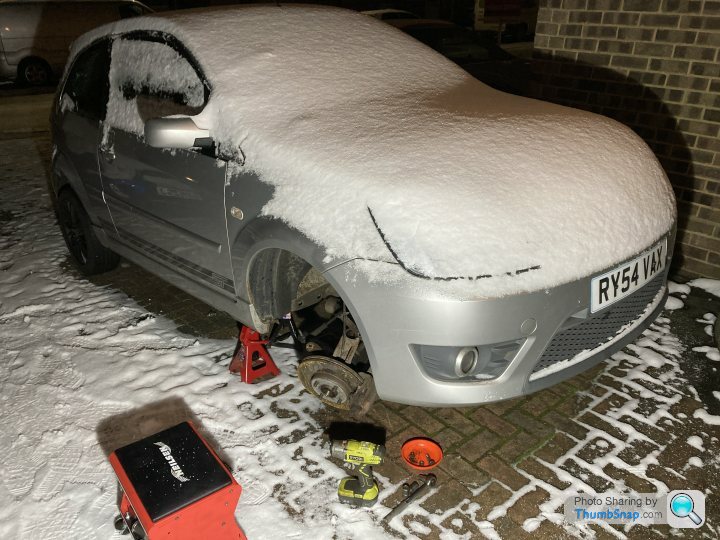
When the weather is like this, the answer to that question is "quite a lot harder"! Changing drop links isn't a difficult job when you're indoors in the warm, you've got the car up on ramps, you're shiny tools are all to hand, and you know what you're doing. But I can confidently say that when you're changing drop links for your first ever time, and you're sitting on the floor outside in the freezing cold, with snow dropping down the back of your neck, and you can't see anything in the dark, and you've skinned your knuckle for the second time, and your 10mm socket has just rolled under the car for the fifth time, and you can't for the life of you figure out why the bolt in the drop link just keeps spinning and spinning without ever coming loose... it isn't as much fun as it looks on YouTube.
I finally clocked that you need to hold a flathead screwdriver against the inside of the drop link head to stop it turning on the other side, just before my fingers fell off from the cold - and the one on the other side helped me by falling apart in my hands. So I managed to get both sides done. Whilst the car was up on axle stands I also took off the big 17 inch wheels that had come with the car. They were reasonably ok Team Dynamics wheels - perfectly good for the road. But the plan was always to run the car with 15 inch wheels, for various reasons including, 1. smaller wheels means less weight, 2. it saves money buying smaller tyres, and 3. I was planning to steal an old set of wheels off our trackday Fiesta!
The car looks ok now on the smaller wheels. They are a set of 15 inch Smiths wheels, with a worn set of R888R tyres that have done at least 200 laps of Brands Hatch. The plan is at some point to upgrade to some Team Dynamics 1.2 or 1.3 wheels, and to some proper rubber; but at the moment that would blow the budget - so hand me down wheels and well worn tyres will have to do! I'm determined to squeeze in under that £5k build target.
Now that I know how to change drop links I'd be interested in recommendations for fitting upgraded or adjustable ones. The ones I put onto the car were only cheap OEM ones to fit with our 'budget race car' theme; but I'd happily budget for some more performance oriented ones once the season is underway and the budget is no longer restricted to £5k.
When changing and checking over the suspension I felt the drop-links needed replacing. I didn't have any to hand, so ordered a set of OEM ones from the motor factors. Unfortunately when they arrived the weather outside was absolutely horrendous. This process was about answering the question, how much harder is it to build your own race car when you don't have a fully kitted out workshop and years of engineering experience?
When the weather is like this, the answer to that question is "quite a lot harder"! Changing drop links isn't a difficult job when you're indoors in the warm, you've got the car up on ramps, you're shiny tools are all to hand, and you know what you're doing. But I can confidently say that when you're changing drop links for your first ever time, and you're sitting on the floor outside in the freezing cold, with snow dropping down the back of your neck, and you can't see anything in the dark, and you've skinned your knuckle for the second time, and your 10mm socket has just rolled under the car for the fifth time, and you can't for the life of you figure out why the bolt in the drop link just keeps spinning and spinning without ever coming loose... it isn't as much fun as it looks on YouTube.
I finally clocked that you need to hold a flathead screwdriver against the inside of the drop link head to stop it turning on the other side, just before my fingers fell off from the cold - and the one on the other side helped me by falling apart in my hands. So I managed to get both sides done. Whilst the car was up on axle stands I also took off the big 17 inch wheels that had come with the car. They were reasonably ok Team Dynamics wheels - perfectly good for the road. But the plan was always to run the car with 15 inch wheels, for various reasons including, 1. smaller wheels means less weight, 2. it saves money buying smaller tyres, and 3. I was planning to steal an old set of wheels off our trackday Fiesta!
The car looks ok now on the smaller wheels. They are a set of 15 inch Smiths wheels, with a worn set of R888R tyres that have done at least 200 laps of Brands Hatch. The plan is at some point to upgrade to some Team Dynamics 1.2 or 1.3 wheels, and to some proper rubber; but at the moment that would blow the budget - so hand me down wheels and well worn tyres will have to do! I'm determined to squeeze in under that £5k build target.
Now that I know how to change drop links I'd be interested in recommendations for fitting upgraded or adjustable ones. The ones I put onto the car were only cheap OEM ones to fit with our 'budget race car' theme; but I'd happily budget for some more performance oriented ones once the season is underway and the budget is no longer restricted to £5k.
Edited by SparrowHawk on Tuesday 6th April 19:44
PARTS ARRIVING
One of the most enjoyable aspects of this process is shopping for parts. We've all done it, perusing the usual sites and looking at all the bits we'd like to buy. So it's been really enjoyable ordering them and then getting them in the post, it's like Christmas each time something new turns up.
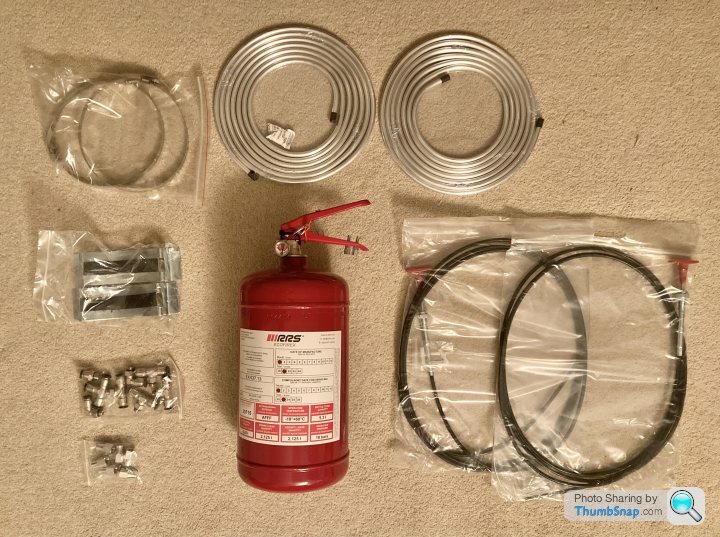
One of the mandatory parts is a plumbed-in fire extinguisher system. There are plenty to choose from, and I went for this one from the Tegiwa store. It's the RRS Ecofirex 4.25ltr kit, which is FIA approved and comes with everything you need for fitting. It was £164 delivered which is great value, and all that was missing from the kit was some protection for the pipes which I can add myself when fitting.
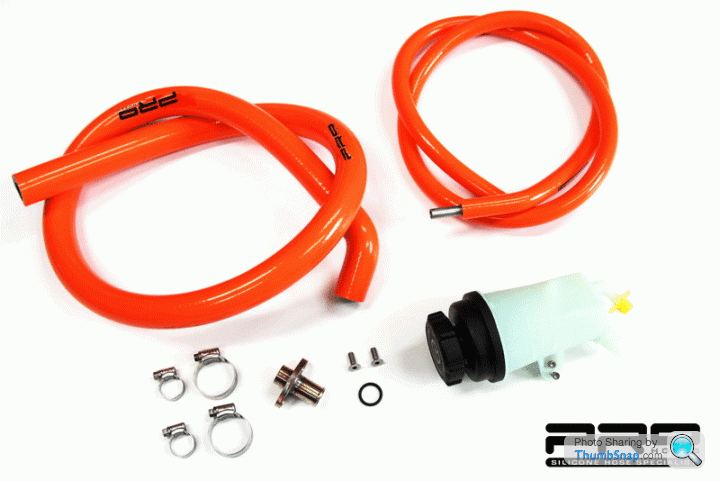
Next up was the power steering relocation kit. These are essential on the Fiesta, as the power steering pump is located in a pretty toasty part of the engine bay and is very liable to boiling over after a hard session on track - I've seen it happen multiple times. These relocation kits are around £150 which to me seems rather a lot for a bit of silicone hose and an old Mondeo reservoir, although by all accounts the kits are very good. But in the spirit of keeping costs down I cobbled together my own kit for around £50.
 [url]
[url]
The adapter for the steering pump is £25 and is decent quality. I wasn't fully convinced I'd ended up with silicone hoses of the correct internal diameter, but we'll see how I get on when it comes to fitting. I have a feeling there is a reason most people just buy the off-the-shelf kits! But it is a budget build so the opportunity to save £100 couldn't be passed up.

Next to arrive were the OMP seat base and seat mounts. Buying the seat mount was an easy decision to make. I've seen people bolt their race seat directly to the floor pan (I didn't fancy that), and I've seen plenty of people who know what they're doing fabricate new seat rails to position the seat precisely where they want it. But I am not a welder and as with the roll cage, the seat did not seem a safe/appropriate point for me to start learning! The Base was £90 delivered, and the side mounts were another £30 from demon tweeks. The floor under the seats is a very strange shape on the Fiesta and this bolt on solution seemed the best option.
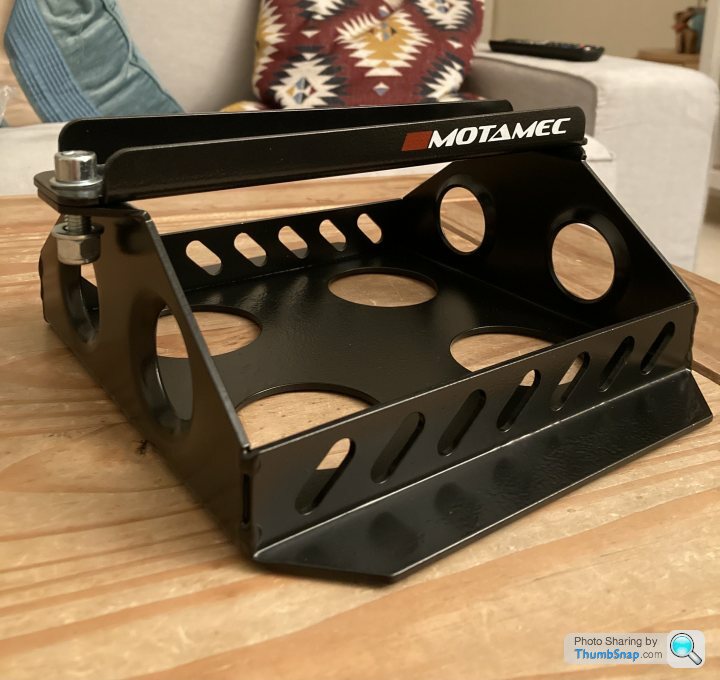
I also had a couple of bits from Motamec arrive. I've seen their parts on a few cars, and was surprised at the build quality and finish. They are a relatively 'cheap' option but the quality seems pretty much on par with a lot of other more expensive stuff on the market and so a good option if you don't want to pay for the brand name; perfect for this application.
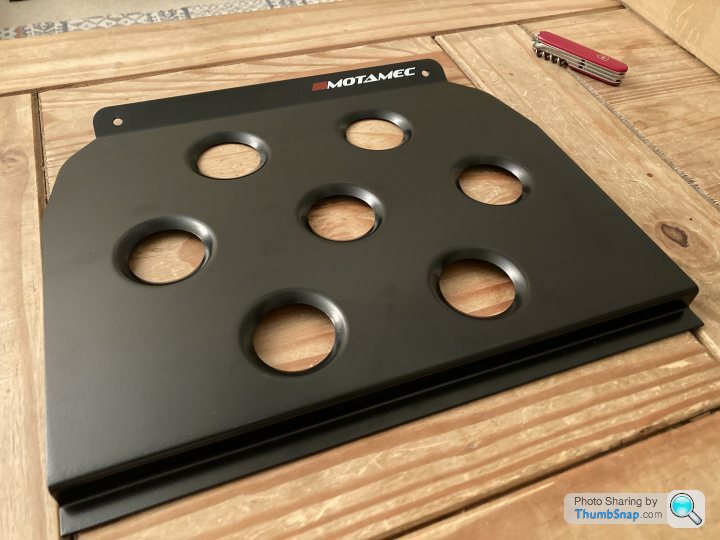
The battery tray was very sturdy, and would be positioned behind where the front passenger seat had been. The foot rest felt less sturdy, but was nicely finished.. although it was strange they had only drilled two mounting holes meaning I'd inevitably scratch that nice finish when drilling the others.
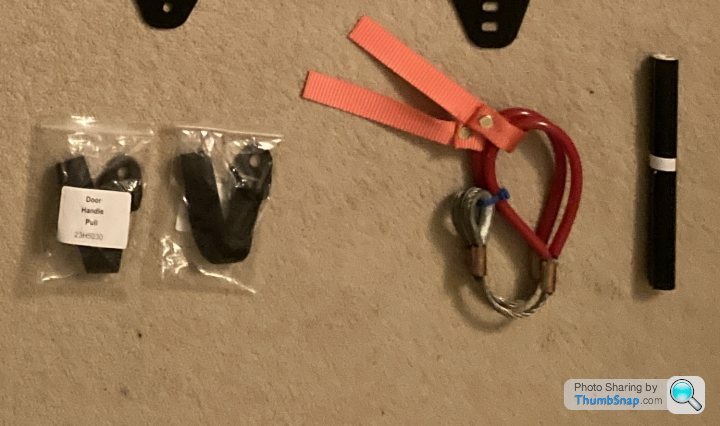
Last but not least some MSA approved wire tow straps for the front end, door pulls for the doorcards, and a sun strip as the roof-lining and sun visors were now gone.
One of the most enjoyable aspects of this process is shopping for parts. We've all done it, perusing the usual sites and looking at all the bits we'd like to buy. So it's been really enjoyable ordering them and then getting them in the post, it's like Christmas each time something new turns up.
One of the mandatory parts is a plumbed-in fire extinguisher system. There are plenty to choose from, and I went for this one from the Tegiwa store. It's the RRS Ecofirex 4.25ltr kit, which is FIA approved and comes with everything you need for fitting. It was £164 delivered which is great value, and all that was missing from the kit was some protection for the pipes which I can add myself when fitting.
Next up was the power steering relocation kit. These are essential on the Fiesta, as the power steering pump is located in a pretty toasty part of the engine bay and is very liable to boiling over after a hard session on track - I've seen it happen multiple times. These relocation kits are around £150 which to me seems rather a lot for a bit of silicone hose and an old Mondeo reservoir, although by all accounts the kits are very good. But in the spirit of keeping costs down I cobbled together my own kit for around £50.
[url]The adapter for the steering pump is £25 and is decent quality. I wasn't fully convinced I'd ended up with silicone hoses of the correct internal diameter, but we'll see how I get on when it comes to fitting. I have a feeling there is a reason most people just buy the off-the-shelf kits! But it is a budget build so the opportunity to save £100 couldn't be passed up.
Next to arrive were the OMP seat base and seat mounts. Buying the seat mount was an easy decision to make. I've seen people bolt their race seat directly to the floor pan (I didn't fancy that), and I've seen plenty of people who know what they're doing fabricate new seat rails to position the seat precisely where they want it. But I am not a welder and as with the roll cage, the seat did not seem a safe/appropriate point for me to start learning! The Base was £90 delivered, and the side mounts were another £30 from demon tweeks. The floor under the seats is a very strange shape on the Fiesta and this bolt on solution seemed the best option.
I also had a couple of bits from Motamec arrive. I've seen their parts on a few cars, and was surprised at the build quality and finish. They are a relatively 'cheap' option but the quality seems pretty much on par with a lot of other more expensive stuff on the market and so a good option if you don't want to pay for the brand name; perfect for this application.
The battery tray was very sturdy, and would be positioned behind where the front passenger seat had been. The foot rest felt less sturdy, but was nicely finished.. although it was strange they had only drilled two mounting holes meaning I'd inevitably scratch that nice finish when drilling the others.
Last but not least some MSA approved wire tow straps for the front end, door pulls for the doorcards, and a sun strip as the roof-lining and sun visors were now gone.
Thanks for the input snowen250. I've not driven at Lydden before, so it's good to have a heads up on the tyre degradation. This set of rubber should have at least one race meeting left in it.. and I'm not expecting to set any record laps in my budget built car so I'm not too worried about the tyres making me uncompetitive in my first meeting.
I've met Colin a few times, he's a good guy and really knows his stuff. I looked at doing arrive & drive with him this season, before deciding to embark on this project instead. If the car isn't ready in time for Lydden then I'll know I made the wrong choice! The build is further along than my posts are.. but it's by no means finished.
k20ris thanks for the advice on drop links. This will come in handy when I upgrade them.
FRONT TOW STRAPS
There doesn't seem to be a consensus on the best solution for front towing eyes/straps. Some people utilise the manufacturer mounting, to install a strap, some use a metal towing eye mounted into that same point, others mount a strap to the front crossmember etc. But I noticed that some of the Scottish Fiesta Championship cars and the BRSCC cars had twin towing eyes at the front, coming through the front grille. So I decided to try to emulate that.
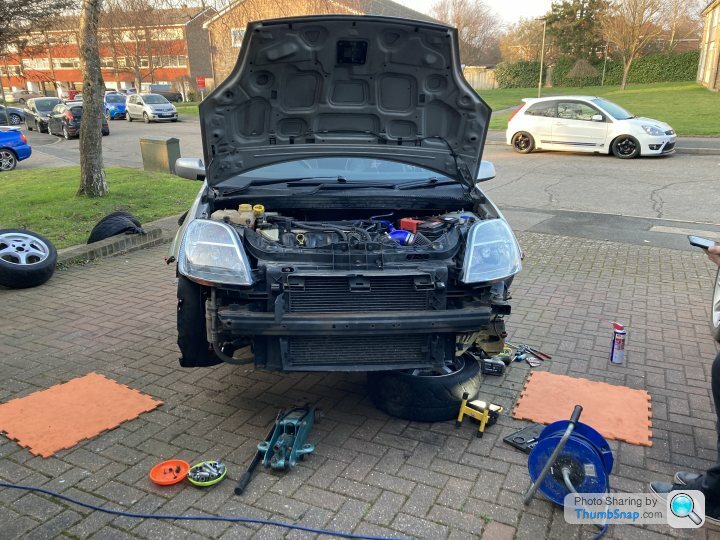
In order to remove the front bumper I also took out the front wheel arch liners. I could see that these were doing a job; reducing the amount of water spray that ended up inside the engine back and also protecting the body. But decided they were not essential and that it would be easier working on the car without them, so they were removed.
The towing straps weren't quite as easy to install as I'd hoped. There was no obvious point on which to mount them, as the front crossmember presented various different angles and varying levels of thickness. In the end I opted for the two points pictured, drilling through the bottom of the bar, at a point where I could reach around to the other side in order to add on the nuts.
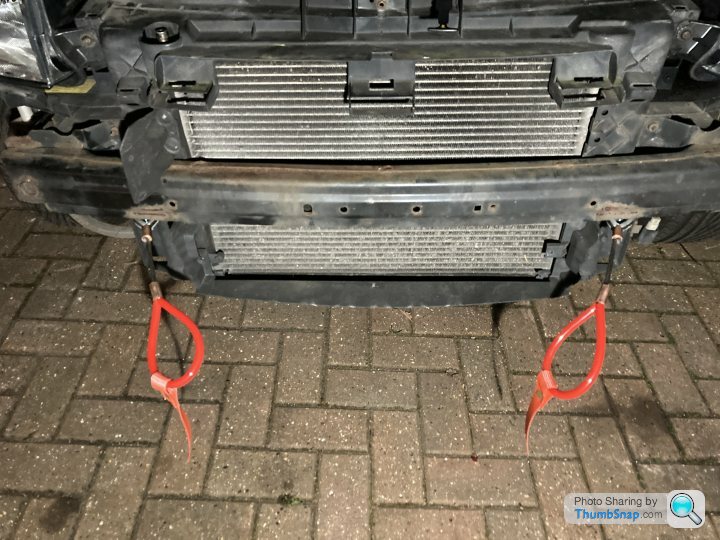
M12 bolts did the trick, and the tow straps were positioned in order to exit the front bumper inside the symmetrical vents on the grille. I put the bumper back on for a test fit and realised that although the towing eyes came through the vents.. there was a significant interference between the bumper and the bottom end of the towing eye. They have heavy duty crimps around the bottom and these were fouling on the plastic inside the vent.
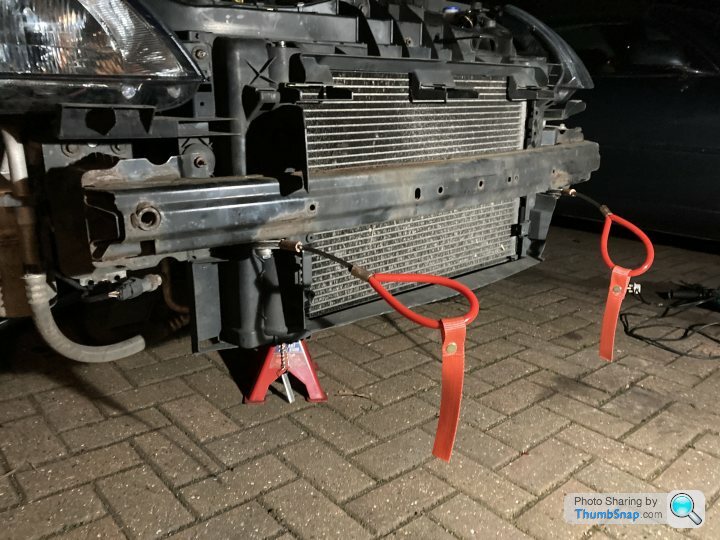
Taking the bumper back off I set about the vents with a dremel tool. A couple of test-fittings showed I needed to take out a full couple of square inches from each vent before the bumper would sit flush.
Once the bumper was safely on we did a quick test run. Towing the car forwards by both tow loops, it pulled the car easily and luckily.. didn't pull the bumper off either!
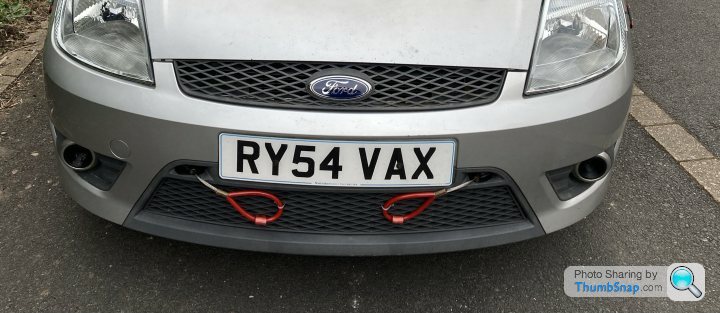
Remembering to use the trick of part-snipping through the cable ties, I tidied up the end result by attaching the loose loops to the grille. Job done and it looked reasonably smart.
There doesn't seem to be a consensus on the best solution for front towing eyes/straps. Some people utilise the manufacturer mounting, to install a strap, some use a metal towing eye mounted into that same point, others mount a strap to the front crossmember etc. But I noticed that some of the Scottish Fiesta Championship cars and the BRSCC cars had twin towing eyes at the front, coming through the front grille. So I decided to try to emulate that.
In order to remove the front bumper I also took out the front wheel arch liners. I could see that these were doing a job; reducing the amount of water spray that ended up inside the engine back and also protecting the body. But decided they were not essential and that it would be easier working on the car without them, so they were removed.
The towing straps weren't quite as easy to install as I'd hoped. There was no obvious point on which to mount them, as the front crossmember presented various different angles and varying levels of thickness. In the end I opted for the two points pictured, drilling through the bottom of the bar, at a point where I could reach around to the other side in order to add on the nuts.
M12 bolts did the trick, and the tow straps were positioned in order to exit the front bumper inside the symmetrical vents on the grille. I put the bumper back on for a test fit and realised that although the towing eyes came through the vents.. there was a significant interference between the bumper and the bottom end of the towing eye. They have heavy duty crimps around the bottom and these were fouling on the plastic inside the vent.
Taking the bumper back off I set about the vents with a dremel tool. A couple of test-fittings showed I needed to take out a full couple of square inches from each vent before the bumper would sit flush.
Once the bumper was safely on we did a quick test run. Towing the car forwards by both tow loops, it pulled the car easily and luckily.. didn't pull the bumper off either!
Remembering to use the trick of part-snipping through the cable ties, I tidied up the end result by attaching the loose loops to the grille. Job done and it looked reasonably smart.
QUICK-RELEASE BUMPER
Whilst the bumper was off I also added some rivets to the front wings & bumper, so that it can be secured with bands rather than bolts. This has made taking the bumper on and off much quicker and easier, and seems quite secure. I'm not sure whether people go out on track with only these bands to secure the bumper? I will probably add an additional bolt on either side for race day, just in case.
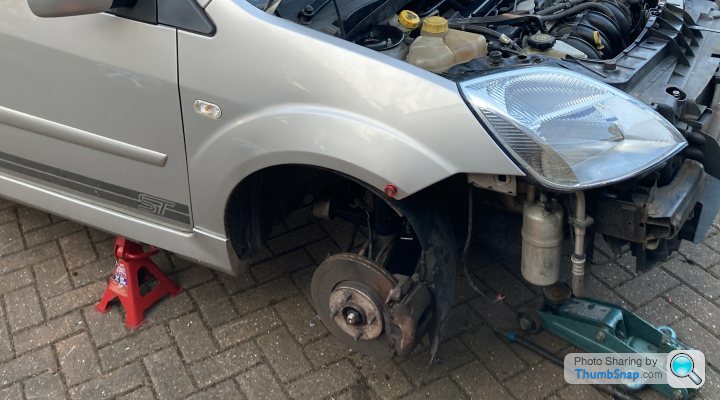
At the same time we also removed the fog lights, which are now surplus to requirement. In their place we fitted some 3D printed ducts, that will allow us to run ducting to the front brakes to aid cooling. Not really a necessity in a low powered car such as this, but a fun addition - and it looks neat too.
Although the stock brake setup is adequate on these cars (I believe most Fiesta race series retain stock calipers?) I have experienced brake fade on Fiestas out on track due to overheating - so every little helps. My main priority with the brakes is good quality race-oriented pads, with race fluid and braided hoses.

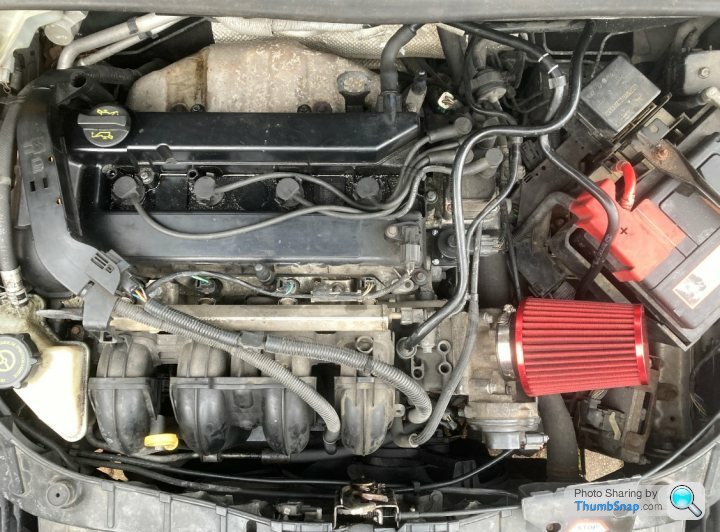
Another easy job was fitting a proper induction kit. We've recently upgraded the intake manifold & throttle body on our other trackday car, so I was able to 'borrow' the Mountune induction kit from that car. These kits come with a handy additional hose, to re-circulate oil fumes back into the engine; meaning we can run it as an enclosed system and not fit an oil catch can. I'm not sure if that is a controversial choice on a race car? I understand the catch cans primary purpose is to reduce the amount of oil vapour recirculated into the engine - but I'm struggling to see the performance benefit that this would add to a 2.0 n/a Fiesta. Input welcomed!
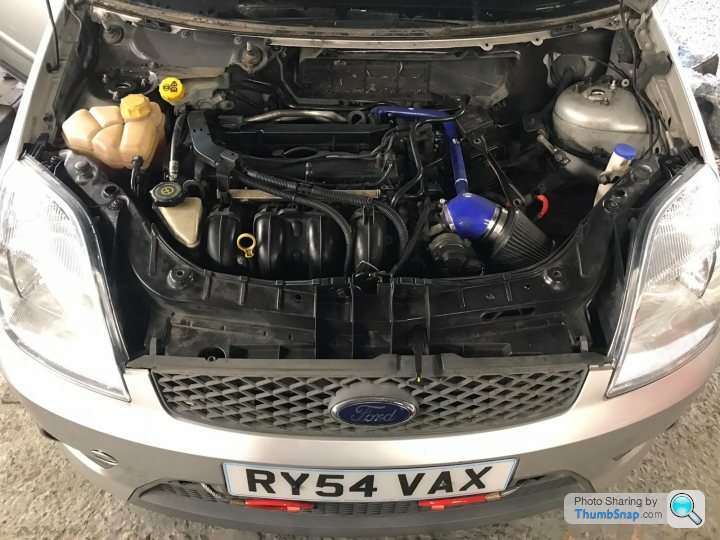
We also took out the battery, to create some room in the engine bay and to start figuring out where everything was going to go. It's a fairly tight engine bay, hence not wanting to run an additional oil catch can. We needed to relocate the battery into the driver compartment, and also relocate the power steering reservoir. We also needed to figure out the routing for the extinguisher jets and the kill chords.
Whilst the bumper was off I also added some rivets to the front wings & bumper, so that it can be secured with bands rather than bolts. This has made taking the bumper on and off much quicker and easier, and seems quite secure. I'm not sure whether people go out on track with only these bands to secure the bumper? I will probably add an additional bolt on either side for race day, just in case.
At the same time we also removed the fog lights, which are now surplus to requirement. In their place we fitted some 3D printed ducts, that will allow us to run ducting to the front brakes to aid cooling. Not really a necessity in a low powered car such as this, but a fun addition - and it looks neat too.
Although the stock brake setup is adequate on these cars (I believe most Fiesta race series retain stock calipers?) I have experienced brake fade on Fiestas out on track due to overheating - so every little helps. My main priority with the brakes is good quality race-oriented pads, with race fluid and braided hoses.
Another easy job was fitting a proper induction kit. We've recently upgraded the intake manifold & throttle body on our other trackday car, so I was able to 'borrow' the Mountune induction kit from that car. These kits come with a handy additional hose, to re-circulate oil fumes back into the engine; meaning we can run it as an enclosed system and not fit an oil catch can. I'm not sure if that is a controversial choice on a race car? I understand the catch cans primary purpose is to reduce the amount of oil vapour recirculated into the engine - but I'm struggling to see the performance benefit that this would add to a 2.0 n/a Fiesta. Input welcomed!
We also took out the battery, to create some room in the engine bay and to start figuring out where everything was going to go. It's a fairly tight engine bay, hence not wanting to run an additional oil catch can. We needed to relocate the battery into the driver compartment, and also relocate the power steering reservoir. We also needed to figure out the routing for the extinguisher jets and the kill chords.
ROLL CAGE UPDATE
At this point I also had an update from JP to say that the roll cage was finished and had arrived back from powder coating. It was good to know that this important part of the jigsaw was falling into place.
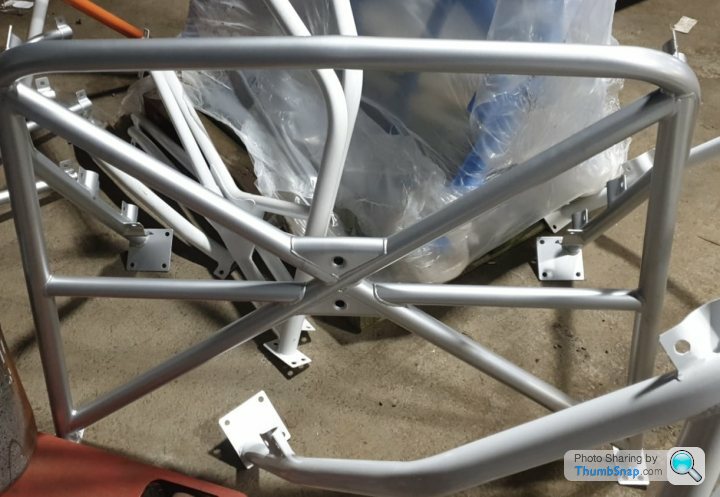
The cage looked good to me, and I was excited at the prospect of having it fitted. I figured that would be the point at which this began to feel like a race car build.
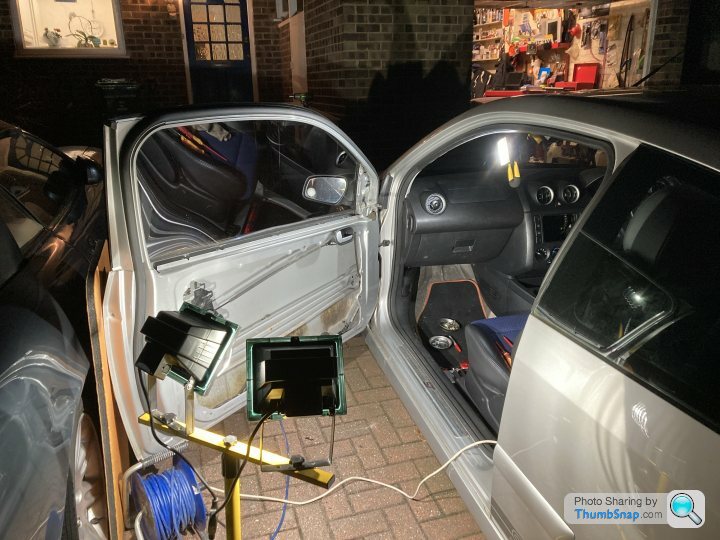
We booked the car in for fitting; which meant I had a deadline for getting a couple other jobs done. Namely, getting the windows out and race door cards on with some polycarbonate windows - and also removing the dashboard (which I had really been putting off since removing the rest of the interior!).
At this point I also had an update from JP to say that the roll cage was finished and had arrived back from powder coating. It was good to know that this important part of the jigsaw was falling into place.
The cage looked good to me, and I was excited at the prospect of having it fitted. I figured that would be the point at which this began to feel like a race car build.
We booked the car in for fitting; which meant I had a deadline for getting a couple other jobs done. Namely, getting the windows out and race door cards on with some polycarbonate windows - and also removing the dashboard (which I had really been putting off since removing the rest of the interior!).
POLYCARBONATE WINDOWS & RACE DOORCARDS
I wouldn't say this was a very difficult job, but it was bloody time consuming.
Another one of the jobs I'd been looking forward to, because I know there is a fair amount of weight to take out of the doors, and because I think the end result looks quite cool and would be a nice step forward on the build.
I chose ACW Plastics, as they came recommended and were reasonably priced. I found cheaper options available, but I was quite keen for this job to go as smoothly as possible so went with the name I'd been recommended. They aren't cheap, at £150 for two pieces of plastic, but you get what you pay for as they say. And that price did include a locking window on the drivers side.
The door cards I opted for were Racecardoorcards. At £100 I'm less convinced about these being good value for money. Ultimately with this product I guess you are paying for convenience rather than the end product.

Taking the door card off proved a little trickier than expected. The wing mirror surround pops off easily, but removing the rubber around the window buttons was not easy. The passenger side came out easily, but the driver side was really tough and much more flexible - as if it was made of a slightly different material? In the end I used brute force and just broke the plastic around the inside handle.
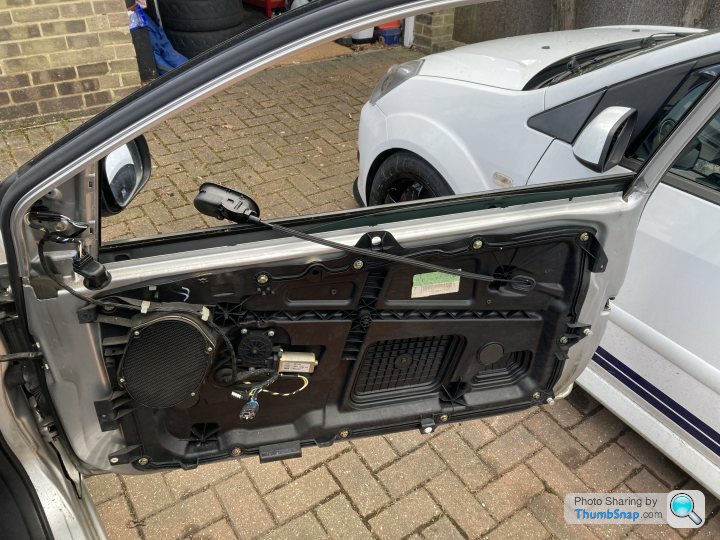
Once the outer layer is off you have this odd contraption on the inside. The number of bolts and fixings that came out this thing was ridiculous. By the time I'd finished both sides it seemed like I'd taken out 1kg just in fixings! There is certainly a knack to removing this inner doorcard and it's safe to say this is an area where experience would have helped. For one thing I had started the procedure with the windows up, which turned out to make the job harder. I also thought that removing this section just required a few bolts and application of some force - but in fact there is certainly an art to it.
In the end once again I had to resort to brute force, snapping the brittle plastic in order to detach it from the window lifting mechanism and also bashing a hole through the plastic to allow the door handle through it. Its safe to say this ape-like approach wasn't how I wanted to do the job, and it hurt my ego a little that I couldn't calmly and methodically disassemble it piece by piece like you see the pros do it. But again, this seems to be a fairly consistent theme in this build - and it keeps reminding me what you are paying for when you pay a motorsport mechanic to do a job; its the years of experience they've built up in problem solving and a simple knack of doing things methodically 'the right way'. It's also another result of working outside in the wind and the cold; I'm sure I'd have found it much easier to remain patient and methodical if I was working on a level surface and had the heating on!
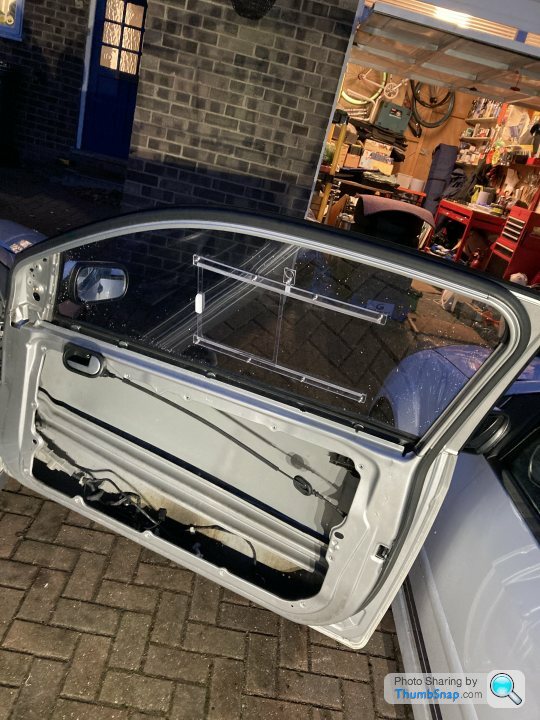
With the doorcards completely out I tucked away the wiring loom (removing these completely would be a job for another day) and set about fitting the driver side window. This job really did require a lot of patience. The windows slot in by lifting them up through the door, making sure to slide them into the rubber runners, and then guiding them upwards and pushing them into the rubber seal around the top of the door. Its definitely easier said than done, as the window keeps trying to jump out of the seals.
Once it is positioned in I gave it a really good firm push to make sure it was seated all the way into the top of the seals. I then taped it in place to start work on the fixings. This was where I made my first mistake. Having previously owned a race-prepared MX-5 which the previous owner had angle grinded all over the place, I'd developed a dislike for sharp metal edges on the inside of cars. I was determined to fit these windows without cutting the doors. Spoiler alert; it can be done. But bloody hell did I make it difficult for myself and in all honesty I think the best option is just to cut the doors.
The main issue is that the gap between the top of the window sill, and the lip that you want to attach your screws through (at the bottom of the window) is very small. In order to give yourself more room the solution would be to angle grind off an inch or so of the metal at the top of the window sill. But this is right at elbow height and I just didn't want to do that. So instead I battled for what felt like several hours, to drill pilot holes through the window and then into the door skin, through what tiny space I did have - so that I could fix the window in place.
This is where I made my second mistake. Having painstakingly drilled all of my pilot holes, snapping several fine drill bits in the process (because the area you are drilling into on the inside of the door is a sloping angle), I finally started to screw in some screws with nice big plastic washers to hold the window in place. Again this was made incredibly difficult by the lack of space and I was chewing up my screwdriver on the sharp lip of metal that I now wished more than anything I had just cut out of the way at the start. The second mistake was... in my concentration on drilling the pilot holes I had not re-checked the position of the window. You guessed it... it had moved!

After a lot of swearing and a bit of embarrassment (no one was watching but I was a bit embarrassed at the sense of achievement I'd been feeling whilst screwing the window in place in the wrong position) I finally had the window very firmly fixed in place in the correct position. I used four screws along the bottom with nice big soft washers which seemed to do a very good job. I've also seen that some people drill small holes along the top of the windows and add additional cable ties, but this looks untidy so I'll ask around the paddock first before replicating this.
Next up was the doorcards. These went on very easily as they came pre-drilled. What wasn't so good was that they came with no instructions whatsoever, and the supplied door handle bracket was like one of those chinese puzzles you get out of a christmas cracker. No matter which way I positioned it, the door handle would not sit flush in the doorcard. In the end I contacted the seller for more details. Helpfully he did send me a full colour guide for fitting the doorcards... a full 2 weeks after I contacted him. Not so helpful. But I still had the handle very firmly fixed in place and although it wasn't flush it still functioned perfectly.
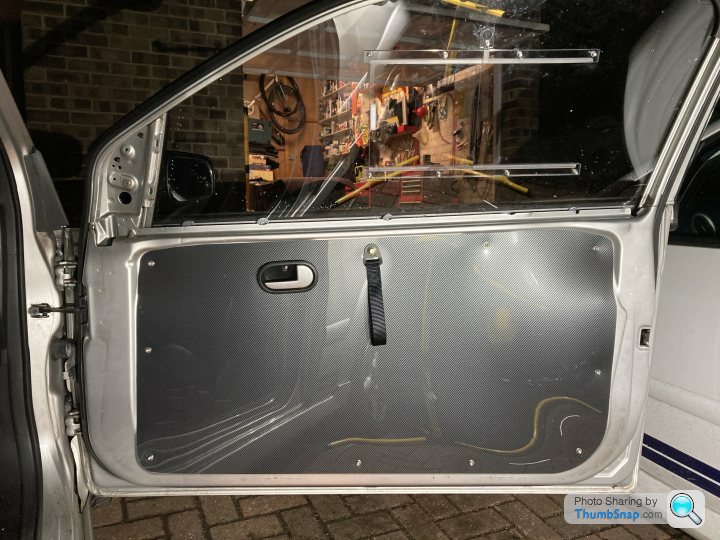
I fitted a door strap using one of the heavy duty bolts holding the original doorcards in, and the job was done. I then replicated the same on the other side, which I found a bit easier having learned from my mistakes and only having the position the window once. It all came together quite nicely in the end and I was definitely pleased with the end result. It had taken me quite a few hours - enough to call it a full day. Again, this was a real departure from what it looked like online where people whizz around doing these jobs in seemingly half an hour. But a large part of that is down to lack of experience and doing things slowly. It was very rewarding once done.
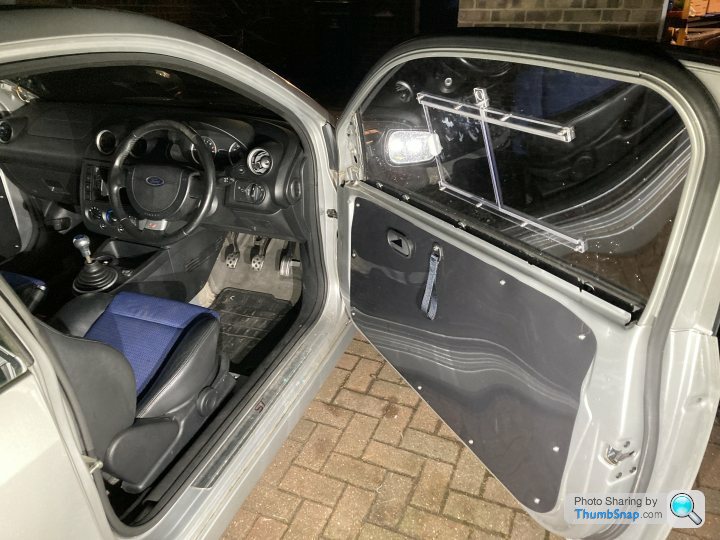
The main thing was, the car could now go for its roll cage fitting. So that will be the next update.
I wouldn't say this was a very difficult job, but it was bloody time consuming.
Another one of the jobs I'd been looking forward to, because I know there is a fair amount of weight to take out of the doors, and because I think the end result looks quite cool and would be a nice step forward on the build.
I chose ACW Plastics, as they came recommended and were reasonably priced. I found cheaper options available, but I was quite keen for this job to go as smoothly as possible so went with the name I'd been recommended. They aren't cheap, at £150 for two pieces of plastic, but you get what you pay for as they say. And that price did include a locking window on the drivers side.
The door cards I opted for were Racecardoorcards. At £100 I'm less convinced about these being good value for money. Ultimately with this product I guess you are paying for convenience rather than the end product.
Taking the door card off proved a little trickier than expected. The wing mirror surround pops off easily, but removing the rubber around the window buttons was not easy. The passenger side came out easily, but the driver side was really tough and much more flexible - as if it was made of a slightly different material? In the end I used brute force and just broke the plastic around the inside handle.
Once the outer layer is off you have this odd contraption on the inside. The number of bolts and fixings that came out this thing was ridiculous. By the time I'd finished both sides it seemed like I'd taken out 1kg just in fixings! There is certainly a knack to removing this inner doorcard and it's safe to say this is an area where experience would have helped. For one thing I had started the procedure with the windows up, which turned out to make the job harder. I also thought that removing this section just required a few bolts and application of some force - but in fact there is certainly an art to it.
In the end once again I had to resort to brute force, snapping the brittle plastic in order to detach it from the window lifting mechanism and also bashing a hole through the plastic to allow the door handle through it. Its safe to say this ape-like approach wasn't how I wanted to do the job, and it hurt my ego a little that I couldn't calmly and methodically disassemble it piece by piece like you see the pros do it. But again, this seems to be a fairly consistent theme in this build - and it keeps reminding me what you are paying for when you pay a motorsport mechanic to do a job; its the years of experience they've built up in problem solving and a simple knack of doing things methodically 'the right way'. It's also another result of working outside in the wind and the cold; I'm sure I'd have found it much easier to remain patient and methodical if I was working on a level surface and had the heating on!
With the doorcards completely out I tucked away the wiring loom (removing these completely would be a job for another day) and set about fitting the driver side window. This job really did require a lot of patience. The windows slot in by lifting them up through the door, making sure to slide them into the rubber runners, and then guiding them upwards and pushing them into the rubber seal around the top of the door. Its definitely easier said than done, as the window keeps trying to jump out of the seals.
Once it is positioned in I gave it a really good firm push to make sure it was seated all the way into the top of the seals. I then taped it in place to start work on the fixings. This was where I made my first mistake. Having previously owned a race-prepared MX-5 which the previous owner had angle grinded all over the place, I'd developed a dislike for sharp metal edges on the inside of cars. I was determined to fit these windows without cutting the doors. Spoiler alert; it can be done. But bloody hell did I make it difficult for myself and in all honesty I think the best option is just to cut the doors.
The main issue is that the gap between the top of the window sill, and the lip that you want to attach your screws through (at the bottom of the window) is very small. In order to give yourself more room the solution would be to angle grind off an inch or so of the metal at the top of the window sill. But this is right at elbow height and I just didn't want to do that. So instead I battled for what felt like several hours, to drill pilot holes through the window and then into the door skin, through what tiny space I did have - so that I could fix the window in place.
This is where I made my second mistake. Having painstakingly drilled all of my pilot holes, snapping several fine drill bits in the process (because the area you are drilling into on the inside of the door is a sloping angle), I finally started to screw in some screws with nice big plastic washers to hold the window in place. Again this was made incredibly difficult by the lack of space and I was chewing up my screwdriver on the sharp lip of metal that I now wished more than anything I had just cut out of the way at the start. The second mistake was... in my concentration on drilling the pilot holes I had not re-checked the position of the window. You guessed it... it had moved!
After a lot of swearing and a bit of embarrassment (no one was watching but I was a bit embarrassed at the sense of achievement I'd been feeling whilst screwing the window in place in the wrong position) I finally had the window very firmly fixed in place in the correct position. I used four screws along the bottom with nice big soft washers which seemed to do a very good job. I've also seen that some people drill small holes along the top of the windows and add additional cable ties, but this looks untidy so I'll ask around the paddock first before replicating this.
Next up was the doorcards. These went on very easily as they came pre-drilled. What wasn't so good was that they came with no instructions whatsoever, and the supplied door handle bracket was like one of those chinese puzzles you get out of a christmas cracker. No matter which way I positioned it, the door handle would not sit flush in the doorcard. In the end I contacted the seller for more details. Helpfully he did send me a full colour guide for fitting the doorcards... a full 2 weeks after I contacted him. Not so helpful. But I still had the handle very firmly fixed in place and although it wasn't flush it still functioned perfectly.
I fitted a door strap using one of the heavy duty bolts holding the original doorcards in, and the job was done. I then replicated the same on the other side, which I found a bit easier having learned from my mistakes and only having the position the window once. It all came together quite nicely in the end and I was definitely pleased with the end result. It had taken me quite a few hours - enough to call it a full day. Again, this was a real departure from what it looked like online where people whizz around doing these jobs in seemingly half an hour. But a large part of that is down to lack of experience and doing things slowly. It was very rewarding once done.
The main thing was, the car could now go for its roll cage fitting. So that will be the next update.
Edited by SparrowHawk on Monday 12th April 16:10
Gassing Station | UK Club Motorsport | Top of Page | What's New | My Stuff