Discussion


Hi all
I'm a long time lurker but haven't posted much here.
Because I don't have enough projects, and too much spare time, I've taken on another project.
However, this was an opportunity I couldn't pass up, as the price was low.
Naturally, there was a reason for this.
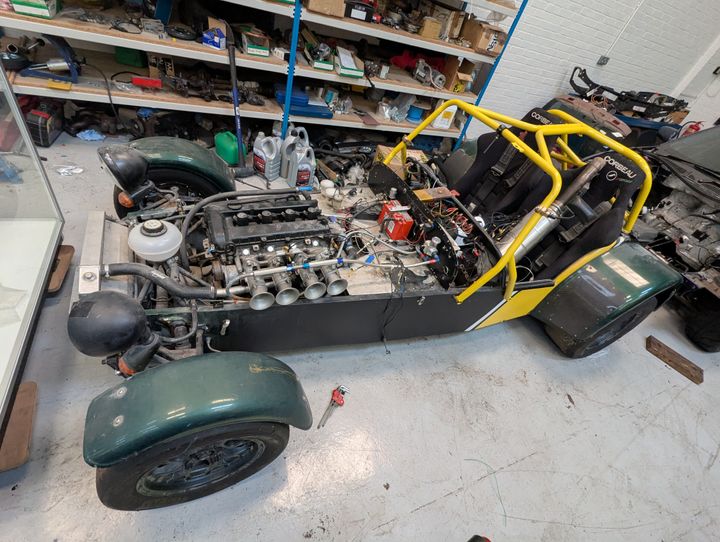
It's a mess. The more you look at it, the worse it gets.
The ECU and engine wiring loom are on the passenger seat.
The chassis wiring has more wires than connections, and more loops than I can trace.
The engine has bolts missing from the inlet and exhaust manifolds.
The engine was cranked over, but there may not be any oil in the engine.
The cage isn't on straight.
It's lived on a drive for a good while.
I don't really know what's needed, but I know I can sell it for more in parts than I paid, so it seemed a no brainer.
It has a Duratec on very old Jenvey ITBs, and it might have a plate diff. Or the diff has no oil in it, both are possible.
All I need to do now is sell the 1.5 Audis (or make one good one and scrap the other) and finish the bits on my Mk2 Golf so I can look at this.
This will be a slow burner as it needs a good amount of work, and I don't have much time at the moment.
I'm a long time lurker but haven't posted much here.
Because I don't have enough projects, and too much spare time, I've taken on another project.
However, this was an opportunity I couldn't pass up, as the price was low.
Naturally, there was a reason for this.
It's a mess. The more you look at it, the worse it gets.
The ECU and engine wiring loom are on the passenger seat.
The chassis wiring has more wires than connections, and more loops than I can trace.
The engine has bolts missing from the inlet and exhaust manifolds.
The engine was cranked over, but there may not be any oil in the engine.
The cage isn't on straight.
It's lived on a drive for a good while.
I don't really know what's needed, but I know I can sell it for more in parts than I paid, so it seemed a no brainer.
It has a Duratec on very old Jenvey ITBs, and it might have a plate diff. Or the diff has no oil in it, both are possible.
All I need to do now is sell the 1.5 Audis (or make one good one and scrap the other) and finish the bits on my Mk2 Golf so I can look at this.
This will be a slow burner as it needs a good amount of work, and I don't have much time at the moment.
I did a bit on this today.
The good news is there was oil in it after all, although I'm not sure how much.
There was enough for cranking it over, so that's good news.
I've ordered some bolts for the manifolds. I'll pull them off this week, and refit the exhaust with new hardware.
I'd like to update the ITBs as they are quite old, and we do a lot with Jenvey, so it would be better to get a set of Jenvey's on.
The seat is too small, I literally sit on the sides.
I'll need to sell the drivers seat and replace it with one that has more generous dimensions.
I've had a look and they are available in the right size.
I also started pulling bits out of the wiring.
The dash is run off some controller with it's own sensors. I'll get rid of that and reduce the sensors fitted to the ones needed for the ECU only.
I will need to separate out the chassis harness to see what's useable and what needs replacing.
Lots to do and learn. I've never had one of these before.
Looks like a lot to do!
Consider joining the Caterham and Lotus Seven Club
https://share.google/DVD3bueSaK6fSmGE4
The members I'm sure would be interested and also be a helpful source of information on the car's history and your rebuild.
Consider joining the Caterham and Lotus Seven Club
https://share.google/DVD3bueSaK6fSmGE4
The members I'm sure would be interested and also be a helpful source of information on the car's history and your rebuild.
Thanks all, it's quite the project.
I work on my own cars so there's nothing here that is worrying yet. The wiring can be sorted with a bit of patience, it's all the little things that are going to add up.
It needs new headlights, front indicators and wing mirrors, and probably a good bunch of other things I haven't found yet.
I now need to work out where to put a build project.
I work on my own cars so there's nothing here that is worrying yet. The wiring can be sorted with a bit of patience, it's all the little things that are going to add up.
It needs new headlights, front indicators and wing mirrors, and probably a good bunch of other things I haven't found yet.
Nothingtoseehere said:
Looks like a lot to do!
Consider joining the Caterham and Lotus Seven Club
https://share.google/DVD3bueSaK6fSmGE4
The members I'm sure would be interested and also be a helpful source of information on the car's history and your rebuild.
Thanks, I actually just joined this morning.Consider joining the Caterham and Lotus Seven Club
https://share.google/DVD3bueSaK6fSmGE4
The members I'm sure would be interested and also be a helpful source of information on the car's history and your rebuild.
I now need to work out where to put a build project.
As I have no history on the car, I thought I'd email Caterham with the chassis number and see if they knew anything about it.
I didn't really expect a response, never mind one a few hours after sending the email!
A very helpful person named Martin with a title of Archivist sent the following information.
23613 was one of three R400-spec cars supplied in early 2008 in kit form to Palmer Motorsport at Bedford Autodrome, with this kit for this car built up in February 2008. There is no invoice on file, but I do have the attached specification. A separate email describes their requirements as:
Caterham to supply 3x new PalmerSport replacement cars with standard Duratec engines, Caterham wet sump, Caterham inlet manifold. No wiring, no fuel system, no instrumentation.
Attached was an excert from the original email, with the following specifications:
Arch motors series 3 chassis (with our current additions, gas tank brackets, etc)
No heater matrix (please supply blanking panel)
R 400 suspension (See Robin for spring rates, We need to have the Stffer race spring)
13" Minilite replica 6" all around
3.62 LSD (needs a final evaluation)
Aero screens
Bench Seats
Front Vented discs (4 pot calipers)
Orange rear ARB
Race Master cyl
Clutch Master cyl
Blank Carbon Dash Panel, Kick Panels and rear arch protector panels. No dash
FIA Standard rear roll hoop (with Diag)
Centre Console without handbrake
Race upper steering column (quick release) with boss + Momo wheel
Carbon front Cycle wing guards, fibreglass rears, colourless
Central mounted mirror, with master kill, Palmersport to fit.
Please see Robin for new style side impact protection bars
See attached BOM
Some of that is no longer there, as the wheels are not minilites, the dash is far from blank, there is no aero screen, the rear mirror is missing.
I'm pretty sure the R400 is supposed to have roller barrell throttle bodies, but these are normal butterfly ITBs. I'm happier removing them now as they are not correct anyway.
If anyone has any idea what the current ITBs are, please let me know.
It's really nice to have a bit of history of the car, and 5/5 to Martin at Caterham for the speedy response with the information.
AlexDta said:
Turn7 said:
Ive never seen that design of rollcage on a Caterham before ?
Interesting. I wonder where it's from then.Caterham cages are either double D type or single roof x brace.
[url]
images.pistonheads.com/55130/202510213585386[/url]
I did the Palmer Sport day three times quite a few years ago. On each occasion, the Caterham's I drove were LPG powered, so the comment in the build specification having no fuel tank may mean this car was at one time LPG powered. You could tell they were LPG powered by the gas smell.
Piers
Piers
yep, would definitely have been LPG at Palmersport. Easy to enter cage with bench seats (not the most supportive) adds up to very get in and out-able.
Fabulous project. I'm on my second Caterham fixer upper project, but yours looks a lot of work!
One thing I would check out is the chassis condition if you've not done it already. Surface rust where it's accessible is fine, easy to clean and wire brush and the paint with POR. Need to check for more serious stuff, lower rails where the grot trap is. From the outside see where the bottom of the side goes from curved to flat. Look for any ali bubbling, Corrosion there could be a big problem. Also check underneath at the back around the rear basket and in front of the DD tube.
It turns out the throttle bodies are some cheap chinese Jenvey knock offs.
I've managed to sell them already, so that's good news.
However, I still haven't finished finding the issues.
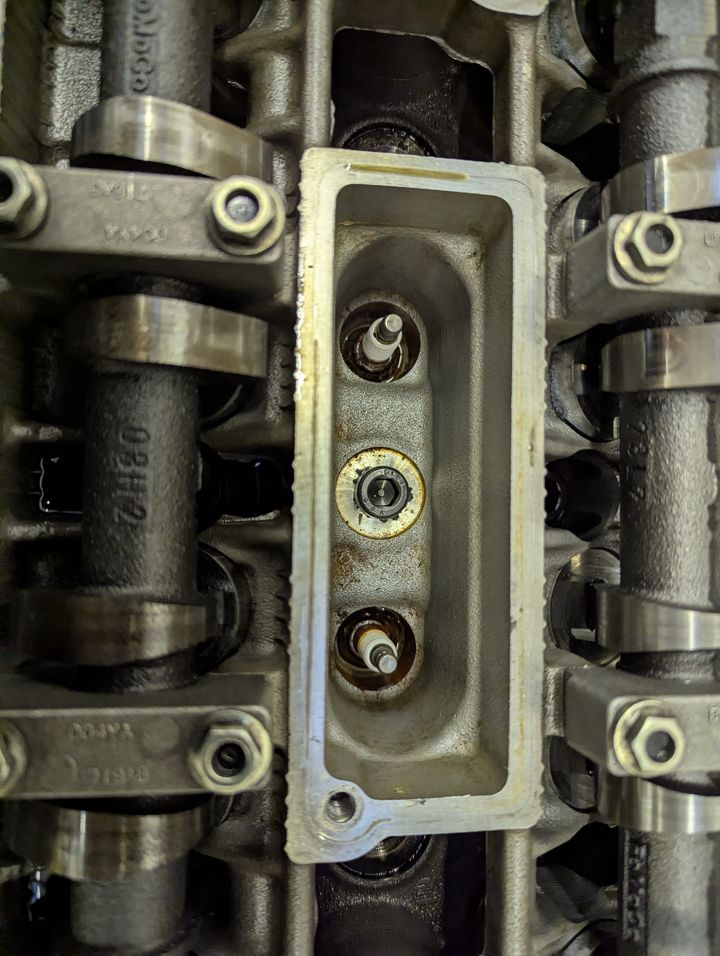
The 2.0 Duratec has a temperature sensor inbtween coils 2 and 3.These are known to fail and fill the valley with water.
I pulled out the four coils.
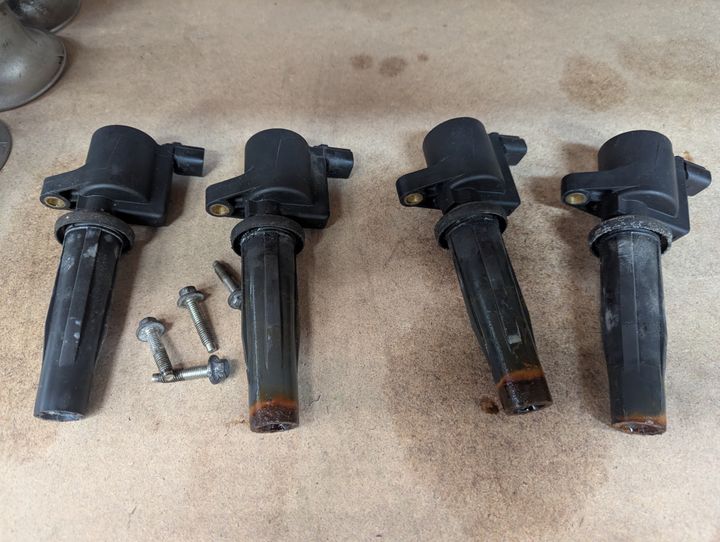
Hmmm. That doesn't look promising.
Yep, that's full of water. Two and three are full, one has a bit, four is dry.
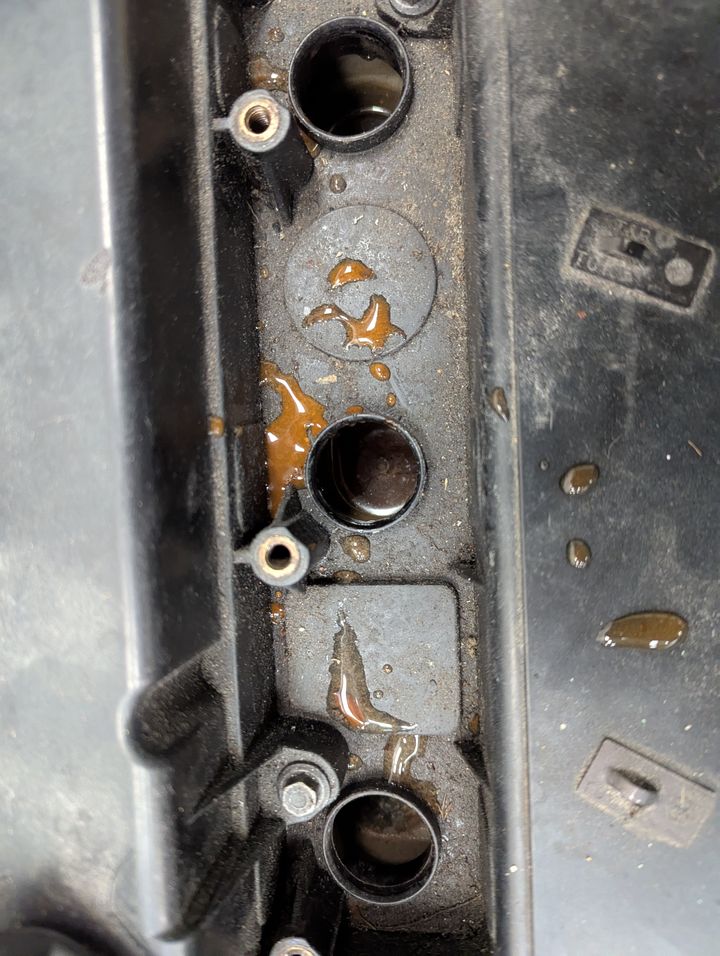
Let's pull the rocker cover.
Fairly standard for a failed sensor, right?
The eagle eyed among you will spot that the sensor is, in fact, simply not fitted.
I've soaked up all the water and left it to dry, and it now looks like this.
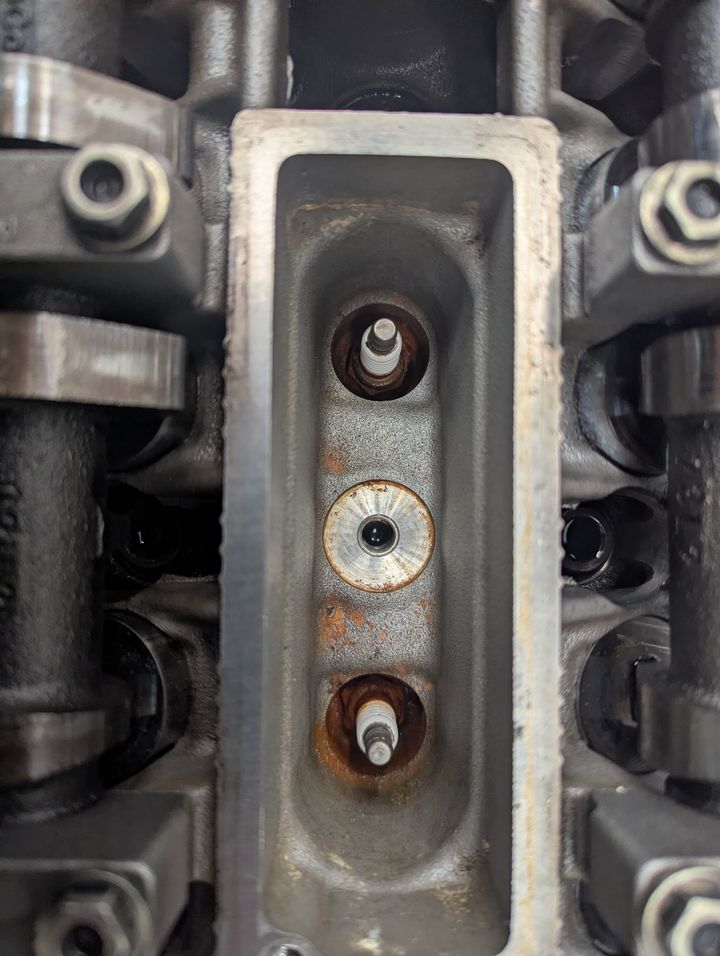
Nothing a new set of plugs and coils can't solve.
I'll probably blank off the hole as I don't need that sensor, as I'll use a temperature sensor in the water pipes.
I also spotted that the NSR shock bolt isn't tight:
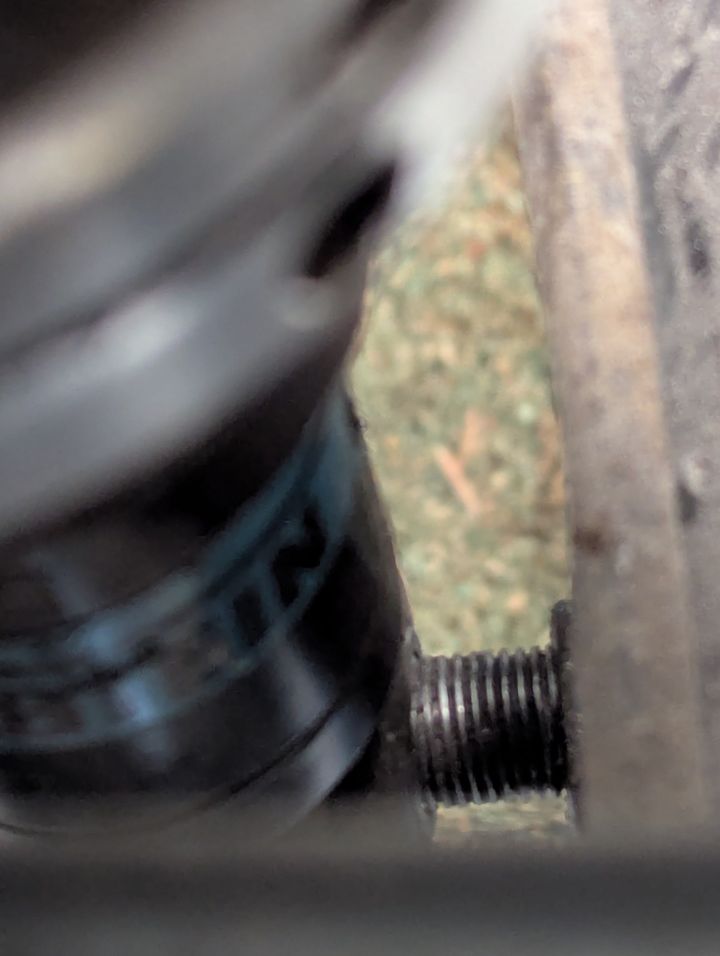
The rear bolts on the cage are also not tight.
Before I drive this anywhere, it will get a full bolt check with paint pen.
I've started removing a bunch of wiring. Despite removing a good chunk, it doesn't really look any different.
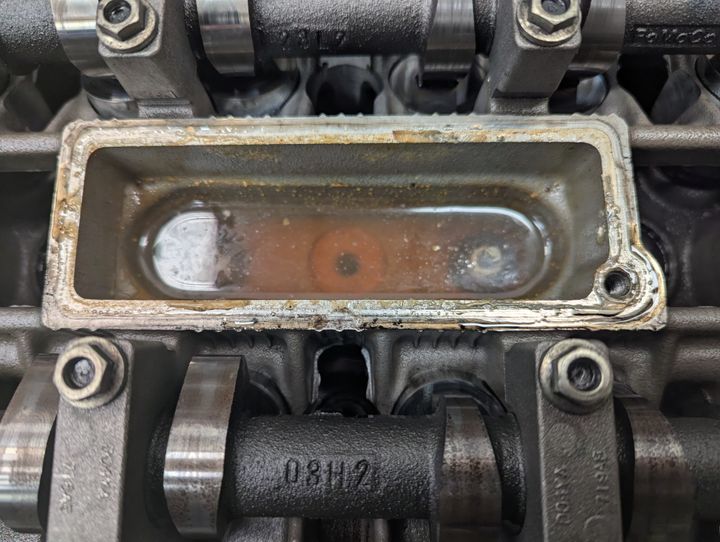
The cams look to be standard FoMoCo cams, which ties in with this being a standard Duratec.
I want to do a compression test, so need to get some oil. I can then put the new plugs in after testing that.
I've taken the tiny battery out, and will just use a spare battery to crank it over.
I've managed to sell them already, so that's good news.
However, I still haven't finished finding the issues.
The 2.0 Duratec has a temperature sensor inbtween coils 2 and 3.These are known to fail and fill the valley with water.
I pulled out the four coils.
Hmmm. That doesn't look promising.
Yep, that's full of water. Two and three are full, one has a bit, four is dry.
Let's pull the rocker cover.
Fairly standard for a failed sensor, right?
The eagle eyed among you will spot that the sensor is, in fact, simply not fitted.
I've soaked up all the water and left it to dry, and it now looks like this.
Nothing a new set of plugs and coils can't solve.
I'll probably blank off the hole as I don't need that sensor, as I'll use a temperature sensor in the water pipes.
I also spotted that the NSR shock bolt isn't tight:
The rear bolts on the cage are also not tight.
Before I drive this anywhere, it will get a full bolt check with paint pen.
I've started removing a bunch of wiring. Despite removing a good chunk, it doesn't really look any different.
The cams look to be standard FoMoCo cams, which ties in with this being a standard Duratec.
I want to do a compression test, so need to get some oil. I can then put the new plugs in after testing that.
I've taken the tiny battery out, and will just use a spare battery to crank it over.
I started removing the wiring at the back of the car next. There is none left in the engine bay, apart from the three wires connected to the alternator in a connector.
Naturally, they were never connected to anything else....
The rear was fairly simple. The tail light connectors that should be near the inner arch are gone, with heat shrink over them. It looks well done, so I expect it was done by PS to remove the connectors once they leaked.
There is a brake pressure sensor connected to the right rear caliper, but when I touched it the wires fell off.
The fuel level and fuel pump wires were cut near existing joins, the rain light unplugged and that was about it.
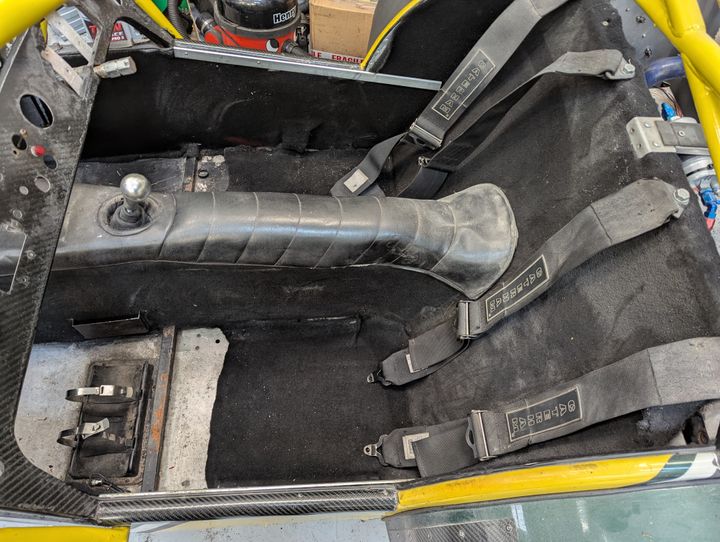
Next up was remove the seats.
This was fairly simple, as they were only held in with two bolts each. One was through the aluminium floor plate with no additional strengthening!
Getting there.
When I took the wheels off, I noticed hand brake cables on the rear calipers. As can be seen above, the centre console doesn't allow for a hand brake, so that doesn't make sense.
I then removed the centre console to allow access to the wiring loom. This revealed a hand brake.
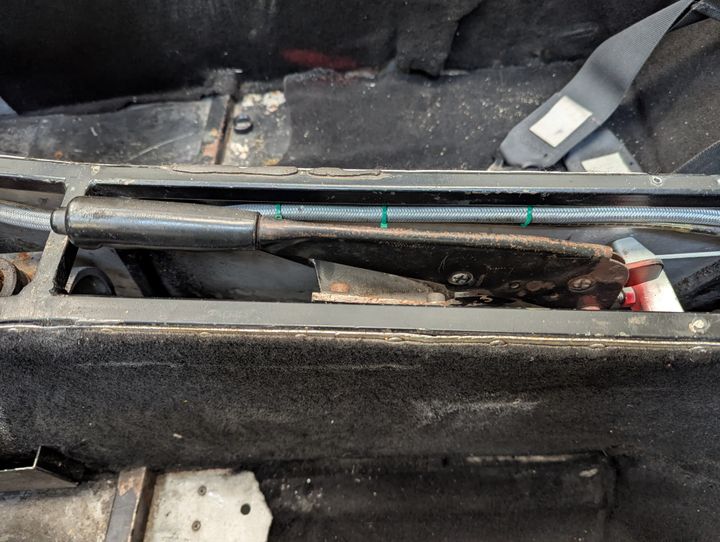
Um. What?
Why does a car that has never been registered on the road have a handbrake that is covered by the centre console?
I spotted a screw missing from the fuel level sender cover.
I then recognised the screws, as I used a few hundred building the camper van. These are the type thathave a tip that effectively drills a hole as it's screwed in.
To the fuel tank.
I guess I'll add remove and clean the fuel tank to the to do list.
However, I'm now at the point that I can start working out new wiring.
First up will be a new engine wiring harness, along with a small PDM to power everything required for the engine bay.
That will be planned out this week.
Naturally, they were never connected to anything else....
The rear was fairly simple. The tail light connectors that should be near the inner arch are gone, with heat shrink over them. It looks well done, so I expect it was done by PS to remove the connectors once they leaked.
There is a brake pressure sensor connected to the right rear caliper, but when I touched it the wires fell off.
The fuel level and fuel pump wires were cut near existing joins, the rain light unplugged and that was about it.
Next up was remove the seats.
This was fairly simple, as they were only held in with two bolts each. One was through the aluminium floor plate with no additional strengthening!
Getting there.
When I took the wheels off, I noticed hand brake cables on the rear calipers. As can be seen above, the centre console doesn't allow for a hand brake, so that doesn't make sense.
I then removed the centre console to allow access to the wiring loom. This revealed a hand brake.
Um. What?
Why does a car that has never been registered on the road have a handbrake that is covered by the centre console?
I spotted a screw missing from the fuel level sender cover.
I then recognised the screws, as I used a few hundred building the camper van. These are the type thathave a tip that effectively drills a hole as it's screwed in.
To the fuel tank.
I guess I'll add remove and clean the fuel tank to the to do list.
However, I'm now at the point that I can start working out new wiring.
First up will be a new engine wiring harness, along with a small PDM to power everything required for the engine bay.
That will be planned out this week.
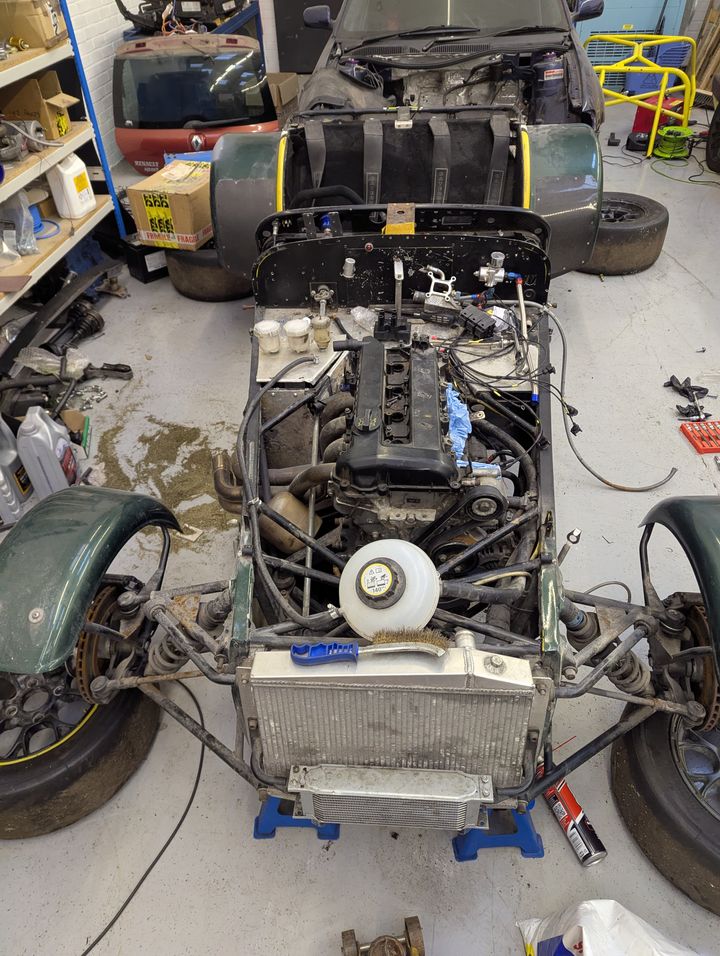
Some more progress has been made.
Firstly, the car has been named Frank.Anyone care to guess what that's short for?
I wanted to get the rear shocks mounted properly.
I'd removed the bolt from the LH side. This looked like a 12mm fine thread. It also felt like the wrong thread, which would explain why it was sticking out.
So I removed the bolt from the RH side. This looked like a 10mm standard thread.
OK.
A bit of reading reveals there are two types of chassis, metric and imperial. As this is a 2008 car it should be metric.
The De Dion beam on an imperial car uses a 1/2"UNF (fine) thread while the metric chassis uses an M10 thread.
After checking the fitment of the bolts, I realised my metric chassis has an imperial De Dion tube.
I measured the threads and the metric was definitely M10 and the "12mm fine" was actually 1/2" UNF.
The M10 bolt fitted just snugly enough to give the impression it was actually doing up correctly. It wasn't.
The reason the correct bolt wasn't in properly is that the leading threads are damaged. You can see that here.
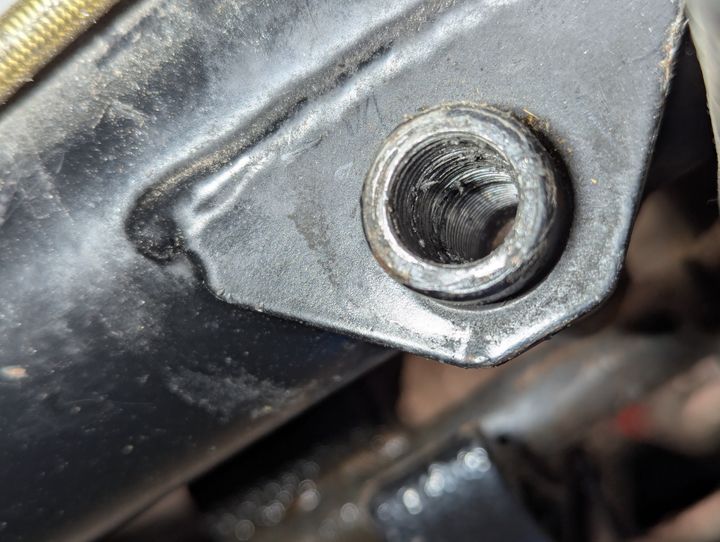
I purchased a thread chasing kit and they have cleaned up well enough. I also put a longer bolt in to be safe.
I then read up on torque specs for 1/2" UNF and used the lowest setting as it's different depending on bolt material. Both bolts tightened up correctly to the selected setting.
I then read the manual and realised I was over by about 50% on the factory manual torque. Whoops.
I also realised that there are supposed to be washers either side of the shock, but I didn't have any 1/2" washers, so I ordered them.
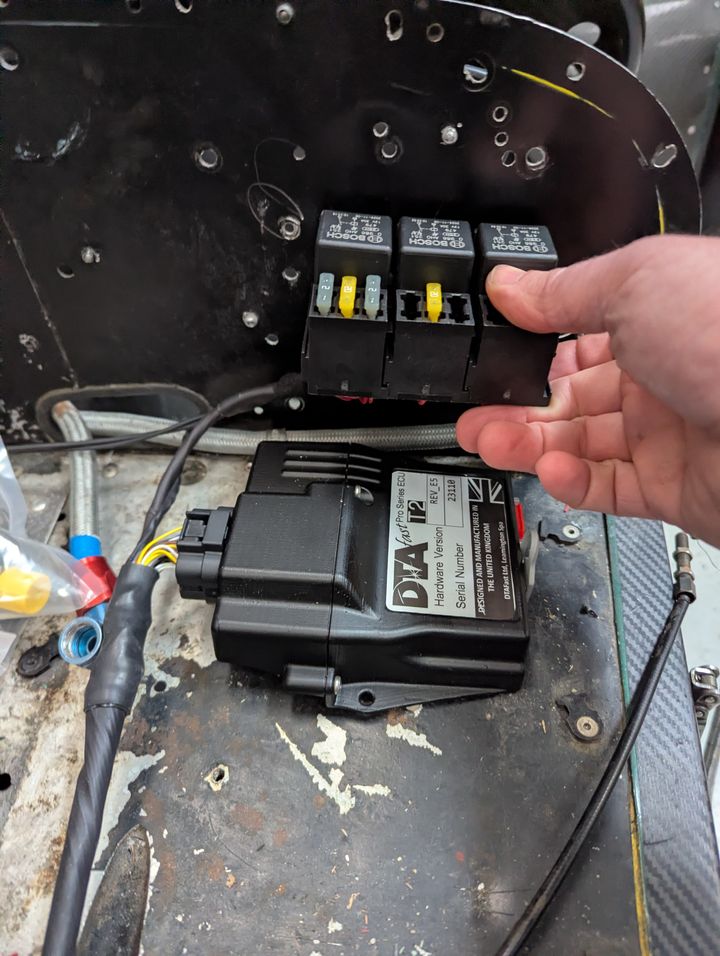
As wiring is one of our specialities, I decided to knock up a loom with relays just to see if the engine will run.
It will also allow us to make a kit for these with our ECUs. As I just want to see if the engine is OK, I'm doing this on our smallest ECU, the T2. This requires a coil pack as it doesn't have enough outputs to drive the four individual coils.
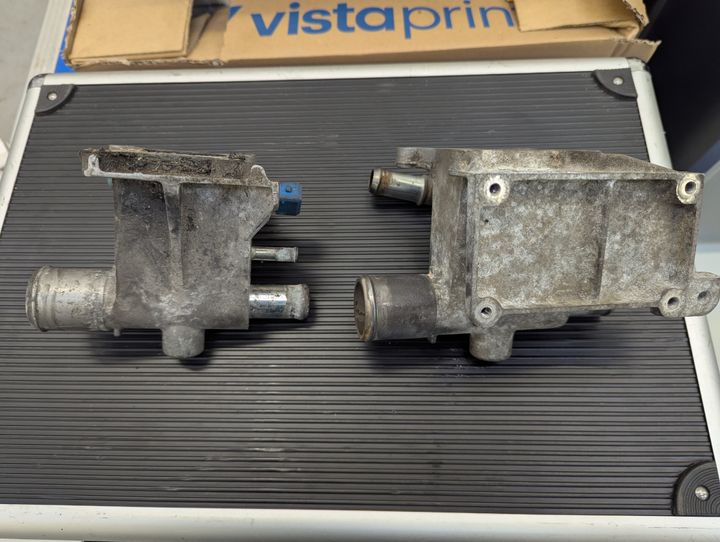
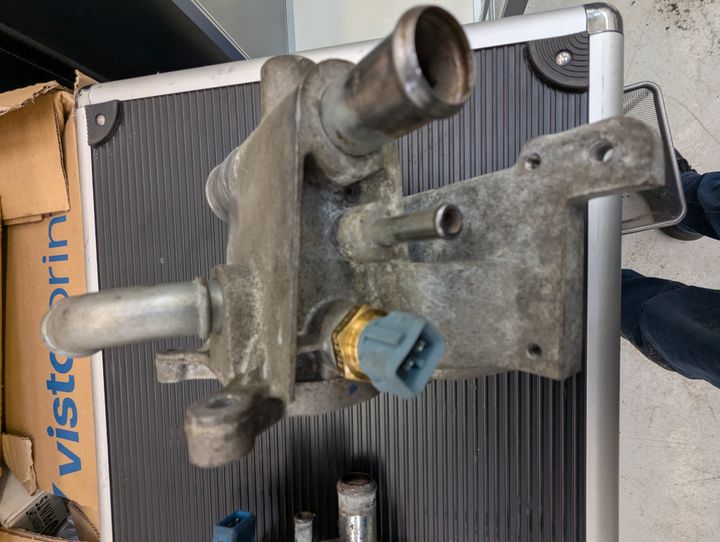
The coil pack sits on the side of the engine on the coolant outlet. Someone had chopped off the mounting base for the coil pack on mine, but a friend sent me a complete one.
Old vs new.
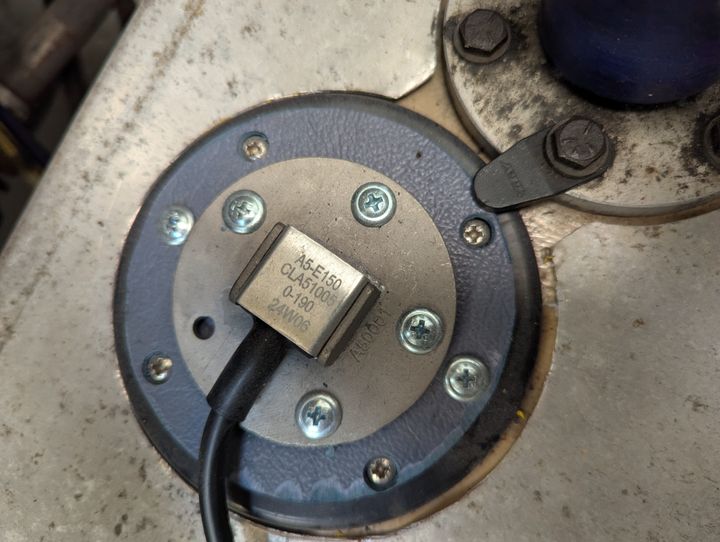
I also fitted a new water temperature sensor, as I trust nothing on this car.
I bolted that on, and then laid out the loom.
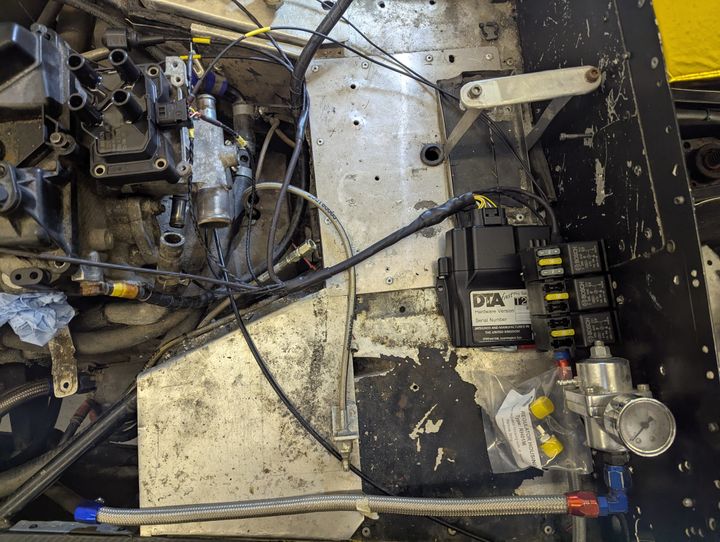
The first fit isn't bad for a first attempt, but there isn't enough space there.
I don't like the adjustable fuel pressure regs, so had planned to remove it anyway. The Jenvey mount is already there.
After removing it, that will fit much better.
I've also plugged the hole in the cylinder head. Oddly, it was a normal M10 thread, so none of the standard sensors will fit there. I'd planned to run a combined temperature and pressure sensor there to learn more about water pressure with temperature, but nothing was simple to fit, so I just ended up putting an M10 bolt with crush washer in.
The cage was painted by Stevie Wonder so I removed that to have it cleaned. Topless shot:
Cage painting:
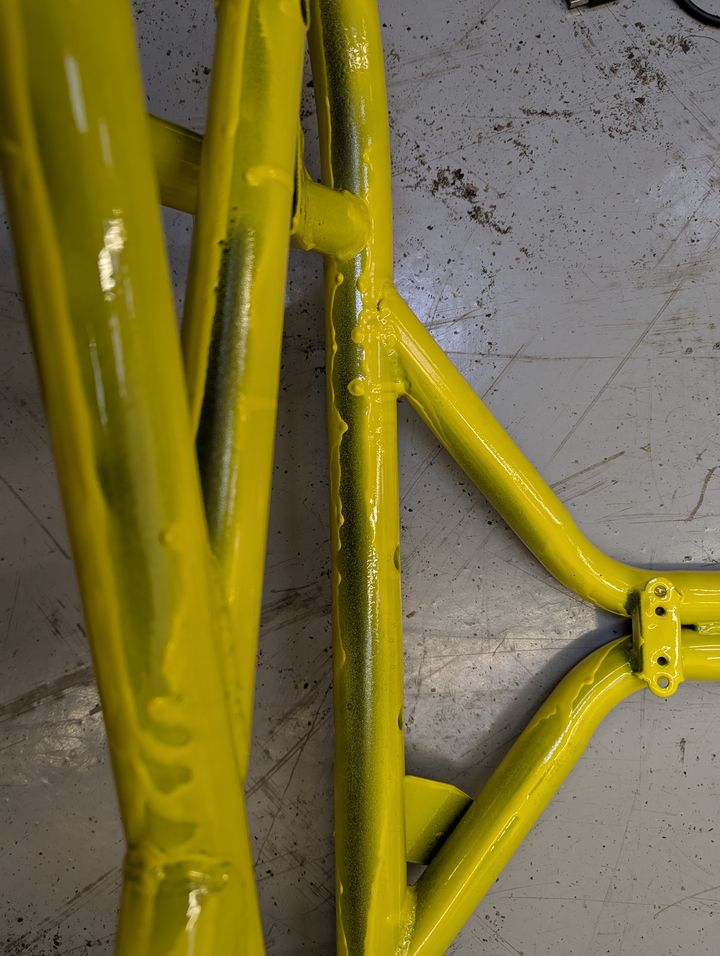
Mike at LotusBits has acquired a laser tool that removes rust and paint, so he's cleaning it off for me.
I'll then make sure it's painted properly.
Firstly, the car has been named Frank.Anyone care to guess what that's short for?
I wanted to get the rear shocks mounted properly.
I'd removed the bolt from the LH side. This looked like a 12mm fine thread. It also felt like the wrong thread, which would explain why it was sticking out.
So I removed the bolt from the RH side. This looked like a 10mm standard thread.
OK.
A bit of reading reveals there are two types of chassis, metric and imperial. As this is a 2008 car it should be metric.
The De Dion beam on an imperial car uses a 1/2"UNF (fine) thread while the metric chassis uses an M10 thread.
After checking the fitment of the bolts, I realised my metric chassis has an imperial De Dion tube.
I measured the threads and the metric was definitely M10 and the "12mm fine" was actually 1/2" UNF.
The M10 bolt fitted just snugly enough to give the impression it was actually doing up correctly. It wasn't.
The reason the correct bolt wasn't in properly is that the leading threads are damaged. You can see that here.
I purchased a thread chasing kit and they have cleaned up well enough. I also put a longer bolt in to be safe.
I then read up on torque specs for 1/2" UNF and used the lowest setting as it's different depending on bolt material. Both bolts tightened up correctly to the selected setting.
I then read the manual and realised I was over by about 50% on the factory manual torque. Whoops.
I also realised that there are supposed to be washers either side of the shock, but I didn't have any 1/2" washers, so I ordered them.
As wiring is one of our specialities, I decided to knock up a loom with relays just to see if the engine will run.
It will also allow us to make a kit for these with our ECUs. As I just want to see if the engine is OK, I'm doing this on our smallest ECU, the T2. This requires a coil pack as it doesn't have enough outputs to drive the four individual coils.
The coil pack sits on the side of the engine on the coolant outlet. Someone had chopped off the mounting base for the coil pack on mine, but a friend sent me a complete one.
Old vs new.
I also fitted a new water temperature sensor, as I trust nothing on this car.
I bolted that on, and then laid out the loom.
The first fit isn't bad for a first attempt, but there isn't enough space there.
I don't like the adjustable fuel pressure regs, so had planned to remove it anyway. The Jenvey mount is already there.
After removing it, that will fit much better.
I've also plugged the hole in the cylinder head. Oddly, it was a normal M10 thread, so none of the standard sensors will fit there. I'd planned to run a combined temperature and pressure sensor there to learn more about water pressure with temperature, but nothing was simple to fit, so I just ended up putting an M10 bolt with crush washer in.
The cage was painted by Stevie Wonder so I removed that to have it cleaned. Topless shot:
Cage painting:
Mike at LotusBits has acquired a laser tool that removes rust and paint, so he's cleaning it off for me.
I'll then make sure it's painted properly.
Gassing Station | Caterham | Top of Page | What's New | My Stuff