
Discussion


I've been successful in dressing car paint repairs with micro abrasives and polishes (dressing in large car vandalism marks is mostly a breeze )
but now looking to improve paintwork fixes when its somewhat larger work.
Larger marks or paint wear are a bit of a problem.
Below are the worst 2 actual damage I'd like to resolve.
The bumper rather than replace for the sake of tenner of bigboy flex filler have pulled out then filled.
(Seems most 2nd hand bumpers even at £200+ aren't even mint and have repair issues of their own needed, often scratches). Before touching:
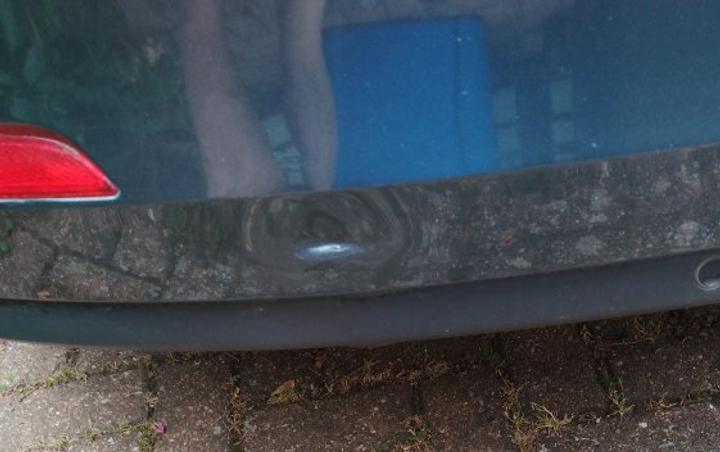
I've never done anything but aerosol spraycans which can be mixed results and usually never that professional looking and want to get more blended results with the finer spray achieved with other stuff.
Maybe useful to do some sort of course too.
Rather than vanity marks I'm far more intimidated by the typical bumper arch sideswipes where its gone down to plastic in more than one place even though the area is relatively small its clear
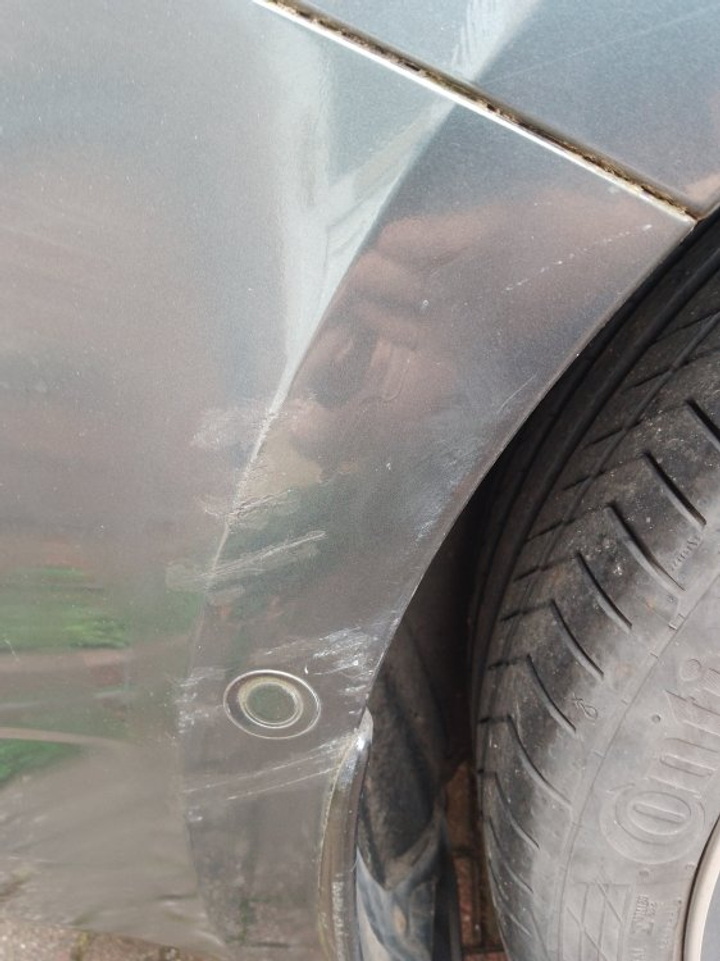
Rather than rely on others which is expensive it would be nice to learn to get into spraying and prepared to put in the time and effort.
I already picked up the correct paint cheaply as a small tin instead of getting a touch up stick as they are useless, just use an artists brush and lacquer then cut down to fill in micro scratches but really now need proper spray tools for DIY
I'm thinking learning to do small amounts of compressing spraying and getting the basic kit needed ( respirator, lines, filters, and if necessary compressor)?
I'm waiting to hear of news of this to the UK as it seems more ideal for my sort of requirement:
https://inokraftshop.com/pages/dx-spray-gun
Failing that I've also heard that reasonable results with compressor can be acquired with a budget with smaller outputs needed with Hyundai 750W compact compressor?
https://www.ebay.co.uk/itm/295506309676
Or there is always sandal/tyre power
https://www.youtube.com/watch?v=vPm1kbPqAac
https://www.youtube.com/watch?v=5i7EuBpL_B0
https://www.youtube.com/shorts/IzCQ0Cd-Afo
but now looking to improve paintwork fixes when its somewhat larger work.
Larger marks or paint wear are a bit of a problem.
Below are the worst 2 actual damage I'd like to resolve.
The bumper rather than replace for the sake of tenner of bigboy flex filler have pulled out then filled.
(Seems most 2nd hand bumpers even at £200+ aren't even mint and have repair issues of their own needed, often scratches). Before touching:
I've never done anything but aerosol spraycans which can be mixed results and usually never that professional looking and want to get more blended results with the finer spray achieved with other stuff.
Maybe useful to do some sort of course too.
Rather than vanity marks I'm far more intimidated by the typical bumper arch sideswipes where its gone down to plastic in more than one place even though the area is relatively small its clear
Rather than rely on others which is expensive it would be nice to learn to get into spraying and prepared to put in the time and effort.
I already picked up the correct paint cheaply as a small tin instead of getting a touch up stick as they are useless, just use an artists brush and lacquer then cut down to fill in micro scratches but really now need proper spray tools for DIY
I'm thinking learning to do small amounts of compressing spraying and getting the basic kit needed ( respirator, lines, filters, and if necessary compressor)?
I'm waiting to hear of news of this to the UK as it seems more ideal for my sort of requirement:
https://inokraftshop.com/pages/dx-spray-gun
Failing that I've also heard that reasonable results with compressor can be acquired with a budget with smaller outputs needed with Hyundai 750W compact compressor?
https://www.ebay.co.uk/itm/295506309676
Or there is always sandal/tyre power
https://www.youtube.com/watch?v=vPm1kbPqAac
https://www.youtube.com/watch?v=5i7EuBpL_B0
https://www.youtube.com/shorts/IzCQ0Cd-Afo
Hi, I run my own small bodyshop, half the month I do classic resto and custom work, and the other half your usual bodyshop repairs.
There is a lot to cover, and certainly I cant teach you it in a forum reply, but what do you want to know to start?
The main point I need to get across is that yes, your repairs are local, but generally you need to respray the entire panel as you need the clear coat to go to an edge to have any sort of long term repair. Yes, you will have watched videos of smart repairs where it's blended out on small repairs, and there are options around that, but thats not really something you can do while learning how to paint.
You could tidy up the bumper with some heat and straightening out the dent with pressure behind while heat is applied, it doesn't look like the paint is broken, but there is a high chance it will probably come off while you are manipulating it as paint really doesn't like sticking to plastic.
The scratches to your wheel arch look like they are on a metallic silver car? Silver is a hard colour to work with to blend as the metallics have to lay down in the same orientation otherwise you get a different shade, despite it being the same paint. They are also very close to I assume the rear bumper and you run a risk of the shade looking different where it joins edge to edge being so close. A correct repair would probably be to also blend into the bumper making it a bigger job than it looks.
You say you want to learn and not pay for the work to be done, but with that comes a big initial outlay, more than paying a pro, and a steep learning curve when you are working on your own car.
Happy to help, but you need to break down what you want help with, 99% is your repair and prep, not the painting.
Fire away with the questions, from your initial links, really you need a decent small compressor and gun, the electric ones are more for domestic painting of waterbased emulsion rather than car repairs.
There is a lot to cover, and certainly I cant teach you it in a forum reply, but what do you want to know to start?
The main point I need to get across is that yes, your repairs are local, but generally you need to respray the entire panel as you need the clear coat to go to an edge to have any sort of long term repair. Yes, you will have watched videos of smart repairs where it's blended out on small repairs, and there are options around that, but thats not really something you can do while learning how to paint.
You could tidy up the bumper with some heat and straightening out the dent with pressure behind while heat is applied, it doesn't look like the paint is broken, but there is a high chance it will probably come off while you are manipulating it as paint really doesn't like sticking to plastic.
The scratches to your wheel arch look like they are on a metallic silver car? Silver is a hard colour to work with to blend as the metallics have to lay down in the same orientation otherwise you get a different shade, despite it being the same paint. They are also very close to I assume the rear bumper and you run a risk of the shade looking different where it joins edge to edge being so close. A correct repair would probably be to also blend into the bumper making it a bigger job than it looks.
You say you want to learn and not pay for the work to be done, but with that comes a big initial outlay, more than paying a pro, and a steep learning curve when you are working on your own car.
Happy to help, but you need to break down what you want help with, 99% is your repair and prep, not the painting.
Fire away with the questions, from your initial links, really you need a decent small compressor and gun, the electric ones are more for domestic painting of waterbased emulsion rather than car repairs.
Edited by DaveF-SkinnysAutos on Friday 31st July 07:33
Hi
Appreciate your feedback and of course you are vastly experienced on the subject and my father was in the paint industry ( but abrasive side) and we did some laymans paint repairs - the best of which was on solid yellows as simple colour, and yes his advice too was always to go to some kind of feature line so I have heard of these things.
However I also have quite a bit of time on my hands and prepared to experiment, worse case end up cleaning off although this can be just as much work I accept
The painting community in US have got their hands on the DX though and the results seem to be pretty reasonable ( at least acceptable for me if I was able to replicate)? Seems to be receiving some positive results.
Just one of many many videos - a bit mute though as its not available in UK yet - but may be so I might be interested in holding for this.
https://www.youtube.com/watch?v=7xZTkPYdfgk
Shape wise I've already heated and stretched out the bumper but couldn't get the exact shape and found yes the paint would be weak in the equation so sought to just use the bigboy flex filler and have already started smoothing out the shape at least so that's a strong start.
Bumper Shape is almost there but I'm going to add another layer and further sanding to seamlessly smooth it out on multiple axis as I didn't quite get it first time.
Definitely accept that prep is important, just getting the smooth shape and no cracks or holes for instance is super important and to be able to bind paint to properly etc.
Appreciate your feedback and of course you are vastly experienced on the subject and my father was in the paint industry ( but abrasive side) and we did some laymans paint repairs - the best of which was on solid yellows as simple colour, and yes his advice too was always to go to some kind of feature line so I have heard of these things.
However I also have quite a bit of time on my hands and prepared to experiment, worse case end up cleaning off although this can be just as much work I accept
The painting community in US have got their hands on the DX though and the results seem to be pretty reasonable ( at least acceptable for me if I was able to replicate)? Seems to be receiving some positive results.
Just one of many many videos - a bit mute though as its not available in UK yet - but may be so I might be interested in holding for this.
https://www.youtube.com/watch?v=7xZTkPYdfgk
Shape wise I've already heated and stretched out the bumper but couldn't get the exact shape and found yes the paint would be weak in the equation so sought to just use the bigboy flex filler and have already started smoothing out the shape at least so that's a strong start.
Bumper Shape is almost there but I'm going to add another layer and further sanding to seamlessly smooth it out on multiple axis as I didn't quite get it first time.
Definitely accept that prep is important, just getting the smooth shape and no cracks or holes for instance is super important and to be able to bind paint to properly etc.
Turns out I do have an air compressor....just sort of gifted it when asking if he just happened to have one on leaving today.
Well when you consider poor old dad isn't going to be so much as filling a tyre or driving let alone anything else, too busy tapping on his armchair (dementia) I was told I could have it by his SoH.
I think its same as this one, hasn't really been used apparently. Tested and its working. So I'd just need to get in line filter and spray head? As mentioned already got the basecoat paint so why not give it a go.
https://www.youtube.com/watch?v=29QL1TdD7aY
Well when you consider poor old dad isn't going to be so much as filling a tyre or driving let alone anything else, too busy tapping on his armchair (dementia)
I was told I could have it by his SoH.I think its same as this one, hasn't really been used apparently. Tested and its working. So I'd just need to get in line filter and spray head? As mentioned already got the basecoat paint so why not give it a go.
https://www.youtube.com/watch?v=29QL1TdD7aY
Perfect from afar, far from perfect....could do with sanding and polishing but just a quick effort, I also was getting an earful from the wife about starting and not finishing the dinner (lol) welcome to my world
At least you can't see the scratches on the rear fender now and the bump filled, personally happy with driving about in this state could probably improve with a little sanding and further polishing though.
untouched side
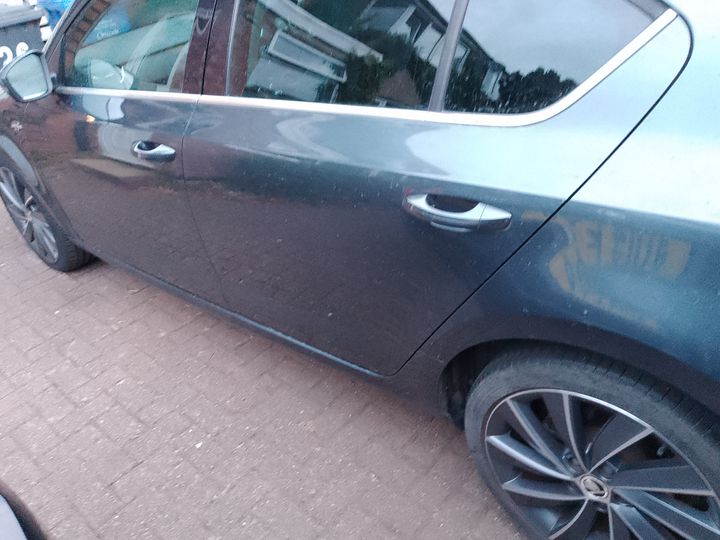
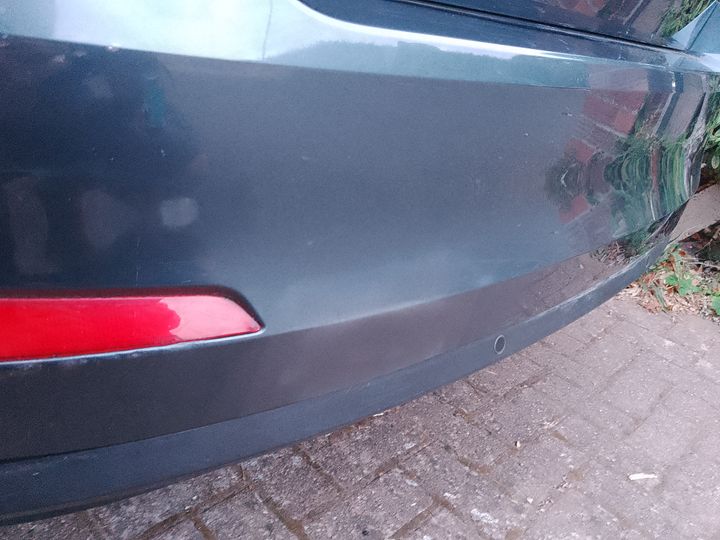
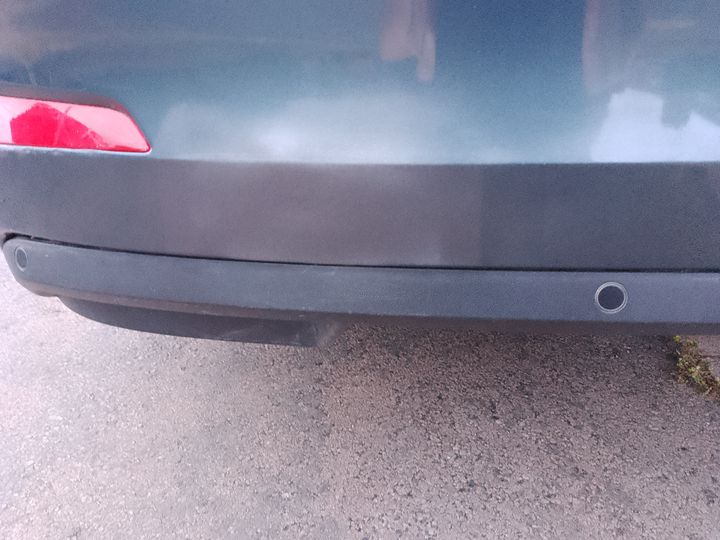
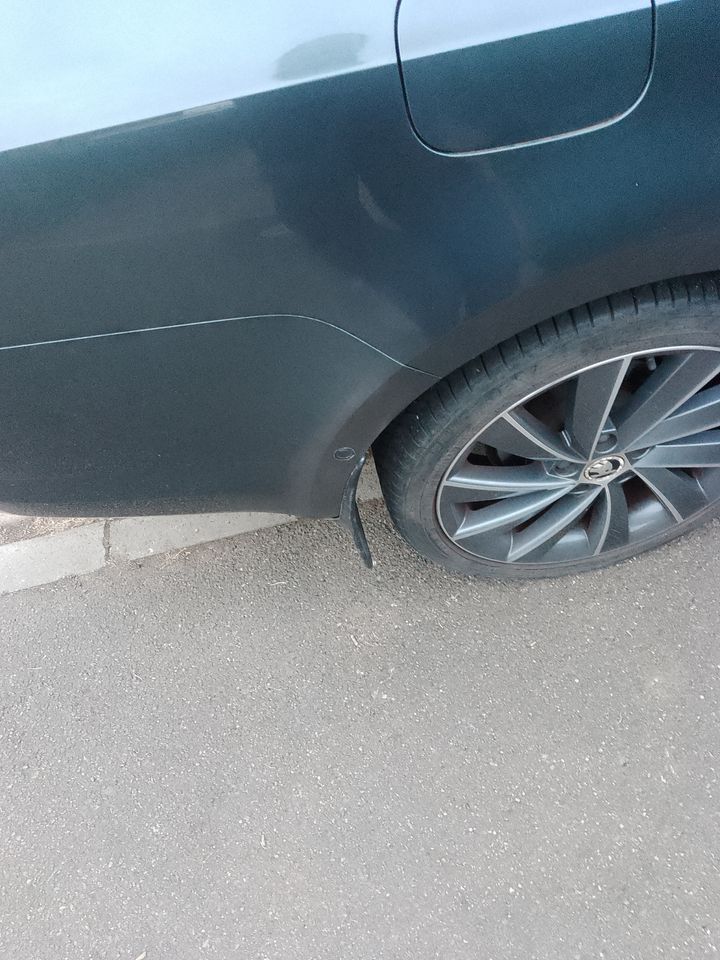
At least you can't see the scratches on the rear fender now and the bump filled, personally happy with driving about in this state could probably improve with a little sanding and further polishing though.
untouched side
Fair play for having a go, if you are happy thats a success, and no doubt you also learnt loads, and thats a skill if you needed to do it again.
Its hard to tell from your photos whether its dry spray thats causing the dullness, what steps did you do in relation to painting, ie, have you used base coat and then a lacquer, and if so did you use 2k lacquer, ie you had to add a hardener to it?
Its hard to tell from your photos whether its dry spray thats causing the dullness, what steps did you do in relation to painting, ie, have you used base coat and then a lacquer, and if so did you use 2k lacquer, ie you had to add a hardener to it?
I was eager to try the compressor and see if I could get a fair starting result.
It was a rush job because I'm missing both the regulator and water filter part which is still in the post!
Just wanted to get an attempt to see whilst the sun was out and for sure this isn't the end of my efforts.
About 5/10, impressed with the gun as the way it feeds is much more controlled than a aerosol and the gun itself seems decent.
Definitely can go back and do again. Its given me chance to get shape on the bumper I'm happy with at least.
I didn't have any other lacquer just a normal can so layed on a little after basecoat. Also I think I oversprayed the base coat and should have stopped sooner which is probably not helping.
No to 2K epoxy also, that stuff is dangerous and from what I understand you are better having separated breathing systems and air extraction for it.
It was a rush job because I'm missing both the regulator and water filter part which is still in the post!
Just wanted to get an attempt to see whilst the sun was out and for sure this isn't the end of my efforts.
About 5/10, impressed with the gun as the way it feeds is much more controlled than a aerosol and the gun itself seems decent.
Definitely can go back and do again. Its given me chance to get shape on the bumper I'm happy with at least.
I didn't have any other lacquer just a normal can so layed on a little after basecoat. Also I think I oversprayed the base coat and should have stopped sooner which is probably not helping.
No to 2K epoxy also, that stuff is dangerous and from what I understand you are better having separated breathing systems and air extraction for it.
The other thing that I consider a result is that the basecoat seems to be more or less a match I think ? but obviously would stand out a mile if sprayed to a hard line wouldn't it?
I haven't the confidence or skill yet to spray correctly the whole bumper so for just now doing best that I can ( without the complete tools ) to fill in the damage.
Cannot see the dent or scratches any more so that is part success but would like to improve the paint result again sure
daytonavrs said:
I was eager to try the compressor and see if I could get a fair starting result.
It was a rush job because I'm missing both the regulator and water filter part which is still in the post!
Just wanted to get an attempt to see whilst the sun was out and for sure this isn't the end of my efforts.
About 5/10, impressed with the gun as the way it feeds is much more controlled than a aerosol and the gun itself seems decent.
Definitely can go back and do again. Its given me chance to get shape on the bumper I'm happy with at least.
I didn't have any other lacquer just a normal can so layed on a little after basecoat. Also I think I oversprayed the base coat and should have stopped sooner which is probably not helping.
No to 2K epoxy also, that stuff is dangerous and from what I understand you are better having separated breathing systems and air extraction for it.
Obviously I cant teach you to paint on here, but it's all about settings on the gun, you have flow, fan and pressure and it's a balance between those three. You need a fine thin misting with base paint, lots of thin layers, laying it down only on the bit you want to repair, letting it flash off a few minutes between coats, assuming you brought solvent paint that should have mixed it 1:1 with thinners.It was a rush job because I'm missing both the regulator and water filter part which is still in the post!
Just wanted to get an attempt to see whilst the sun was out and for sure this isn't the end of my efforts.
About 5/10, impressed with the gun as the way it feeds is much more controlled than a aerosol and the gun itself seems decent.
Definitely can go back and do again. Its given me chance to get shape on the bumper I'm happy with at least.
I didn't have any other lacquer just a normal can so layed on a little after basecoat. Also I think I oversprayed the base coat and should have stopped sooner which is probably not helping.
No to 2K epoxy also, that stuff is dangerous and from what I understand you are better having separated breathing systems and air extraction for it.
You then can spread the blend area out a bit further once you've got actual coverage on your repair to blend any shade difference.
You then need 2K lacquer, NOT epoxy, epoxy is a type of primer, its the 2K lacquer that give its shine, it also need to be lacquered over the entire panel, so the entire panel needs to be sanded with something like P600, you cannot generally blend lacquer, it needs to cover the entire panel you are painting. The exception is a smart repair where there are options to blend the lacquer, but thats not for a DIY'er respectfully. The lacquer needs mixing 2:1 with a hardener, but then needs thinning about 5-10% but this comes from experience of conditions, temperature and what the panel is, shape, vertical, horizontal etc.
Its the 2K lacquer that makes it shiny and protects it.
You can get 2K lacquer in an aerosol, you have to pull the pin in the bottom which mixes it with the hardener, once done you have to bin the can as it sets hard.
You have 1K lacquer which is basically a shiny transparent base paint, it does a job but doesn't have the same qualities as 2K lacquer.
You are correct, 2K paint can kill you and needs treating with respect.
Thanks Dave
One other error I've assumed thinner is just isopropyl alcohol is good enough and probably didn't use enough, next time around going to try using Barrettine Cellulose Thinner 500ml in correct ratio
Short of working out a way to connect my new mask setup to some sort of adhoc pipework that lets me breath from inside the house or something,
I think I will stay clear of 2k....
Seen a guy spraying on youtube and he says use PPE and seen videos of him spraying that s t in confined space also looks dodgy but I saw a lot of consensus is there isn't any good enough PPE for it, not sure I'm good enough at holding my breath and running for cover either lol
One other error I've assumed thinner is just isopropyl alcohol is good enough and probably didn't use enough, next time around going to try using Barrettine Cellulose Thinner 500ml in correct ratio
Short of working out a way to connect my new mask setup to some sort of adhoc pipework that lets me breath from inside the house or something,
I think I will stay clear of 2k....
Seen a guy spraying on youtube and he says use PPE and seen videos of him spraying that s
t in confined space also looks dodgy but I saw a lot of consensus is there isn't any good enough PPE for it, not sure I'm good enough at holding my breath and running for cover either lolNo you have to use normal thinners, not cellulose thinners, thats for cellulose paint. I assume you have solvent base paint, what's what most shops sell you? There is water based base that bodyshops use, you have to use a water based thinner for that, but my assumption will be you have a solvent base, so need just a standard thinner for solvent based paint to thin it with.
I'm not going to comment on PPE, an air fed mask is the only safe way, but there are 2K masks sold out there which should hold up to quick garage exposure and they are worn by Smart repairers working outside, but its your decision, but you should be wearing PPE for the whole process, not just the lacquer.
I'm not going to comment on PPE, an air fed mask is the only safe way, but there are 2K masks sold out there which should hold up to quick garage exposure and they are worn by Smart repairers working outside, but its your decision, but you should be wearing PPE for the whole process, not just the lacquer.
Believe it or not it was sold as cellulose paint got for F7Y, not knowing any better that is exactly what I bought and it did say to thin with cellulose. (Autocolourdirect on ebay, aka "Scoobys Paints")
I suppose step 1 should really be familiarising with all the types of paints !
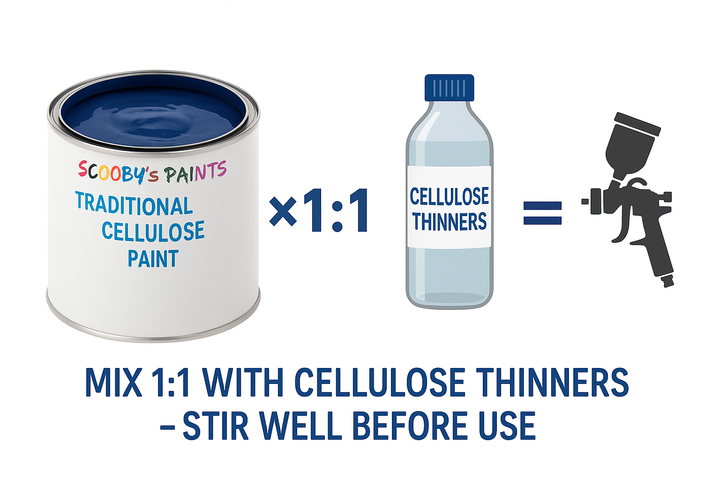
I suppose many of us most commonly use the 1k acrylics which need lacquer over. The cellulose not needing lacquer apparently but can have it
I suppose step 1 should really be familiarising with all the types of paints !
I suppose many of us most commonly use the 1k acrylics which need lacquer over. The cellulose not needing lacquer apparently but can have it
Edited by daytonavrs on Friday 21st August 00:10
Gassing Station | Bodywork & Detailing | Top of Page | What's New | My Stuff