Tamiya 1:24th Porsche 911 GT1
Discussion


Well, I've finally taken the plunge, and bought this:

I walked past my local model shop yesterday and after reading everything on here the temptation was too great. It's still in the box at the moment but I'll make a start on it once I have cleared enough space on the desk.
Right then, who wants to hazard a guess as to what silly mistakes I'll make first? Or wants to warn me about them ahead of time?
I also bought basic tools and paints, if I like doing this one I may have to invest a bit more!
In the spirit of "not spending too much" until I know I like doing this, I didn't buy the 22 ( ) different paints the instructions mention. I don't fancy spending £40 or so if I'm only going to dip the paint brush once...
I plan to only highlight some parts of the engine using some of the paints I couldn't do without (black, orange and red, mostly for the lights and some outside bits). Will this make my engine bay look really bad? Can I touch it up later?
) different paints the instructions mention. I don't fancy spending £40 or so if I'm only going to dip the paint brush once...I plan to only highlight some parts of the engine using some of the paints I couldn't do without (black, orange and red, mostly for the lights and some outside bits). Will this make my engine bay look really bad? Can I touch it up later?
Looks like quite an ambitious project, although it's a good make so should go together with no problems.
Too much glue is a common mistake to begin with as is too little patience so bear that in mind. Also dry fit (i.e. make sure bits go together well without glue) 10X and glue once, if in doubt don't apply glue.
Very lightly sand gluing edges before applying glue - sometimes it's worth running a very sharp blade (like a scalpel) along the gluing edge to remove seams and help give a key.
If this is going to be a closed up shelf model (i.e. doors bonnet etc closed) then don't sweat the small stuff, just paint the interior/engine a suitable colour, if you want to be slightly adventurous then look up "washing" and "Dry brushing" as methods to add depth and highlights to these bits.
Concentrate on getting a good finish to the exterior - the cheapest way is to invest in a tin of halfords primer and halfords appliance white - spray the primer - sand smooth any blemishes and re-apply primer. When happy apply 2-3 light coats of the white, letting each coat cure before continuing.
After you have applied the decals apply a spray of glass\satin varnish
Job should be a good 'un.
Alex@POD said:
Thanks! I am learning patience, and at 30 years old I think I finally got the hang of it
For the exterior finish, how important is having the shell painted, as it has been moulded in white plastic? I'm afraid if I spray paint it I'll lose the panel lines and such...
You'll be disappointed if you don't paint the body.For the exterior finish, how important is having the shell painted, as it has been moulded in white plastic? I'm afraid if I spray paint it I'll lose the panel lines and such...
The key to getting a good finish and not obliterating the detail is light coats. Get some 1500 grit wet and dry and give each coat a light wet sand after it has cured. Make sure you use very light pressure, don't press. Thoroughly wash the shell afterwards and let dry.
Before you apply the decals, apply a light coat of clear. Don't wet sand that coat. Apply the decals, wait for them to thoroughly dry (a box in the airing cupboard is good) and then apply light coats of clear over them. If you wish you can lightly wet sand and polish the last coat for a super glossy deep shine.
The most important thing though, through every process, not just the paint, is to make sure you enjoy it.
Time for a quick update.
I spent a bit more time than planned on this yesterday, so I got a few things done:


I had taken a few pictures through the build so far, but I didn't realise they are all too big to upload...
I'm not completely please with some of the quality of the painted bits, but as it will be mostly hidden I can live with it.
Doing this also brought home the scale of the work DrGn is doing on the Jaguar, I didn't realise everything was this small!
I spent a bit more time than planned on this yesterday, so I got a few things done:
I had taken a few pictures through the build so far, but I didn't realise they are all too big to upload...
I'm not completely please with some of the quality of the painted bits, but as it will be mostly hidden I can live with it.
Doing this also brought home the scale of the work DrGn is doing on the Jaguar, I didn't realise everything was this small!
I think you're doing a fantastic job. So much so that I would suggest for your next one you might consider using a 'dry brush' technique on the black engine castings. Tamiya do some "weathering master" powder type stuff that you can lightly brush over the plastic and it will make the ribs and raised detail become more pronounced. I did this on my Tamiya S2000 and it worked quite well:
(look at the black suspension parts and you'll see the very light gunmetal highlights).
If you can't see your engine when assembled then don't bother, but if you do another you could try it.
Keep up the good work!
(look at the black suspension parts and you'll see the very light gunmetal highlights).
If you can't see your engine when assembled then don't bother, but if you do another you could try it.
Keep up the good work!
I do like that, some weathering "a la doc" would bring it out well
Pictures too big?
If you use a Windows product to operate your 'pooter you already have a built in image resizer in MS Paint, the freeby Art package in your Windose button's Accessories slider
Open paint, [Window button, all programmes, accessories] look along the top for "Image"-"stretch/skew" enter stretch and change the 100% default setting to whatever size you think will let it fit, (I often use 60% or 70% to get a useable image)
Then resave with another name so you keep your original in its highest quality and definition...
(can you tell we'd like to see your other pictures too )
)
Pictures too big?
If you use a Windows product to operate your 'pooter you already have a built in image resizer in MS Paint, the freeby Art package in your Windose button's Accessories slider
Open paint, [Window button, all programmes, accessories] look along the top for "Image"-"stretch/skew" enter stretch and change the 100% default setting to whatever size you think will let it fit, (I often use 60% or 70% to get a useable image)
Then resave with another name so you keep your original in its highest quality and definition...
(can you tell we'd like to see your other pictures too
)Thanks for the support guys, I'll have to read up on the techniques mentioned.
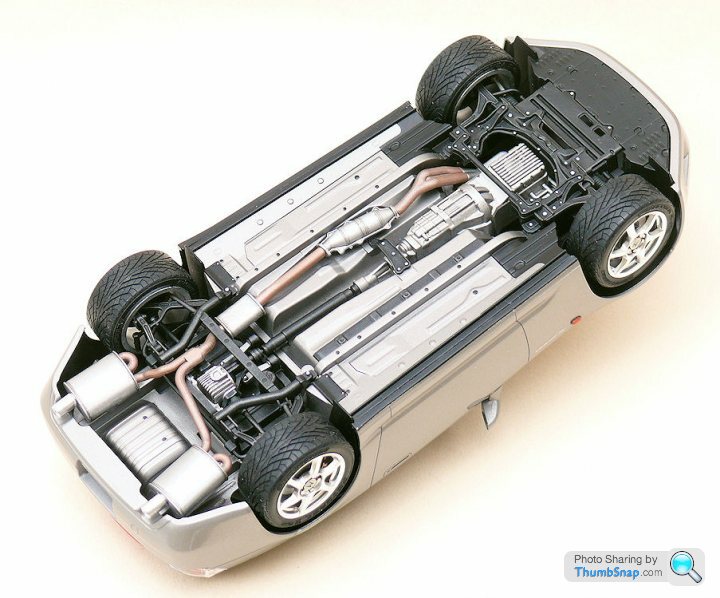
One problem I have is getting carried away, not thinking of you lot. As a result I nearly have a rolling chassis tonight, but I forgot to take pictures through the build so far!
Perdu, a simple "resize them in Paint you numpty" would have sufficed, major blonde moment there... However I have noticed just opening them in Paint and saving without resizing gets the file size down to 700kb from over 2mb...
Anyway:
The first picture I remembered I had to take. You can see the engine and box, cam covers painted red as opposed to 4 different colours in the manual, exhausts manifolds underneath, airbox and basic suspension.


Everything I had left at that point:

Turbos and exhausts fitted:

Fast forward to:


I had a slight problem with overspray but that will be covered in the end...
I have to finish the dashboard, touch up the door panels, fit the seat, the wheels, then I think it will be just the body left!
One problem I have is getting carried away, not thinking of you lot. As a result I nearly have a rolling chassis tonight, but I forgot to take pictures through the build so far!
Perdu, a simple "resize them in Paint you numpty" would have sufficed
, major blonde moment there... However I have noticed just opening them in Paint and saving without resizing gets the file size down to 700kb from over 2mb...Anyway:
The first picture I remembered I had to take. You can see the engine and box, cam covers painted red as opposed to 4 different colours in the manual, exhausts manifolds underneath, airbox and basic suspension.
Everything I had left at that point:
Turbos and exhausts fitted:
Fast forward to:
I had a slight problem with overspray but that will be covered in the end...
I have to finish the dashboard, touch up the door panels, fit the seat, the wheels, then I think it will be just the body left!
Hey Alex
no fair "numpty"
as if it matters
Not everyone realises just how useful "mspaint" is, for free.
he he
The model is looking fine, as you say the overspray is "for later" at least you are painting the shell rather than leaving it and hoping the white plastic looked right
It wouldn't, really
Dry brushing and powder dusting, well, have a go and ask doc and red firecracker amongst others for hints and tips
All I'd offer is, to dry brush, dip in your paint then wipe off every bit of colour you can see, then "dust" the brush lightly over your target area, after wiping the brush again. Needs to be dry!
Then vague, fantastic bits of contrast will eventually just happen
Like all skills you need to practise, if you haven't done it at all, how about painting some of your sprues (the model is on these in the box)* with colour then adding the dry brushing to the edges on them. Soon see the slight colour change come over them and wont risk the model while you practise
bet he tells me he knows what that is already
Thanks for the advice Perdu, I never thought of practising on the sprue!
Here is where I'm at so far:


I'm finding the small decals very difficult and fragile, I am not looking forward to the big ones on the body!
Only the body left to assemble now, and if I remember to pop by the shop to get some gold paint I'll get the wheels the right colour too (gold was out of stock at the weekend).
Here is where I'm at so far:
I'm finding the small decals very difficult and fragile, I am not looking forward to the big ones on the body!
Only the body left to assemble now, and if I remember to pop by the shop to get some gold paint I'll get the wheels the right colour too (gold was out of stock at the weekend).
Oh yessss!
That is looking really good, makes me realise just how little I actually did to my car except when I did the painting…
(Don't ask, I'll never tell!)
When I painted my Sauber I used the sprues a lot when painting the shell and side pods
This left me lots of prepainted sprues which I realised could act as practice pieces
Since I had been a modeller from the sixties 'til the mid-eightis without realising this, just thought I'd pass it on
Anyway
I love the car
No real "fool proof" as often different decals need handling in different ways.
I tend to cut fairly close to the decal and pop into slightly warm water - once the decal loosens from the backing sheet take the whole thing (decal and backing sheet) out of the water and apply to the model just about where you want the decal to go. Then hold the decal and very gently pull the backing sheet from underneath.
For large decals you may want to spend some time so keep the decal wet (I use a paintbrush to apply more water) as you go along.
There are decal solutions to help with softening the decal and helping it settle over raised details which may help but you still need the decal applied in the right place.


 I need to work on my photo skills...
Hint with decals; don't cut too close to them, you need to leave the clear film intact as this slopes away to nothing at the edge. If you cut this edge off you will get a ridge which will a) show and b) make the decal prone to lifting at a later date. I give the completed parts a coat of clear before and after decalling which renders the film invisible. The first coat needs to be gloss but the second can be matt, gloss or satin depending what finish the part requires.
Does anybody use 'klear' floor polish over their models?
Got a tub here that I used to use when I was making the tamiya 1/12 bikes (it is fantastic when touching up damaged table tops!)
I am sure i just use to brush or spray it on (depending how big the part was) and leave to dry for a near perfect smooth, gloss finish.
I used to add a tiny tiny drop of washing up liquid to my warm water when doing decals, and use tweezers for for applying.
Forum | Scale Models | Top of Page | What's New | My Stuff