Complete newbie here
Discussion


Seen some of the threads on here and the absolutely incredible work that has gone into making model kits, so I thought I would give it a shot. Treated myself to a Revell Apollo Spacecraft.
This thread will probably make you guys cringe and make you want to rip your eyeballs out
I just hope that I will get some good advice and eventually improve to the point where I can actually be proud of having a model I made myself sitting on my desk.
So... Onto the gratuitous first picture

This thread will probably make you guys cringe and make you want to rip your eyeballs out
I just hope that I will get some good advice and eventually improve to the point where I can actually be proud of having a model I made myself sitting on my desk.
So... Onto the gratuitous first picture

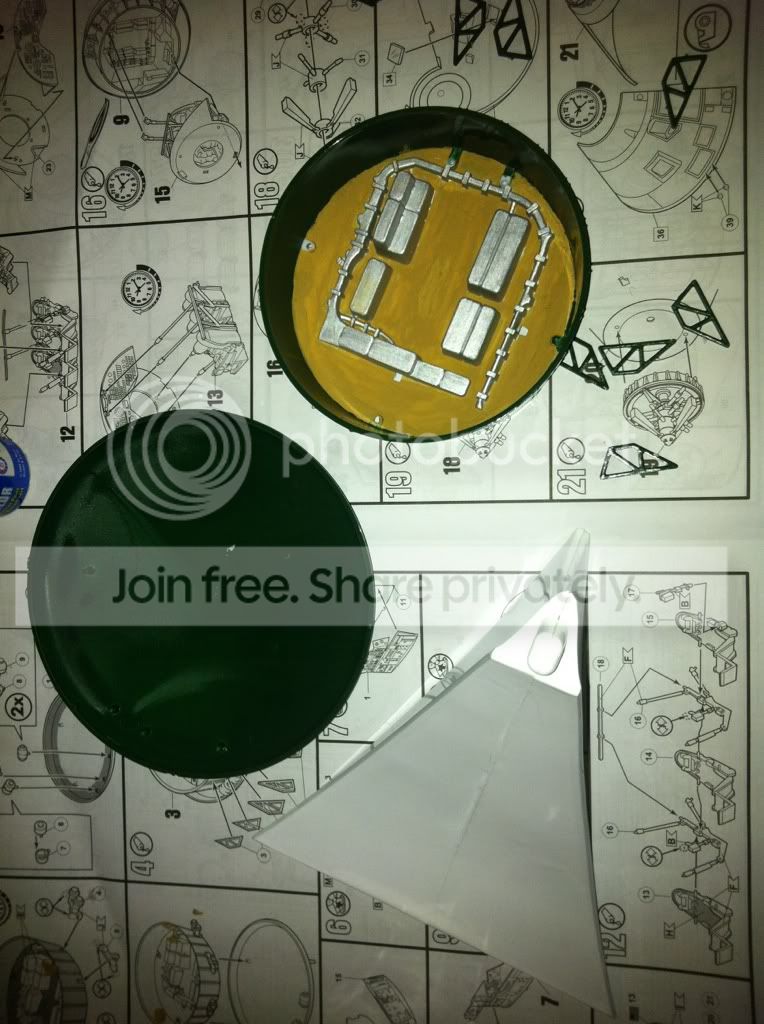
It's the 1/32 kit, I picked it over the others since it has a few big clear panels showing off the insides which I think is pretty cool.
I've already run into problems though. The kit itself came with 4 paints but my friend offered me a load of his old revell paints. If you look in my picture below you can see that the silver areas I painted were done with my friends old paints (enamel) and it came out much nicer, then when I went to paint the cockpit I used the green paint that came with the kit (the one in a plastic container) but it's pretty horrible. It's not very sticky and shows the brush strokes really badly. I think it's water based since it washes off much more easily. Guess the only solution is to just buy better paint?
I've already run into problems though. The kit itself came with 4 paints
but my friend offered me a load of his old revell paints. If you look in my picture below you can see that the silver areas I painted were done with my friends old paints (enamel) and it came out much nicer, then when I went to paint the cockpit I used the green paint that came with the kit (the one in a plastic container) but it's pretty horrible. It's not very sticky and shows the brush strokes really badly. I think it's water based since it washes off much more easily. Guess the only solution is to just buy better paint? Try not to mix enamels with acrylics. They aren't that compatible. I'd stick with enamels - especially if brush painting.
The kit is pretty ancient (pre 1969) so does not accurately depict the actual Block II design Apollo Command and Service Module as used by all the manned Apollo missions.
The kit is pretty ancient (pre 1969) so does not accurately depict the actual Block II design Apollo Command and Service Module as used by all the manned Apollo missions.
Cat Face said:
It's the 1/32 kit, I picked it over the others since it has a few big clear panels showing off the insides which I think is pretty cool.
I've already run into problems though. The kit itself came with 4 paints but my friend offered me a load of his old revell paints. If you look in my picture below you can see that the silver areas I painted were done with my friends old paints (enamel) and it came out much nicer, then when I went to paint the cockpit I used the green paint that came with the kit (the one in a plastic container) but it's pretty horrible. It's not very sticky and shows the brush strokes really badly. I think it's water based since it washes off much more easily. Guess the only solution is to just buy better paint?
If you have large expanses of silver or green, but don't have an airbrush, you could consider getting some Halfords spray cans (their aluminium is pretty good). Silver is notoriously difficult to brush paint to a good finish at the best of times. Don't bother brush painting large areas with acrylics (like the green stuff in the little plastic pots), it's very difficult to get a consistent finish. AS you said, enamels are much better for brush painting.I've already run into problems though. The kit itself came with 4 paints
but my friend offered me a load of his old revell paints. If you look in my picture below you can see that the silver areas I painted were done with my friends old paints (enamel) and it came out much nicer, then when I went to paint the cockpit I used the green paint that came with the kit (the one in a plastic container) but it's pretty horrible. It's not very sticky and shows the brush strokes really badly. I think it's water based since it washes off much more easily. Guess the only solution is to just buy better paint? You can paint enamels over acrylics or vice versa so long as the first coat is completely cured. I have had problems with water based paints lifting off the plastic with the masking tape, possibly becasue the surface wasn't totally clean or was too smooth.
I remember reading threads here where you guys recommended a cheap chinese airbrush, but the ebay links had expired. Can you point me to the correct one?
Yeah, I'm going to go to Halfords/B&Q and pick up some spray paint. I was going to assemble the base last night and it barely fits together, what's the equivalent of polyfiller for these models?
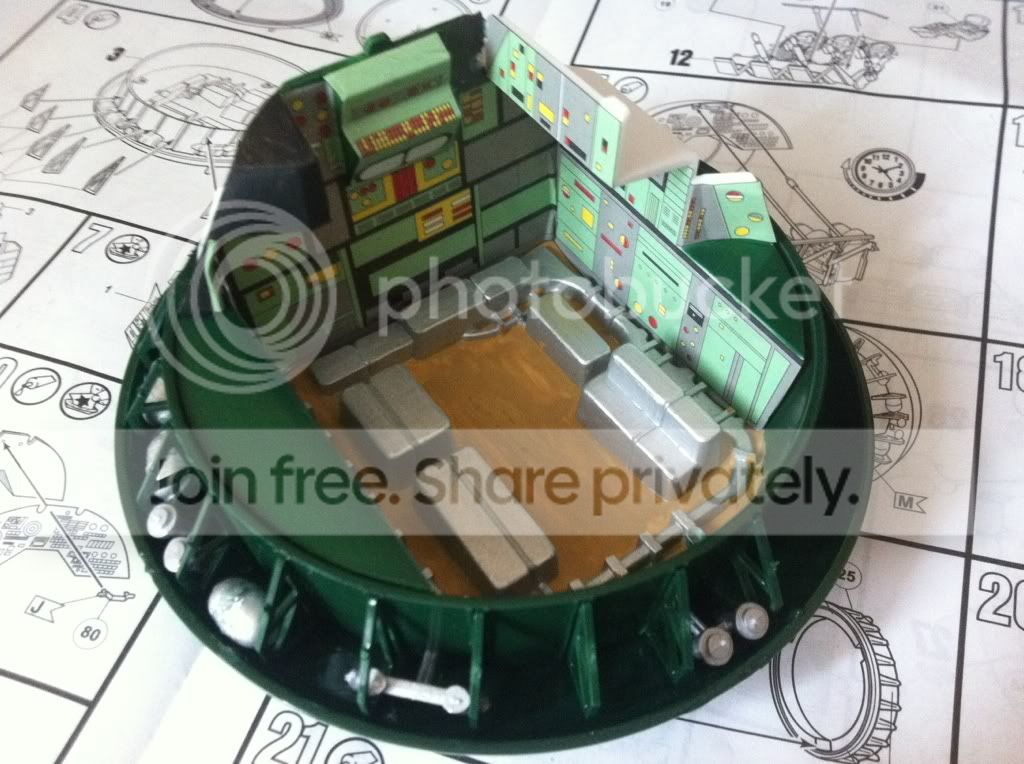
Next stage now is to paint the rest of the command module (the circular piece that I've painted in silver), but the base surrounding the silver has to be green so I'm not looking forward to it. It's too intricate to spray, and the shape is such that you can;t tape it up. I guess this is where an airbrush would come in handy?
Yeah, I'm going to go to Halfords/B&Q and pick up some spray paint. I was going to assemble the base last night and it barely fits together, what's the equivalent of polyfiller for these models?
Next stage now is to paint the rest of the command module (the circular piece that I've painted in silver), but the base surrounding the silver has to be green so I'm not looking forward to it. It's too intricate to spray, and the shape is such that you can;t tape it up. I guess this is where an airbrush would come in handy?
You need to get to a model shop, such as Modelzone or even Hobbycraft - or a local independent if one is nearby.
My local shop (Morningstar in Camberley) sells the cheap Chinese range of airbrushes. They are part of the Expo range of modelling tools.
http://www.expotools.com/store/pages/supportFiles/...
There are a number of model putties and fillers that will work.
Humbrol Model Filler is generally avaiable in most model shops.
Squadron Signal Green or White putty is also fairly easy to get hold of.
Superglues can also be used as a filling medium.
Even Tippex works in certain situations.
When spraying , it is best to lay on a coat of primer first. Halfords spray can White or Grey Primer works really well. Tamiya primer is even better but is more expensive.
Be wary of the painting guidegiven in the model instructions. They are not always correct.
Edited by Eric Mc on Thursday 2nd February 10:09
Cat Face said:
I remember reading threads here where you guys recommended a cheap chinese airbrush, but the ebay links had expired. Can you point me to the correct one?
Yeah, I'm going to go to Halfords/B&Q and pick up some spray paint. I was going to assemble the base last night and it barely fits together, what's the equivalent of polyfiller for these models?
Next stage now is to paint the rest of the command module (the circular piece that I've painted in silver), but the base surrounding the silver has to be green so I'm not looking forward to it. It's too intricate to spray, and the shape is such that you can;t tape it up. I guess this is where an airbrush would come in handy?
I always use Milliput for filler. It's water soluble so you can make it any consistency you need, and unlike the usual "tube" fillers you can fill and mould it for ages before it sets. Any excess can therefore easily be wiped off with a damp cloth before curing (avoiding the risk of damaging surrounding detail by filing or sanding) so that very little work is required after setting.Yeah, I'm going to go to Halfords/B&Q and pick up some spray paint. I was going to assemble the base last night and it barely fits together, what's the equivalent of polyfiller for these models?
Next stage now is to paint the rest of the command module (the circular piece that I've painted in silver), but the base surrounding the silver has to be green so I'm not looking forward to it. It's too intricate to spray, and the shape is such that you can;t tape it up. I guess this is where an airbrush would come in handy?
You'll still need to mask whether you're using a spray can or an airbrush. I can't see why you can't mask the silver base? I always use Tamiya tape. Cut it into small sections and put them in place with tweezers until you've covered the area.
One other thought is that instead of Halfords spray, you might find a better colour match from Tamiya or Humbrol model sprays. In cold weather put them in warm water for a while before spraying, and use very, very light coats built up until you're happy.
Some progress finally. Filler and spray paint arrived so I've completed the base and painted some bits and bobs. I had to brush paint the brown so I'm not too happy. Clearly some brush strokes visible but it will mostly be covered up so hopefully it won't be too noticeable. Spray painting these small parts wastes a lot of paint - I guess airbrushes are less wasteful? I've gone through almost a whole can of humbrol green for those 2 bits!
Cat Face said:
I had to brush paint the brown so I'm not too happy.
You're doing very well if this is your first kit, but since you said you're not happy: You should have sprayed it all. As I said, just cut Tamiya masking tape up into small pieces and apply with tweezers.I'd have sprayed the inner face of the frustum green, masked it completely (easy), then sprayed the yellow base (very easy), then used the 'mosaic' masking technique to completely mask the yellow areas around the raised silver bits (time consuming, but pretty straightforward) before finally spraying them silver.
You could even have tried dry-brushing the silver to highlight the raised details and even added a wash if you were feeling lucky - the wash would have defined the yellow base/silver interface a bit, but it wouldn't have really been necessary.
There are no short cuts

That Sir, is why you are incredible and I am rubbish! I thought you were joking when you said I should mask the silver bits, I don't I have the dexterity to do that. What do you mean by adding a wash?
I've inevitably ended up painting some areas where I need to glue other components onto so should I scratch the paint off before gluing?
I've inevitably ended up painting some areas where I need to glue other components onto so should I scratch the paint off before gluing?
Cat Face said:
That Sir, is why you are incredible and I am rubbish! I thought you were joking when you said I should mask the silver bits, I don't I have the dexterity to do that. What do you mean by adding a wash?
I've inevitably ended up painting some areas where I need to glue other components onto so should I scratch the paint off before gluing?
Not at all - it's not difficult, just time consuming. If you cut masking tape into strips of various random lenghts and widths, you then simply arrange them around the raised (to be subsequently painted silver) features until the area you want masking is covered. You don't even have to cut out the exact shapes you're masking around, you just add layer overlapping layer until everything is done. There's nothing really difficult or skilful about it.I've inevitably ended up painting some areas where I need to glue other components onto so should I scratch the paint off before gluing?
A wash is where you apply very thin (usually dark) paint over a surface, and allow the pigmet to settle in or around any surface features. You then leave it to dry before wiping the excess off with a cloth damped with whatever thinners the wash was made up from. It's important to use dissimilar paint types (eg enamel wash over acrylic base paint), or else the base paint will be damaged. It has the efect of highlighting surface detail. As I said it might take some pratctice, and isn't essential, but well worth a try. do a Google or Youtube search for more info.
You should definitely abrade through any paint on mating surfaces - the glue will work far better becasue it works by effectively dissolving and fusing the plastic together. A layer of paint will hinder this process.
I didn't mean to overwhelm you with advice! The main thing is to enjoy the process. If the above seems too much too soon, then go ahead and finish this model and try some new things on the next one if you want. It will be an impressive model when it's finished.
Eric Mc said:
Don't be afraid to make mistakes. You always learn from them.
I make mistakes all the time even now - but most mistakes are fixable (if a bit frustrating).
I tend to get carried away with details and forget the complete basic fundamentals, like how much glue to put on a particular part without it splodging out of the join, or glueing a part together wihout first checking it won't spring apart on its own.I make mistakes all the time even now - but most mistakes are fixable (if a bit frustrating).
Forum | Scale Models | Top of Page | What's New | My Stuff