1/48 Revell Starfighter Build Log
Discussion


It's been a while since I completed the Hawk build log so I thought I'd do another relatively basic kit.
I'm also working on a Canberra B(I)8 at the moment, I was going to build a Lightning alongside but I thought I'd start that when the Canberra's done.
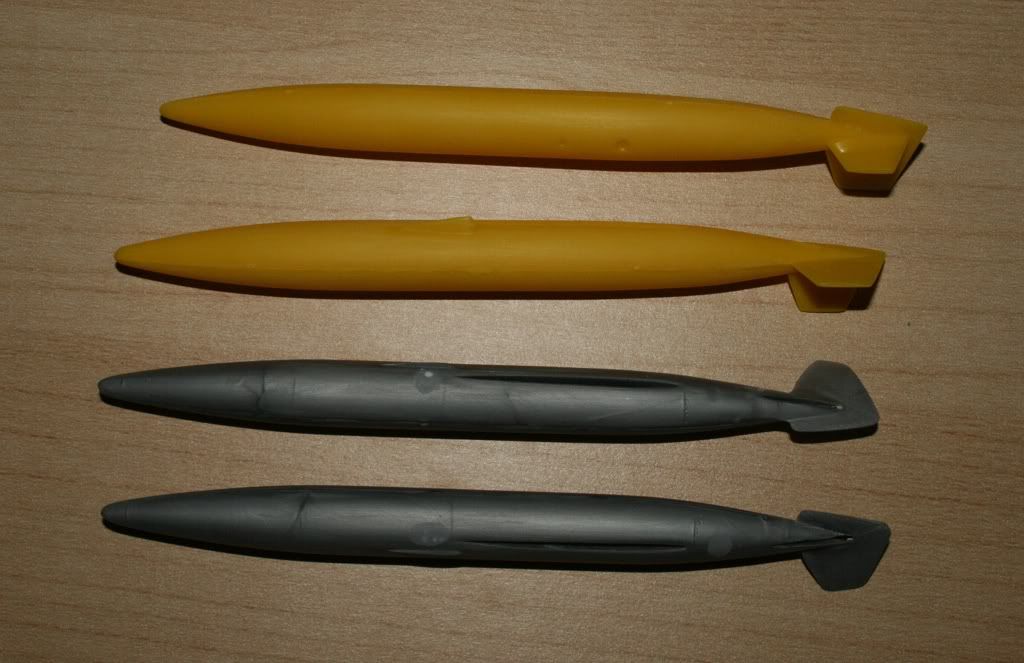
I recently found the remains of an ESCI kit I started a few years back, including a sprue that still had the wingtanks on it. I've always liked the look of the F104 when it had both sets of tanks fitted. The Revell kit only comes with one set of tanks, but now I can fit the extra ESCI ones and get the look I want.
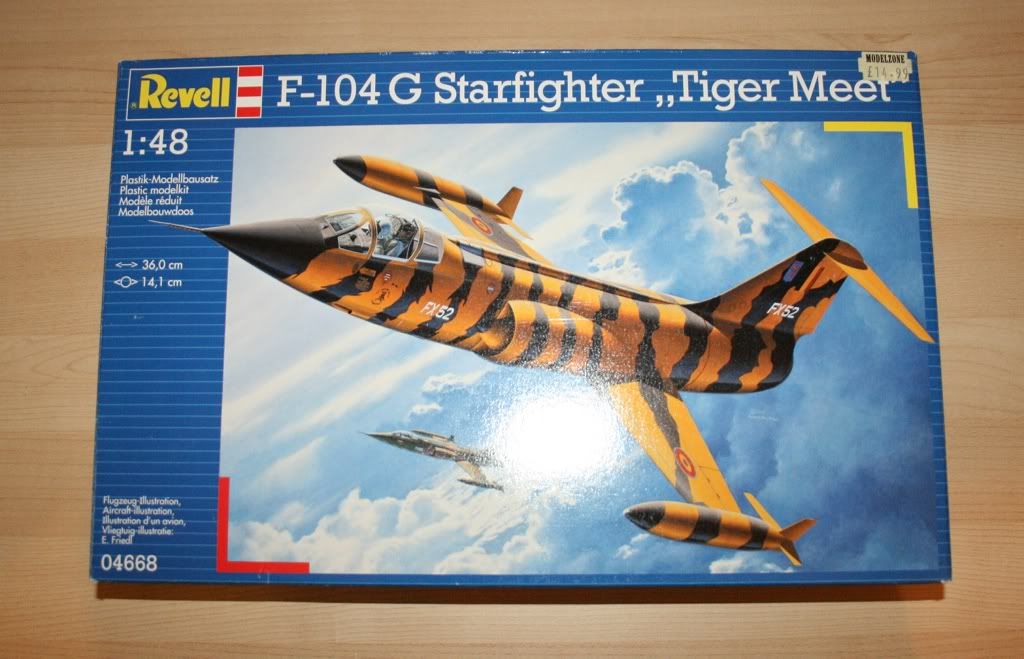
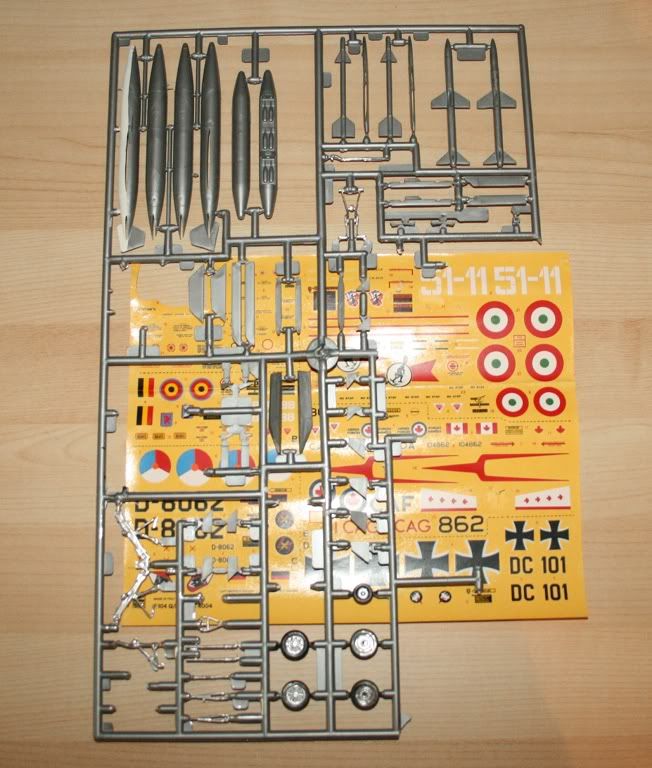
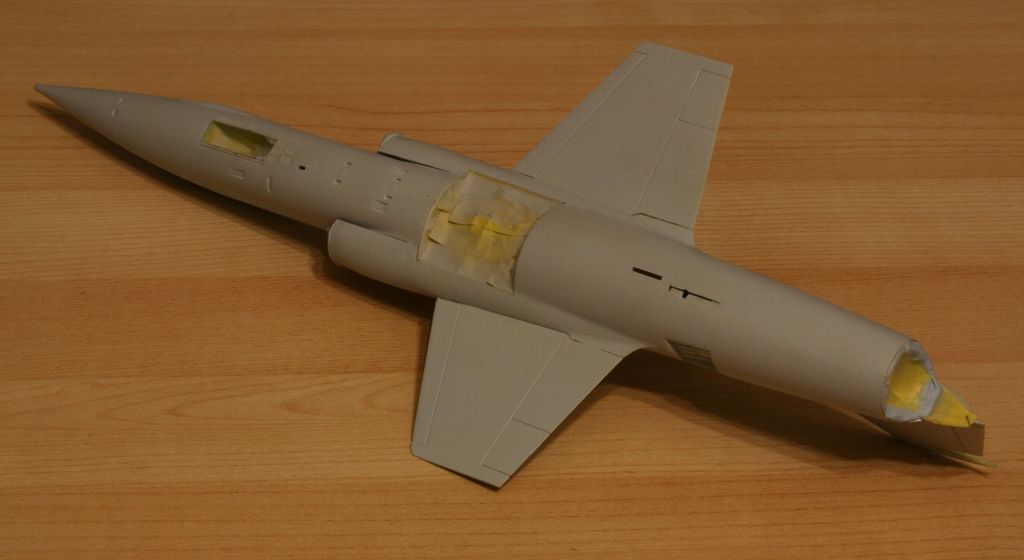
Here's the Revell kit, it's a 'Tiger meet' version.
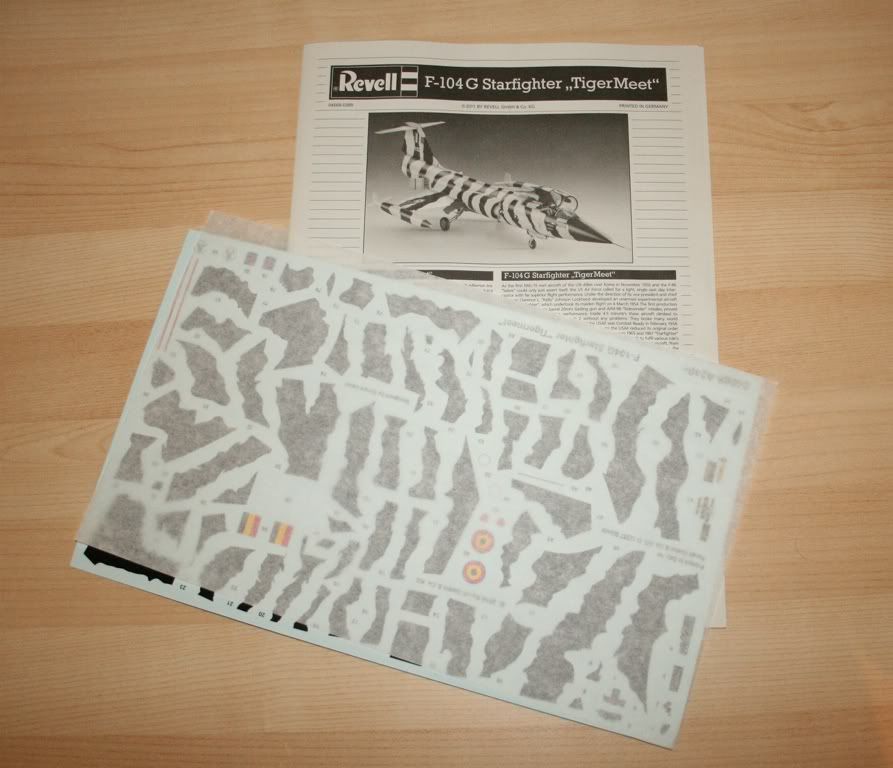
The decals are provided for the stripes, general markings and cockpit instruments, although the cockpit panels have raised lines if you want to dry brush them.
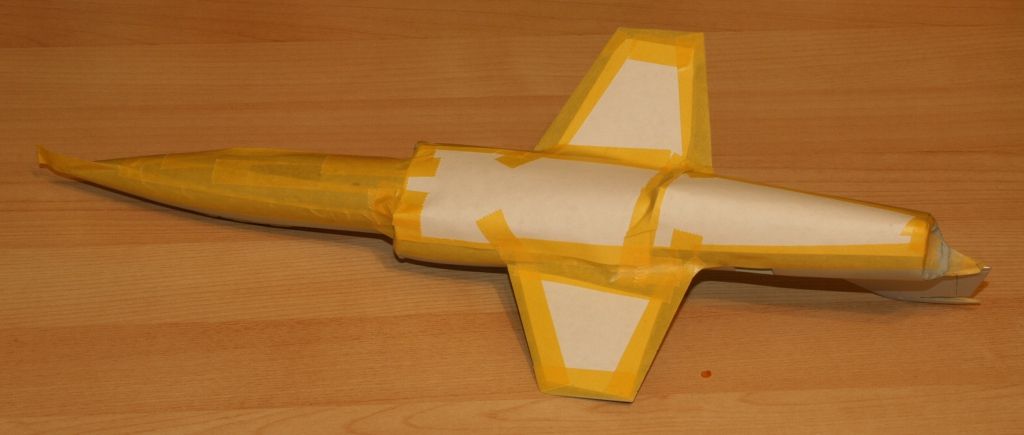
It's a very bright shade of yellow The finer panel lines are raised, although the rudder and ailerons are recessed. The plastic is very shiny in places, I will be using primer on this model.
The fuselage is molded in two halves, top and bottom so any seams will be along the side.
Interestingly, the rear part of the fuselage is separate in the same way that it is on the real aircraft. It's a nice design as the join lines will simulate the real panel lines.
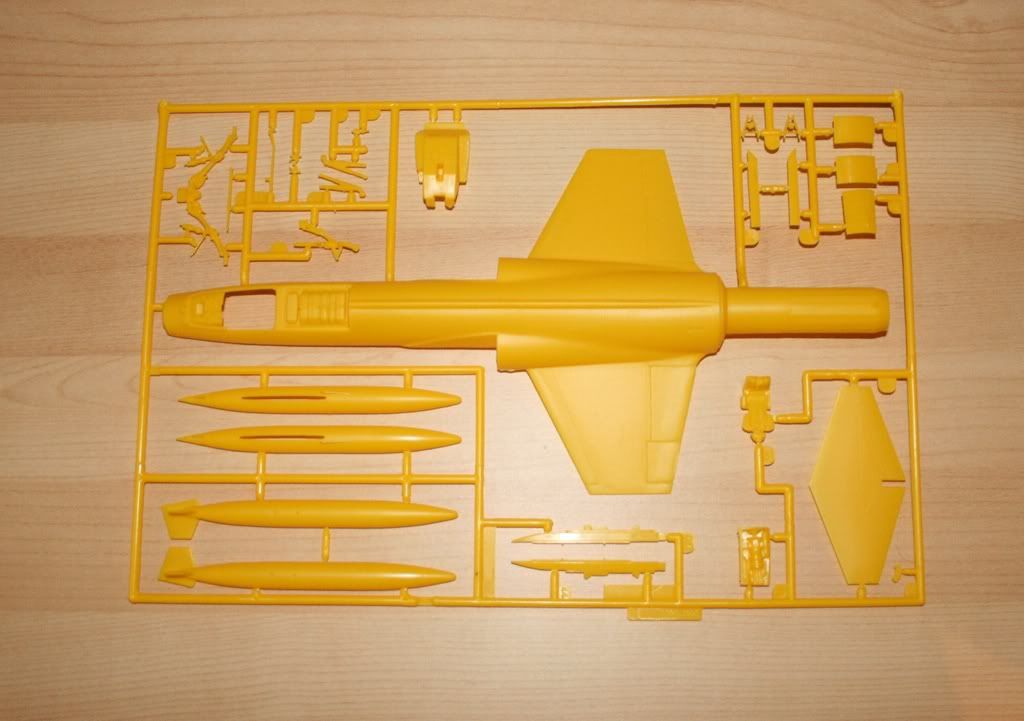
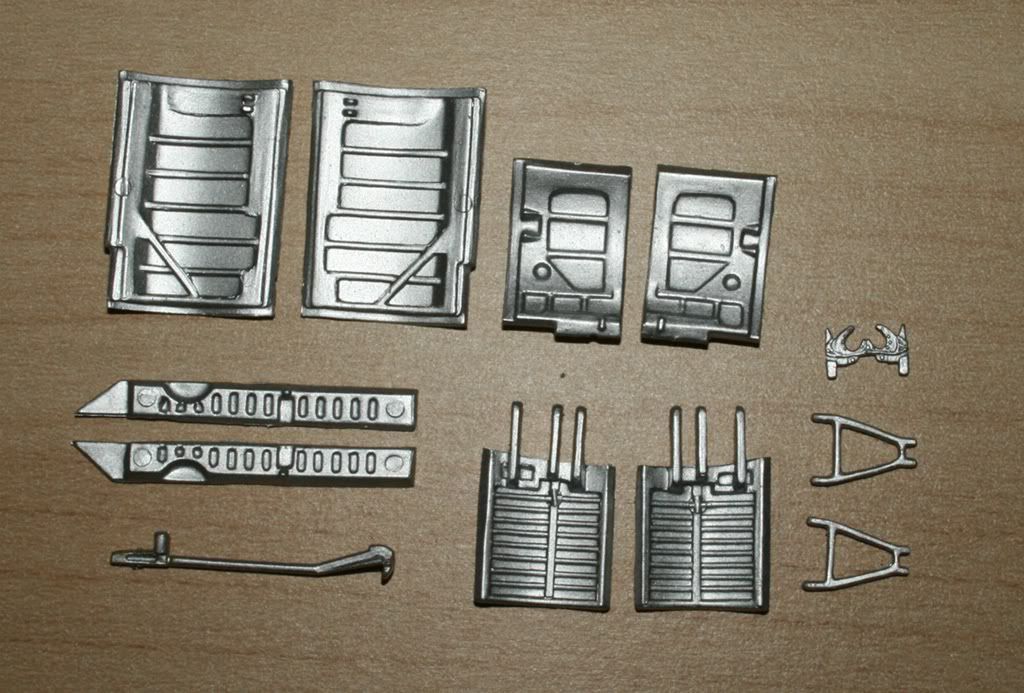
The lower half of the fuselage, tail and canopy, the only weapons are a couple of sidewinders.
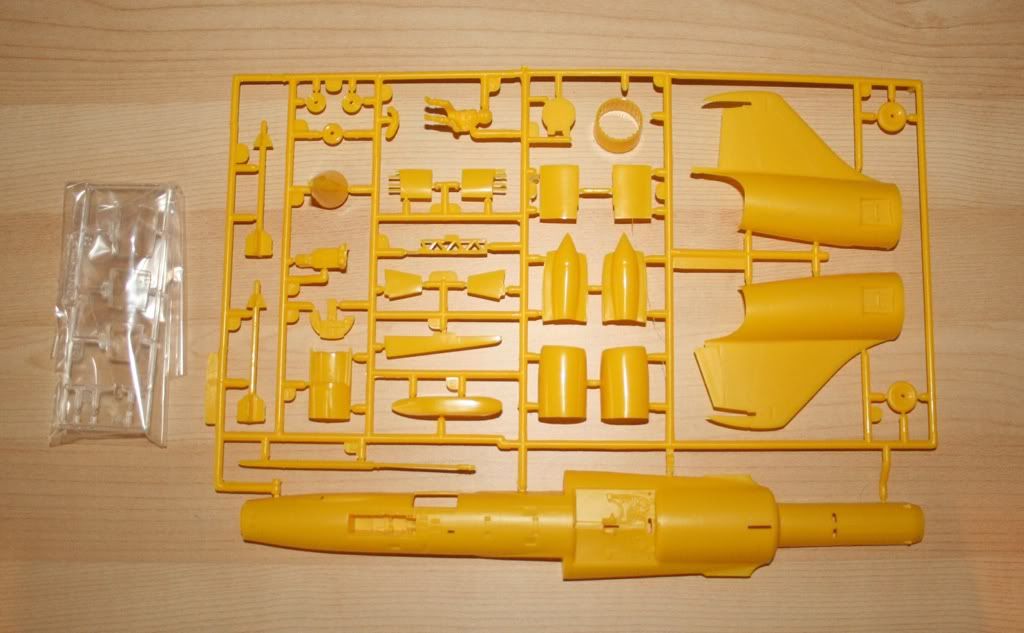
Here are the parts from the old ESCI model I found, raised panel lines on these parts too but a full set of two wingtanks and I even have the decal set! The decals include some general markings that are not on the Revell sheet so they will help to add some detail.
I'd like to build it as a German F104G, like the one here...
http://www.airplane-pictures.net/image1479.html
What will be interesting will be finding the correct shade of fluorescent orange for the wing tanks.
I'm also working on a Canberra B(I)8 at the moment, I was going to build a Lightning alongside but I thought I'd start that when the Canberra's done.
I recently found the remains of an ESCI kit I started a few years back, including a sprue that still had the wingtanks on it. I've always liked the look of the F104 when it had both sets of tanks fitted. The Revell kit only comes with one set of tanks, but now I can fit the extra ESCI ones and get the look I want.
Here's the Revell kit, it's a 'Tiger meet' version.
The decals are provided for the stripes, general markings and cockpit instruments, although the cockpit panels have raised lines if you want to dry brush them.
It's a very bright shade of yellow
The finer panel lines are raised, although the rudder and ailerons are recessed. The plastic is very shiny in places, I will be using primer on this model.The fuselage is molded in two halves, top and bottom so any seams will be along the side.
Interestingly, the rear part of the fuselage is separate in the same way that it is on the real aircraft. It's a nice design as the join lines will simulate the real panel lines.
The lower half of the fuselage, tail and canopy, the only weapons are a couple of sidewinders.
Here are the parts from the old ESCI model I found, raised panel lines on these parts too but a full set of two wingtanks and I even have the decal set! The decals include some general markings that are not on the Revell sheet so they will help to add some detail.
I'd like to build it as a German F104G, like the one here...
http://www.airplane-pictures.net/image1479.html
What will be interesting will be finding the correct shade of fluorescent orange for the wing tanks.
Lovely
This looks like a fun project so please keep us up to speed
That dayglo was a Dockerblaze colour I think (I used to have all that info set aside, all got donated to a guy a few miles away some years ago sorry) An "internet never fails" situation I think. Hi Google!.
Hell of a machine the Starfighter, I love the Tiger stripes in that kit.
I bet that took a bit of patience to get right
Thanks for the info on the colour Perdu, if you do a google image search for 'Dockerblaze' now, images from this thread appear! 
I always thought it was a great looking aircraft. I used to like seeing the Luftwaffe one they had at Lasham, it's now moved to Bruntingthorpe I think.
I've never liked the 'Tiger Meet' schemes though, I prefer combat aircraft in natural camoflage. So I won't be using a lot of Microsol.
Having examined the sprues, it appears to be a Monogram model originally, it certainly looks and feels different to other Revell kits I have built. The parts are quite thin in places but I think with care it should go together ok.
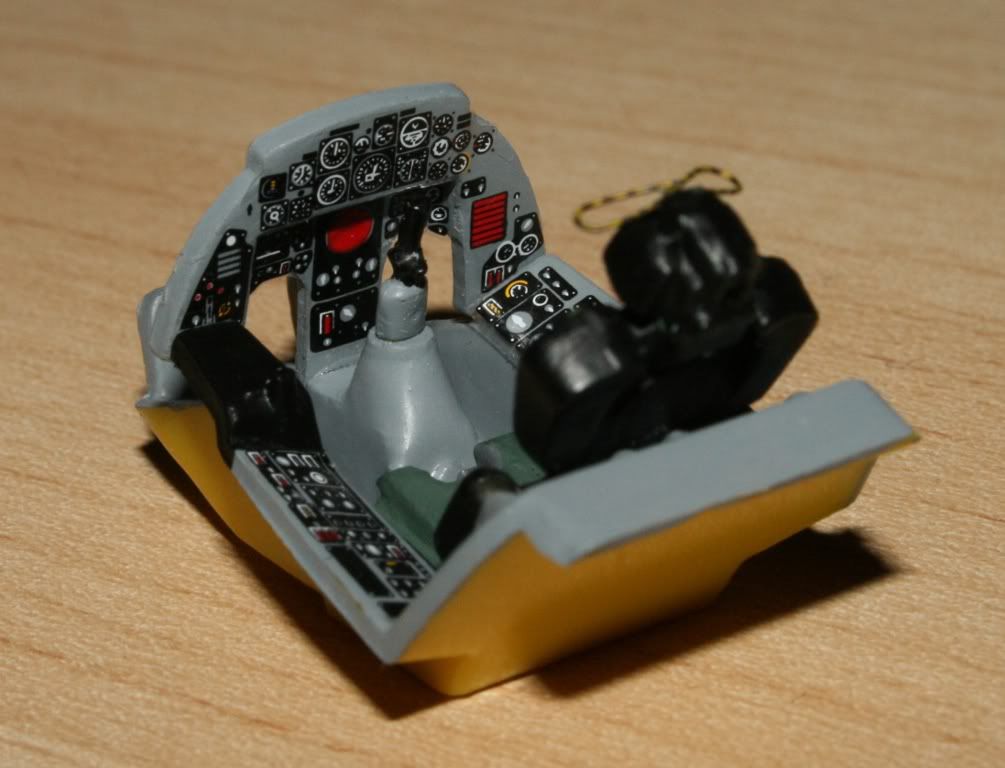
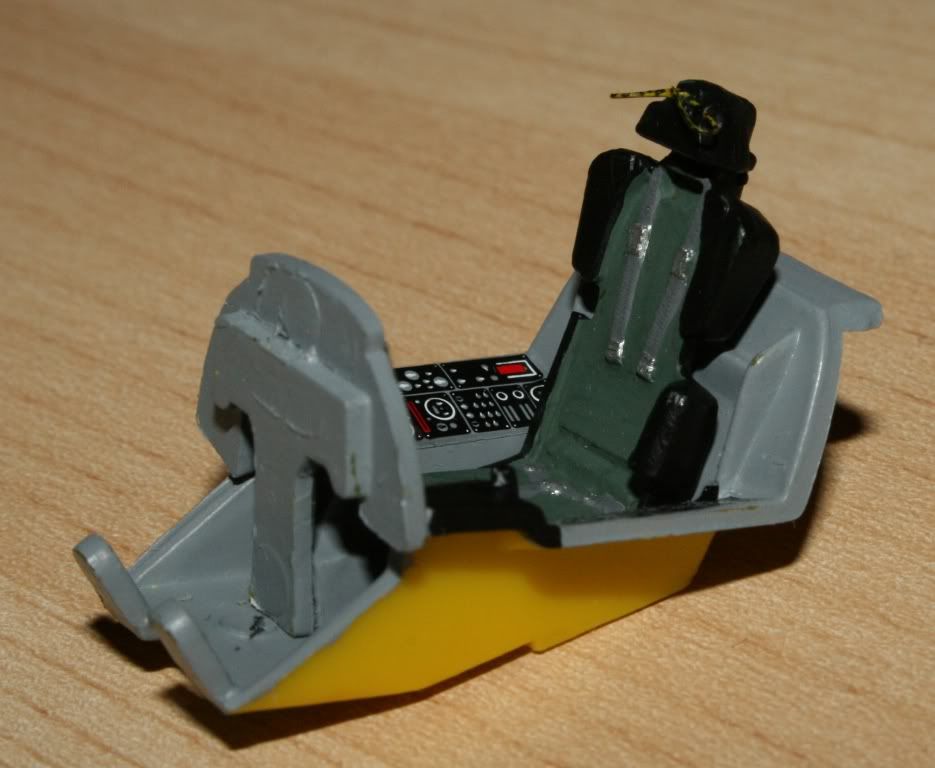
A small update, the cockpit and seat have been completed, so I should be able to join the fuselage halves soon.
The ejection handles were scratchbuilt from 5A fusewire, painted yellow then stripes added with a pen.
I always thought it was a great looking aircraft. I used to like seeing the Luftwaffe one they had at Lasham, it's now moved to Bruntingthorpe I think.
I've never liked the 'Tiger Meet' schemes though, I prefer combat aircraft in natural camoflage. So I won't be using a lot of Microsol.
Having examined the sprues, it appears to be a Monogram model originally, it certainly looks and feels different to other Revell kits I have built. The parts are quite thin in places but I think with care it should go together ok.
A small update, the cockpit and seat have been completed, so I should be able to join the fuselage halves soon.
The ejection handles were scratchbuilt from 5A fusewire, painted yellow then stripes added with a pen.
Good start to the kit, will be good to see how it comes out.
I had a Tigermeet Starfighter when I was younger, a 1/48 kit as well, although I don't think it was a Revell kit.
Mine seemed mega-detailed, lots of panels could be left off to see the gun etc underneath, and I had a choice of ejector seats to select. Thinking about it, it was probably a Hasegawa kit with that level of detail.
It will make a colourful addition to your collection though OP!


SlipStream77 said:
Thanks everyone.
The pictures are useful too, I think then that maybe Humbrol Gloss Orange (18) may do it, it's pretty bright.
You can get flourescent orange: Gunze do one that looks pretty much spot on (H98), and I've used Revell e-mail colour (whatever that means) 32332 luminous red (RAL 3026). I used it as an experiment on a McLaren, but it was a bit too much...The pictures are useful too, I think then that maybe Humbrol Gloss Orange (18) may do it, it's pretty bright.
Best applied over a matt white base.
dr_gn said:
You can get flourescent orange: Gunze do one that looks pretty much spot on (H98), and I've used Revell e-mail colour (whatever that means) 32332 luminous red (RAL 3026). I used it as an experiment on a McLaren, but it was a bit too much...
Best applied over a matt white base.
Thanks, I asked at my local airbrush shop and they had Createx Fluorescent sunburst, which looks pretty close. It's at the bottom of the page.Best applied over a matt white base.
http://www.everythingairbrush.com/acatalog/Createx...
Unrelated to the Starfighter, I was in Modelzone today and they currently have the 1/48 Academy F15E for sale at half price, so I snapped one up. For a big model with PE, Cartograf decals and a lot of stores it's excellent value at £15.
http://www.modelzone.co.uk/academy-f-15e-strike-ea...
Review here...
http://www.cybermodeler.com/hobby/kits/aca/kit_aca...
SlipStream77 said:
dr_gn said:
You can get flourescent orange: Gunze do one that looks pretty much spot on (H98), and I've used Revell e-mail colour (whatever that means) 32332 luminous red (RAL 3026). I used it as an experiment on a McLaren, but it was a bit too much...
Best applied over a matt white base.
Thanks, I asked at my local airbrush shop and they had Createx Fluorescent sunburst, which looks pretty close. It's at the bottom of the page.Best applied over a matt white base.
http://www.everythingairbrush.com/acatalog/Createx...
Unrelated to the Starfighter, I was in Modelzone today and they currently have the 1/48 Academy F15E for sale at half price, so I snapped one up. For a big model with PE, Cartograf decals and a lot of stores it's excellent value at £15.
http://www.modelzone.co.uk/academy-f-15e-strike-ea...
Review here...
http://www.cybermodeler.com/hobby/kits/aca/kit_aca...
A minor update, the Canberra is taking up most of my time at the moment. All the parts that are aluminium are painted but nothing's weathered yet.
Some undercarriage parts, ready for assembly. (I missed and ejector mark)
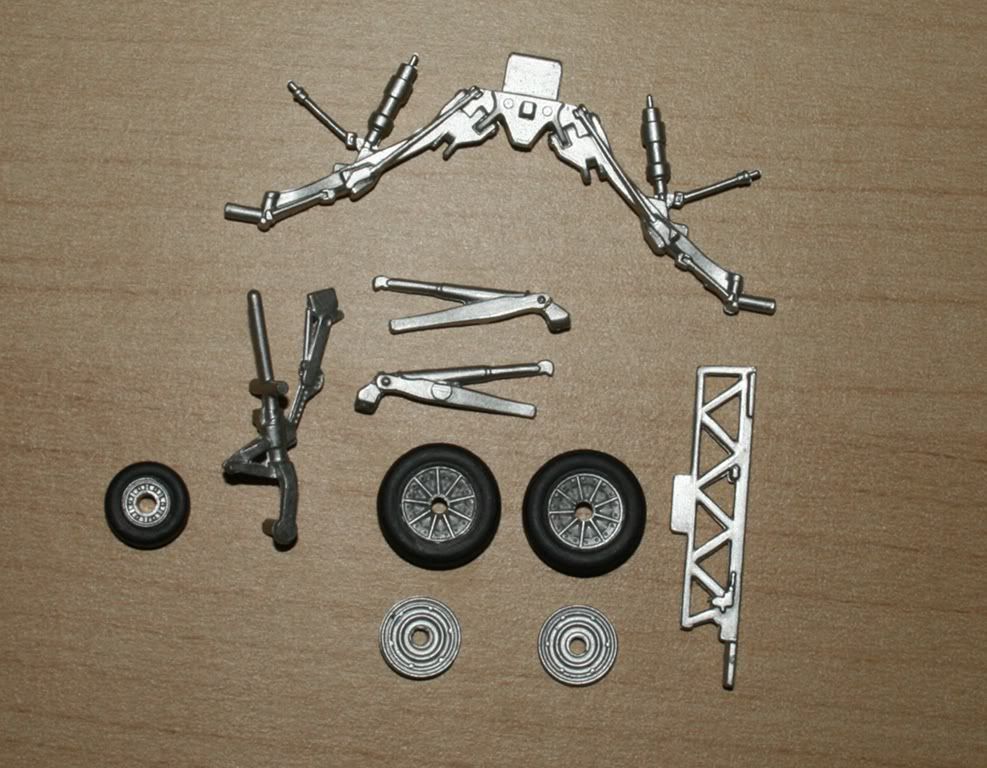
Various undercarriage doors and airbrakes.
Drop tanks, fins still to be attached and some more filling required. Silver tanks are from the ESCI kit.
Rear part of the fuselage joined and the intakes painted and assembled.
Hopefully I will get all the major parts of the fuselage assembled soon and get some photos of it posted. It will need a bit of filling, especially around the cannon access panel but overall the fit is pretty good.
Some undercarriage parts, ready for assembly. (I missed and ejector mark)
Various undercarriage doors and airbrakes.
Drop tanks, fins still to be attached and some more filling required. Silver tanks are from the ESCI kit.
Rear part of the fuselage joined and the intakes painted and assembled.
Hopefully I will get all the major parts of the fuselage assembled soon and get some photos of it posted. It will need a bit of filling, especially around the cannon access panel but overall the fit is pretty good.
dr_gn said:
U/C parts are looking good. Will you be using a dark wash?
Are you adding any hydraulic lines etc.,or is it OOB?
Thanks, yes, I will be using a dark wash on the undercarriage and door internals. Are you adding any hydraulic lines etc.,or is it OOB?
I'm not sure about adding any lines yet, I will have a look at some photos and see if there is anything I think I could do well.
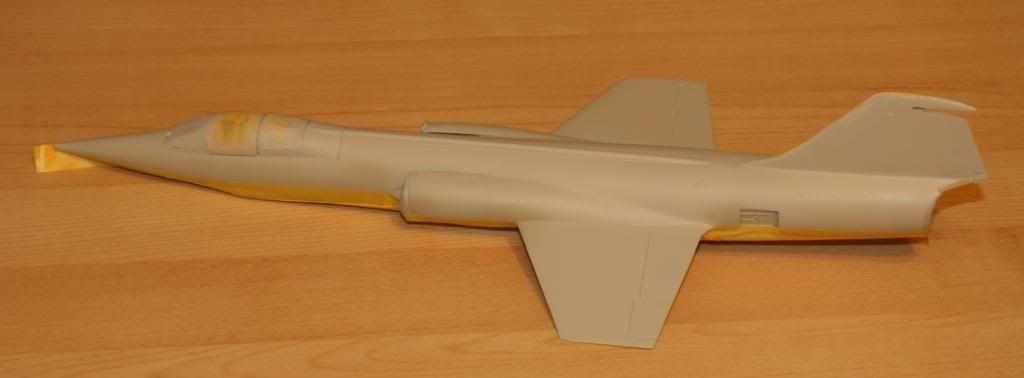
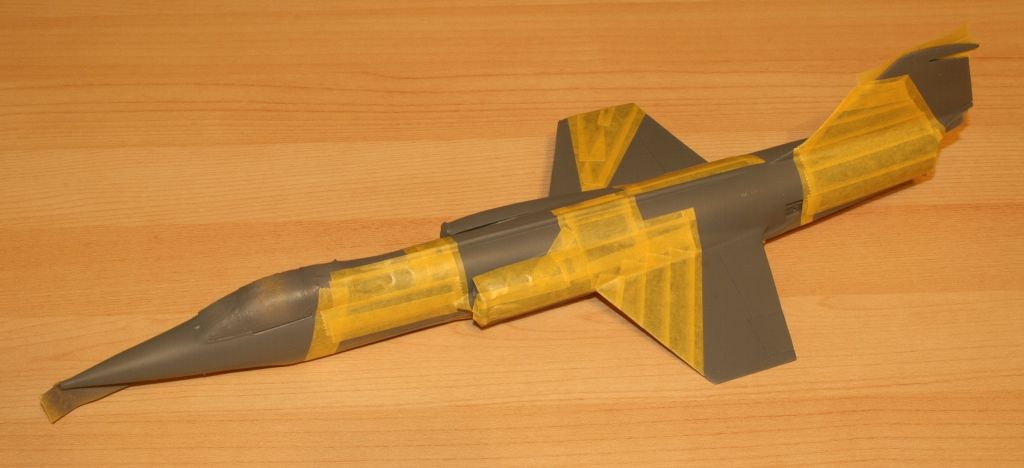
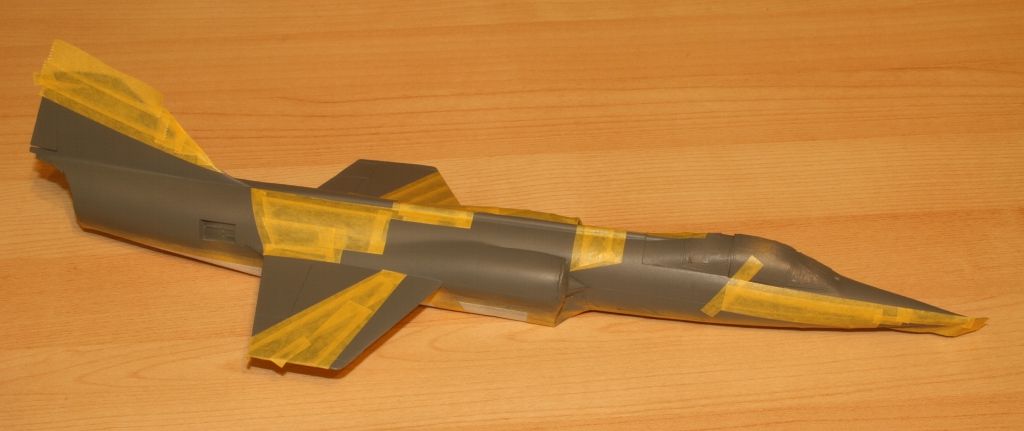
Took a bit of a break from this build and modelling in general, but I'm back to it again! Here's the current progress on the Starfighter, filled and primed.
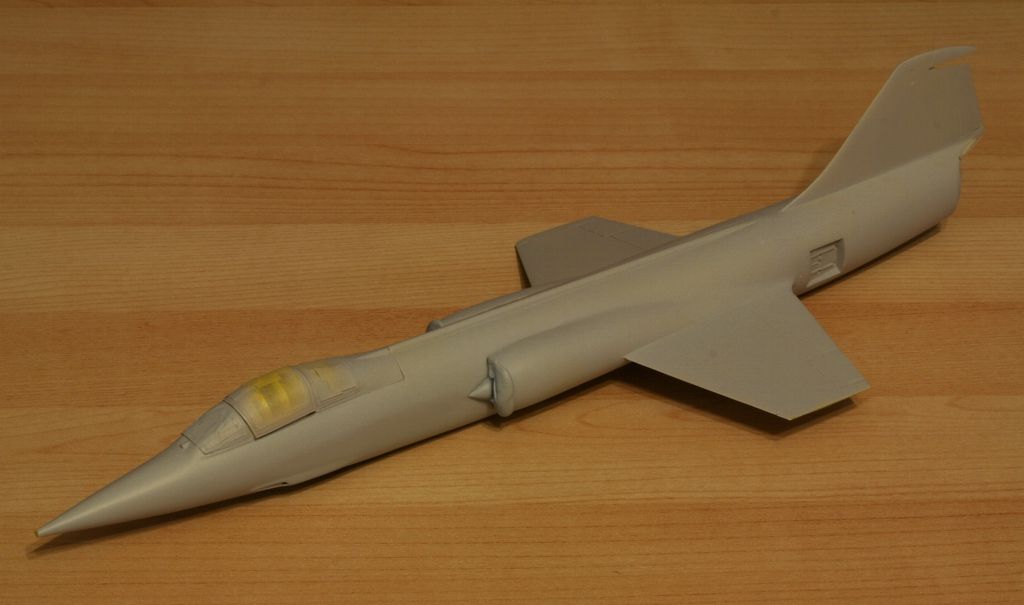
The moveable part of the canopy looks a little loose as it's only held in there by masking tape at the moment. I also decided not to mask the inner parts of the airbrake as they're pretty awkward and the aluminium paint I have brushes on really well anyway.
I might build up the front of the canopy with some filler as there's a step there.
It looks so much better in grey than yellow!
The next stage is a coat of Light Aircraft Grey on the underside, which coincidentally is almost exactly the same shade as the primer...
Most other parts are also ready for their paint too, they're all currently blu-tacked to cocktail sticks so not very photogenic!
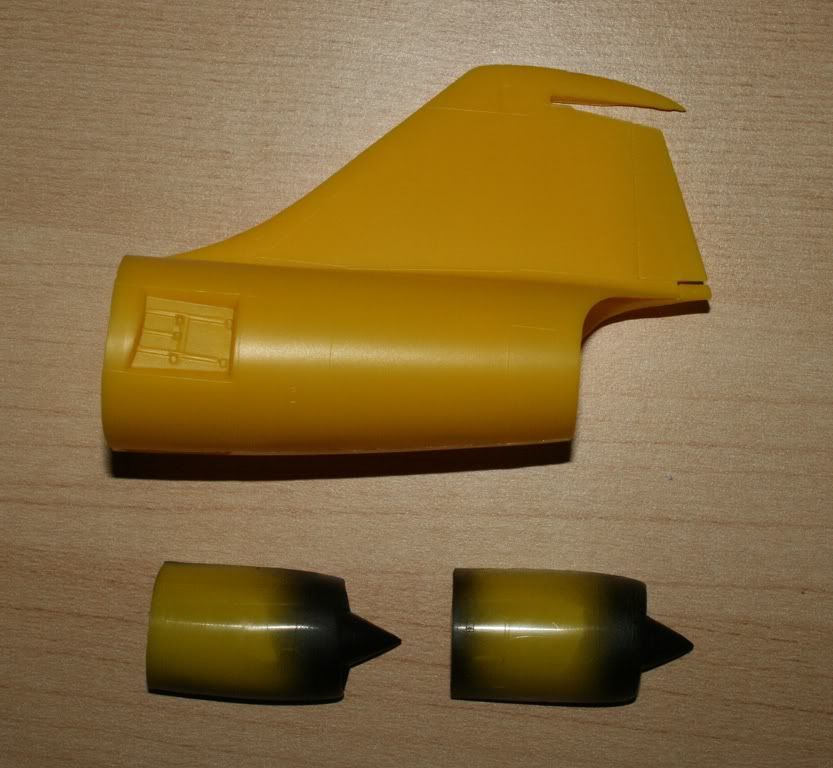
The fuel tanks need finishing, I have to create some fins for a couple of them and they need filling too. It's getting there though, only 9 months and counting since I started!
The moveable part of the canopy looks a little loose as it's only held in there by masking tape at the moment. I also decided not to mask the inner parts of the airbrake as they're pretty awkward and the aluminium paint I have brushes on really well anyway.
I might build up the front of the canopy with some filler as there's a step there.
It looks so much better in grey than yellow!
The next stage is a coat of Light Aircraft Grey on the underside, which coincidentally is almost exactly the same shade as the primer...
Most other parts are also ready for their paint too, they're all currently blu-tacked to cocktail sticks so not very photogenic!
The fuel tanks need finishing, I have to create some fins for a couple of them and they need filling too. It's getting there though, only 9 months and counting since I started!
I had a 1:72 kit of one of these about 5 years ago-
If it's the same story as mine I wouldn't even bother with the Tiger stripe decals.
They didn't fit at all- It was a shame as I tried for ages over the course of about a week trying to get them right but they were massively mismatched with gaps and overlaying all over the shop. I ended up soaking the whole lot in water to remove all the exterior decals and painted them on instead. After this i lost interest in the kit and never finished it. It's still in a box under my desk somewhere at my parents place.
A little more progress on the Starfighter, most of the painting is complete now.
After the primer, the bottom had a coat of Humbrol 166 Light Aircraft Grey which was then masked.
The top then had a coat of Humbrol 164.
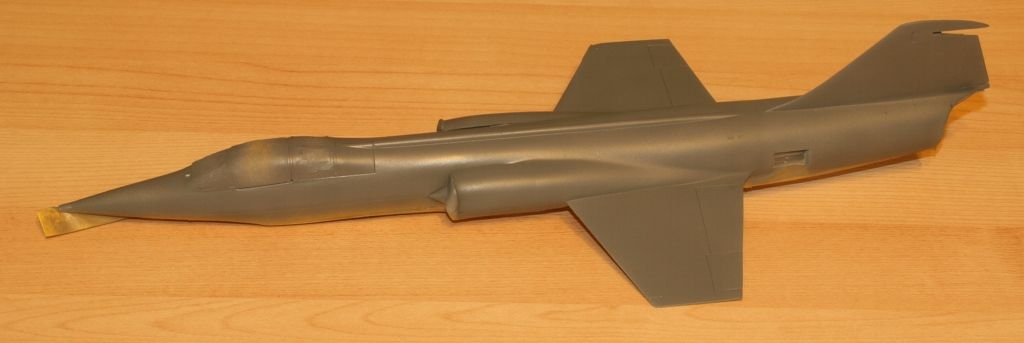
The camouflage masking was applied, Luftwaffe camo' appears to be applied using masking, so it doesn't have a soft edge and it's made up from straight lines. I thought initially this would be easier to do than the 'blu-tack' method for soft masking, in actual fact, it's more time consuming!
Vallejo Olive Grey applied. This is great paint and goes on really well, so easy to use.


And with masking removed this is how it looks as of a few hours ago, I've since sprayed the nose white as per Luftwaffe markings.
The Intakes were sprayed black at a very early stage and masked with Tamiya tape, blutack and masking fluid.
There are a few areas that need retouching but very little paint was removed when the tape came off, probably because I used primer this time!
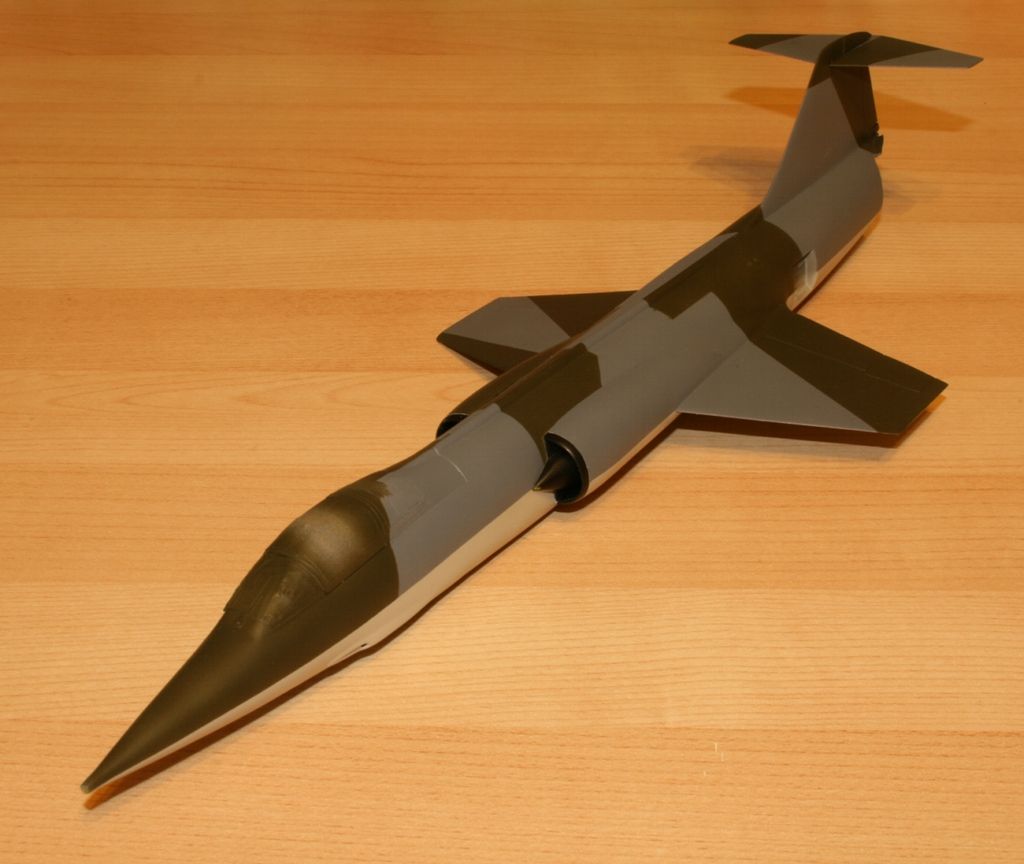
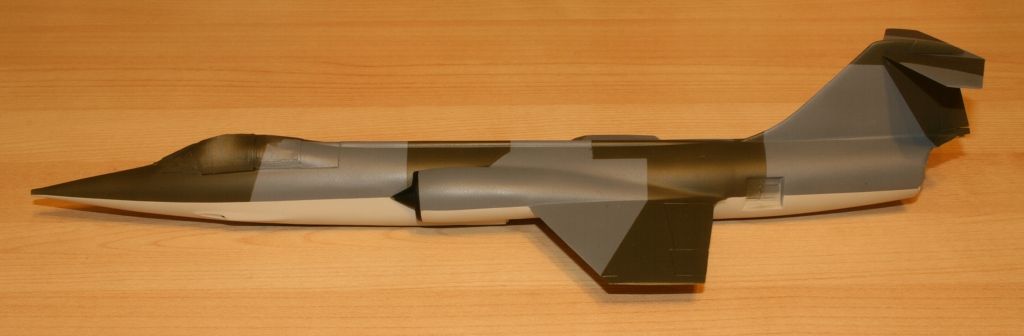
Following the retouching, it just needs a coat of varnish now and I can start applying decals.
The crosses and numbering that came with the ESCI kit are not great so I'm going to be using these instead..
http://www.hannants.co.uk/product/ML48108
Hopefully, the next update should be a fully 'decalled' airframe.
After the primer, the bottom had a coat of Humbrol 166 Light Aircraft Grey which was then masked.
The top then had a coat of Humbrol 164.
The camouflage masking was applied, Luftwaffe camo' appears to be applied using masking, so it doesn't have a soft edge and it's made up from straight lines. I thought initially this would be easier to do than the 'blu-tack' method for soft masking, in actual fact, it's more time consuming!
Vallejo Olive Grey applied. This is great paint and goes on really well, so easy to use.
And with masking removed this is how it looks as of a few hours ago, I've since sprayed the nose white as per Luftwaffe markings.
The Intakes were sprayed black at a very early stage and masked with Tamiya tape, blutack and masking fluid.
There are a few areas that need retouching but very little paint was removed when the tape came off, probably because I used primer this time!
Following the retouching, it just needs a coat of varnish now and I can start applying decals.
The crosses and numbering that came with the ESCI kit are not great so I'm going to be using these instead..
http://www.hannants.co.uk/product/ML48108
Hopefully, the next update should be a fully 'decalled' airframe.
Forum | Scale Models | Top of Page | What's New | My Stuff