Tameo Jordan 198 1:43
Discussion


Not the model I was intending to tackle next, but I'm still acquiring info on the Pescarolo. So, the next build is this car, the Jordan 198;

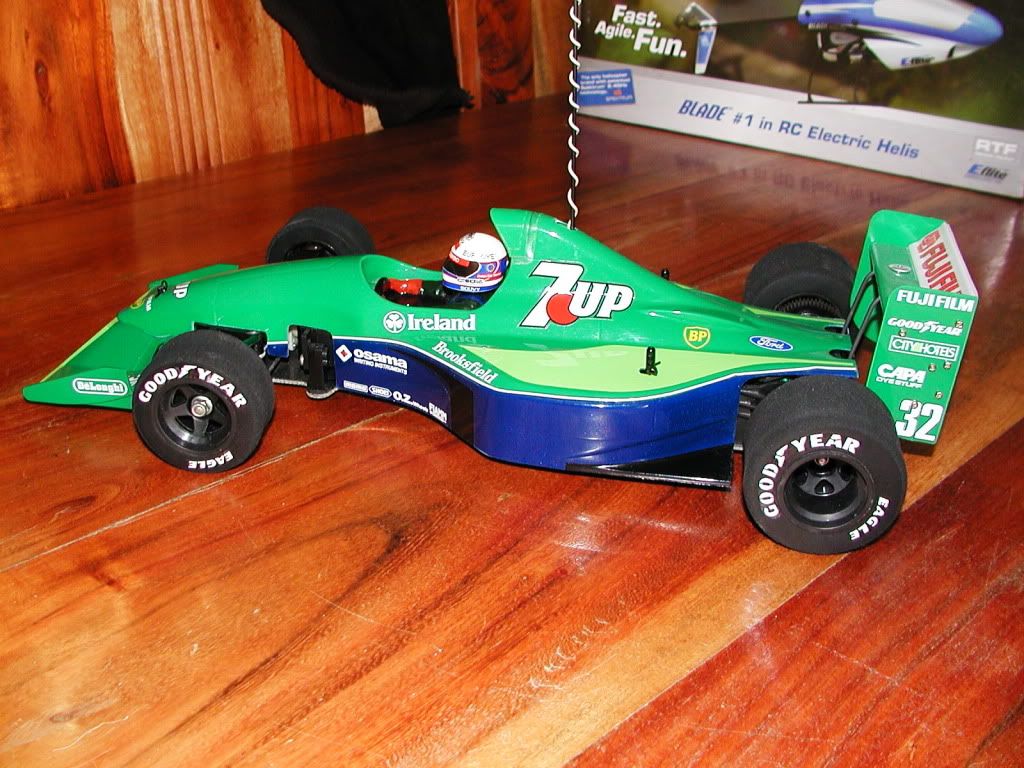
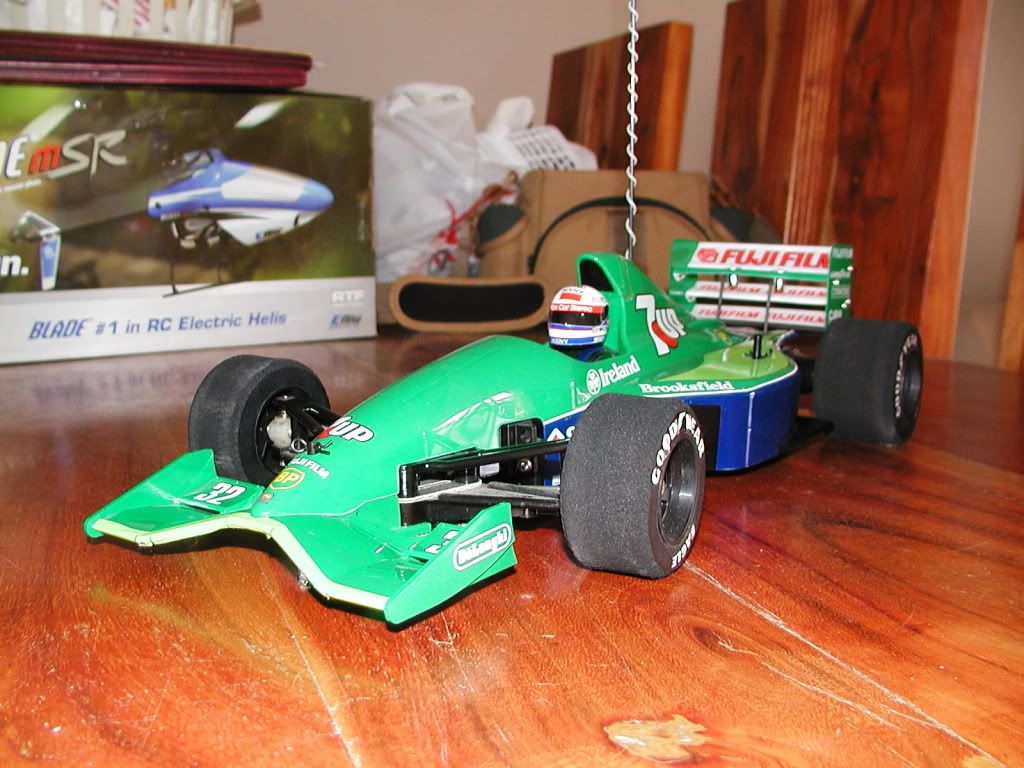
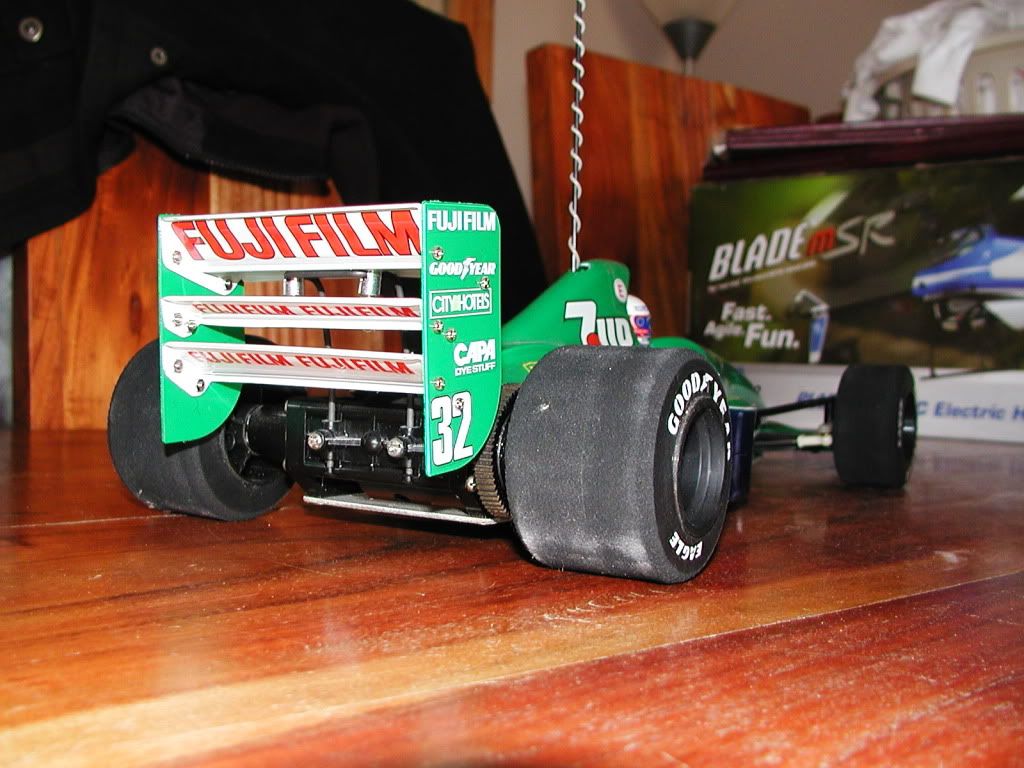
The Tameo kit is a white meal model with etched and turned accessories, depicting the car from the opening race, the Australian Grand Prix. Unusually for me, there's also a blooming good instruction sheet!

jordan198-5 by Red Firecracker, on Flickr
This is the bulk of the kit, with white metal main castings, a bag of bits and a couple of sheets of etch;

jordan198-1 by Red Firecracker, on Flickr
The etches are pretty comprehensive and very fine in places. You'll notice a few bits missing from the sheet as this kit had previously been started before coming to me. The rear wing had been constructed and a couple of bits attached to the body. I has taken apart the rear wing to fully clean and reconstruct.
Here is the contents of the bag;

jordan198-3 by Red Firecracker, on Flickr
As you can see, typical Tameo, all nice and clean and sharp.
Decal wise the kit is well provided for, with two sheets of decals so plenty of spares. It also contains separate sheets form the ever so naughty tobacco decals and a colour chip for the correct shade of yellow.

jordan198-4 by Red Firecracker, on Flickr
On to construction.
First job, a nice and easy one, was to open out the upper seatbelt slots in the seat;

jordan198-9 by Red Firecracker, on Flickr
Next I moved onto the body and ground out the airbox hole to add some depth;

jordan198-6 by Red Firecracker, on Flickr
Also, the holes in the body were drilled;

jordan198-7 by Red Firecracker, on Flickr
And now onto the first issue. Unusually for Tameo, in my experience, there is quite a nasty step between the floor and sidepod on one side;

jordan198-8 by Red Firecracker, on Flickr
The black mark on the upper edge of the sidepod in this picture is the amount of material that needs to be removed. I need to look through my library of Jordan books to get some good images of the sidepod from the right race to see how much sculpturing needs doing rather than plain shaving.

jordan198-10 by Red Firecracker, on Flickr
Added to that there is quite a bit of work to do where the floor joins the body, so plenty to do.
The Tameo kit is a white meal model with etched and turned accessories, depicting the car from the opening race, the Australian Grand Prix. Unusually for me, there's also a blooming good instruction sheet!
jordan198-5 by Red Firecracker, on Flickr
This is the bulk of the kit, with white metal main castings, a bag of bits and a couple of sheets of etch;
jordan198-1 by Red Firecracker, on Flickr
The etches are pretty comprehensive and very fine in places. You'll notice a few bits missing from the sheet as this kit had previously been started before coming to me. The rear wing had been constructed and a couple of bits attached to the body. I has taken apart the rear wing to fully clean and reconstruct.
Here is the contents of the bag;
jordan198-3 by Red Firecracker, on Flickr
As you can see, typical Tameo, all nice and clean and sharp.
Decal wise the kit is well provided for, with two sheets of decals so plenty of spares. It also contains separate sheets form the ever so naughty tobacco decals and a colour chip for the correct shade of yellow.
jordan198-4 by Red Firecracker, on Flickr
On to construction.
First job, a nice and easy one, was to open out the upper seatbelt slots in the seat;
jordan198-9 by Red Firecracker, on Flickr
Next I moved onto the body and ground out the airbox hole to add some depth;
jordan198-6 by Red Firecracker, on Flickr
Also, the holes in the body were drilled;
jordan198-7 by Red Firecracker, on Flickr
And now onto the first issue. Unusually for Tameo, in my experience, there is quite a nasty step between the floor and sidepod on one side;
jordan198-8 by Red Firecracker, on Flickr
The black mark on the upper edge of the sidepod in this picture is the amount of material that needs to be removed. I need to look through my library of Jordan books to get some good images of the sidepod from the right race to see how much sculpturing needs doing rather than plain shaving.
jordan198-10 by Red Firecracker, on Flickr
Added to that there is quite a bit of work to do where the floor joins the body, so plenty to do.
Looking forward to seeing this one progress, and the techniques you use.
I'd love to have another go at a 1:43 Ferrari 156/85. I think my original one was Tameo, but in those days (1985) there was no photo etch, just white metal, rubber tyres and a bit of blue acetate for the windscreen.
I'd love to have another go at a 1:43 Ferrari 156/85. I think my original one was Tameo, but in those days (1985) there was no photo etch, just white metal, rubber tyres and a bit of blue acetate for the windscreen.


I had/have a bit of a thing for Jordan Grand Prix, so have a fair few books (and bits of car, in fact).
If you look in the first picture, of the real car, the sidepod is not slab sided, it curves back into the floor, which is where the model is wrong on that side, hence the bits that need shaping rather than plain carving down. However, '98 was a year of massive developments (it was the year of the sidepod wings etc,), so I've no doubt that area had lots of changes, especially as the rear wing extensions didn't appear at every race.
If you look in the first picture, of the real car, the sidepod is not slab sided, it curves back into the floor, which is where the model is wrong on that side, hence the bits that need shaping rather than plain carving down. However, '98 was a year of massive developments (it was the year of the sidepod wings etc,), so I've no doubt that area had lots of changes, especially as the rear wing extensions didn't appear at every race.
Red Firecracker said:
I had/have a bit of a thing for Jordan Grand Prix, so have a fair few books (and bits of car, in fact).
Same here re. bits of car - I've got a 191 front wing flap, and a 192 rear tyre, as well as some paint fragments from the scene of DeCesaris's massive crash just before Bridge at the '91 BGP:http://www.youtube.com/watch?v=k9AMRgASDEA
I picked a few of them up knowing that they might come in handy if Tamiya ever kitted the 191 - which of course they did!
dr_gn said:
Same here re. bits of car - I've got a 191 front wing flap,
I apologise for the parlance, but Oh. My. God!!!!!! (I have a set of Ian Philips' trousers from '91 and a '91 team polo shirt, how sad is that!)Also got a set of barge boards, a pair of exhaust holders, a brake disc with bell and a pair of V10 exhaust manifolds from '98 cars. That was an expensive day at Silverstone! There was a place that engineered all the old Jordans and they sold off the surplus bits and pieces. The guy was an annoyingly good salesman. I drew the line at a plank, it wouldn't fit in the car.
Red Firecracker said:
dr_gn said:
Same here re. bits of car - I've got a 191 front wing flap,
I apologise for the parlance, but Oh. My. God!!!!!! (I have a set of Ian Philips' trousers from '91 and a '91 team polo shirt, how sad is that!)Also got a set of barge boards, a pair of exhaust holders, a brake disc with bell and a pair of V10 exhaust manifolds from '98 cars. That was an expensive day at Silverstone! There was a place that engineered all the old Jordans and they sold off the surplus bits and pieces. The guy was an annoyingly good salesman. I drew the line at a plank, it wouldn't fit in the car.
Happy days.
Red Firecracker said:
I'd like to add a kit bag from the Barclays sponsored F3000 days to my list of woe as well!
Oh dear, oh Dear. I suppose I'd better mention the Stewart GP carbon brake discs then?Here are the Jordan items:


The wheel is just an old F3000 thing. You should have seen the faces of the lads at the local tyre fitting place when I took that tyre and wheel in...They had to evacuate the place too becasue the tyre was so hard with age, they had to pump it up to some ridiculous pressure to pop it onto the rim. So ridiculous it actually cracked the rim when it finally went!

I think there's a lot of cross over between plastic and mixed media. I don;t have a separate set of tools for each, and the same processes are used in both as well. There are obviously subtle differences in what you can and can't do with the materials, but I think that comes from experience and knowing when to 'listen' to the material.
Red Firecracker said:

That is one area that things have moved on an awful lot. The different types of superglue available now can be quite baffling, but also very useful.
I always used Araldite. What's the best glue these days?
Have you seen the Bosica 156/85? A bit more than white metal in that one!
http://www.miniwerks.com/forum/topic.asp?TOPIC_ID=...
But funnily enough, even though that is an extremely expensive kit, built by a modeller of the highest reputation, there are still little bits on it (in those pictures) that annoy me.
Adhesive wise, I do tend to use superglues and solder nowadays rather than epoxy adhesives, mainly as they are so much more user friendly and quick. Additionally, if I just need a pin prick of glue, that's much easier with super glue than epoxy. The ones with a separate activator are especially fun.
Red Firecracker said:
Have you seen the Bosica 156/85? A bit more than white metal in that one!
http://www.miniwerks.com/forum/topic.asp?TOPIC_ID=...
But funnily enough, even though that is an extremely expensive kit, built by a modeller of the highest reputation, there are still little bits on it (in those pictures) that annoy me.
Adhesive wise, I do tend to use superglues and solder nowadays rather than epoxy adhesives, mainly as they are so much more user friendly and quick. Additionally, if I just need a pin prick of glue, that's much easier with super glue than epoxy. The ones with a separate activator are especially fun.
Hmmm, I see what you mean - How come someone can take so many pictures of a model with a bent rear wing? The front suspension wishbones are way too thin and the rose joint detail is a bit cack-handed too. Yellow cockpit? Don't like the finish on the tyres either. The other thing that catches my eye is the seat harness is floating above the seat.http://www.miniwerks.com/forum/topic.asp?TOPIC_ID=...
But funnily enough, even though that is an extremely expensive kit, built by a modeller of the highest reputation, there are still little bits on it (in those pictures) that annoy me.
Adhesive wise, I do tend to use superglues and solder nowadays rather than epoxy adhesives, mainly as they are so much more user friendly and quick. Additionally, if I just need a pin prick of glue, that's much easier with super glue than epoxy. The ones with a separate activator are especially fun.
Not a bad effort though.
dr_gn said:
Hmmm, I see what you mean - How come someone can take so many pictures of a model with a bent rear wing? The front suspension wishbones are way too thin and the rose joint detail is a bit cack-handed too. Yellow cockpit? Don't like the finish on the tyres either. The other thing that catches my eye is the seat harness is floating above the seat.
Not a bad effort though.
The wing looks blimmin ridiculous and I bet he didnt know itNot a bad effort though.
The yellow cockpit though, might that be high density foam as part of the monocoque safety structure? The colour looks just right if it was fitted to Ferraris back then.
I never "got" factory built models though, sorry guys
If somebody else "built" it why would I want to have it in my collection.
I suppose that is the difference between "Collector" and "Modeller"
Takes all kinds
b
Resurrecting this one after a bit more work (so you have to excuse me if the descriptions for the first pictures are a little vague!)
The next main bit of work from the last post was to sort out the gaps and excess material of the sidepods and also to thin out a few of the trailing edges.
Here are pictures of the side of the casting after the remedial work;

Tameo F1 Jordan 198 1:43 scale by @RedFirecracker, on Flickr

Tameo F1 Jordan 198 1:43 scale by @RedFirecracker, on Flickr
Next, I have thinned out some of the details such as trailing edges of the diffuser and the engine cover.

Tameo F1 Jordan 198 1:43 scale by @RedFirecracker, on Flickr

Tameo F1 Jordan 198 1:43 scale by @RedFirecracker, on Flickr
Now that I was happier with the overall fit and finish, time for some primer;

Tameo F1 Jordan 198 1:43 scale by @RedFirecracker, on Flickr
The picture above is before rubbing down.
Now we get to more recent stuff as in today. Building out of the box can be a bit formulaic, so it's always good to add some spice or challenges into a build. There's not much you can do with engine detail on these, but you can cut lumps off the front! So, being a little bit cautious, and also to give me some bits to create an interesting visual image, I decided to cast additional noses and front wings. First job is to create the mould, which for the nose is a single piece of silicon. I use lego to create a box, seal the bottom with Blu-Tac and then a bit of vaseline over the sides.
The body/nose in the mould looks like this;

Tameo F1 Jordan 198 1:43 scale by @RedFirecracker, on Flickr
The front wing requires a two part mould, upper and lower. So basically the same process, you just need to make sure you have a means of getting the resin into and the air out of the mould, hence the plastic straws (the Blu-Tak is holding then upright whilst the superglue sets);

Tameo F1 Jordan 198 1:43 scale by @RedFirecracker, on Flickr
Once the silicon is dry in this one, I can take it all apart, flip it over, cover the dry silicon in vaseline to stop it sticking and pour the second half of the mould. More pictures of that tomorrow.
The next main bit of work from the last post was to sort out the gaps and excess material of the sidepods and also to thin out a few of the trailing edges.
Here are pictures of the side of the casting after the remedial work;
Tameo F1 Jordan 198 1:43 scale by @RedFirecracker, on Flickr
Tameo F1 Jordan 198 1:43 scale by @RedFirecracker, on Flickr
Next, I have thinned out some of the details such as trailing edges of the diffuser and the engine cover.
Tameo F1 Jordan 198 1:43 scale by @RedFirecracker, on Flickr
Tameo F1 Jordan 198 1:43 scale by @RedFirecracker, on Flickr
Now that I was happier with the overall fit and finish, time for some primer;
Tameo F1 Jordan 198 1:43 scale by @RedFirecracker, on Flickr
The picture above is before rubbing down.
Now we get to more recent stuff as in today. Building out of the box can be a bit formulaic, so it's always good to add some spice or challenges into a build. There's not much you can do with engine detail on these, but you can cut lumps off the front! So, being a little bit cautious, and also to give me some bits to create an interesting visual image, I decided to cast additional noses and front wings. First job is to create the mould, which for the nose is a single piece of silicon. I use lego to create a box, seal the bottom with Blu-Tac and then a bit of vaseline over the sides.
The body/nose in the mould looks like this;
Tameo F1 Jordan 198 1:43 scale by @RedFirecracker, on Flickr
The front wing requires a two part mould, upper and lower. So basically the same process, you just need to make sure you have a means of getting the resin into and the air out of the mould, hence the plastic straws (the Blu-Tak is holding then upright whilst the superglue sets);
Tameo F1 Jordan 198 1:43 scale by @RedFirecracker, on Flickr
Once the silicon is dry in this one, I can take it all apart, flip it over, cover the dry silicon in vaseline to stop it sticking and pour the second half of the mould. More pictures of that tomorrow.
Edited by Red Firecracker on Saturday 27th July 17:40
Forum | Scale Models | Top of Page | What's New | My Stuff