Models in progress...
Discussion


I'm currently working on a couple of models and I thought I'd post one or two photos of the progress.
Feel free to post photos of your current projects in this thread, I'm always interested in build logs. It's a great way of learning new techiques too, I've picked up quite a lot from PH modellers .
.
This is a 1/48 Tamiya F51D Mustang, it depicts the aircraft as used in the Korean war.
The cockpit has just been completed and the next stage is joining the fuselage.
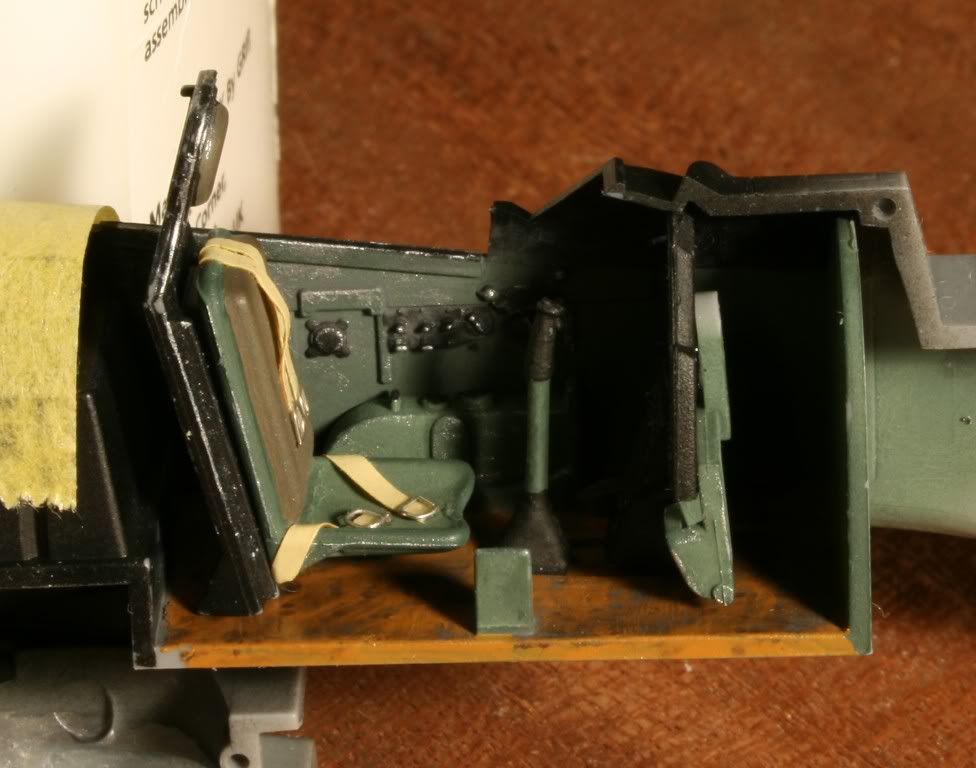
The belts are Tamiya tape, painted and cut to size. Five amp fusewire wrapped around the edge of a steel rule form the buckles, which were then fixed with PVA. There's maybe a little too much dry-brush weathering but I wanted it to look used.

I also dry brushed the instrument panel, thinking it would look better than the provided decal. After some deliberation I decided to try the decal and I think it looks ok, there is a little silvering but it looks a bit like dirt/dust on the panel so I left it.
The cockpit floor was brush painted and looked really bad initially until I applied Promodeller's wash to it and the rest of the cockpit and I think that helped. I guess where the aircraft is stationed there is a lot of mud around.
The other model I'm working on is an old Airfix Jaguar GR3A, it's in the primer stage at the moment so it's not very exciting, I will put some photos up when the camo goes on and the undercarriage is ready.
Feel free to post photos of your current projects in this thread, I'm always interested in build logs. It's a great way of learning new techiques too, I've picked up quite a lot from PH modellers
.This is a 1/48 Tamiya F51D Mustang, it depicts the aircraft as used in the Korean war.
The cockpit has just been completed and the next stage is joining the fuselage.
The belts are Tamiya tape, painted and cut to size. Five amp fusewire wrapped around the edge of a steel rule form the buckles, which were then fixed with PVA. There's maybe a little too much dry-brush weathering but I wanted it to look used.
I also dry brushed the instrument panel, thinking it would look better than the provided decal. After some deliberation I decided to try the decal and I think it looks ok, there is a little silvering but it looks a bit like dirt/dust on the panel so I left it.
The cockpit floor was brush painted and looked really bad initially until I applied Promodeller's wash to it and the rest of the cockpit and I think that helped. I guess where the aircraft is stationed there is a lot of mud around.
The other model I'm working on is an old Airfix Jaguar GR3A, it's in the primer stage at the moment so it's not very exciting, I will put some photos up when the camo goes on and the undercarriage is ready.
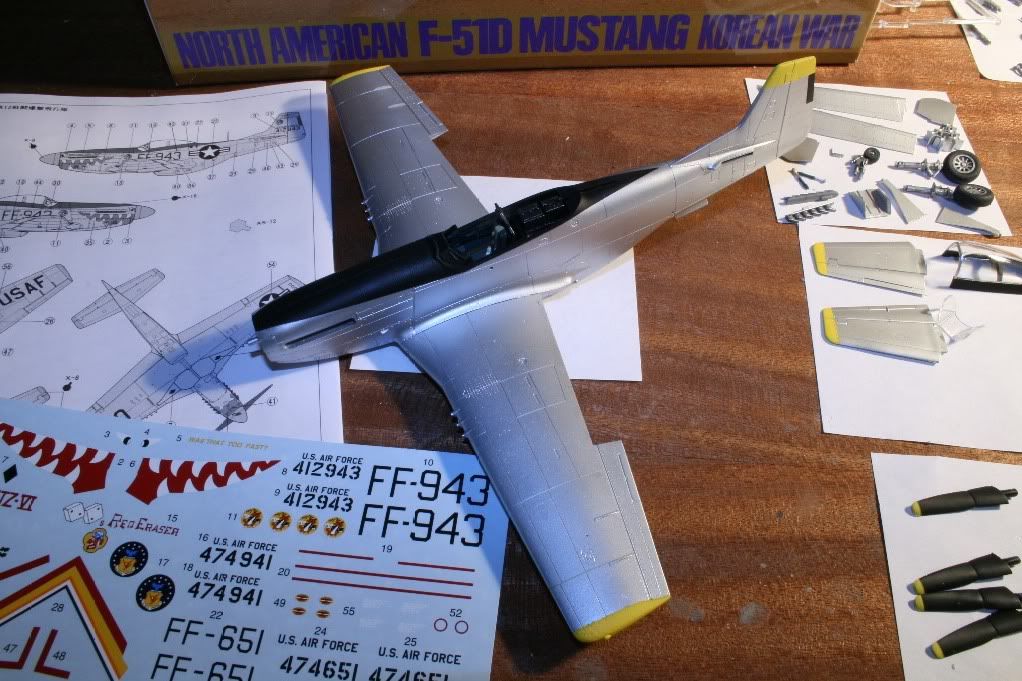
The fuselage and wings are now painted and assembled, the silver paint was difficult to use as it didn't adhere well to the plastic. Also I confirmed that silver shows up dust and the slightest surface defects really well. I think I might try some bare metal foil next time.
Other than that, it's pretty good, working on the decals now. I'm sealing them with Klear because I will be using Promodeller's for weathering when they're done, it's the first time I've used the weathering wash on the body of a model. It should look pretty good in the panel lines and rivets against the silver.
SlipStream77 said:
The fuselage and wings are now painted and assembled, the silver paint was difficult to use as it didn't adhere well to the plastic. Also I confirmed that silver shows up dust and the slightest surface defects really well. I think I might try some bare metal foil next time.
Other than that, it's pretty good, working on the decals now. I'm sealing them with Klear because I will be using Promodeller's for weathering when they're done, it's the first time I've used the weathering wash on the body of a model. It should look pretty good in the panel lines and rivets against the silver.
Don't forget to Klear the entire thing before the Promodeller wash and leave it for a couple of days to harden: If the silver is anything less than a gloss finish, the wash *will* stain it, and if the Klear's not cured and you apply water to get the excess wash off...been there.
dr_gn said:
SlipStream77 said:
The fuselage and wings are now painted and assembled, the silver paint was difficult to use as it didn't adhere well to the plastic. Also I confirmed that silver shows up dust and the slightest surface defects really well. I think I might try some bare metal foil next time.
Other than that, it's pretty good, working on the decals now. I'm sealing them with Klear because I will be using Promodeller's for weathering when they're done, it's the first time I've used the weathering wash on the body of a model. It should look pretty good in the panel lines and rivets against the silver.
Don't forget to Klear the entire thing before the Promodeller wash and leave it for a couple of days to harden: If the silver is anything less than a gloss finish, the wash *will* stain it, and if the Klear's not cured and you apply water to get the excess wash off...been there.
That's useful advice, in the past I've found Klear to give an inconsistent finish when applied using a brush, presumably I can airbrush it? Will it need more than one coat?
SlipStream77 said:
The fuselage and wings are now painted and assembled, the silver paint was difficult to use as it didn't adhere well to the plastic.
Did you use undercoat first? When I used to paint Games Workshop models I used to undercoat the models (plastic and metal) first with a spray white undercoat (several thin layers) and never lost any definition in the detail.FunkyNige said:
SlipStream77 said:
The fuselage and wings are now painted and assembled, the silver paint was difficult to use as it didn't adhere well to the plastic.
Did you use undercoat first? When I used to paint Games Workshop models I used to undercoat the models (plastic and metal) first with a spray white undercoat (several thin layers) and never lost any definition in the detail.SlipStream77 said:
Feel free to post photos of your current projects in this thread, I'm always interested in build logs. It's a great way of learning new techiques too, I've picked up quite a lot from PH modellers
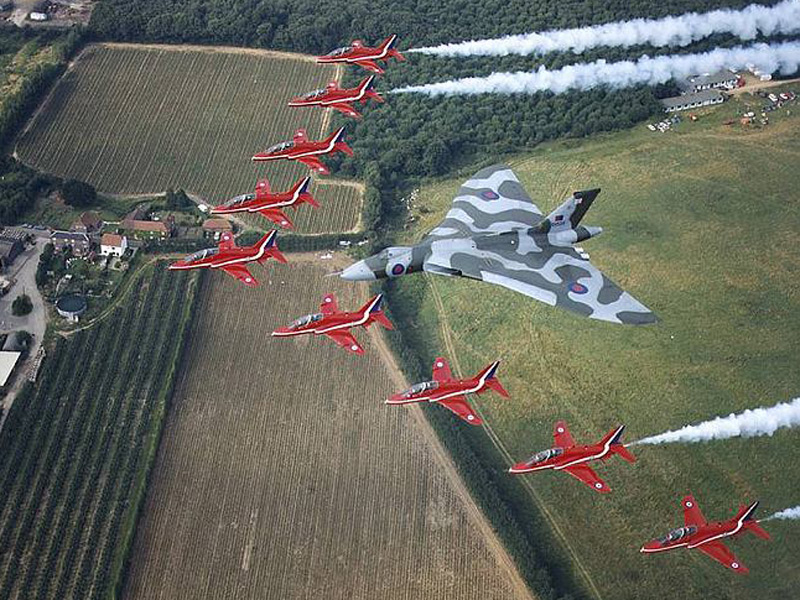
I am currently building 9 Red Arrow Hawks. Red 1 and 2 are ready for paint and in final stages, Red 3 and 4 are in final construction stages 5-6 cockpit area 7-9 boxed. Eventually i will build the Concorde to make this:
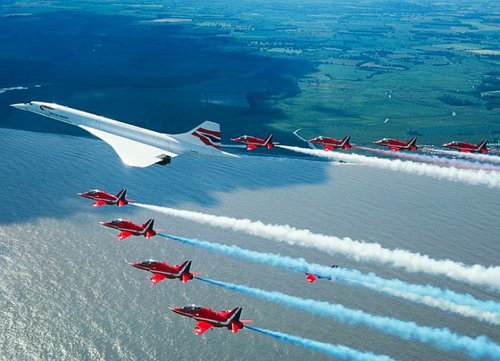
or maybe a Vulcan
Edited by XG332 on Friday 20th August 00:40
SlipStream77 said:
dr_gn said:
SlipStream77 said:
The fuselage and wings are now painted and assembled, the silver paint was difficult to use as it didn't adhere well to the plastic. Also I confirmed that silver shows up dust and the slightest surface defects really well. I think I might try some bare metal foil next time.
Other than that, it's pretty good, working on the decals now. I'm sealing them with Klear because I will be using Promodeller's for weathering when they're done, it's the first time I've used the weathering wash on the body of a model. It should look pretty good in the panel lines and rivets against the silver.
Don't forget to Klear the entire thing before the Promodeller wash and leave it for a couple of days to harden: If the silver is anything less than a gloss finish, the wash *will* stain it, and if the Klear's not cured and you apply water to get the excess wash off...been there.
That's useful advice, in the past I've found Klear to give an inconsistent finish when applied using a brush, presumably I can airbrush it? Will it need more than one coat?
Eric Mc said:
How about modelling theis earlier (1972) Concorde/Red Arrows frormation?

Be a bit of a bummer if he has 9x Hawks rather than Folland Gnats 
(Perennial lurker here to this forum...some amazing skill demonstrated. Very nearly bought a couple of 1:24 kits the other day - Hobbycraft seems to have plenty of the Airfix range, and I fondly remember doing a Harrier as a 14yr old).
Murph7355 said:
Eric Mc said:
How about modelling theis earlier (1972) Concorde/Red Arrows frormation?
Be a bit of a bummer if he has 9x Hawks rather than Folland Gnats (Perennial lurker here to this forum...some amazing skill demonstrated. Very nearly bought a couple of 1:24 kits the other day - Hobbycraft seems to have plenty of the Airfix range, and I fondly remember doing a Harrier as a 14yr old).
My current production line - the old FROG Sea Vizen and the more modern Revell Junkers 87B Stuka - both in 1/72 scale.


The Sea Vixen is a real struggle. The kit originally came out in 1976 or so and was one of the last produced by FROG before they folded. It has reappeared quite a few times since and my version is a 1998 Revell reboxing. It has shape, dimensional and fit issues. The cockpit is also virtually completely bare with a rudimentary and inaccurate ejector seat and the navigator's compartment has no seat at all. I have replaced the origimnal pilot's seat with a white metal Aeroclub Martin Baker Mk 4 and I tarted up the kit seat and gave it to the nav.
The nav's upper roof window was represented by a set of panel lines rather than a proper aperture so I have cut out the necessay "hole".
The Stuka is much nicer being a true 1990s moulding with nice recessed lines and plenty of adequate detail in the cockpit - especially for 1/72. The main problem with this one is the fact that the trailing edge flaps are depicted as being attached to the wing by means of solid, triangular "gussets". In reality, they were attached by wire actuator cables. I have removed the flaps, cut away the solid gussets and will fabricate proper actuators from thin wire.
The Stuka project stalled a couple of months ago when I lost the kit's tailwheel. I eventually found a nice pack of generic white metal tailwheels from Aeroclub and a suitable looking one has been selected.
The Sea Vixen is a real struggle. The kit originally came out in 1976 or so and was one of the last produced by FROG before they folded. It has reappeared quite a few times since and my version is a 1998 Revell reboxing. It has shape, dimensional and fit issues. The cockpit is also virtually completely bare with a rudimentary and inaccurate ejector seat and the navigator's compartment has no seat at all. I have replaced the origimnal pilot's seat with a white metal Aeroclub Martin Baker Mk 4 and I tarted up the kit seat and gave it to the nav
.The nav's upper roof window was represented by a set of panel lines rather than a proper aperture so I have cut out the necessay "hole".
The Stuka is much nicer being a true 1990s moulding with nice recessed lines and plenty of adequate detail in the cockpit - especially for 1/72. The main problem with this one is the fact that the trailing edge flaps are depicted as being attached to the wing by means of solid, triangular "gussets". In reality, they were attached by wire actuator cables. I have removed the flaps, cut away the solid gussets and will fabricate proper actuators from thin wire.
The Stuka project stalled a couple of months ago when I lost the kit's tailwheel. I eventually found a nice pack of generic white metal tailwheels from Aeroclub and a suitable looking one has been selected.
Eric Mc said:
The main problem with this one is the fact that the trailing edge flaps are depicted as being attached to the wing by means of solid, triangular "gussets". In reality, they were attached by wire actuator cables. I have removed the flaps, cut away the solid gussets and will fabricate proper actuators from thin wire.
Eric - attached by wires? Have a look at pages 39/40 of the Aeroclub Stuka book and you'll see the triangular mountings along the flap, the pushrods could indeed be represented by wire, but the mounts themselves are solid. No doubt the model mounts will be overscale, but pieces of thin plastic card or cut-up photo-etch brass would be more appropriate (and a lot stronger) than wire.BTW...did you see this guy on B/M last week?

http://www.britmodeller.com/forums/index.php?showt...
I hadn't as I don't spend a massive amount of time on Britmodeller.
That is depressingly impressive.
The problem with the Revell kit is that ALL the pushrods for the flaps are simple triangular "plates". I think there are smaller triangular attachment points which I will fabricate from card but the actual actuators are definitely triangular shaped wire/cable pushrods.
I have a couple of publication on the Stuka which have plan drawings so I will follow those.
Eric Mc said:
I hadn't as I don't spend a massive amount of time on Britmodeller.
That is depressingly impressive.
The problem with the Revell kit is that ALL the pushrods for the flaps are simple triangular "plates". I think there are smaller triangular attachment points which I will fabricate from card but the actual actuators are definitely triangular shaped wire/cable pushrods.
I have a couple of publication on the Stuka which have plan drawings so I will follow those.
WEll, you've definitely got the Aeroclub Stuka book That is depressingly impressive.
The problem with the Revell kit is that ALL the pushrods for the flaps are simple triangular "plates". I think there are smaller triangular attachment points which I will fabricate from card but the actual actuators are definitely triangular shaped wire/cable pushrods.
I have a couple of publication on the Stuka which have plan drawings so I will follow those.
It's more of a 'walkaround' but has loads of detail shots of the mounts.I'm having a crisis with the 109 at the moment. can't decide whether to fit the engine and mask everyting, or leave the engine out till it's all painted. Trouble is, if I don't glue it all in, I'll never know 'for sure' if the cowings/prop will fit properly. Then again knowing my luck the whole engine will get covered in white overspray if I do fit it...
How about "tacking" the engine and cowling loosely in position - do your masking and painting - and then remove everything once everything is painted for proper "fixing".
The Stuka book I have is actually from the German AirDoc series. Having looked at it again, I realise that it doesn't contain any proper plans but it does feature lots of good quality black and white photos - including one of a Stuka which had conveniently flipped over on its back when landing - nicely exposing all the flap attachment details.
The Stuka book I have is actually from the German AirDoc series. Having looked at it again, I realise that it doesn't contain any proper plans but it does feature lots of good quality black and white photos - including one of a Stuka which had conveniently flipped over on its back when landing - nicely exposing all the flap attachment details.
Edited by Eric Mc on Saturday 21st August 19:39
Eric Mc said:
My current production line - the old FROG Sea Vizen and the more modern Revell Junkers 87B Stuka - both in 1/72 scale.
Coming along nicely. There's a Sea Vixen in the Solent Sky museum in Southampton, it's an almost airworthy example and there is also a seperate cockpit section that you can sit in IIRC.http://www.thunder-and-lightnings.co.uk/seavixen/s...
They might be useful to provide any extra research material.
Edited by SlipStream77 on Saturday 21st August 23:21
dr_gn said:
SlipStream77 said:
dr_gn said:
SlipStream77 said:
The fuselage and wings are now painted and assembled, the silver paint was difficult to use as it didn't adhere well to the plastic. Also I confirmed that silver shows up dust and the slightest surface defects really well. I think I might try some bare metal foil next time.
Other than that, it's pretty good, working on the decals now. I'm sealing them with Klear because I will be using Promodeller's for weathering when they're done, it's the first time I've used the weathering wash on the body of a model. It should look pretty good in the panel lines and rivets against the silver.
Don't forget to Klear the entire thing before the Promodeller wash and leave it for a couple of days to harden: If the silver is anything less than a gloss finish, the wash *will* stain it, and if the Klear's not cured and you apply water to get the excess wash off...been there.
That's useful advice, in the past I've found Klear to give an inconsistent finish when applied using a brush, presumably I can airbrush it? Will it need more than one coat?

It's a floor polish which has excellent covering qualities for models.
Unfortunately, Johnson chose to withdraw this product from the UK market around two years ago so it is now quite rare top find bottles of the stuff.
It is still available in other countries e.g. the US and Australia. In those markets it is refered to as Johnson's Future.
Edited by Eric Mc on Sunday 22 August 13:55
Forum | Scale Models | Top of Page | What's New | My Stuff