DIY heat management
Discussion


Restarted work on the Ultima, lots to do, I’ve decided to have a go at the exhaust heat management, just finished the cat and a bit of the muffler end caps. It can see why its so expensive to have done as it’s very time consuming, the good news is that the materials and tools are readily available, I’ve definitely purchased a more powerful spot welder than needed but really happy with the results. I’ll post more pictures as I get further along.
Hope it’s of interest.
Tim
Hope it’s of interest.
Tim
[url]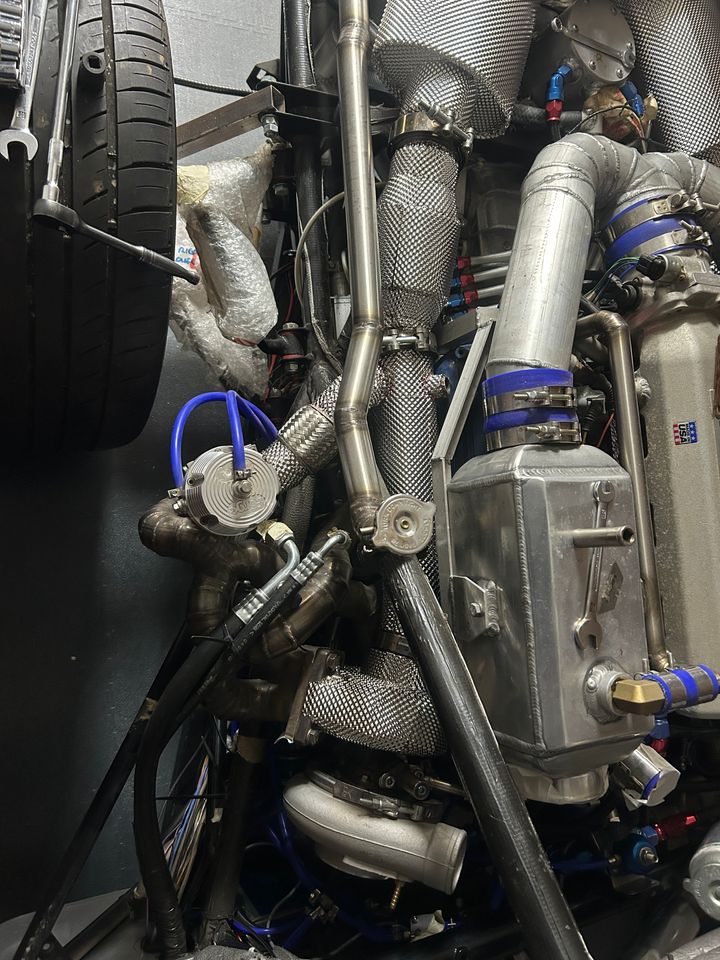 |https://forums-images.pistonheads.com/441902/202605114950534[/
First turbo done, 2nd turbo and manifolds left to do, thinking of doing the waste gate body and making an X pipe to replace the cats to straight pipe it, exhausts on v bands so shouldn’t take to long to change between cats and straight pipe and back again. Should have designed the exhaust for electric bypass, to late now, no room left.
First turbo done, 2nd turbo and manifolds left to do, thinking of doing the waste gate body and making an X pipe to replace the cats to straight pipe it, exhausts on v bands so shouldn’t take to long to change between cats and straight pipe and back again. Should have designed the exhaust for electric bypass, to late now, no room left.
I’ve decided to modify the waste gate feed so each pair of cylinders feeds either side of the twin scroll turbo, at the moment all cylinders are linked, I plan on cutting the waste gate tube along its length and welding in a plate, then finish the heat covering. Had a quick count up and each manifold has approximately 60 patterns made, 60 pieces of heat resistant material and 60 pieces of stainless sheet cut. Once I’ve finished I’ll post the finished system off the chassis and list all the tools, costings and materials used, should make it easy for anyone to do something similar without the research
Regards Tim
List of items used
Amazon 3mm Ceramic Fibre blanket 1260 degrees 1m x 610mm £16.34 each, used 3 x on manifold and down pipes
Amazon 5mm Ceramic Fibre blanket 1260 degrees 1m x 610mm £23 used 1 x on turbo and muffler
AWithZ spot welder £259, much more powerful than I needed, 0.25 on stainless sheet to stainless sheet and 4.25 for stainless sheet to turbo or manifold flange (power goes to 9.99)
EBay Stainless heat shield 1m x 600mm £15.98 used 5 x
Carpet Adhesive used 1.5 cans, used for sticking ceramic fibre to metal parts before applying the stainless sheet, will burn off once running.
Masking tape, used for sticking to metal parts to get a template of the shape needed, transferred this to cardboard to create a solid template for the fibre blanket and stainless, allowing 10mm extra on the stainless to spot welder to
Red marker, tried lots of colours and found the red the most easy to see on the stainless
Total material costs £151.92 (haven’t included adhesive and masking tape)
Tools welder £259 (haven’t included scissors pens etc)
Method of construction
Use masking tape to wrap around shape, use pencil to mark cut lines, carefully cut the tape with a Stanley knife so you can peel it off, mark on the tape a top or bottom symbol, this will make it easier to put your fibre blanket on the adhesive as you only have one good chance. Peel off the masking tape and mark the cut line on the object to be covered so you can position the blanket accurately.
Position the tape on the cardboard, cereal box is good for this and cut the shape you have marked on the tape, this will give you a hard template that you can position on the blanket to cut, add 6mm to the length an you should end up with a piece of fibre blanket that exactly fits the shape needed.
Spray the adhesive onto the position needed and allow to dry for 20seconds, line up the cut blanket, this is where the top and bottom marks and the cut line come into play and gradually wind the pattern onto the adhesive, I found that there is a bit of stretch but it does tear easily. You should now have a perfectly shaped piece of fibre blanket stuck to your part, carry on until it’s fully covered.
Once you have covered your part in fibre blanket you’re ready to start the stainless covering. Use the templates you have used for the fibre blanket, hopefully you have marked their positions on the blanket. Remember you need to add length and width so you have something to spot weld to, cut the shape and wrap in position, try and get it as tight as you can. This is the part you need 3 hands but it can be done, make sure the power settings are correct for where your spot welding, keeping the stainless tight push the spot welder probes onto the area to weld and press the foot pedal. The probes need a certain amount of pressure to work properly, you should now have a piece of stainless on top of your fibre blanket, add more welds and repeat the process as you complete the item.
Wear gloves when handling the stainless, it gets quite sharp when cutting
Wear gloves and a mask with the fibre blanket, it like handling loft insulation leaves your skin itchy if exposed
Hope the above makes sense, I’m not an expert on the process, this is how I’ve done it and my experience, to any one contemplating this, hope this is of some help
Regards Tim
Gassing Station | Ultima | Top of Page | What's New | My Stuff