Bonnet adjustment
Discussion


TR4man said:
Is it my imagination, but does the gap between the windscreen scuttle and the rear of the bonnet also need adjusting?
Yes, it does need pushing back a bit too, i'm thinking that pushing it back towards the windscreen will lift the nose up slightly. I suppose it is a bit hit and miss when it comes to these?If the system is the same as on the Vixen then the following was my approach.
(1) The bonnet frame has threaded legs which the bottom sections screw into. Adjusting these along the thread should raise or lower the height of the front of the bonnet. You will need to remove the long bolt through the 'U' section / bonnet feet (where bonnet frame mounts on the chassis) and lift the feet out of the 'U' section to allow them to turn in / out.
(2) The frame feet bolt into the 'U' shaped section which is in turn bolted to the chassis. This 'U' section can be slid forwards or backwards on the chassis. Sliding this backwards will decrease the gap between the rear of the bonnet and the bulkhead and vice versa
(3) Finally the bonnet pins are threaded. A nut inside the spring can be slackened so the threaded pin can be wound in or out, then tightened again to lock the pin at the appropriate length. Winding the pin in (shortening) will pull the rear of the bonnet surface down, winding out will lift the surface up.
From your photo, the rear bonnet surface looks correct to the bulkhead surface, so bonnet pins are probably OK (3).
To adjust (1) & (2), firstly pop the bonnet catches but leave the bonnet down, as this allows changes at the front to be made without stressing anything.
Then remove the long bolts that go through the 'U' sections & bonnet feet (1). Lift the feet out of the 'U' section, slacken the lock nut, then wind out the lower leg section. Extend the overall leg length (try 2-5 full turns each side). This should raise the front of the bonnet.
Then slacken the bolts securing the 'U' sections to the chassis (2) and gently push/knock them backwards (try 5-10mm), it should reduce the gap between the bulkhead and bonnet.
Re-tighten the 'U' section bolts, then return the bonnet frame feet into the 'U' sections and replace the long bolts.
Trial close the bonnet and re-assess. Adjust again as necessary. When you're happy, don't forget to re-tighten the lock nuts on the bonnet legs.
Good luck - it is a bit of trial and error.
Moto
From the picture the 'Martin' should be running the wide mouth bonnet with vents, but this is the later bonnet frame (so later bonnet).
The angle of 'attack of the pivots within the frame are at nearly 45 degrees and the wide mouth are near vertical.
I am presuming that the spar across the car will need to be replaced (I have the moulds) and you are going to 'either' mod the frame by cranking the frame bush holders or change the chassis boxes with new ones with longer slots (removing the 2BA earths on the boxes). Also my thoughts are you will need to modify the leading arc of the bonnet in front of the wheel to allow the tyres to rotate on lock and ensure they do not rub. IMHO, ALL do-able without it being noticeable after the work has been done. A@
Adrian@ said:
From the picture the 'Martin' should be running the wide mouth bonnet with vents, but this is the later bonnet frame (so later bonnet).
The angle of 'attack of the pivots within the frame are at nearly 45 degrees and the wide mouth are near vertical.
I am presuming that the spar across the car will need to be replaced (I have the moulds) and you are going to 'either' mod the frame by cranking the frame bush holders or change the chassis boxes with new ones with longer slots (removing the 2BA earths on the boxes). Also my thoughts are you will need to modify the leading arc of the bonnet in front of the wheel to allow the tyres to rotate on lock and ensure they do not rub. IMHO, ALL do-able without it being noticeable after the work has been done. A@
Thanks for the tips Adrian, much appreciated!The angle of 'attack of the pivots within the frame are at nearly 45 degrees and the wide mouth are near vertical.
I am presuming that the spar across the car will need to be replaced (I have the moulds) and you are going to 'either' mod the frame by cranking the frame bush holders or change the chassis boxes with new ones with longer slots (removing the 2BA earths on the boxes). Also my thoughts are you will need to modify the leading arc of the bonnet in front of the wheel to allow the tyres to rotate on lock and ensure they do not rub. IMHO, ALL do-able without it being noticeable after the work has been done. A@
I have got mixture of bonnets from my selection of photos I have of them. As 1 2,3,4,8 and 9 have the wide mouth and 5,6,7 have the later one. I suppose they were made right when the bonnet design changed and the factory used what ever they had?
Edited by henrytvr on Saturday 13th June 23:21
Moto said:
If the system is the same as on the Vixen then the following was my approach.
(1) The bonnet frame has threaded legs which the bottom sections screw into. Adjusting these along the thread should raise or lower the height of the front of the bonnet. You will need to remove the long bolt through the 'U' section / bonnet feet (where bonnet frame mounts on the chassis) and lift the feet out of the 'U' section to allow them to turn in / out.
(2) The frame feet bolt into the 'U' shaped section which is in turn bolted to the chassis. This 'U' section can be slid forwards or backwards on the chassis. Sliding this backwards will decrease the gap between the rear of the bonnet and the bulkhead and vice versa
(3) Finally the bonnet pins are threaded. A nut inside the spring can be slackened so the threaded pin can be wound in or out, then tightened again to lock the pin at the appropriate length. Winding the pin in (shortening) will pull the rear of the bonnet surface down, winding out will lift the surface up.
From your photo, the rear bonnet surface looks correct to the bulkhead surface, so bonnet pins are probably OK (3).
To adjust (1) & (2), firstly pop the bonnet catches but leave the bonnet down, as this allows changes at the front to be made without stressing anything.
Then remove the long bolts that go through the 'U' sections & bonnet feet (1). Lift the feet out of the 'U' section, slacken the lock nut, then wind out the lower leg section. Extend the overall leg length (try 2-5 full turns each side). This should raise the front of the bonnet.
Then slacken the bolts securing the 'U' sections to the chassis (2) and gently push/knock them backwards (try 5-10mm), it should reduce the gap between the bulkhead and bonnet.
Re-tighten the 'U' section bolts, then return the bonnet frame feet into the 'U' sections and replace the long bolts.
Trial close the bonnet and re-assess. Adjust again as necessary. When you're happy, don't forget to re-tighten the lock nuts on the bonnet legs.
Good luck - it is a bit of trial and error.
Moto
Thank you! It makes so much more sense seeing it written down. I am having a go on Monday so I will report back with the results!(1) The bonnet frame has threaded legs which the bottom sections screw into. Adjusting these along the thread should raise or lower the height of the front of the bonnet. You will need to remove the long bolt through the 'U' section / bonnet feet (where bonnet frame mounts on the chassis) and lift the feet out of the 'U' section to allow them to turn in / out.
(2) The frame feet bolt into the 'U' shaped section which is in turn bolted to the chassis. This 'U' section can be slid forwards or backwards on the chassis. Sliding this backwards will decrease the gap between the rear of the bonnet and the bulkhead and vice versa
(3) Finally the bonnet pins are threaded. A nut inside the spring can be slackened so the threaded pin can be wound in or out, then tightened again to lock the pin at the appropriate length. Winding the pin in (shortening) will pull the rear of the bonnet surface down, winding out will lift the surface up.
From your photo, the rear bonnet surface looks correct to the bulkhead surface, so bonnet pins are probably OK (3).
To adjust (1) & (2), firstly pop the bonnet catches but leave the bonnet down, as this allows changes at the front to be made without stressing anything.
Then remove the long bolts that go through the 'U' sections & bonnet feet (1). Lift the feet out of the 'U' section, slacken the lock nut, then wind out the lower leg section. Extend the overall leg length (try 2-5 full turns each side). This should raise the front of the bonnet.
Then slacken the bolts securing the 'U' sections to the chassis (2) and gently push/knock them backwards (try 5-10mm), it should reduce the gap between the bulkhead and bonnet.
Re-tighten the 'U' section bolts, then return the bonnet frame feet into the 'U' sections and replace the long bolts.
Trial close the bonnet and re-assess. Adjust again as necessary. When you're happy, don't forget to re-tighten the lock nuts on the bonnet legs.
Good luck - it is a bit of trial and error.
Moto
henrytvr said:
Thanks for the tips Adrian, much appreciated!
I have got mixture of bonnets from my selection of photos I have of them. As 1 2,3,4,8 and 9 have the wide mouth and 5,6,7 have the later one. I suppose they were made right when the bonnet design changed and the factory used what ever they had?
I am just about to fit a new bonnet (as you'll know, with pictures) on my FB page. The Vixen bucket system is nothing like the M Series.I have got mixture of bonnets from my selection of photos I have of them. As 1 2,3,4,8 and 9 have the wide mouth and 5,6,7 have the later one. I suppose they were made right when the bonnet design changed and the factory used what ever they had?
I am going to say that, any of the cars without vents have had the bonnets replaced, for years the wide mouth vent bonnet was deemed to be unavailable.
Note (as I have moulds to make all of them)...Bonnets with top vents, there is a very early bonnet with a numberplate sized lower vent and inset oblong marker lamps (there was a factory kit to evolve this to first generation), a first generation with top vents and wide mouth with inset oblong marker lamps (as was fitted to the 3000ML's) and second generation with pointed surface mounted side markers (as was fitted to the Martin's). All these either could be fitted with flush chrome 1/4 bumpers or rubber 1/4's with a factory stack off fitting kit. (the generation aspect have two different bonnet frames, as I have the original factory jigs to create them).
Then with the later non top vented bonnet the first generation has towers to mount the bumpers (modified so bumpers can be fitted without a fitting kit) before the 2nd generation which have flush fitted rubber bumpers (there is a factory SE bonnet mould to create one piece flared version, which internally the lower vent system is different) and kits to flare and add later top rear vents are available (I have a mould to raise the central scoop too. A@
I am pretty sure (painfully) I can find up to chassis numbers on these changes, but I do not think you are likley to find different bonnets IN the sequence... hence my presumption. (given that this is supposed to be a 10th anniversary edition of 10, I do not think there was a 10th), you should have the historic list from AC Roney (I cannot find it on line now, but I am sure I have a saved copy somwhere).
Edited by Adrian@ on Sunday 14th June 10:41
Adrian@ said:
I am just about to fit a new bonnet (as you'll know, with pictures) on my FB page. The Vixen bucket system is nothing like the M Series.
I am going to say that, any of the cars without vents have had the bonnets replaced, for years the wide mouth vent bonnet was deemed to be unavailable.
Note (as I have moulds to make all of them)...Bonnets with top vents, there is a very early bonnet with a numberplate sized lower vent and inset oblong marker lamps (there was a factory kit to evolve this to first generation), a first generation with top vents and wide mouth with inset oblong marker lamps (as was fitted to the 3000ML's) and second generation with pointed surface mounted side markers (as was fitted to the Martin's). All these either could be fitted with flush chrome 1/4 bumpers or rubber 1/4's with a factory stack off fitting kit. (the generation aspect have two different bonnet frames, as I have the original factory jigs to create them).
Then with the later non top vented bonnet the first generation has towers to mount the bumpers (modified so bumpers can be fitted without a fitting kit) before the 2nd generation which have flush fitted rubber bumpers (there is a factory SE bonnet mould to create one piece flared version, which internally the lower vent system is different) and kits to flare and add later top rear vents are available (I have a mould to raise the central scoop too. A@
I am pretty sure (painfully) I can find up to chassis numbers on these changes, but I do not think you are likley to find different bonnets IN the sequence... hence my presumption. (given that this is supposed to be a 10th anniversary edition of 10, I do not think there was a 10th), you should have the historic list from AC Roney (I cannot find it on line now, but I am sure I have a saved copy somwhere).
I have found all of them apart from 7 and 10. I do know 10 is a one owner car in Scotland but that is it. I am going to say that, any of the cars without vents have had the bonnets replaced, for years the wide mouth vent bonnet was deemed to be unavailable.
Note (as I have moulds to make all of them)...Bonnets with top vents, there is a very early bonnet with a numberplate sized lower vent and inset oblong marker lamps (there was a factory kit to evolve this to first generation), a first generation with top vents and wide mouth with inset oblong marker lamps (as was fitted to the 3000ML's) and second generation with pointed surface mounted side markers (as was fitted to the Martin's). All these either could be fitted with flush chrome 1/4 bumpers or rubber 1/4's with a factory stack off fitting kit. (the generation aspect have two different bonnet frames, as I have the original factory jigs to create them).
Then with the later non top vented bonnet the first generation has towers to mount the bumpers (modified so bumpers can be fitted without a fitting kit) before the 2nd generation which have flush fitted rubber bumpers (there is a factory SE bonnet mould to create one piece flared version, which internally the lower vent system is different) and kits to flare and add later top rear vents are available (I have a mould to raise the central scoop too. A@
I am pretty sure (painfully) I can find up to chassis numbers on these changes, but I do not think you are likley to find different bonnets IN the sequence... hence my presumption. (given that this is supposed to be a 10th anniversary edition of 10, I do not think there was a 10th), you should have the historic list from AC Roney (I cannot find it on line now, but I am sure I have a saved copy somwhere).
Edited by Adrian@ on Sunday 14th June 10:41
According to the chassis numbers 1-4 are in sequence then there is a jump to 5 (3667FM) and then they are not in sequence.
Again, I find all this fascinating!
How cool that number 10 is still around.
You should list the full spec. all I can remember is, Broadspeed blueprinted (blue rocker covers was their 'thing' then) with the O/D chassis and O/D gearbox, 3.45 (so, TR6), I think, the first cars to have the MGB chrome edge switches and the tan half centre console interior (that became the standard until the later cars) with Wolfrace rims as part of the spec. (which then became the option in place of Gemini), then, tobacco leaf and chocolate band (John Ballie hand cut decals no doubt) with the chocolate 'Ford' topping roof with sunshine roof...a quick toy that actually ran the speeds that TVR listed for the range standard car!! A@
You should list the full spec. all I can remember is, Broadspeed blueprinted (blue rocker covers was their 'thing' then) with the O/D chassis and O/D gearbox, 3.45 (so, TR6), I think, the first cars to have the MGB chrome edge switches and the tan half centre console interior (that became the standard until the later cars) with Wolfrace rims as part of the spec. (which then became the option in place of Gemini), then, tobacco leaf and chocolate band (John Ballie hand cut decals no doubt) with the chocolate 'Ford' topping roof with sunshine roof...a quick toy that actually ran the speeds that TVR listed for the range standard car!! A@
Edited by Adrian@ on Sunday 14th June 12:41
Henry, this is the issue of the wrong bonnet and how the frame 'attacks' the chassis, you want up and to do that the pivot needs to go back (longer slots/different boxes 38.1 x 38.1 x 3.2 BUT longer), as you lift it up (spinning the pivot out on its thread), the pivot is going back and the bonnet is moving away from the scuttle (limited by the slot)!
Q. tyre size under the bonnet, OE would be 185/80/14 (slim) AND has the car got angle adjuster plates on the chassis to change the spare wheel rake (you might need them).
I would suggest removing the height adjusting spring pins on the spar (these do nothing more than set height to the shell AND should be under zero pressure to close the bonnet) and get the bonnet to close naturally on the pivots, hence the spare wheel rack and size being important (the pivot is a special long threaded pin with 1-1/2" shank...two penny washers a lock nut and a nyloc, that run through the slot giving you space for packing washers that allow R/L movement of the whole bonnet.
Another 'factory' mod is to bend the pivot pins as it leaves the bonnet frame (it means removing them and taking them to a vice, etc to bring them into your slot range. (as it helps to have a proper slot to run in replacing would be the better option IMHO) A@
Edited by Adrian@ on Tuesday 16th June 07:48
Without the spring pins, the bonnet should shut freely. (replacing the spar into the bonnet will allow the pins to be in the correct position.
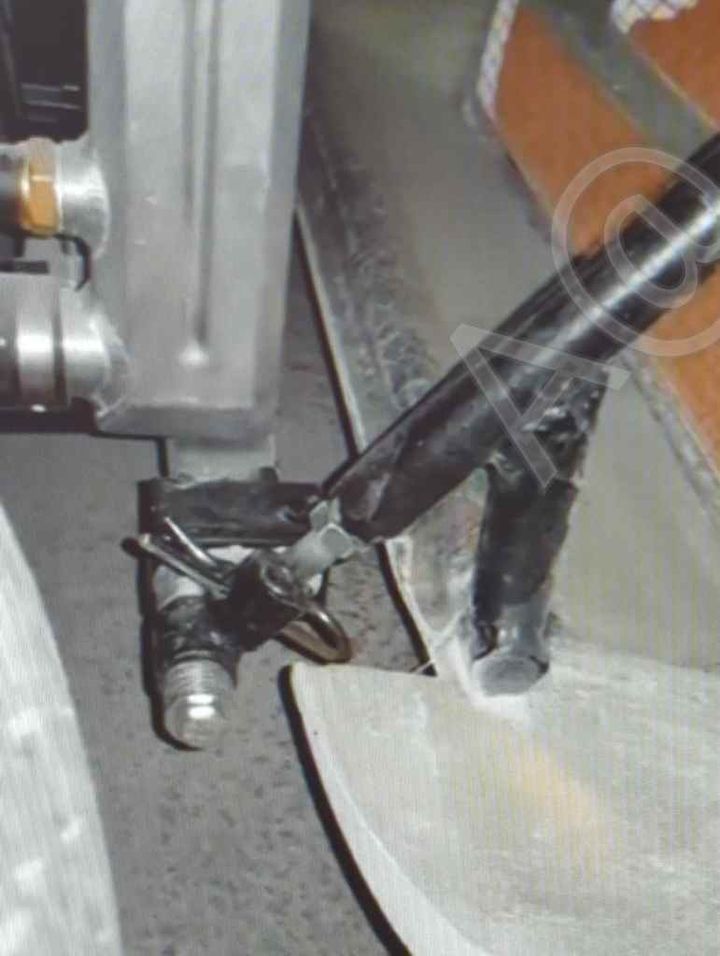
Notice the angle of the earlier frame, (when you raise the nose, the angle has less movement backwards). In this picture the bonnet is fully open, note all the packer washers (this is a first fit) ...eventually, the pivot gets all but one outer shims (washers) removed leaving the inner shims a lock nut, penny washer, chassis, penny washer, nyloc, with the pivot bush free to rotate on the pivot pin.
A@
henrytvr said:
Thank you Adrian, very much appreciated. In order to do that much damage it must have been like that for quite a while.
I sort of agree (long time), but, it actually looks like it has been cut in an attempt to get it fitted though TBH.I had to buy the mould so as to create my wide mouth top vented bonnets (for my then 3000M turbo back in 1991) to keep it's originality.
The factory only supplied the later bonnet and Trevor Bee (who had been the factory mould maker prior to going out on his own as T.E.T mouldings) made a one makes all bonnet mould system (it has parts that you assembly to make the different versions) which I have added too as well, to make one piece (not grafted in as such) inset markers, rear top SE vents and the original number plate slot version. A@
Forums | TVR Classics | Top of Page | What's New | My Stuff