Replacing water pipes & hoses
Discussion


I'm going to upgrade the cooling hoses and metal pipes on the Cerb soon due to the corrosion, I've ordered the silicon hoses, s/steel jubilees, new thermostat and s/steel cooling pipes but not the water rail that connect up to the heads. How easy are they to replace with engine in place etc?
They are a quite a chunk of change in s/steel and I notice quite a few people have them powder coated, mine look decent enough other than the bottom where the hoses connect with the usual corrosion so I'm thinking of should I leave them or if I'm going to the trouble of replacing all the other pipes at the front (apart from the heater ones) it's worth the extra effort to get them off and either cleaned up and coated or bash the credit card on the s/steel ones.
Any ideas on how long replacing all the other pipes should take? A day's job or more?
Mags
I took less than a day to do the lot, and I am far from handy with the spanners, but always remember the TVR factor! That bolt that just won't come out, the fitment that needs triple jointed baby arms to reach, etc. Joking aside, you should be fine.
I didn't do the water rails either, but they "look" like they ought to be doable at the same time. No doubt someone will be along soon with better knowledge...
And the all important question, what colour pipes have you gone for?!
I didn't do the water rails either, but they "look" like they ought to be doable at the same time. No doubt someone will be along soon with better knowledge...
And the all important question, what colour pipes have you gone for?!
It is a really easy trivial job removing the water rails - unless they've not been touched for years, in which case some of the bolts heads may be corroded and resist being undone
The trick is to ensure you are using a hex bit on an extension with a ratchet - an Allen key probably won't get you anywhere
I recommend using Mikalor rather than Jubilee clips

The trick is to ensure you are using a hex bit on an extension with a ratchet - an Allen key probably won't get you anywhere
I recommend using Mikalor rather than Jubilee clips
Thanks, I found that exact pic in an old thread about replacing the cooling hoses I was reading. The jubilee's are already on their way but I might get some mikalors once I know the sizes as I notice someone else found the sizes you used were slightly different and I guess can vary depending on the thickness of the hoses.
I started off using 43-47mm Mikalors, but they were slightly too large, so I changed to 40-43mm but they were too difficult to fit
In the end I found I could fit the 40-43mm if I used 'Engine Assembly Lube'
Not an easy journey, but I've mapped it out for you so you should have a better time than me
In the end I found I could fit the 40-43mm if I used 'Engine Assembly Lube'
Not an easy journey, but I've mapped it out for you so you should have a better time than me
Peter uses coolant rails that he fabricated himself, so Jubilee clamps are likely to work well
However if you are trying to use original water rails that you have cleaned up, or better still have had blasted and coated, then you will find Mikalors will be better at sealing
As Peter says, you do need to check and tighten when using silicone hoses
However if you are trying to use original water rails that you have cleaned up, or better still have had blasted and coated, then you will find Mikalors will be better at sealing
As Peter says, you do need to check and tighten when using silicone hoses

Mr Cerbera said:
... and just in case, like me, a picture etc....
Here is JensenA's pic from years ago ....
Thanks, thankfully I used a photo from John who sells the hose kits on Ebay.Here is JensenA's pic from years ago ....
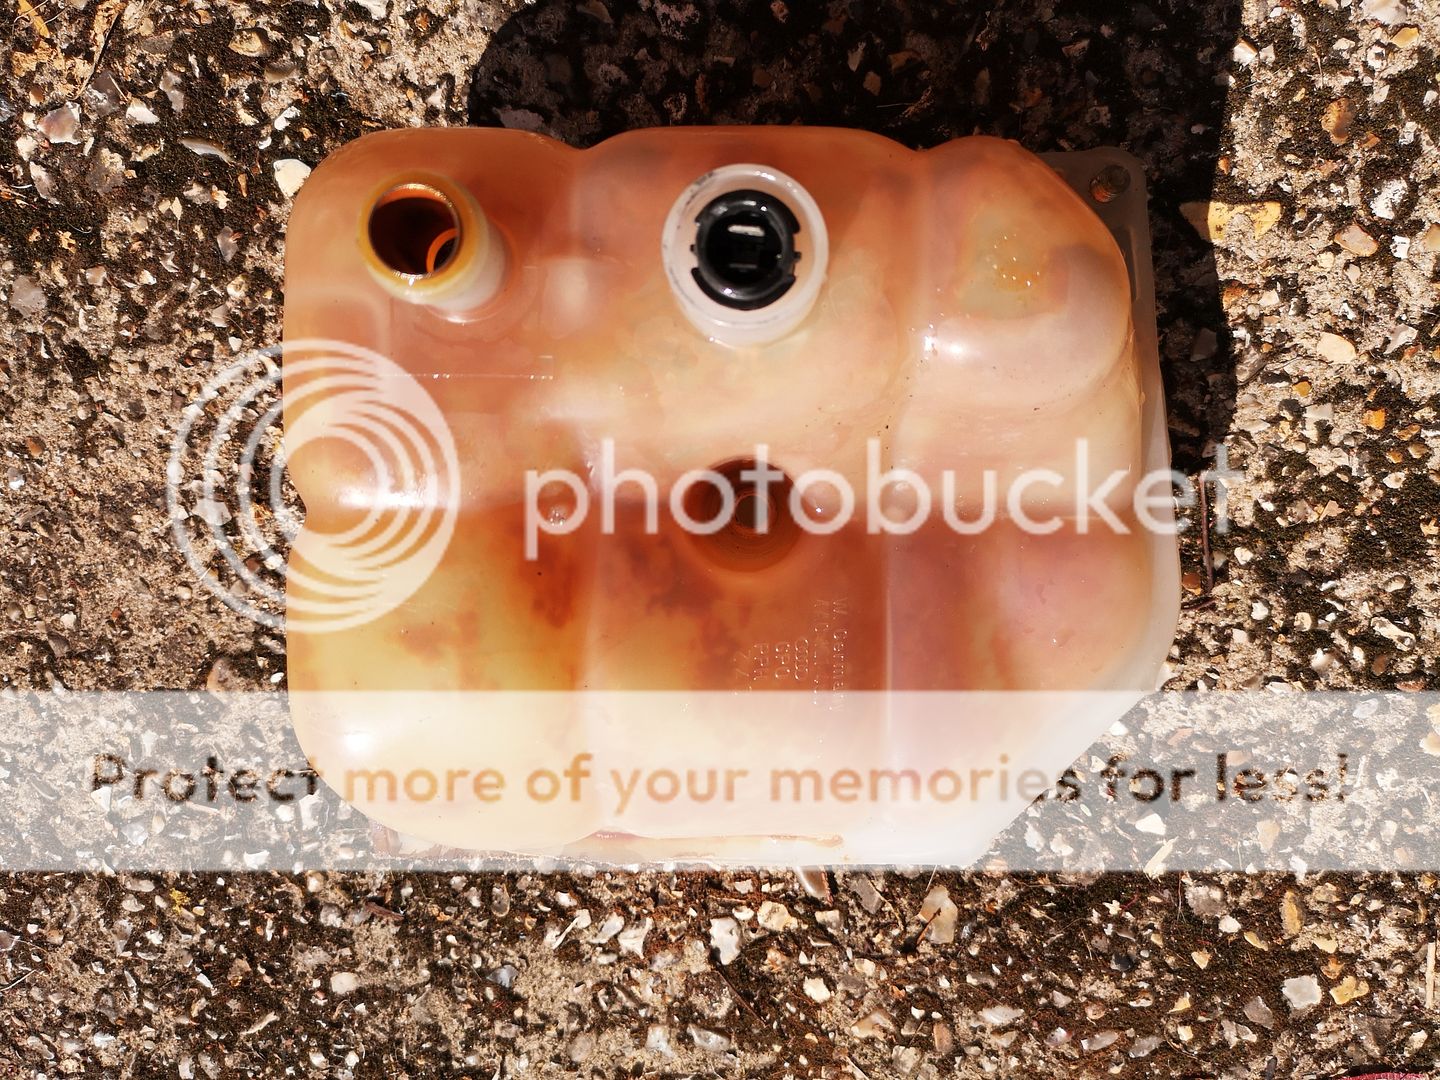
Not been successful though, did a pressure test and all was OK, filled, bled and let the car warm up fully, both fans on, and back off again, switched off and left overnight. Came back this morning to a couple of small leaks from hose clamps, tightened and started up again, this time as it warned up it spat loads of fluid out the bottom of the expansion tank. I took it off and it looks like something has blown out of the hole in the middle of the photo below?
Something is rattling around inside the tank so I'm hoping this is some sort of blank that has popped? or is this an overflow that allows excess fluid out?
I'm hoping its a knackered tank, starting to get a little concerned the system is pressurising too much from head gasket failure, but hopefully I'm worrying over nothing!
Edited by Mags on Sunday 30th June 18:35
Hi Mags 
Looks like you've followed the accepted procedure.
Just a coupla things to add:
When I've drained the coolant system, on refilling, I've been surprised how many air pockets still remain in it, so my recommendation would be:
Park the car on an incline with the front higher.
Refill the header tank
Run the engine and take the level plug off the top right of the radiator.
Only when you gat a constant flow of coolant should you replace it
(It'll pop 'n' spit whilst the air comes through)
Then do the same for each of the Water Rail Bleed Screws (under the airboxes)
After two heating cycles I'd let it all cool then repeat.
I have read somewhere that the 'hole' in the centre of the Header Tank is there for fitting on some other vehicle (a Volks I think) so is not required for Cerb purposes.
Obviously you want to ensure that the feed pipe hoseclip under the tank is secured ( a real b d unless you possess the right number of small-gauge socket-heads and extensions).

The overflow pipe (at the upper, back of the tank) is the only place that you should be experiencing overflow indications.

So, once you've ensured all that is secure, it must be a buggered header tank.
(I have seen some 'groovy' polished alloy ones that look the Mutt's Nuts )
)
Best o'
PJ
____________________________________________________________
ETA
Oooh, just one thing.
I was convinced that I had a leak in the bottom of my Header Tank
BUT
It turned out to be the plastic 'Y'-piece joint for the two Water Rail Pipes (located at the back of the engine block, just above The Big Fuse).
(I replaced it with a Brass one )
Looks like you've followed the accepted procedure.
Just a coupla things to add:
When I've drained the coolant system, on refilling, I've been surprised how many air pockets still remain in it, so my recommendation would be:
Park the car on an incline with the front higher.
Refill the header tank
Run the engine and take the level plug off the top right of the radiator.
Only when you gat a constant flow of coolant should you replace it
(It'll pop 'n' spit whilst the air comes through)
Then do the same for each of the Water Rail Bleed Screws (under the airboxes)
After two heating cycles I'd let it all cool then repeat.
I have read somewhere that the 'hole' in the centre of the Header Tank is there for fitting on some other vehicle (a Volks I think) so is not required for Cerb purposes.
Obviously you want to ensure that the feed pipe hoseclip under the tank is secured ( a real b
d unless you possess the right number of small-gauge socket-heads and extensions).The overflow pipe (at the upper, back of the tank) is the only place that you should be experiencing overflow indications.
So, once you've ensured all that is secure, it must be a buggered header tank.
(I have seen some 'groovy' polished alloy ones that look the Mutt's Nuts
)Best o'
PJ
____________________________________________________________
ETA
Oooh, just one thing.
I was convinced that I had a leak in the bottom of my Header Tank
BUT
It turned out to be the plastic 'Y'-piece joint for the two Water Rail Pipes (located at the back of the engine block, just above The Big Fuse).
(I replaced it with a Brass one
)Edited by Mr Cerbera on Wednesday 3rd July 14:58
Thanks very much for your help.
I have performed those steps all but being on an incline, got water through the rad bleed and the 2 water rails etc.
I maybe trying to over analyse this but the hole in the middle of the tank actually looks like an overflow (the white plastic around the cap seems to be connected to it if the blue cap lets out excess pressure?) I've ordered a standard Audi/VW replacement so will see, it was only 20 quid. Surely even TVR wouldn't position an overflow to just vent onto the body next to the battery?
So, and this is bit that is confusing me, where is the overflow and how does excess fluid get out of the system? Is that not needed? (mechanics please help me out here)
The small overflow pipe you show that runs behind the wiper motor on mine connects to a 3 way T piece and off to the water rails, so it's not an overflow?
Anyways, got new bits to fit on Saturday and hope this resolves it, it's always been fine in the past right up until it went wrong LOL
Mark
Oh and I think I will be replacing some or all of the larger jubilees with Mikalors as was suggested. My brother in law who runs a large food grade manufacturing plant told me they don't use SS jubilees as they don't apply equal pressure and they only use SS Mikalors. Over tightening the Jubilees just pinches the hose.
Will hopefully report back after the weekend assuming I get to fit the new parts.
Will hopefully report back after the weekend assuming I get to fit the new parts.
Mags said:
Excellent thanks, so TVR were that daft!
It looks like it will take a pipe so I'll see if I can fit an overflow to the ground instead of all over the inner wing!
I have tried that, and it doesn't really work because the overflow will simply flow over the top of the tank because there is no seal around the capIt looks like it will take a pipe so I'll see if I can fit an overflow to the ground instead of all over the inner wing!
I reckon that is the reason why many Cerbs have bad corrosion on the upper chassis rail on the passenger side, but much less so on the drivers side
It can also cause ingress in to the cabin, at least there aren't any critical electronics in the passenger footwell - oh wait...
ukkid35 said:
I have tried that, and it doesn't really work because the overflow will simply flow over the top of the tank because there is no seal around the cap
I reckon that is the reason why many Cerbs have bad corrosion on the upper chassis rail on the passenger side, but much less so on the drivers side
It can also cause ingress in to the cabin, at least there aren't any critical electronics in the passenger footwell - oh wait...
OK, I won't bother then.I reckon that is the reason why many Cerbs have bad corrosion on the upper chassis rail on the passenger side, but much less so on the drivers side
It can also cause ingress in to the cabin, at least there aren't any critical electronics in the passenger footwell - oh wait...
Agree on the other comments, pretty sure it's soaked the heat shield on the cables and the trans tunnel. I'll pop the ECU carpet cover off just to check it's not damp in there, very good point!
The hose on the bottom of the rad is a challenge as well, my rad has a straight lower exit (it's a TVR branded rad, logo on the plastic sides) unlike the OG factory one I have seen in pictures that has an angled outlet so it's impossible to access the hose once the rad is in the car. There is no room at all to get your hand onto the hose because it immediately hits the return of the body where the front of the inner wing begins, nightmare!
Mags said:
The hose on the bottom of the rad is a challenge as well, my rad has a straight lower exit (it's a TVR branded rad, logo on the plastic sides) unlike the OG factory one I have seen in pictures that has an angled outlet so it's impossible to access the hose once the rad is in the car. There is no room at all to get your hand onto the hose because it immediately hits the return of the body where the front of the inner wing begins, nightmare!
I totally agree as I have fitted the same radAnother issue is that you can't fit the top air-con hose before fitting the rad, because it won't go past the hose
And you can't tighten the hose if the rad is already in place - Catch 22
Joolz showed me a U shaped metal plate that he uses to ease rads past the hose, but I'm not convinced it would work without taking material off the rad brackets
There is also a gap along the top and sides of the rad where the rubber seal should stop air escaping, ensuring that the ram effect forces air though the core
On the plus side the rad is very light, and does seem to keep the temps pretty stable
Pleased to say she’s back on the road now, the new expansion tank and cap has worked. In fact I’m starting to thInk the whole problem stemmed from only a knackered cap as that’s where I first got steam and leakage and then after trying to refill and get home I blew a knackered jubilee and swollen hose.
Anyway, nice new hoses and stainless pipes in the front of the chassis hopefully means it’s done for a long time now.
Anyway, nice new hoses and stainless pipes in the front of the chassis hopefully means it’s done for a long time now.
Gassing Station | Cerbera | Top of Page | What's New | My Stuff