
Remote Boot Release
Discussion


I realise it's been done before but I just got around to fitting the remote boot release to the Chim. Pleasantly surprised that it only took 30 mins end to end and cost £30.
I bought the 2 channel remote control unit from Maplins (they were out of stock of the single channel ones) so it is possible to do it cheaper. in fact on eBay there are several Chinese companies doing the same thing for £8!
Wiring it up is a doddle (just 3 wires). You just need a 12V permanent feed that you split into two (one to power the receiver, one to connect to the "common" terminal), an earth (easy enough) and a wire that you connect to the "NO" terminal and then to the feed to the boot solenoid.
If you pop the switch out you'll see it only has wires, a green 12V ignition fed wire and the output to the solenoid. Connect your "NO" feed to that wire. There's a permanent 12V feed at the ignition switch and plenty of earth points (I used the bolt holding the steering column on).
I used self adhesive tape to attach the control unit under the dash, beside the original boot switch and as a bonus I can reach underneath and press the "set" button which also pops the boot with the ignition off.
I wired an inline fuse in, mainly so I can disconnect the unit if I have to leave the car for any length of time (to save any battery drain).
I'll admit it is still using all of the same components as the OEM solution so it'll be prone to the same issues but I did this for convenience rather than any "upgrade" reason.
It's really nice to be able to pop the boot without the hassle of opening the car and turning the ignition on..
Shame I have to have 2 remotes on the key bunch but i can live with that.
I wonder what i could use the second channel for? I suspect if I had a newer car I'd use it to drive the door opening solenoid to "pop" the door open as I walk to it... can't do that with my 96 as I only have a single solenoid per door..
Any other suggestions for something to turn on remotely?
I suppose I could wire it up to turn the headlights on....that'd just need another relay.. The good thing about the Maplins kit is you can program it to be latched or non-latched or to work as a timer...
I bought the 2 channel remote control unit from Maplins (they were out of stock of the single channel ones) so it is possible to do it cheaper. in fact on eBay there are several Chinese companies doing the same thing for £8!
Wiring it up is a doddle (just 3 wires). You just need a 12V permanent feed that you split into two (one to power the receiver, one to connect to the "common" terminal), an earth (easy enough) and a wire that you connect to the "NO" terminal and then to the feed to the boot solenoid.
If you pop the switch out you'll see it only has wires, a green 12V ignition fed wire and the output to the solenoid. Connect your "NO" feed to that wire. There's a permanent 12V feed at the ignition switch and plenty of earth points (I used the bolt holding the steering column on).
I used self adhesive tape to attach the control unit under the dash, beside the original boot switch and as a bonus I can reach underneath and press the "set" button which also pops the boot with the ignition off.
I wired an inline fuse in, mainly so I can disconnect the unit if I have to leave the car for any length of time (to save any battery drain).
I'll admit it is still using all of the same components as the OEM solution so it'll be prone to the same issues but I did this for convenience rather than any "upgrade" reason.
It's really nice to be able to pop the boot without the hassle of opening the car and turning the ignition on..
Shame I have to have 2 remotes on the key bunch but i can live with that.
I wonder what i could use the second channel for? I suspect if I had a newer car I'd use it to drive the door opening solenoid to "pop" the door open as I walk to it... can't do that with my 96 as I only have a single solenoid per door..
Any other suggestions for something to turn on remotely?
I suppose I could wire it up to turn the headlights on....that'd just need another relay.. The good thing about the Maplins kit is you can program it to be latched or non-latched or to work as a timer...
If you wanted you could use the second channel to pop the drivers door, is yours a model with a switch on the wing which activates the door? Or is it an earlier model like mine where you have to actually push down to use the mechanism?
If it has a switch you could bypass this and send the signal from your kit, or better still you could wire up the kit to work along side the door button
If it has a switch you could bypass this and send the signal from your kit, or better still you could wire up the kit to work along side the door button
brett84 said:
If you wanted you could use the second channel to pop the drivers door, is yours a model with a switch on the wing which activates the door? Or is it an earlier model like mine where you have to actually push down to use the mechanism?
If it has a switch you could bypass this and send the signal from your kit, or better still you could wire up the kit to work along side the door button
Excellent suggestion.If it has a switch you could bypass this and send the signal from your kit, or better still you could wire up the kit to work along side the door button
OP, have you a link to the Maplins and/or eBay kit?
Harrytsg said:
Excellent suggestion.
OP, have you a link to the Maplins and/or eBay kit?
This is the Maplins one:OP, have you a link to the Maplins and/or eBay kit?
http://www.maplin.co.uk/2-channel-rf-remote-contro...
Here's an example of one on eBay:
http://www.ebay.co.uk/itm/1CH-RF-Wireless-Signal-R...
It's important that you find one that either has a "momentary" (i.e non-latched) mode or a timed mode just to give the solenoid a bit of an easier life.
Also the Maplins one has a "heater" cct that you disable (remove the jumper) for in car installations as it's not needed and draws unnecessary power. The instructions will remind you

brett84 said:
If you wanted you could use the second channel to pop the drivers door, is yours a model with a switch on the wing which activates the door? Or is it an earlier model like mine where you have to actually push down to use the mechanism?
If it has a switch you could bypass this and send the signal from your kit, or better still you could wire up the kit to work along side the door button
Yup, that would have been nice, but as I said in my original post I only have a single solenoid per door and a mechanical press button on the rear wing If it has a switch you could bypass this and send the signal from your kit, or better still you could wire up the kit to work along side the door button

Julesprivate said:
Harrytsg said:
Excellent suggestion.
OP, have you a link to the Maplins and/or eBay kit?
This is the Maplins one:OP, have you a link to the Maplins and/or eBay kit?
http://www.maplin.co.uk/2-channel-rf-remote-contro...
Here's an example of one on eBay:
http://www.ebay.co.uk/itm/1CH-RF-Wireless-Signal-R...
It's important that you find one that either has a "momentary" (i.e non-latched) mode or a timed mode just to give the solenoid a bit of an easier life.
Also the Maplins one has a "heater" cct that you disable (remove the jumper) for in car installations as it's not needed and draws unnecessary power. The instructions will remind you
I have fitted solenoids in the boot which work on remote to pop the door, it's a bit of work but not that difficult and a nice touch.
You could do this, you need decent solenoids, not the maplins type ones, like this
http://www.ebay.co.uk/itm/JOM-Trunk-Boot-or-Door-P...
The reason being, it's much easier to mount the solenoid somewhere then just route a cable (i used push bike brake cable with the outer sleeve) than it is to mount the solenoid on the mechanism. Because it's got to pull the cable, the smaller black plastic ones don't work.
I would also run this through a relay, fused relays are really cheap
http://www.ebay.co.uk/itm/30-Amp-Fused-On-Off-Rela...
So you would have standard relay wiring, permanent live going to pin30, earth is pin85, pin87 to the solenoid and the signal from your remote going to pin86. The other pin on the solenoid goes to an earth. The cable feeds from the solenoid over the inner wing and there is already a spare hole on the mechanism right next to where the original mechanism works so you just need to buy a cable adjuster to hold the end, like this
http://www.ebay.co.uk/itm/M6-Brake-Cable-Adjuster-...
and a could decent cable clamps for either end
http://www.ebay.co.uk/itm/KART-4-x-CABLE-CLAMP-WIT...
You could do this, you need decent solenoids, not the maplins type ones, like this
http://www.ebay.co.uk/itm/JOM-Trunk-Boot-or-Door-P...
The reason being, it's much easier to mount the solenoid somewhere then just route a cable (i used push bike brake cable with the outer sleeve) than it is to mount the solenoid on the mechanism. Because it's got to pull the cable, the smaller black plastic ones don't work.
I would also run this through a relay, fused relays are really cheap
http://www.ebay.co.uk/itm/30-Amp-Fused-On-Off-Rela...
So you would have standard relay wiring, permanent live going to pin30, earth is pin85, pin87 to the solenoid and the signal from your remote going to pin86. The other pin on the solenoid goes to an earth. The cable feeds from the solenoid over the inner wing and there is already a spare hole on the mechanism right next to where the original mechanism works so you just need to buy a cable adjuster to hold the end, like this
http://www.ebay.co.uk/itm/M6-Brake-Cable-Adjuster-...
and a could decent cable clamps for either end
http://www.ebay.co.uk/itm/KART-4-x-CABLE-CLAMP-WIT...
That's tempting... that'd give me something for the second channel to do.. Admitedly my door won't "pop" too far as it's the old "mechanical" type but my drivers side does open a bit using the "knob" so that would be OK.
Good idea fitting it in the boot and feeding back through the wheelarch I may investigate that sometime.
I'm still considering using the second channel to turn the headlights on, that was a useful feature on my old Rover...
Good idea fitting it in the boot and feeding back through the wheelarch I may investigate that sometime.
I'm still considering using the second channel to turn the headlights on, that was a useful feature on my old Rover...
thread revival...
I have been loosely researching a remote fob/receiver to do this, and have found a few examples - with the important feature of being a momentary switch, not latched on
https://www.ebay.co.uk/itm/358768208977
My thought is to follow the method of adding it to the existing button under the dash, but clearly adding a fused permanent 12V - maybe directly from the battery or cutting into the radio wiring with a piggyback spade connector.
The question I have is whether these things cause a battery drain of any note - I imagine it's not much different from the alarm, but I can't find any information on it, now do I actually know how to judge it.
I have been loosely researching a remote fob/receiver to do this, and have found a few examples - with the important feature of being a momentary switch, not latched on
https://www.ebay.co.uk/itm/358768208977
My thought is to follow the method of adding it to the existing button under the dash, but clearly adding a fused permanent 12V - maybe directly from the battery or cutting into the radio wiring with a piggyback spade connector.
The question I have is whether these things cause a battery drain of any note - I imagine it's not much different from the alarm, but I can't find any information on it, now do I actually know how to judge it.
Drop Dave at HF solutions a note. I think he officially retired but may still answer emails, he was able to integrate the release into the fob. I've got one of his kits.
https://www.facebook.com/p/HF-Solutions-1000425860...
https://www.facebook.com/p/HF-Solutions-1000425860...
Yes, Dave is brilliant, very helpful and pleasant fellow.
Which system do you have?
I have the earlier Foxguard system ,and have discussed it with Bridgwater Electronics, who refurbished the unit for me a year or two ago, and they said there's no way to modify any of the existing kit to accommodate this.
Hence the options become a separate fob, or the reed switch idea that ModWise came up with a few years ago (TVRSSW have one on their site, but out of stock).
Which system do you have?
I have the earlier Foxguard system ,and have discussed it with Bridgwater Electronics, who refurbished the unit for me a year or two ago, and they said there's no way to modify any of the existing kit to accommodate this.
Hence the options become a separate fob, or the reed switch idea that ModWise came up with a few years ago (TVRSSW have one on their site, but out of stock).

I have now fitted a similar remote receiver and it works well.
I took a fused permanent 12V supply from the permanent live at the ignition switch. This feeds both the receiver and the COM terminal of its relay. I connected the receiver earth to the existing black earth wire in the horn wiring under the dashboard.
The NO terminal of the receiver relay is connected in parallel to the red/blue wire leaving the original boot-release button and going to the boot solenoid. The original button under the dashboard therefore continues to work normally.
The receiver is set to momentary operation, so pressing the remote sends only a short 12V pulse to the boot solenoid.
The standby current of my receiver is specified as 5mA. This works out at approximately 0.12Ah per day or 3.6Ah over 30 days. On its own that is not a particularly large drain, although it needs to be considered together with the alarm and any other permanent loads, especially if the car is left standing for several weeks.
I also fitted an easily accessible inline fuse in the permanent supply. This allows me to disconnect the receiver if the car is going to stand unused for a long time. Alternatively, a maintenance charger should prevent it from becoming an issue.
I took a fused permanent 12V supply from the permanent live at the ignition switch. This feeds both the receiver and the COM terminal of its relay. I connected the receiver earth to the existing black earth wire in the horn wiring under the dashboard.
The NO terminal of the receiver relay is connected in parallel to the red/blue wire leaving the original boot-release button and going to the boot solenoid. The original button under the dashboard therefore continues to work normally.
The receiver is set to momentary operation, so pressing the remote sends only a short 12V pulse to the boot solenoid.
The standby current of my receiver is specified as 5mA. This works out at approximately 0.12Ah per day or 3.6Ah over 30 days. On its own that is not a particularly large drain, although it needs to be considered together with the alarm and any other permanent loads, especially if the car is left standing for several weeks.
I also fitted an easily accessible inline fuse in the permanent supply. This allows me to disconnect the receiver if the car is going to stand unused for a long time. Alternatively, a maintenance charger should prevent it from becoming an issue.
Bavarian said:
I have now fitted a similar remote receiver and it works well.
I took a fused permanent 12V supply from the permanent live at the ignition switch. This feeds both the receiver and the COM terminal of its relay. I connected the receiver earth to the existing black earth wire in the horn wiring under the dashboard.
The NO terminal of the receiver relay is connected in parallel to the red/blue wire leaving the original boot-release button and going to the boot solenoid. The original button under the dashboard therefore continues to work normally.
The receiver is set to momentary operation, so pressing the remote sends only a short 12V pulse to the boot solenoid.
The standby current of my receiver is specified as 5mA. This works out at approximately 0.12Ah per day or 3.6Ah over 30 days. On its own that is not a particularly large drain, although it needs to be considered together with the alarm and any other permanent loads, especially if the car is left standing for several weeks.
I also fitted an easily accessible inline fuse in the permanent supply. This allows me to disconnect the receiver if the car is going to stand unused for a long time. Alternatively, a maintenance charger should prevent it from becoming an issue.
Probably not reading the thread in enough detail, but with the OP's solution, is he not then unsecuring the boot by adding a way to pop the boot without the key?I took a fused permanent 12V supply from the permanent live at the ignition switch. This feeds both the receiver and the COM terminal of its relay. I connected the receiver earth to the existing black earth wire in the horn wiring under the dashboard.
The NO terminal of the receiver relay is connected in parallel to the red/blue wire leaving the original boot-release button and going to the boot solenoid. The original button under the dashboard therefore continues to work normally.
The receiver is set to momentary operation, so pressing the remote sends only a short 12V pulse to the boot solenoid.
The standby current of my receiver is specified as 5mA. This works out at approximately 0.12Ah per day or 3.6Ah over 30 days. On its own that is not a particularly large drain, although it needs to be considered together with the alarm and any other permanent loads, especially if the car is left standing for several weeks.
I also fitted an easily accessible inline fuse in the permanent supply. This allows me to disconnect the receiver if the car is going to stand unused for a long time. Alternatively, a maintenance charger should prevent it from becoming an issue.
Bavarian said:
I have now fitted a similar remote receiver and it works well.
I took a fused permanent 12V supply from the permanent live at the ignition switch. This feeds both the receiver and the COM terminal of its relay. I connected the receiver earth to the existing black earth wire in the horn wiring under the dashboard.
The NO terminal of the receiver relay is connected in parallel to the red/blue wire leaving the original boot-release button and going to the boot solenoid. The original button under the dashboard therefore continues to work normally.
The receiver is set to momentary operation, so pressing the remote sends only a short 12V pulse to the boot solenoid.
The standby current of my receiver is specified as 5mA. This works out at approximately 0.12Ah per day or 3.6Ah over 30 days. On its own that is not a particularly large drain, although it needs to be considered together with the alarm and any other permanent loads, especially if the car is left standing for several weeks.
I also fitted an easily accessible inline fuse in the permanent supply. This allows me to disconnect the receiver if the car is going to stand unused for a long time. Alternatively, a maintenance charger should prevent it from becoming an issue.
That’s good info, thank you. I took a fused permanent 12V supply from the permanent live at the ignition switch. This feeds both the receiver and the COM terminal of its relay. I connected the receiver earth to the existing black earth wire in the horn wiring under the dashboard.
The NO terminal of the receiver relay is connected in parallel to the red/blue wire leaving the original boot-release button and going to the boot solenoid. The original button under the dashboard therefore continues to work normally.
The receiver is set to momentary operation, so pressing the remote sends only a short 12V pulse to the boot solenoid.
The standby current of my receiver is specified as 5mA. This works out at approximately 0.12Ah per day or 3.6Ah over 30 days. On its own that is not a particularly large drain, although it needs to be considered together with the alarm and any other permanent loads, especially if the car is left standing for several weeks.
I also fitted an easily accessible inline fuse in the permanent supply. This allows me to disconnect the receiver if the car is going to stand unused for a long time. Alternatively, a maintenance charger should prevent it from becoming an issue.
My car has a nominal drain, and I don’t have to keep it on a charger, which is handy, but I’ll keep an eye with the charger I keep in the boot.
I would also wire it similarly to you, though might look at one of the unused 12V tags on the fuse board
To Jezzaaa:
The original dashboard button still only works with the ignition switched on. Without the ignition, the boot can only be opened using the separate remote fob, which effectively acts as the key.
If possible I would choose a fob with a recessed or flush-fitting button. If the button protrudes too far, it could easily be pressed accidentally in your pocket and open the boot without you noticing.
The original dashboard button still only works with the ignition switched on. Without the ignition, the boot can only be opened using the separate remote fob, which effectively acts as the key.
If possible I would choose a fob with a recessed or flush-fitting button. If the button protrudes too far, it could easily be pressed accidentally in your pocket and open the boot without you noticing.
All fitted. pretty easy. Following the OP's (Julesprivate) wiring direction.
I used kit from AliExpress, since Maplins shut years ago.
It is a remote control and receiver relay kit that has a couple of key details:
433MHz - which is a pretty common frequency, but as long as it is mounted away from the alarm/central locking system, it will be fine. This was a watch-out that the good chap from Bridgwater Electronics suggested. I have no interference happening in my car.
5-30V - so it can handle the 12.4V that comes through the car (which could easily be higher - my battery charges to 14.4V when I plug it in on icy days)
Momentary setting - so the boot solenoid is not energised for longer than the instant it requires to release the catch. In this kit, holding the button down on the remote control keeps the relay energised, therefore the solenoid energised. Release the button and the relay cuts the current. So you only need to blip the button.
In-line fuse before the relay unit on the +12V permanent supply. I used a 10A fuse in that, as the relay itself states 10A.
I sourced the permanent live from the back of my radio head unit - the wiring had a spare bullet connector, so I didn't have to cut into any wiring at all.
I fitted an earth cable with a ring connector to the same little bolt that the horn earths to on the inner side of the steering column - you do need to get the plastic surround off the column for access.
The NO connection from the relay then goes to the outgoing wire from the original button - here I used a piggyback spade connector directly onto the button, therefore avoiding cutting any wires there too.
Then tucked it up by the button. The relay has an outer case not shown, which is chunky enough to wedge it up there comfortably.
Forgive the scruffy state of my footwell, it needs a hoover...
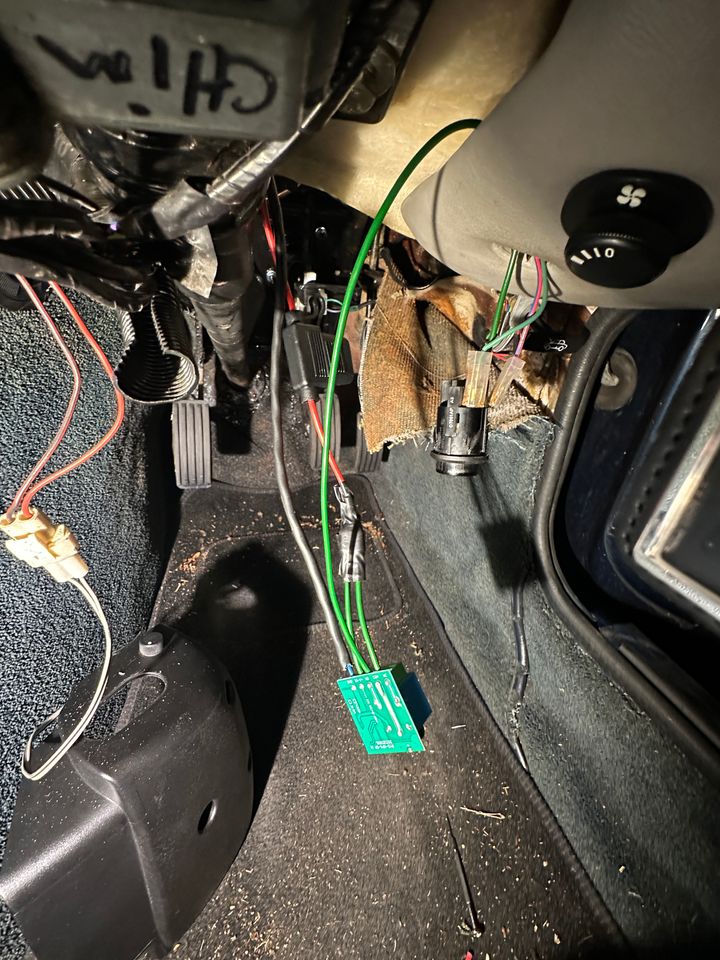
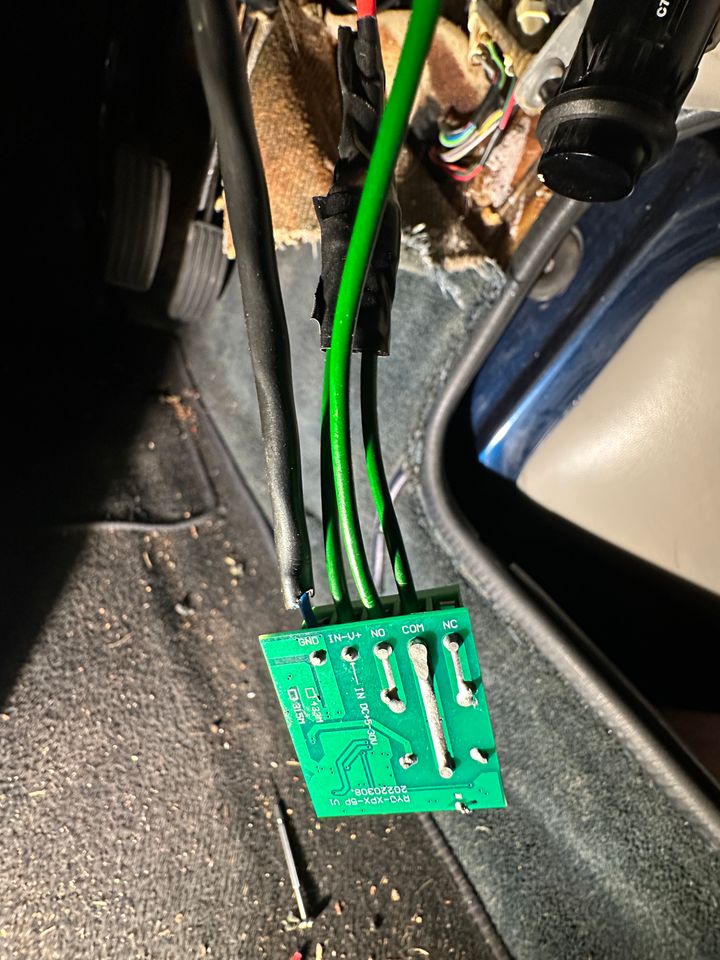
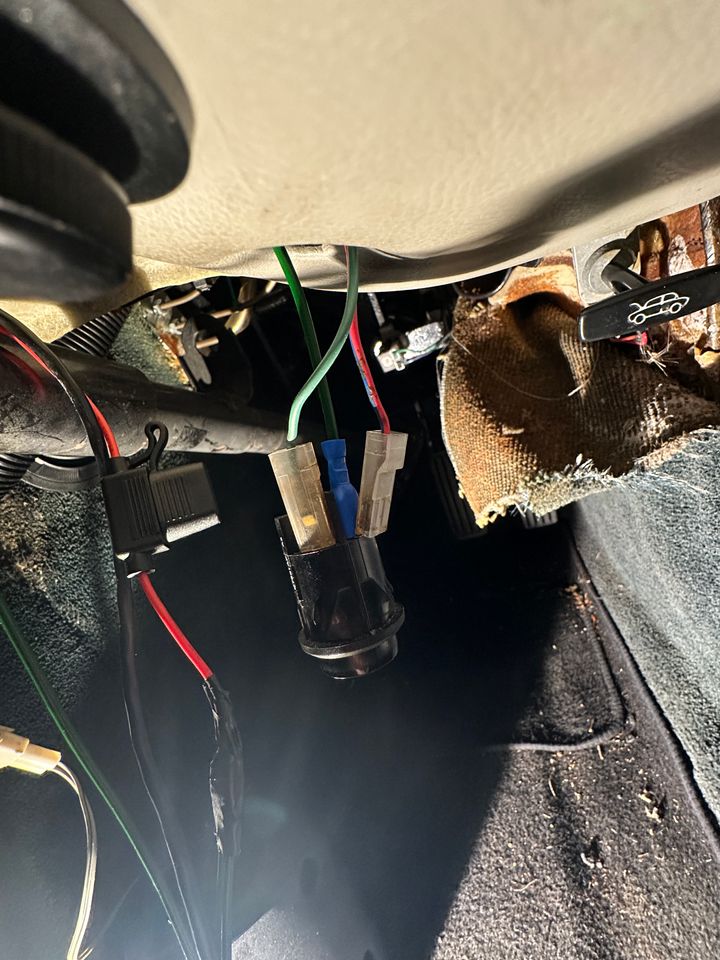
I used kit from AliExpress, since Maplins shut years ago.
It is a remote control and receiver relay kit that has a couple of key details:
433MHz - which is a pretty common frequency, but as long as it is mounted away from the alarm/central locking system, it will be fine. This was a watch-out that the good chap from Bridgwater Electronics suggested. I have no interference happening in my car.
5-30V - so it can handle the 12.4V that comes through the car (which could easily be higher - my battery charges to 14.4V when I plug it in on icy days)
Momentary setting - so the boot solenoid is not energised for longer than the instant it requires to release the catch. In this kit, holding the button down on the remote control keeps the relay energised, therefore the solenoid energised. Release the button and the relay cuts the current. So you only need to blip the button.
In-line fuse before the relay unit on the +12V permanent supply. I used a 10A fuse in that, as the relay itself states 10A.
I sourced the permanent live from the back of my radio head unit - the wiring had a spare bullet connector, so I didn't have to cut into any wiring at all.
I fitted an earth cable with a ring connector to the same little bolt that the horn earths to on the inner side of the steering column - you do need to get the plastic surround off the column for access.
The NO connection from the relay then goes to the outgoing wire from the original button - here I used a piggyback spade connector directly onto the button, therefore avoiding cutting any wires there too.
Then tucked it up by the button. The relay has an outer case not shown, which is chunky enough to wedge it up there comfortably.
Forgive the scruffy state of my footwell, it needs a hoover...
Forums | Chimaera | Top of Page | What's New | My Stuff