Chimaera Passenger Footwell Leak
Discussion


Got a water leak from above the heater box.

Dripping in where these 2 rusty screws go through the dash (looking up into the dash with the map pocket unscrewed), but no idea where the actual entry source is.
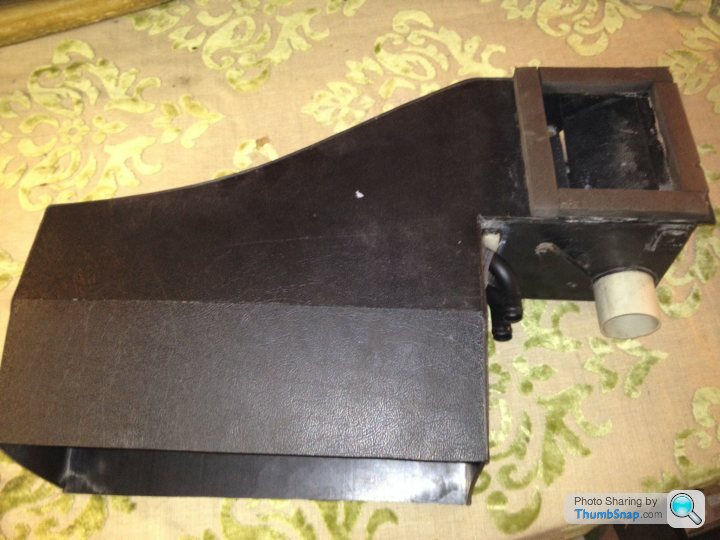
Heater box for ref:
Thinking it must be getting in somewhere under the mesh at the bottom of the windscreen that I can't access with it in place? It's rivetted on with about 10 rivets, so was reluctant to unnecessarily remove it, and sounds like there's also a risk of snapping the washer tube.
Can anyone advise if I've missed anywhere obvious where the water may be getting in?
Cheers
Dripping in where these 2 rusty screws go through the dash (looking up into the dash with the map pocket unscrewed), but no idea where the actual entry source is.
Heater box for ref:
- Can't unbolt the heater box as the heads on the screws are so corroded and can't get a drill in either, so unable to trace from the inside
- Had multiple attempts at running a bead of silicone round the bottom of the windscreen
- Siliconed round the wiper / washer
- Siliconed where the wiper motor bolts in place
- It's not a leaky matrix or anything, wrong point and happens with rain / hose
- Got the dash top off, but can't see any access from there without cutting an opening.
Thinking it must be getting in somewhere under the mesh at the bottom of the windscreen that I can't access with it in place? It's rivetted on with about 10 rivets, so was reluctant to unnecessarily remove it, and sounds like there's also a risk of snapping the washer tube.
Can anyone advise if I've missed anywhere obvious where the water may be getting in?
Cheers
10 rivets!
There should be 2 max 3 rivets retaining the mesh so someone has had a go before me thinks!
Those rivets themselves are a leak point anyway.
It’s likely getting in under the window seal that’s pinching the mesh in place. The mastic bead the screen is bonded too breaks down over time. You can take mesh off then using a knife cut out the seal around the base of the screen enough to apply another bead of mastic before putting windscreen seal back into that newly cut groove.
It’s 50/50 if it will work that’s assuming it’s the screen seal.
If it has ten rivets I’d drill the rivets out and take the mesh off and seal 7 of the holes.
I’d re apply mesh with new rivets and seal them with a dab of mastic before fixing rivets in holes as that might be the leak point.
Classic Chim said:
10 rivets!
There should be 2 max 3 rivets retaining the mesh so someone has had a go before me thinks!
Those rivets themselves are a leak point anyway.
It’s likely getting in under the window seal that’s pinching the mesh in place. The mastic bead the screen is bonded too breaks down over time. You can take mesh off then using a knife cut out the seal around the base of the screen enough to apply another bead of mastic before putting windscreen seal back into that newly cut groove.
It’s 50/50 if it will work that’s assuming it’s the screen seal.
If it has ten rivets I’d drill the rivets out and take the mesh off and seal 7 of the holes.
I’d re apply mesh with new rivets and seal them with a dab of mastic before fixing rivets in holes as that might be the leak point.
Early ones had lots of rivets, they reduced the amount in the later models :/There should be 2 max 3 rivets retaining the mesh so someone has had a go before me thinks!
Those rivets themselves are a leak point anyway.
It’s likely getting in under the window seal that’s pinching the mesh in place. The mastic bead the screen is bonded too breaks down over time. You can take mesh off then using a knife cut out the seal around the base of the screen enough to apply another bead of mastic before putting windscreen seal back into that newly cut groove.
It’s 50/50 if it will work that’s assuming it’s the screen seal.
If it has ten rivets I’d drill the rivets out and take the mesh off and seal 7 of the holes.
I’d re apply mesh with new rivets and seal them with a dab of mastic before fixing rivets in holes as that might be the leak point.


That’s a desperate and pathetic attempt at a repair by someone who has no idea about water ingress.
If that’s factory I’ll eat my hat!
The mesh is pinched by the window rubber and 3 fixings, the mesh serves as no seal at anytime. Seal your window and put rubber back in until mastic has set. Then push with the use of washing up liquid or similar the mesh up under the rubber seal edge.
The rivets simply retain the mesh which does nothing at all other than let hot air out and looks good.
I hope rhst helps.
And I bet a penny to a pound there was no sealant used on those rivet holes before they went in.
They will leak.
Edited by Classic Chim on Thursday 14th January 19:17
Classic Chim said:
That’s a desperate and pathetic attempt at a repair by someone who has no idea about water ingress.
If that’s factory I’ll eat my hat!
The mesh is pinched by the window rubber and 3 fixings, the mesh serves as no seal at anytime. Seal your window and put rubber back in until mastic has set. Then push with the use of washing up liquid or similar the mesh up under the rubber seal edge.
The rivets simply retain the mesh which does nothing at all other than let hot air out and looks good.
I hope rhst helps.
And I bet a penny to a pound there was no sealant used on those rivet holes before they went in.
They will leak.
Gotcha.If that’s factory I’ll eat my hat!
The mesh is pinched by the window rubber and 3 fixings, the mesh serves as no seal at anytime. Seal your window and put rubber back in until mastic has set. Then push with the use of washing up liquid or similar the mesh up under the rubber seal edge.
The rivets simply retain the mesh which does nothing at all other than let hot air out and looks good.
I hope rhst helps.
And I bet a penny to a pound there was no sealant used on those rivet holes before they went in.
They will leak.
Edited by Classic Chim on Thursday 14th January 19:17
Will try get the mesh off this weekend and seal up the excess rivet holes.
Definitely nothing else under there where it could be leaking in? Just puddling up and running up under the window?
Strudul said:
Gotcha.
Will try get the mesh off this weekend and seal up the excess rivet holes.
Definitely nothing else under there where it could be leaking in? Just puddling up and running up under the window?
I have a later car with wiper motor inboard rather than in the engine bay but no it should be hole or leak free under the mesh. The thing is water always travels south but can track along level surfaces to find another downward path. Will try get the mesh off this weekend and seal up the excess rivet holes.
Definitely nothing else under there where it could be leaking in? Just puddling up and running up under the window?
So you could have a leaky window seal say towards the top of the screen, water tracks behind the window rubber and in via the first break point it finds in the original mastic seal the window is bonded too.
It’s very difficult to trace water leaks but I’d start at the top and work down making sure your window rubber and the mastic behind it is sound before proceeding to tidy up that small channel- groove along the base of the window which you can then re seal.
A decent quality mastic gun helps a lot here as it’s far easier to get a constant regular run of mastic with a proper gun! Corking filling guns as used by decorators will make a mess.
Read how to tool off mastic with a piece of wood and soapy water to wipe away access mastic without it gripping everything along its path if you don’t already know.
Follow some auto or window fixers videos in the art of using mastic.
If you have an empty tube you can sometimes use that as both tool and waste mastic collector, spray it with lots of soapy water then press the sides of the tube to sort of create a point to your tube, it now has a natural curved edge to tool off with. I fear the angles of window and body will not allow that so create a wooden tool to do the same. Use a blade and cut a piece of wood to suit. Use a lot of washing up liquid based soapy water to stop the mastic sticking to the wood, each run you have to flick mastic off tool and re dip it in the hot soapy water as any sign of mastic gripping wood of the tool it will need to be fully wiped of any access mastic or you will smear the mastic along rather than cut it out and cleanly away.
Just take your time.
You clean out that groove, apply mastic to dry surfaces. Over fill gap with no air pockets, spray with hot soapy water then tool off as above. You need to get both the screen and body work covered in this liquid to stop mastic gripping as you tool along.
Nightmare but follow a process and it might just work.
Good luck

Strudul said:
Thanks for the advice. I heard a lollipop stick was a good shout.
From my hosepipe tests I think it's definitely getting in low down rather than from the top.
From my hosepipe tests I think it's definitely getting in low down rather than from the top.
Loullipop stick would be a bit flimsy, you want to create a scoop type tool. I worked with guys who would rival a bushman with a blade in their hands sculpturing those tools out lol.
The idea is to be able too tool the whole length in one go which is why old mastic tubes are usually ideal at catching the waste.
You literally want to wet every area anywhere near the stuff once it’s applied as it will drop off and stick to everything, the soapy water reduces this risk considerably in my experience.
Obviously work out the orientation of where the window rubber fits in this area as I can’t remember off hand long before putting any sealant in there.
I think possibly the rubber might have to be fitted before mastic goes off or it might not sit back properly but I can’t remember exactly. Be careful your mastic does not restrict it’s fitting position.
Edited by Classic Chim on Friday 15th January 12:09
Message Board | Chimaera | Top of Page | What's New | My Stuff