Tamiya 1:72 Spitfire Mk1 + Details
Discussion


Having had a closer look, the gap may be a little too big for filler 

I'm going to have a go at cutting out a section of the part I've already cut, and glueing that into place. Will probably need some filler from there, but this isn't going to be perfect - just a way for me to re-learn all the stuff I forgot since I was 10!
I'm going to have a go at cutting out a section of the part I've already cut, and glueing that into place. Will probably need some filler from there, but this isn't going to be perfect - just a way for me to re-learn all the stuff I forgot since I was 10!
HereBeMonsters said:
Having had a closer look, the gap may be a little too big for filler
I'm going to have a go at cutting out a section of the part I've already cut, and glueing that into place. Will probably need some filler from there, but this isn't going to be perfect - just a way for me to re-learn all the stuff I forgot since I was 10!
The nose looks like a square face with a lop-sided mouth to me.I'm going to have a go at cutting out a section of the part I've already cut, and glueing that into place. Will probably need some filler from there, but this isn't going to be perfect - just a way for me to re-learn all the stuff I forgot since I was 10!
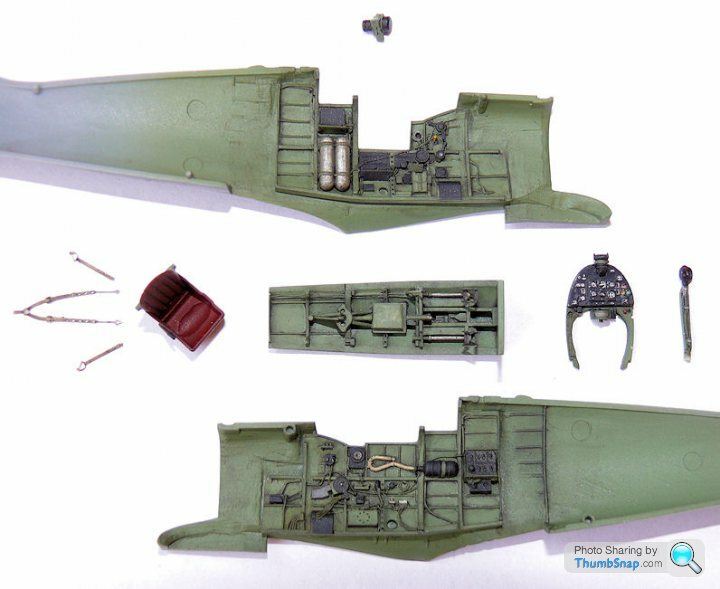
So after a nice holiday at the weekend, I continued with the resin engine covers and p/e gun bay covers by painting interior green followed by a dark wash and matt varnish.
I also cut the original protruding plastic gun barrels off the wing and made some new ones out of brass tube (painted black and with some gunmetal powder applied:

I also cut the original protruding plastic gun barrels off the wing and made some new ones out of brass tube (painted black and with some gunmetal powder applied:
Finished the wheels, exhausts. gun bays, propeller/spinner and seat.
The gun bays fit within the thinned sections of wing, and only the rectangular gun troughs are visible when assembled, so excuse the unpainted ammo chutes and poor finish on the flat bits - they won't be seen.
The seat looks a bit Carlos Fandango in red, but it represents the controversial Aeroplastics seat used in many Spitfires during the war (and it adds a bit of colour to the cockpit).
dr_gn said:
Finished the wheels, exhausts. gun bays, propeller/spinner and seat.
The gun bays fit within the thinned sections of wing, and only the rectangular gun troughs are visible when assembled, so excuse the unpainted ammo chutes and poor finish on the flat bits - they won't be seen.
The seat looks a bit Carlos Fandango in red, but it represents the controversial Aeroplastics seat used in many Spitfires during the war (and it adds a bit of colour to the cockpit).
 looking very good.
 I noticed the 'lots of scraping' to get the resin parts to fit, is this usual?
MonkeySpanker said:
dr_gn said:
Finished the wheels, exhausts. gun bays, propeller/spinner and seat.
The gun bays fit within the thinned sections of wing, and only the rectangular gun troughs are visible when assembled, so excuse the unpainted ammo chutes and poor finish on the flat bits - they won't be seen.
The seat looks a bit Carlos Fandango in red, but it represents the controversial Aeroplastics seat used in many Spitfires during the war (and it adds a bit of colour to the cockpit).
The gun bays fit within the thinned sections of wing, and only the rectangular gun troughs are visible when assembled, so excuse the unpainted ammo chutes and poor finish on the flat bits - they won't be seen.
The seat looks a bit Carlos Fandango in red, but it represents the controversial Aeroplastics seat used in many Spitfires during the war (and it adds a bit of colour to the cockpit).
looking very good. I noticed the 'lots of scraping' to get the resin parts to fit, is this usual?
Some resin items are a one-for-one replacement like guns or control surfaces or whatever. The resin casting process allows much finer detail than injection moulding, so it is worthwhile on visible areas.
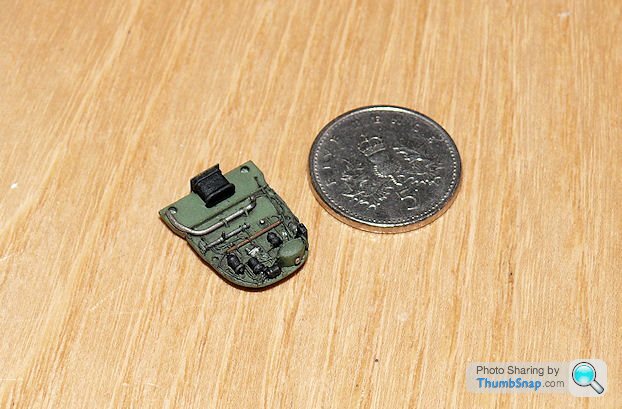
Engine firewall complete now - it's tiny, but incredibly well detailled:
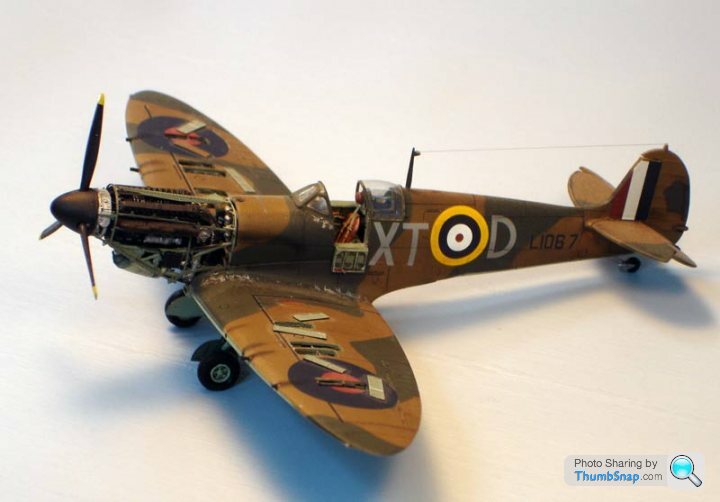
I also got the Xtradecal set for the MkI, II & Prototype Spitfire. I chose QJ-P from No.92 Squadron ("B" pattern camouflage), for no other reason than I like the smaller fuselage roundels combined with the underside roundels, neither of which are included in the original kit as an option.

I'l planning on getting another Tamiya Spitfire (it really is a superb little kit for the money) and building it 'clean' ie with flaps retracted and no engine detail. I'll use one of the other decal options for that one.
I also got the Xtradecal set for the MkI, II & Prototype Spitfire. I chose QJ-P from No.92 Squadron ("B" pattern camouflage), for no other reason than I like the smaller fuselage roundels combined with the underside roundels, neither of which are included in the original kit as an option.
I'l planning on getting another Tamiya Spitfire (it really is a superb little kit for the money) and building it 'clean' ie with flaps retracted and no engine detail. I'll use one of the other decal options for that one.

Ta! So far so good.
It's just a question of picking out colour on the resin - in this case all the detail is cast into the parts, I'm not adding much at all (maybe brake lines).
Finished the tailwheel and engine frames just now:


Thought I'd leave the frames on the header block until they were finished; they are incredibly fragile.
It's just a question of picking out colour on the resin - in this case all the detail is cast into the parts, I'm not adding much at all (maybe brake lines).
Finished the tailwheel and engine frames just now:
Thought I'd leave the frames on the header block until they were finished; they are incredibly fragile.
Red Firecracker said:
dr_gn said:
Thought I'd leave the frames on the header block until they were finished; they are incredibly fragile.
That's going to be, err, interesting!I've seen a couple of nightmare examples of this conversion, where the model is beautifully finished, but where the engine has ended up pointing upwards by a few degrees:
Couldn't live with that...

dr_gn said:
Do you ever scan real aircraft and use the cloud data as a basis for your CAD models? We laser scanned a Jetstream fuselage a couple of years ago with good results.
I am a design engineer myself, and have done some basic aircraft CAD models in the past - it is incredibly easy to get details wrong when transferring dimensions and profiles from paper drawings.
What did you use to scan a whole fuselage?I am a design engineer myself, and have done some basic aircraft CAD models in the past - it is incredibly easy to get details wrong when transferring dimensions and profiles from paper drawings.
I use a Faro scanner sometimes at work, but I assume you have something rather larger?!
srob said:
dr_gn said:
Do you ever scan real aircraft and use the cloud data as a basis for your CAD models? We laser scanned a Jetstream fuselage a couple of years ago with good results.
I am a design engineer myself, and have done some basic aircraft CAD models in the past - it is incredibly easy to get details wrong when transferring dimensions and profiles from paper drawings.
What did you use to scan a whole fuselage?I am a design engineer myself, and have done some basic aircraft CAD models in the past - it is incredibly easy to get details wrong when transferring dimensions and profiles from paper drawings.
I use a Faro scanner sometimes at work, but I assume you have something rather larger?!
http://www.metris3d.hu/laserradar_eng_1107.pdf
I think Metris is Nikon now (I've moved departments since we scanned it).
dr_gn said:
lufbramatt said:
yes- these kits still make lovely looking models and very few people will ever know the difference! I only noticed after spending a fair amount of time looking at how the structure works from an engineering point of view.
The onle kit that's so bad I'd almost say trading standards should get involved is the new cyberhobby 1/72 sea vixen. That thing's nowhere near right!
Do you ever scan real aircraft and use the cloud data as a basis for your CAD models? We laser scanned a Jetstream fuselage a couple of years ago with good results.The onle kit that's so bad I'd almost say trading standards should get involved is the new cyberhobby 1/72 sea vixen. That thing's nowhere near right!
I am a design engineer myself, and have done some basic aircraft CAD models in the past - it is incredibly easy to get details wrong when transferring dimensions and profiles from paper drawings.
It would also be difficult to arrange in terms of getting the reference airframe into a suitable environment for a decent amount of time. Museums are crammed full of other exhibtis which can't be moved, and working aircraft tend to be in use a lot of the time earning their keep, or being maintained. If we wanted to spend a length of time setting up a scanning session we would have to pay for it.
lufbramatt said:
dr_gn said:
lufbramatt said:
yes- these kits still make lovely looking models and very few people will ever know the difference! I only noticed after spending a fair amount of time looking at how the structure works from an engineering point of view.
The onle kit that's so bad I'd almost say trading standards should get involved is the new cyberhobby 1/72 sea vixen. That thing's nowhere near right!
Do you ever scan real aircraft and use the cloud data as a basis for your CAD models? We laser scanned a Jetstream fuselage a couple of years ago with good results.The onle kit that's so bad I'd almost say trading standards should get involved is the new cyberhobby 1/72 sea vixen. That thing's nowhere near right!
I am a design engineer myself, and have done some basic aircraft CAD models in the past - it is incredibly easy to get details wrong when transferring dimensions and profiles from paper drawings.
It would also be difficult to arrange in terms of getting the reference airframe into a suitable environment for a decent amount of time. Museums are crammed full of other exhibtis which can't be moved, and working aircraft tend to be in use a lot of the time earning their keep, or being maintained. If we wanted to spend a length of time setting up a scanning session we would have to pay for it.
I think I saw in Hornby magazine a while ago that some model locomotives (diesels) have been moulded from scan data. Not sure if Hornby themselves do it though.
Gassing Station | Scale Models | Top of Page | What's New | My Stuff