Can anyone give me a technical explanation about .
Discussion


... scanning resolution effects.
Here's the deal.
Being without DSLR I occasionally use 35mm and these days get the films processed and the frames digitised on to CD. I have always used Boots previously for no good reason other than our locel one seems to do a reasonably good job of the film process and print - though less good last time I thought. I did use a local ASDA service once - good but the results all had a very strong green/dull red and I didn't have the CD version as the film was mainly a lens test.
So my films from Donington last weekend were going elsewhere as a trial and because I didn't want the hassle of heading into town. The local Tesco Extra store got the deal as they were happy to drop the pics straight onto a single CD without making me pay for some prints I did not want. Great!
Now the odd bit.
Viewing the new shots they look fine. Colour is OK, grain about what I expected for 800 and 400 ASA film and so on.
Open them in an editor (and I have tried several) and they instantly look terrible and VERY grainy. Only the Tesco ones do this, not the Boots output. (Must try an dremember what happened to the ASDA films ...)
Digging deeper, the file information seems revealing.
The Boots Hires versions of the files give file sizes of 550kb to about 850Kb based on image sizes of 1840x1232. 72dpi. They start from a 6.5Mb scanned file.
The Boots Lores images compress the file size by a factor of about 10 but keep the image the same size and have the same reported dpi.
The Tesco processed files (only one resolution) give fiels sizes around 1Mb for images reported as 1909x1273 from a 7Mb scanned file. However they only report at 26 dpi.
Now I am guessing the the effect I am seeing relates to the way the editors are assessing the dpi resolution for the files. So there is not much to be done other then get the negatives re-scanned.
What I don't understand, but would like to, is how the relationship between image size, file size and dpi resolution works. Can anyone point me in the right direction on this?

Personally I'd ignore the file size as it's largely irrlevent (provided storage space is sufficient).
Image size in terms of number of x pixels by number of y pixels will give you the size of the image at 100%. If you are displaying the images soley on a screen / the web, then you should only be interested in images around 640x480 or thereabouts.
Where it gets interesting is when you throw resolution into the equation (resolution is irrelevent for screen or web display). The resolution and image size are the key variables when it comes to printing. The standard resolution for printing is around 300dpi.
Generally the image size is fixed (for aguments sake), eg a my 10D images are 3072x2048 pixels. If I intend to print the images, then I can increase / decrease the DPI (resolution) to give me the print size I want (within reason), hence:
300 DPI gives me 26x17cm
240 DPI gives me 32x21cm
100 DPI gives me 78x52cm
You can see this by opening the Image Size window in PS, unticking the Resample Image checkbox and varying the resolution.
So, when you are scanning you need to work out what output image size you'd like and change the resolution on the scanner to obtain the image of that size.
Hope this goes a little way to explain things.
Steve
The only thing that exists in a digial image is pixels. Everything else is a tag. If your image is 1000x1000 and the DPI tab says it's 100DPI, this hints to the image render that it should be 10 inchs square. You could set the DPI to anything and as long as the viewer is set to a pixel 1:1 view the image will not change.
As for the noise, dunno sorry.
As for the noise, dunno sorry.
Part of what LongQ was seeing on the photos he uploaded to PH was compression (being generated by the site as the photos were 1900 wide.), but that doesn't really explain his quality issues with the various editors he has tried...
Make sure you're viewing at 100% magnification in the editor and if they look ok , then you should be able to reduce the image dimensions to 800 by something and they should look ok when you upload to PH.
Make sure you're viewing at 100% magnification in the editor and if they look ok , then you should be able to reduce the image dimensions to 800 by something and they should look ok when you upload to PH.
rj_vaughan said:
Part of what LongQ was seeing on the photos he uploaded to PH was compression (being generated by the site as the photos were 1900 wide.), but that doesn't really explain his quality issues with the various editors he has tried...
Make sure you're viewing at 100% magnification in the editor and if they look ok , then you should be able to reduce the image dimensions to 800 by something and they should look ok when you upload to PH.
That's true Rob but it seems to be worse as a result of the effects of making use of an editor. Some of the files change appearance very distinctly as a result of opening them from the viewer into the editor with no changes at all. But only this last batch of files show this tendency.
Given the small primary subject image on most of the negatives I would rather have as many dpi as possible to allow enlargement with some semblance of image quality retained. I can imagine that secondary compression could take out a large percentage of the available detail at 26dpi.
Time to dream up a few experiments.
(In the meantime the images as they are offer a good excuse to abuse them with various filters to see what happens!)
Still busy considering what you writ...But, in relation to:
You have files of, say, 2400x1600.
They will all contain the same number of pixels, namely 3.84 million. So that will directly relate to your file size...........
EXCEPT
a) when they are compressed (e.g. by the file type) and remember you can express different levels of compression in, say, JPEG format.
b) the colour information - multipy by three straight away
c) 8 bit or 16 bit
Anyway, a scan on one machine is not necessarily the same as on any other. Unfortuantely you have as much control over the scanning with these places as the temperature they bake your bread.
I have in the past (but have now virtually given up) tried scanning with a Nikon scanner. I found it a right PITA to get consistent results......
LongQ said:I think the answer is nothing to do with this. After all you still have teh same number of pixels in an image no matter whether you express this as 26, 72, 150 or 300 dpi or ppi - it's just your output which will differ in size.
72dpi. ...... 26 dpi.
Now I am guessing the the effect I am seeing relates to the way the editors are assessing the dpi resolution for the files.
You have files of, say, 2400x1600.
They will all contain the same number of pixels, namely 3.84 million. So that will directly relate to your file size...........
EXCEPT
a) when they are compressed (e.g. by the file type) and remember you can express different levels of compression in, say, JPEG format.
b) the colour information - multipy by three straight away
c) 8 bit or 16 bit
Anyway, a scan on one machine is not necessarily the same as on any other. Unfortuantely you have as much control over the scanning with these places as the temperature they bake your bread.
I have in the past (but have now virtually given up) tried scanning with a Nikon scanner. I found it a right PITA to get consistent results......
beano500 said:
Still busy considering what you writ...But, in relation to: LongQ said:
72dpi. ...... 26 dpi.
Now I am guessing the the effect I am seeing relates to the way the editors are assessing the dpi resolution for the files.
I think the answer is nothing to do with this. After all you still have teh same number of pixels in an image no matter whether you express this as 26, 72, 150 or 300 dpi or ppi - it's just your output which will differ in size.
You have files of, say, 2400x1600.
They will all contain the same number of pixels, namely 3.84 million. So that will directly relate to your file size...........
EXCEPT
a) when they are compressed (e.g. by the file type) and remember you can express different levels of compression in, say, JPEG format.
b) the colour information - multipy by three straight away
c) 8 bit or 16 bit
Anyway, a scan on one machine is not necessarily the same as on any other. Unfortuantely you have as much control over the scanning with these places as the temperature they bake your bread.
I have in the past (but have now virtually given up) tried scanning with a Nikon scanner. I found it a right PITA to get consistent results......
Interesting observations.
I once read up on this subject and thought I vaguely understood the variables - but now I'm not sure at all.
Had to go to the bank so I popped in the Tesco and asked if they had an option to set the dpi values. Apparently not. You shove the neg strip in one side and the results come out the other. Pretty much what I expected. (Their kit seems to have Photo-me badges on it.)
The person on the desk today suggested considering (locally available) Click! or Max Spielmann who may have more hardware options available and possibly could offer a more bespoke service I guess.
I think some more searches and tests are required first. I like to have a vague idea about the sunject matter before asking service staff technically related questions!
beano500 said:
Have you costed up buying a scanner?
You'd have all the control then.
I did a year or so ago but mainly because I have just a few 2 1/4" square negs I wanted to scan. There are few scanners available for that size and prices are high as well. And frankly I don't have the time to go through that process for every film even though I haven't been shooting that many.
If I considered just the 35mm stuff then a dedicated neg/pos scanner might be viable - but then your experience suggests perhaps not according to your previous post.
Maybe it would be easier to get the cheque book out and go DSLR ...

This image seems a little less prone to pixellation so lets test it. PS Elements, saved as a 81K 'for web' file from a 1.2Mb original.
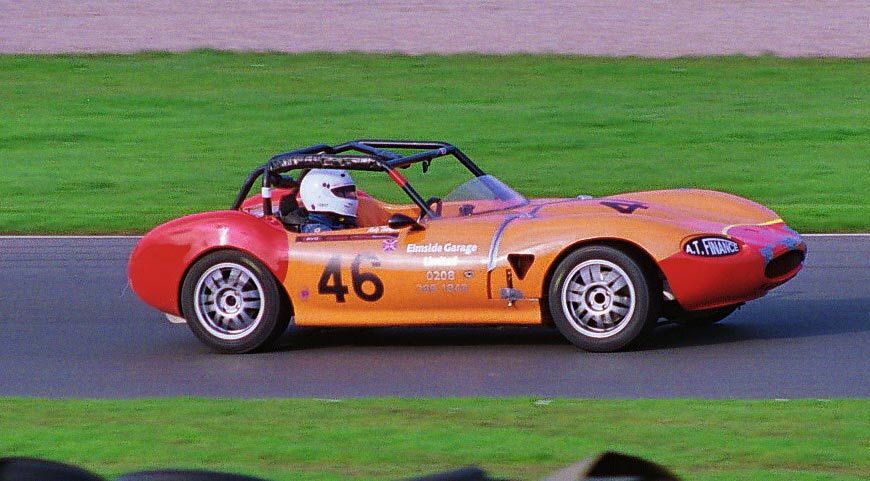
Nope, still losing something somewhere.
http://img.photobucket.com/albums/v663/longq/Ginetta/Photo09_5A_web.jpg
>> Edited by LongQ on Thursday 7th April 00:39
Nope, still losing something somewhere.
http://img.photobucket.com/albums/v663/longq/Ginetta/Photo09_5A_web.jpg
>> Edited by LongQ on Thursday 7th April 00:39
The best a normal computer/display is going to do for you is 24 bit colour. I don't know much about analogue photography, but I'd say that's akin to CD quality sound.
The way to calculate absolute data size in bytes is to multiply the number of pixels along each side of the image to get the pixel area, multiply that by the number of bits associated with colour information in your image, and divide by eight, to get the absolute number of bytes. 1K byte is actually 1024 bytes, and 1024 Kbytes is 1 Megabyte.
Your 1909 x 1273 image in a decent number of colours should be
1909 x 1273 = 2430157 pixels.
2430157 x 24 = 58323768 bits.
58323768 / 8 = 7290471 bytes.
7290471 / (1024 * 1024) = 6.95 Megs.
Obviously all of your images are compressed (JPEG), and JPEG retains the overall image size in pixels, as scanned, but reduces the quality of information within the picture. If your file for this picture is only 1Meg then that is because jpeg has removed 6/7ths of the quality.
The DPI figure that you are being reported is calculated as an approximate value, on the basis of the ammount of compression applied to the image. It's basically saying that if you reduce the overall size of your image such that the DPI rises to coincide with your monitor dot pitch, the image though smaller, will be of the same quality as the original.
It's really not that simple with jpeg though. If you reduced the size of your original image to the smaller size I just described, saved it to disk as a bitmap, and then blew it back up again, it'd look far worse than anything posted here. Jpeg has a unique way of compressing textures.
Keep them as bitmaps, and your pictures will look 6/7ths better.
As an aside, 24 bit colour information is 3 (RGB) x 8 (bit colour). The three bytes are stored as such and not in a 32 bit longword (which would be more computer freindly). This does save disk space, but not compromise picture quality.
Eight bit color works in such a way as you may have up to 256 separate colours in your image. Each of the colours is stored in a palette and is a 24 bit colour. Each pixel must be set to one of the 256 colours. This saves on memory, and works particularly well for images that have little colour diversity.
I believe that jpegs operate on 16bit colour. This does mean that one colour is represented with twice the precision than the other two. But the image is dynamically compressed with with a view to removing the information that an average eye will miss least, first.
>> Edited by dilbert on Thursday 7th April 01:40
dilbert said:
If your file for this picture is only 1Meg then that is because jpeg has removed 6/7ths of the quality.
I don't think you can express the tricky beast of quality absolutely. It's - um - qualitative! It might have removed 6/7ths of the *information* though. For example, I can reduce a file size by 90% using jpg compression but it certainly looks more than 1/10 as good as the original!
simpo two said:
If your file for this picture is only 1Meg then that is because jpeg has removed 6/7ths of the quality.
I don't think you can express the tricky beast of quality absolutely. It's - um - qualitative! It might have removed 6/7ths of the *information* though. For example, I can reduce a file size by 90% using jpg compression but it certainly looks more than 1/10 as good as the original!
I'd not argue with that at all. I was realy only trying to illustrate that an awful lot of the image quality has been removed. If you check out the bit on scaling I think I expressed there that jpeg compression is far better than plain pixel reduction.
Thanks guys.
I don't consider myself an expert but I sort of understand what is meant to be happening in all this. What I can;t get my head around is why some images seem to suffer a greater degradation than others for pretty much the same degree of manipulation when all other tings seem fairly 'proportionally consistent' - if you see what I mean.
The image I posted embedded diaplays a marginally smaller than the image as stored on photobucket - which is itself compressed to about 1/12th of the orignal scan. The scan output file was a 7 fold compression from the original scammed image.
The actual image selected is a crop from the full 35mm neg and represents perhaps 30% of the area of the negative.
Given all of that I guess the results are not bad! But if you compare the embedded image with the same file viewed through the link provided (or at least if you do that on my screen) the link image is slightly larger (does not get re-sized) yet quite a lot crisper if you look at, for instance, the wheel arches.
So the re-size for embedding has had an effect. Fair enough, I have no problem with that. I suspect that something similar may happen on the photo hosting system to compound the quality loss. But why only (apparently) on some files. What is it that is different about those files to the ones that don't show the degradation behaviour?
In terms of what I can identify so far the common factors might be;
a) The obviously affected files are reporting a scan resolution of 26dpi whereas previously used crops have been 72dpi.
b) The cropped images are not to a 'standard' proportion (although I am not sure this is true of all of the pics where I have noticed the problem. Something else to eliminate then now I think of it.
However this still does not explain the apparent instant degradation when the image is loaded to an editor rather than a viewer.
Trying to get to grips with this seems to be a bit like eating blancmange with a fork!
Just a personal observation, so may be well off the mark, but I'm not convinced bow standard the JPEG standard is. My gf has a Casio compact (5MP, reasonable mid range) and I have a Fuji. The file sizes that come from the Casio are larger for the same bitwise information than the Fuji, but opening and resaving the Casio images in any editor immediately reduces the file size, even with no editing. The Fuji ones save the same size - and with the same quality.
I am guessing that this is what has happened with your Tesco photos. I'd ignore the dpi figures, as has been said above, these are just tags attached to the file.
If there is some difference in the compression methods though, the editors that you are using (which are possibly all using the same version of JPEG) will all miss information stored on the file. Very annoying, as it is clearly there somewhere, but just out of reach.
In respect of Jpeg, I'm going to go into speculation mode, because I don't actually know for sure. I'm also going to talk about other stuff, but that I know for certain.
Witin the bounds of this discussion there are two ways of scaling an image. The first is by using the Jpeg decompression algorithm, the second is by a technique known as "2D Convolution".
I think that a Jpeg has a sort of root image (thumbnail). That's the small image that I was talking about in my previous post. It's the one where the image is smaller but the pixel information is absolute and of the same quality as the original.
I already said that the original image size is kept in the Jpeg file, but since the real image (thumbnail) is so much smaller than the original image somehow the real image needs to be expanded to it's original size. This is where the compression comes in.
If you were to draw a grid of the original image pixels over the thumbnail one pixel in the thumbnail would represent many pixels in the original. If you just scaled the image up then it would appear "blocky".
When compressing jpeg looks for the areas of texture, where colours are similar and remembers those. When you set the ammount of compression the some of the texture information is thrown away. The 2D convolve is probably used to achieve the encoding.
The pixels in the thumbnail are "seeds" for reconstructing the textural information. Depending on what size you want the thumbnail to be expanded to, the decompression algorithm distributes the seeds across the new image, and fills the gaps with stretched bits of texture, with as much precision as it has available given the settings from the compression phase.
Critically this approach does not just convolve the whole image, it merely convolves on the basis of the seed interval, which is set as a function of the ammount of information you ask the compression algorithm to dispose of. I believe you can set this independently.
The other approach is the straight 2D convolve. With this approach a convolve block is passed across the whole image. A convolve block maps to an image by pixel is generated from a standard polynomial. The block is usually, though not necassarily, square and might be 2X2 (bilinear) 3X3 (biquad) 4X4 (bicubic), and so on.
The polynomial is a curve fit that is calulated and drops into each row and column of the convolve block, for each of the three monochrome bitmaps RGB. This process usually takes place at every mappable interval of the convolve block to the image.
The convolve is the standard windows scaling mechanisim, but it does not allow access to the co-efficients of the convolution, so you have no opportunity to select information to throw away.
The point about convolution, is that once you have the co-efficients for each of the curves, of each of the rows and columns for each convolve block for each of the three monochrome bitmaps that represent your image, you can mathematically scale the convolve blocks, and work out what any interpolated pixels should be.
When making an image bigger, each of these techniques introduces different types of artefact. Critically usually Jpeg introduces more artefacts because some of the textural information had to be thrown away.
What is interesting is that if the image information is stored as co-efficients, rather than pixels, it uses a similar ammount of physical memory to the absolute bitmap. It helps however, because it allows the information to be thrown away (compression) in a way which an average brain less readily misses.
IMO this is quite a good indication that an average brain is processing the image information by co-efficients than by pixels.
>> Edited by dilbert on Thursday 7th April 11:57
Gassing Station | Photography & Video | Top of Page | What's New | My Stuff