
I can't keep putting it off any longer, so here it goes ...
Discussion


Well, after lots of deliberating and questioning if I had the skills required to complete a body off resto, I have never done anything as involved as this before, I decided that I shouldn’t wait any longer and should just get on with it and hopefully learn as I go along. Then I started to procrastinate almost immediately, starting by getting my garage prepared for working in and coming up with a plan to lift the body. Having read the method Barkychock used gave me some ideas and I came up with a solution which has turned out to be almost the same a Jaye R’s, by using a 2 chain blocks suspended from a couple of joists so the body is suspended to the ceiling. I too only have a single garage so will be requiring the space below to work on what’s left of the chassis. So here is what I have done so far and hopefully what I’m up to in the coming months.
Before looking all nice and shiny

Bonnet off. This wasn’t quite as simple as I was hoping as hiding behind masses of electrical tape was this

Someone’s been buggering around with the electrical multi connectors on both sides leaving me with this mess instead of the simple 8 pin one. I just hope that they haven’t been messing around with any other bits of the electrics, as it’s never been one of my strong points!
Exhaust and Y pipe off. It’s blowing so either need to get it welded if feeling cheap or replace with a nice new stainless steel one. Think I’ll decide later.

If this is what it looks like by the air filter/radiator mount, I hate to think what the outriggers are like!

Well that as far as I’ve got but she's already looking pretty sorry for herself, now just waiting to put up the joists before making the car immobile . Then finish off disconnecting an awful lot of things, removing the engine and gearbox before finally lifting the body to reveal a chassis that is hopefully not in too bad a state.
Gordon
Before looking all nice and shiny
Bonnet off. This wasn’t quite as simple as I was hoping as hiding behind masses of electrical tape was this
Someone’s been buggering around with the electrical multi connectors on both sides leaving me with this mess instead of the simple 8 pin one. I just hope that they haven’t been messing around with any other bits of the electrics, as it’s never been one of my strong points!
Exhaust and Y pipe off. It’s blowing so either need to get it welded if feeling cheap or replace with a nice new stainless steel one. Think I’ll decide later.
If this is what it looks like by the air filter/radiator mount, I hate to think what the outriggers are like!
Well that as far as I’ve got but she's already looking pretty sorry for herself, now just waiting to put up the joists before making the car immobile . Then finish off disconnecting an awful lot of things, removing the engine and gearbox before finally lifting the body to reveal a chassis that is hopefully not in too bad a state.
Gordon
I have also held back on such things, and stuck to the cosmetic as I dont think I have the skills needed (Self confidence issue) , although i'd love to learn. I note you are in surrey - im near Epsom. Wouldnt mind wandering by to offer some moral support and I might just learn a thing or too as well. Let me know if you need a tea boy some weekend. Pete
 ,Or atleast thats what im saying at the mo.
Good luck ! I'm down in Hampshire and am just near completing a body off - V8S Rebuild
I also had limited experience when I started and its been a steep learning curve so let me know if you want to swap notes
I also had limited experience when I started and its been a steep learning curve so let me know if you want to swap notes
A steep learning curve is what I am hoping for at the moment. They seem like relatively simple so I'm hoping that "refitting is the reverse of the removal" as Haynes would say!
Deeman, your welcome to come round and have a look, I'm in Redhill so not far away. I'm exactly the same as you with the lack of skills but hopefully I'll learn as I go along, hopefully without too many mistakes!
gifdy, your thread and many others has already been really helpful to me to let myself know what I'm in for over the coming months along with useful tips. Hopefully I won't become stuck with anything but I'm sure that I will at some point and will look back on what I just said and laugh!!
As for chassis colour, I didn't really have to think about it. It's going to be the standard red, one thing that's definately going to remain standard. And I think it looks the best too.
Deeman, your welcome to come round and have a look, I'm in Redhill so not far away. I'm exactly the same as you with the lack of skills but hopefully I'll learn as I go along, hopefully without too many mistakes!
gifdy, your thread and many others has already been really helpful to me to let myself know what I'm in for over the coming months along with useful tips. Hopefully I won't become stuck with anything but I'm sure that I will at some point and will look back on what I just said and laugh!!
As for chassis colour, I didn't really have to think about it. It's going to be the standard red, one thing that's definately going to remain standard. And I think it looks the best too.
Thought it would be time for another update after a very busy week.
I finished disconnecting the engine wiring (what a hateful job!)
Drained and disconnected the fuel system
Drained and removed the cooling system
Disconnected gearbox wiring
Removed the anti roll bar to make getting the engine out easier
And probably lots of other things that I can't really remember
All to get to this stage while remembering to disconnect that pesky earth at the back of the block that I couldn't reach with the engine in place.

And this is whats left of my car without its heart

All I have left to do is
Disconnect: The brake master cylinder
The clutch pipe from the master cylinder
Fuel tank inlet pipe
Handbrake
Battery wires in boot
Boot gas strut
Remove the seats
Undo all the chassis bolts
Then finally they should be able to be parted followed by a quick bit of stripping!!
Think I'm going to have a busy few days
I finished disconnecting the engine wiring (what a hateful job!)
Drained and disconnected the fuel system
Drained and removed the cooling system
Disconnected gearbox wiring
Removed the anti roll bar to make getting the engine out easier
And probably lots of other things that I can't really remember
All to get to this stage while remembering to disconnect that pesky earth at the back of the block that I couldn't reach with the engine in place.
And this is whats left of my car without its heart
All I have left to do is
Disconnect: The brake master cylinder
The clutch pipe from the master cylinder
Fuel tank inlet pipe
Handbrake
Battery wires in boot
Boot gas strut
Remove the seats
Undo all the chassis bolts
Then finally they should be able to be parted followed by a quick bit of stripping!!
Think I'm going to have a busy few days

I hope you disconnected the speedo sender before pulling it out, unlike me and SEB400 who told me before I pulled the engine to disconnect it, but I took no notice! 
The resto really isn't too hard - there's just a lot of it!
You also will need to think about where you are going to put everything - when it really starts coming apart it generates a lot of parts and you need to find somewhere to put them all - its worth keeping the chassis with wheels on as long as possible - then you can roll it in and out of the garage and store the bits at the back - removing the final suspension and wheels after everything else.
Once the chassis is stripped you must get it shotblasted - remove the rubber bits that are glued to the chassis as it just bounces off - and it may need degreasing.
Those manifolds will almost certainly be blowing where the 4 pipes meet in the middle - seemingly impossible to get at but the trick is to saw the conical bit of the manifold off and then you can get at the 4 pipes where they meet from inside the manifold - weld up the hole where its blowing then weld the bit you have sawn off back on.
To confirm where the manifolds are blowing I'm told the trick is to fill them with water but haven't tried that myself.
Now I don't have a TVR I don't come on here daily so if you have any questions send me a PM - I check email more often.
Chris
The resto really isn't too hard - there's just a lot of it!
You also will need to think about where you are going to put everything - when it really starts coming apart it generates a lot of parts and you need to find somewhere to put them all - its worth keeping the chassis with wheels on as long as possible - then you can roll it in and out of the garage and store the bits at the back - removing the final suspension and wheels after everything else.
Once the chassis is stripped you must get it shotblasted - remove the rubber bits that are glued to the chassis as it just bounces off - and it may need degreasing.
Those manifolds will almost certainly be blowing where the 4 pipes meet in the middle - seemingly impossible to get at but the trick is to saw the conical bit of the manifold off and then you can get at the 4 pipes where they meet from inside the manifold - weld up the hole where its blowing then weld the bit you have sawn off back on.
To confirm where the manifolds are blowing I'm told the trick is to fill them with water but haven't tried that myself.
Now I don't have a TVR I don't come on here daily so if you have any questions send me a PM - I check email more often.
Chris
Also - if you find you keep banging your head buy yourself a bump cap - its basically a baseball cap with a hard plastic liner - it saves a lot of bruises! I banged my head no end of times with the body suspended but its just annoying rather than painful with a bump cap on!
A hard hat is no good as its too high on your head.
http://www.screwfix.com/p/jsp-hardcap-a1-navy-bump...
A hard hat is no good as its too high on your head.
http://www.screwfix.com/p/jsp-hardcap-a1-navy-bump...
Edited by Barkychoc on Monday 28th November 23:07
The body is now off and hanging in the garage!! Unfortunately my man maths didn't quite work out as well as I had hoped and its not as high as I'd liked as I'm going to be working underneath it. Still to add a couple of extra straps so that if the block and tackle fails the body wont fall onto me!

The chassis doesn't seem too bad. Only found a few holes. The seat belt mounts on the out rigger's are almost non existent.

The rear mounts have been replaced at some point recently and are solid but had not been painted so probably wouldn't have lasted too long. The body mounting points below are hardly in a good state though.

More holes on the central spine with the joint by the front outrigger.

And finally, the outrigger corners have been replaced relatively recently by a previous owner without lifting the body at all. The weld doesn't go all the way round the tube letting in water. They aren't even on completely straight!!


So not too bad in comparison to some of the others but it wasn't too far away from getting into a really bad state. There's hardly any powdercoat still sticking to sound steel instead of rust.
Now to strip the chassis and send it off for shot blasting and repairs.
Chris - thanks for the offer of help from your vast knowledge, hopefully I wont have to ask too many questions. I was wondering though, where did you find replacement bushes for the diff and gearbox mounts?
Many thanks
Gordon
The chassis doesn't seem too bad. Only found a few holes. The seat belt mounts on the out rigger's are almost non existent.
The rear mounts have been replaced at some point recently and are solid but had not been painted so probably wouldn't have lasted too long. The body mounting points below are hardly in a good state though.
More holes on the central spine with the joint by the front outrigger.
And finally, the outrigger corners have been replaced relatively recently by a previous owner without lifting the body at all. The weld doesn't go all the way round the tube letting in water. They aren't even on completely straight!!
So not too bad in comparison to some of the others but it wasn't too far away from getting into a really bad state. There's hardly any powdercoat still sticking to sound steel instead of rust.
Now to strip the chassis and send it off for shot blasting and repairs.
Chris - thanks for the offer of help from your vast knowledge, hopefully I wont have to ask too many questions. I was wondering though, where did you find replacement bushes for the diff and gearbox mounts?
Many thanks
Gordon
The chassis is now back from the shot blasters and showing its full glory.

So looking more closely you can see

The very dodgy outrigger corner replacement done in the past. Its also at 90 Degrees instead of 95ish which accounts for the non straight outriggers.

The great quality welding that took place too. So glad that these are coming off as they were terribly badly done. But at least they weren't rotten which cant be said unfortunately for the rest of the car.

More holes in the outriggers at the top and the body support plates.

Rust in the central spine.

Seatbelt mounts again rusted through and un-salvageable on both sides. At some point in the past, too long a bolt has been used which has damaged both sides.
Now the more interesting bit. The chassis leg that supports the trailing arms.

Passenger side, only one small hole all the way through.
The other side

Spot the hole below the seatbelt mount. The mount too is scrap and you just have to laugh at the attempt at repairing the mount in the past. At least it fooled its way though a few MOT's like this and would continue to do so as none of the holes were visible from the underside. The garage and I thought that the chassis had been caught in time.
Now off to see if I can find any money down the back of the sofa and everyone else's, as its far worse that expected. Its pretty much in the same state as tubbystu's rebuild a couple of winters ago, minus the blown weld from the factory. Mine's a 91 car too so dread to think how bad some other chassis could be.
So looking more closely you can see
The very dodgy outrigger corner replacement done in the past. Its also at 90 Degrees instead of 95ish which accounts for the non straight outriggers.
The great quality welding that took place too. So glad that these are coming off as they were terribly badly done. But at least they weren't rotten which cant be said unfortunately for the rest of the car.
More holes in the outriggers at the top and the body support plates.
Rust in the central spine.
Seatbelt mounts again rusted through and un-salvageable on both sides. At some point in the past, too long a bolt has been used which has damaged both sides.
Now the more interesting bit. The chassis leg that supports the trailing arms.
Passenger side, only one small hole all the way through.
The other side
Spot the hole below the seatbelt mount. The mount too is scrap and you just have to laugh at the attempt at repairing the mount in the past. At least it fooled its way though a few MOT's like this and would continue to do so as none of the holes were visible from the underside. The garage and I thought that the chassis had been caught in time.
Now off to see if I can find any money down the back of the sofa and everyone else's, as its far worse that expected. Its pretty much in the same state as tubbystu's rebuild a couple of winters ago, minus the blown weld from the factory. Mine's a 91 car too so dread to think how bad some other chassis could be.
Edited by The Big G on Wednesday 11th January 11:48
Looks like things are progressing well, you'll have it back for the summer no doubt (SCH 2012 I hope). A tip from me having done mine last year. I see you took the engine out before the body came off. When you put it back together, put the engine on the chassis before the body goes on. Much easier to get to!

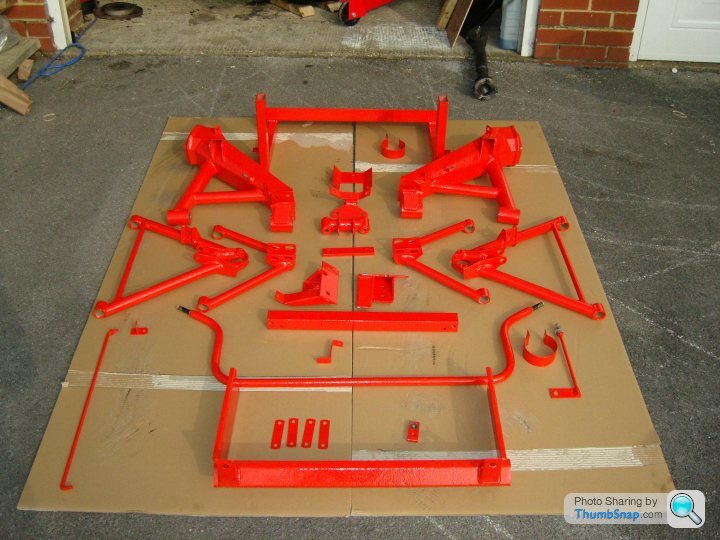
Woo hoo, chassis is finally back!!! Lots of shiny red bits, just the way I like them!! Time got get on seeing if I can remember to put it back together again...

Diff's back in, along with one complete rear side and have started to run some new brake lines. But its time for my first query already. I purchased a complete set of powerflex bushes and have pictured the ones for the lower wishbones below.

I can't seem to fit them. All mention that I can find for front bushes says that the poly part is 2 bits with the metal sleeve. Push one in from either side then the metal inner afterwards. As mine are all one I can't seem to be able to force them through the wishbone and was wondering if there is a trick to this?? As for the trailing arms, they fitted quite easily as they are each in 3 parts so no problems there.
Many thanks
G
Diff's back in, along with one complete rear side and have started to run some new brake lines. But its time for my first query already. I purchased a complete set of powerflex bushes and have pictured the ones for the lower wishbones below.
I can't seem to fit them. All mention that I can find for front bushes says that the poly part is 2 bits with the metal sleeve. Push one in from either side then the metal inner afterwards. As mine are all one I can't seem to be able to force them through the wishbone and was wondering if there is a trick to this?? As for the trailing arms, they fitted quite easily as they are each in 3 parts so no problems there.
Many thanks
G
You need silicon grease that should be supplied with the bushes. It wasn't supplied with mine and it was only when I rang tvrcarparts to say I was really struggling and was there a technique to fitting them that this came to light. Easy to fit with the grease and a soak in hot water.
I have another whole day to work on it tomorrow so will attack them with the hot water, see how much they soften up and hopefully get them to fit. Then maybe finish the front suspension. Spent most of today finishing the rear and running brake pipes, just need to torque up a few bolt then thats the back done for now. I'll add some more photos if I remember to take my camera down to the garage...
G
G
Well, have been down in the garage and still can't seem to be able to fit the bushes after softening them in hot water. All they seem to want to do is deform rather than push through even with a large bolt through the center to try to prevent this. I am contemplating cutting them in two so that I can push them in from either end as per the Superflex bushes. Will this cause any problems?? If so, I'lll give up and take them to a friendly garage and see if they can press them in for me.
I use a length of studding and some washers and a couple of nuts. You will also need a spacer to allow the collar on the bush to seat when it is wound in. There is a length of M12 in my garage. You can wind the bushes in this way - it looks cruel as the bushes deform but they will pop into place.
Hope this helps
Cheers
Tony
Hope this helps
Cheers
Tony
Gassing Station | S Series | Top of Page | What's New | My Stuff