
Home made indicator lenses
Discussion


One of my cracked indicator lenses finally fell apart so I needed replacements. I can't justify the cost of the pattern ones and I don’t like the fact that the Kia lenses etc don’t overlap the end of the rubber bumper, so I decided to try to make my own.
I bought an A4 sheet of 5mm Amber acrylic on internet for a fiver, this gave enough for 3 lenses (plus offcuts to experiment with.
Cutting and forming the acrylic to the shape of the original lens was no problem. (If anyone would like details let me know), but the diffuser pattern was more difficult. I tried various options on the offcuts, grinding grooves, drilling rows of blind holes, pressing heated mesh into the plastic, none of which were very good.
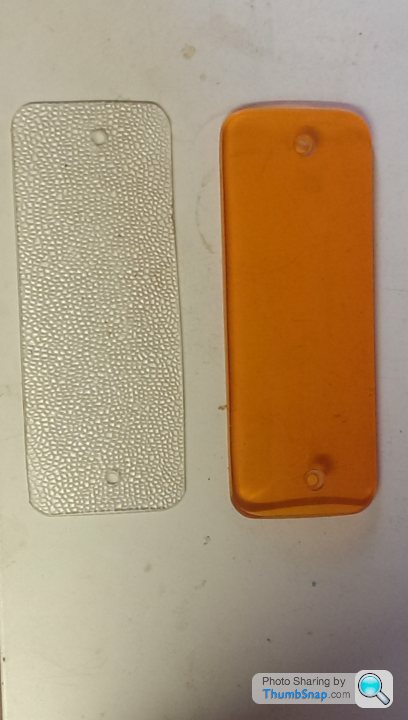
However two methods worked. 1) I had a couple of old indicators which I cut down to exactly fit the reflectors. Glued them in place and set them back into the recess so that the new amber lens would fit over the top. 2) “borrowed” a broken florescent tube diffuser from a local skip. Cut a piece exactly the same shape as my new lens and sandwiched it between the new lens and the reflector.
See photos attached. I have currently fitted the ones using the cut down lens but I think I may change them to the ones using the diffusers. Anyone have an opinion which is better?

I bought an A4 sheet of 5mm Amber acrylic on internet for a fiver, this gave enough for 3 lenses (plus offcuts to experiment with.
Cutting and forming the acrylic to the shape of the original lens was no problem. (If anyone would like details let me know), but the diffuser pattern was more difficult. I tried various options on the offcuts, grinding grooves, drilling rows of blind holes, pressing heated mesh into the plastic, none of which were very good.
However two methods worked. 1) I had a couple of old indicators which I cut down to exactly fit the reflectors. Glued them in place and set them back into the recess so that the new amber lens would fit over the top. 2) “borrowed” a broken florescent tube diffuser from a local skip. Cut a piece exactly the same shape as my new lens and sandwiched it between the new lens and the reflector.
See photos attached. I have currently fitted the ones using the cut down lens but I think I may change them to the ones using the diffusers. Anyone have an opinion which is better?

yes the one fitted to the car is one of the ones I made. they both use the same amber cover, only the diffuser is different. Here is a photo with the florescent tube diffuser fitted to the car with a bit of foil behind it to simulate the reflector (I have already glued the reflectors to the other diffusers) 
Cut the rough shape of the lens from the sheet using a cutting disc in the angle grinder (the only way to cut it practically)about 5% oversize as acrylics shrink when you heat them (some more than others). Then cut a piece of sheet metal to approx the same size and shape as the lens, any metal will do as long as it is thin enough to be bent by hand. Bend it to match the curve of the existing lens. (with the benefit of hindsight it might have been better to bend the metal to match the fibreglass rather than the existing lens. Wait for your wife to go out and then place the metal in the oven with the concave face upward. Lay your acrylic on top of this with a piece of bar on top to press it down. Try to keep the protective paper on the acrylic, otherwise use the shiny side of aluminium foil to stop the acrylic sticking. Heat the oven gradually to 140 degC. The acrylic will slump into the mould. Remove from the oven and allow to cool.
Now trim the acrylic to the final size and shape. Rounding the corners and sides etc. I found the easiest way to do this was to scribe the final shape onto the lens then clamp the grinder on its side in the vice with a sanding disc and use a block of wood on the bench to steady the acrylic as you apply it to the disc. ) Dont forget your safety glasses as in this position the disc will throw the dust upwards), once you have the final shape the edges can be polished using fine wet& dry (I used 2500 because that is what I had) hopefully the faces of the lens will still have the protective paper on and will be unmarked. Drill and countersink the screwholes.
Now trim the acrylic to the final size and shape. Rounding the corners and sides etc. I found the easiest way to do this was to scribe the final shape onto the lens then clamp the grinder on its side in the vice with a sanding disc and use a block of wood on the bench to steady the acrylic as you apply it to the disc. ) Dont forget your safety glasses as in this position the disc will throw the dust upwards), once you have the final shape the edges can be polished using fine wet& dry (I used 2500 because that is what I had) hopefully the faces of the lens will still have the protective paper on and will be unmarked. Drill and countersink the screwholes.

Gassing Station | S Series | Top of Page | What's New | My Stuff