
Rear Diff Carrier
Discussion


You'll need to make access panels in the boot if the body is on, from memory I think there were four onto he ally brace bar at the top, then two at bottom front of cradle and must be two at rear. Plus obviously the Huns an shocks may as well come down with it.
Think I used a 100 mm hole saw to make the access holes in the boot then sealed after with ally plate.
Think I used a 100 mm hole saw to make the access holes in the boot then sealed after with ally plate.
wooly350i said:
You'll need to make access panels in the boot if the body is on
 No you don't... two bolts at the front and two long bolts at the back... the ones through the hanging part of the chassis with the almost inaccessible nuts... if you're very lucky the bolts won't be corroded into the chassis rail. Mine were, I had to drill the b4st4rds out: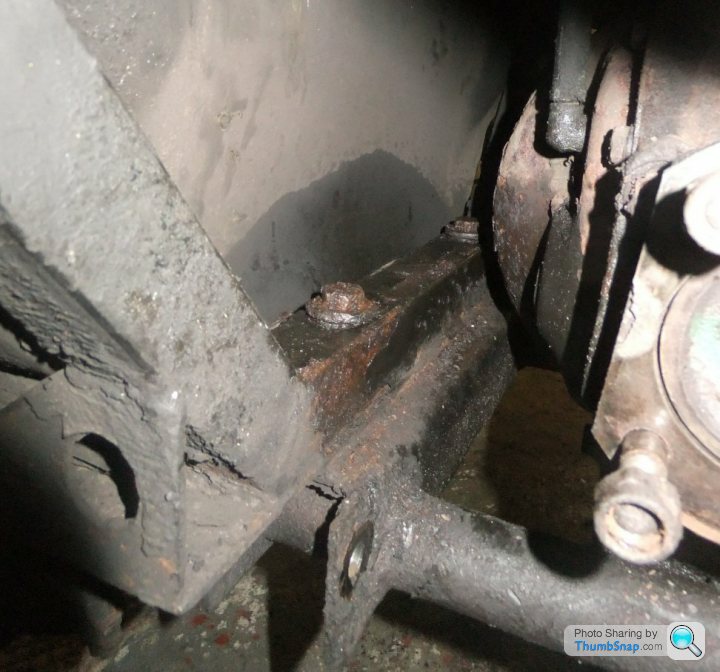
Also the nuts at the ends of the rear alloy beam, those bolts don't need to come out and a spanner will reach over the top of the shock mount to hold the bolt heads.
The only reason you'd need to chop the boot floor would be if the diff top beam rubber mounts were shot as there's no room to get them out with the shell in the way.
Some gory pics here...
http://www.wedgeneering.co.uk/TVR%20390SE%20p13.ht...
Don't forget to check the two Metalastik bushes in the lower cradle holding the diff up...
Edited by Wedg1e on Tuesday 6th May 22:14
Beat me to it !! I was going to say I managed to get the diff out of mine without cutting holes, but I did leave the ally top carrier in place. Fiddly, but do-able.
BEWARE !! the diff assembly is *VERY* heavy and awkward, especially when you're laying on the floor...and it doesn't balance nicely on one jack (I couldn't get it to anyway)
BEWARE !! the diff assembly is *VERY* heavy and awkward, especially when you're laying on the floor...and it doesn't balance nicely on one jack (I couldn't get it to anyway)
wooly350i said:
Ahh, yes ya do if you leave the ally brace in place as we did, raspberry!
John, I'm not sure where you are coming from unless your chassis is different; here's me dropping the diff complete with lower cradle and alloy beam still in place, no holes drilled anywhere...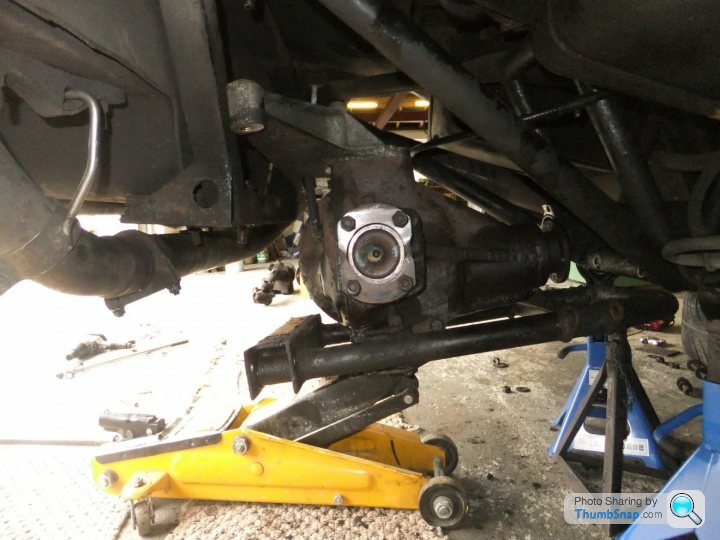
Edit: RCK, note the axle stand supporting the front of the cradle while the jack lowers the unit, made it a lot more manageable! I'll probably use a scissor table to put the unit back in as I plan to fit the discs and calipers as well so I can setup/test it all off the car...
Edited by Wedg1e on Wednesday 7th May 02:03
Wedg1e...!SNAP! I actually did a similar trick with axle stands, and a couple of scissor jacks, and also used some wooden blocks as a safety catch.
Having seen your photo,I can't remember for sure now, but I think I left the ally carrier in place....er....perhaps I didn't after all....damn, I'm getting old. I lowered mine to make it easier to get the calipers off/out.
Just thought I would warn TVRleigh that it's not very stable when half out of the chassis ....
Having seen your photo,I can't remember for sure now, but I think I left the ally carrier in place....er....perhaps I didn't after all....damn, I'm getting old. I lowered mine to make it easier to get the calipers off/out.
Just thought I would warn TVRleigh that it's not very stable when half out of the chassis ....
6 bolts, two horizontal at the front, two on the aluminium carrier and two in the 'U' section low down at the back. No cutting of body required; completed the job on Monday. I had to cut off the lower rear pair of bolts (they're UNF just to be awkward) and also cut through the brake flexi to make life easier. Springs/shocks left in place on the top mount.

It was a pig to get the 2 lower rear bolts back in and tight, but do-able. I replaced them with socket head bolts and then cut down an old allen key to get the right height to swing a ratchet above the brake disc, that did help. There's no chance of getting a socket on the nuts of these bolts either; I had to cut/chisel them off and held the replacement nuts with the tiny-est mole grips I have while tightening from above. I did consider longer bolts and an extension tube but even that wouln't fit.
When I did the rear calipers on the SEAC I did it with the axle in place but had removed the nearside fuel tank. It was still a nasty job but in different ways... caliper mounting bolts and lockwiring was awkward, plus the discs have to come off to get the calipers past the chassis tubes.
It was a pig to get the 2 lower rear bolts back in and tight, but do-able. I replaced them with socket head bolts and then cut down an old allen key to get the right height to swing a ratchet above the brake disc, that did help. There's no chance of getting a socket on the nuts of these bolts either; I had to cut/chisel them off and held the replacement nuts with the tiny-est mole grips I have while tightening from above. I did consider longer bolts and an extension tube but even that wouln't fit.
When I did the rear calipers on the SEAC I did it with the axle in place but had removed the nearside fuel tank. It was still a nasty job but in different ways... caliper mounting bolts and lockwiring was awkward, plus the discs have to come off to get the calipers past the chassis tubes.
Wedg1e said:
John, I'm not sure where you are coming from unless your chassis is different; here's me dropping the diff complete with lower cradle and alloy beam still in place, no holes drilled anywhere...
Edit: RCK, note the axle stand supporting the front of the cradle while the jack lowers the unit, made it a lot more manageable! I'll probably use a scissor table to put the unit back in as I plan to fit the discs and calipers as well so I can setup/test it all off the c...
It was a few years ago Ian, but yes decided to drill some neatly configured access holes to reach the bolts and bushes from the top, doesn't detract other than having to shift the carpet. Fitted the cut outs to a larger over lay plate and sealed in place, requires a sharp scraper to split the seal, makes me very happy. It's frigging hard tapping these bl00dy phones with broken arm Edit: RCK, note the axle stand supporting the front of the cradle while the jack lowers the unit, made it a lot more manageable! I'll probably use a scissor table to put the unit back in as I plan to fit the discs and calipers as well so I can setup/test it all off the c...
Edited by Wedg1e on Wednesday 7th May 02:03
wooly350i said:
It was a few years ago Ian, but yes decided to drill some neatly configured access holes to reach the bolts and bushes from the top, doesn't detract other than having to shift the carpet. Fitted the cut outs to a larger over lay plate and sealed in place, requires a sharp scraper to split the seal, makes me very happy. It's frigging hard tapping these bl00dy phones with broken arm
No probs John... I guess you won't be drinking that mucky beer then 
The Hatter said:
It was a pig to get the 2 lower rear bolts back in and tight, but do-able. I replaced them with socket head bolts and then cut down an old allen key to get the right height to swing a ratchet above the brake disc, that did help. There's no chance of getting a socket on the nuts of these bolts either; I had to cut/chisel them off and held the replacement nuts with the tiny-est mole grips I have while tightening from above. I did consider longer bolts and an extension tube but even that wouln't fit.
When I did the rear calipers on the SEAC I did it with the axle in place but had removed the nearside fuel tank. It was still a nasty job but in different ways... caliper mounting bolts and lockwiring was awkward, plus the discs have to come off to get the calipers past the chassis tubes.
I think it was Barrington who had plates welded across the bottom of the channel on that lower beam so the nuts would be underneath. It's odd the way they've done it to leave the nuts so inaccessible, almost like they didn't think it through before they started When I did the rear calipers on the SEAC I did it with the axle in place but had removed the nearside fuel tank. It was still a nasty job but in different ways... caliper mounting bolts and lockwiring was awkward, plus the discs have to come off to get the calipers past the chassis tubes.
 I guess they wanted the bolts as far apart as possible.
I'll give it some thought before I put mine back together; might just go the welded plate route!
What wooly means is you must drill holes in the boot if you would like an easier job, it also means you can get an air or electric gun on the bolts, saves faffing about with spanners in that tight gap between chassis and body  I'm with him on cutting holes in the body, it's only plastic, if it makes the job easier then why not?!
I'm with him on cutting holes in the body, it's only plastic, if it makes the job easier then why not?! Having seen "The Hatter" photo, mine is an early one with trailing arms, so the front end has a single bush... now I look at that photo, I think I did remove the ally arm as well, as it's only two bolts...
I don't remember it being all THAT bad to get at, just a pain to get an open ended spanner located correctly.
Design-wise, I might get attacked by the esteemed members here, but IMHO there's several places on/in the car where access for maintenance was obviously not on the agenda.
With only a V6 at the front, I do sometimes wonder how hard access around the Rover lump is, especially around the sides ...
I don't remember it being all THAT bad to get at, just a pain to get an open ended spanner located correctly.
Design-wise, I might get attacked by the esteemed members here, but IMHO there's several places on/in the car where access for maintenance was obviously not on the agenda.
With only a V6 at the front, I do sometimes wonder how hard access around the Rover lump is, especially around the sides ...
wooly350i said:
And if ya having to reach high up into the stomach of the car from under her under garments you end up not only with oily hands but oily arm pits and tits too, give me access holes any day.
You forgot the rest of the list -Gritty eyes.
Oily face.
Oily hair.
Rust & grit between your skin and clothes....
Dirt under the fingernails that's somehow impervious to all hand cleaners and nailbrishes
Your other half saying things like
"You look like you've been down a coal mine..."
"No WAY are you walking across the carpet like THAT!"
"WTF..."
RCK974X said:
Design-wise, I might get attacked by the esteemed members here, but IMHO there's several places on/in the car where access for maintenance was obviously not on the agenda.
...
You could say that about most cars, especially modern ones. My Connect van, for example: the oil filter screws into the back of the engine block, just above the subframe, so it's impossible to remove it without getting oil everywhere. This was annoying enough on the old van, but the new one has aircon, and the rigid hoses run through the space you needed to remove the oil filter. So now you have to start unclipping pipes, then STILL get oil everywhere......

One of our staff members had a Suzuki Wagon-R a few years ago and the engine bay was so crammed it looked like the only way to get the alternator out was either drop the engine or take the cylinder head off

I'm told that the only way to change the cambelt on certain engines in the fat-arse Renault Megane is to take the engine off its mountings and move it to the left a few inches (having stripped the driveshafts and front suspension first)

When it comes to holes and blanking plates, the Lotus Esprit was no better: to strip the front suspension you had to remove the footwell carpet, remove a blanking plate and knock the top arm pivot bolt into the cabin!
Gassing Station | Wedges | Top of Page | What's New | My Stuff