
Injector rebuild kit
Discussion


Anyone ever tried one of thee rebuild kits? I'm going to upgrade my fuel regulator but want to put new hoses on the injectors and header rail. Has anyone home stripped their injectors to refurbish them? If so then any top tips? Thanks.
http://www.ebay.co.uk/itm/151406502007?_trksid=p20...
http://www.ebay.co.uk/itm/151406502007?_trksid=p20...
Wedg1e said:
Should do the job. I've cleaned and tested a good few but not overhauled them to that extent.
I've got a complete spare set of injectors so was going to refurb them and then get them professionally cleaned. I have had a quote of £25 per injector just for the clean which seems a bit steep considering there's 8 of the buggers. Anyone know of a good cleaner at less than £25 each?gmw9666 said:
I know Doug at David Gerald is selling OE injectors for my wedge at £120 for a set of 8
Thought that was very good value
Give him a buzz
Blimey that's cheap. Does that include the connector hoses? if so then it would make more sense just to get a new full set. I'll give him a call. Thanks.Thought that was very good value
Give him a buzz
KKson said:
Blimey that's cheap. Does that include the connector hoses? if so then it would make more sense just to get a new full set. I'll give him a call. Thanks.
I know right, he told me after I paid for mine cleaning during the rolling road doh!!!Certainly worth a call to check hey, think he said he had 2 or 3 sets on the shelf
gmw9666 said:
I know right, he told me after I paid for mine cleaning during the rolling road doh!!!
Certainly worth a call to check hey, think he said he had 2 or 3 sets on the shelf
The £25 per injector quote was from Shropshire Automotive, so £200 just to clean them. Will definately make a call tomorrow. Thanks.Certainly worth a call to check hey, think he said he had 2 or 3 sets on the shelf
V8 Developments .. £180 for 8 with £80 deposit when you send your old ones back to them
http://www.v8developments.co.uk/products/injection...
http://www.v8developments.co.uk/products/injection...
Thinking about it, and it's been a while since I peered closely at an injector so bear with me, I could be wrong... I would not be surprised if the fuel hose stubs didn't require some kind of crimping tool to attach them; it seems unlikely to me that a hose under several Bar pressure and carrying fuel would be a simple push-on fitment.
As for cleaning the injectors, the best systems feed a solvent through them whilst pulsing them on and off rapidly; the equipment costs a few bob so understandably it's an expensive process.
However people on various forums (fora?) have reported good results with common or garden ultrasonic baths (as used for cleaning jewellery etc.) and mild detergent.
My approach is to connect a length of fuel hose to the 'test' injector and the cold start line on the car; over-ride the fuel pump relay and using a suitable electrical supply (say, a wire off the resistor pack ), point the injector into a jam jar and switch the inition on. The injector should exhibit a nice conical spray pattern. If it doesn't, or if it dribbles when you turn the power off, it needs cleaning (or binning).
Assuming the pattern is OK, time the fuel flow for say 20 seconds then measure the amount or mark the jar to show the level. Tip the fuel out, move on to the next injector. If at the finish you have 8 measurements of fuel volume that are nigh-on the same, you can probably take it that they're all OK. If any are low that would suggest a blockage and again, cleaning is needed.
Simple [insert stupid meerkat noise]
The injectors have small 'basket' filters on the inlet; with a good light or the fuel hose removed you can clearly see any debris that's collected, and it's probably only this that a home ultrasonic tank will shift... any fuel 'varnish' is unlikely to be disturbed by the high frequency vibration of water. Certainly we don't find at work that ultrasonic cleaning shifts greasy deposits by itself.
If I was to build a large-scale system it'd probably use a spare car fuelpump, a square-wave generator and a tank of Jizer
As for cleaning the injectors, the best systems feed a solvent through them whilst pulsing them on and off rapidly; the equipment costs a few bob so understandably it's an expensive process.
However people on various forums (fora?) have reported good results with common or garden ultrasonic baths (as used for cleaning jewellery etc.) and mild detergent.
My approach is to connect a length of fuel hose to the 'test' injector and the cold start line on the car; over-ride the fuel pump relay and using a suitable electrical supply (say, a wire off the resistor pack
), point the injector into a jam jar and switch the inition on. The injector should exhibit a nice conical spray pattern. If it doesn't, or if it dribbles when you turn the power off, it needs cleaning (or binning).Assuming the pattern is OK, time the fuel flow for say 20 seconds then measure the amount or mark the jar to show the level. Tip the fuel out, move on to the next injector. If at the finish you have 8 measurements of fuel volume that are nigh-on the same, you can probably take it that they're all OK. If any are low that would suggest a blockage and again, cleaning is needed.
Simple [insert stupid meerkat noise]
The injectors have small 'basket' filters on the inlet; with a good light or the fuel hose removed you can clearly see any debris that's collected, and it's probably only this that a home ultrasonic tank will shift... any fuel 'varnish' is unlikely to be disturbed by the high frequency vibration of water. Certainly we don't find at work that ultrasonic cleaning shifts greasy deposits by itself.
If I was to build a large-scale system it'd probably use a spare car fuelpump, a square-wave generator and a tank of Jizer
here's mine being ultrasonically cleaned / vibrated within an inch of its life
the bit of hose you can see is a sort of one way push on.....pushes on but needs to be cut off if worn, clever stuff, got a sort of ribbed / textured exterior
the end caps on the injector tip need to be cut off, it looks like a little black pen lid / cap.......they can then be cleaned and new caps put back on
the clamps on my fuel rail which hold the injectors down were loose and 3 of them didn't have any bolts holding them securely, mad hey (clearly now fixed)
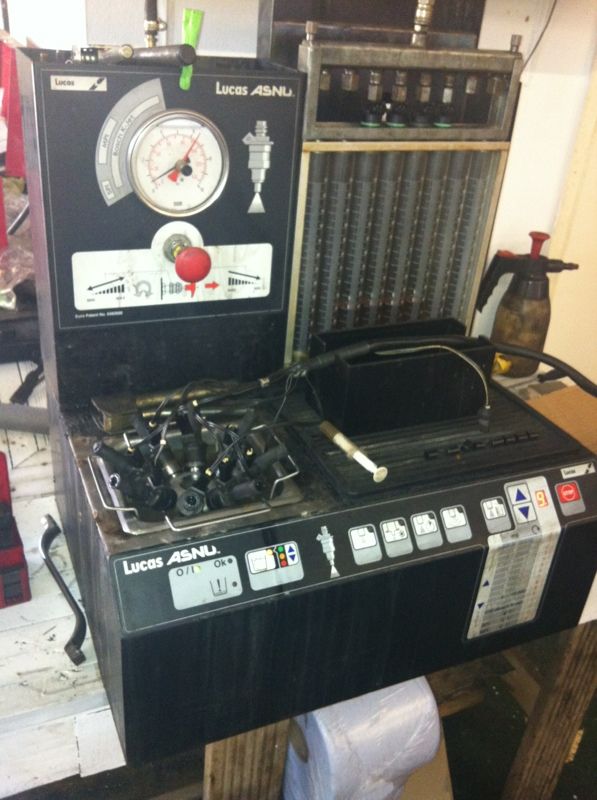
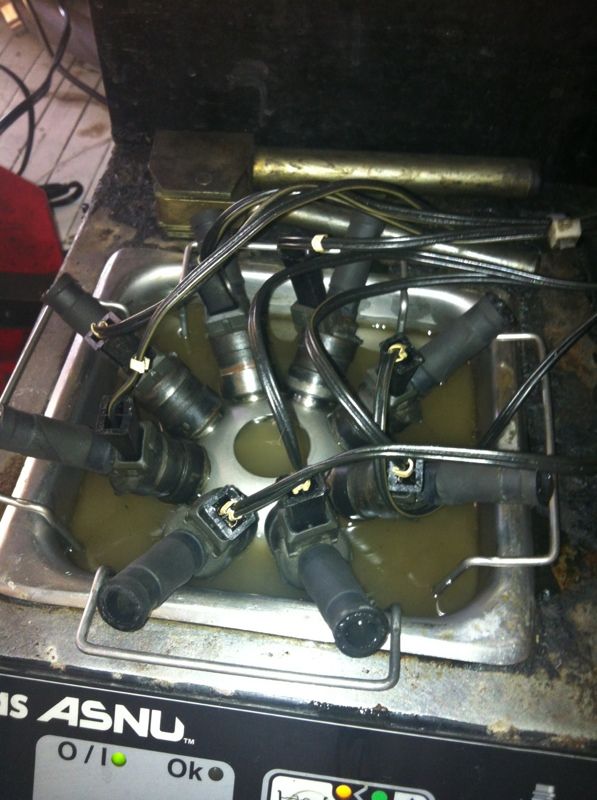
the bit of hose you can see is a sort of one way push on.....pushes on but needs to be cut off if worn, clever stuff, got a sort of ribbed / textured exterior
the end caps on the injector tip need to be cut off, it looks like a little black pen lid / cap.......they can then be cleaned and new caps put back on
the clamps on my fuel rail which hold the injectors down were loose and 3 of them didn't have any bolts holding them securely, mad hey (clearly now fixed)


Edited by gmw9666 on Wednesday 24th September 08:33
Edited by gmw9666 on Wednesday 24th September 08:33
KKson said:
Has anyone home stripped their injectors to refurbish them? If so then any top tips?
Home Workshop Injector Maintenance• I devised this process following Rover SD1 Club local meeting discussions and have done all injectors on two different cars including my current Twin Plenum Vitesse. The injectors are still going strong since 1998.
• All the components needed for injector overhaul can be sourced from a local injection specialist or from Burlen Fuel Systems (Tel: 01722 412500) under the following Burlen part numbers and description (1998 prices).
• BFB103Q10 Filter Baskets 10 off £5.00
• BPC13Q10 Pintle Caps 10 off £2.50
• ABF407 Fuel Injection Hose 2.0 mtr X 7.6 mm £13.40
• BHC1214 Hose Clamps 12-14mm 100 off £14.50
Packing and First Class Post £1.95 all + vat
See Pintle Cap and Filter Basket locations here:

• Cleanliness is a key factor particularly as there is the possibility of metal debris whilst removing the old hoses.
• Cut off the swaged hose collar at a sharp angle using suitable snips or a very fine junior hacksaw blade and discard the old fuel hose
• Cut off the old pintle caps with a sharp blade being careful not to mark the body of the filter.
• Clean all around the area where the pintle cap fits with fine wire wool and metal polish.
• Clean up the body of the injector and the area where the manifold rubber seals fit with a wire brush, wire wool and polish.
• Blow off any debris and wash the injector in a container of clean “Panel Wipe”.
• Last in this sequence, pull out the old injector filter using a wood screw or small "easy-out" gently screwed into the open end of the filter, bathe the injector again and blow away any more debris with a 100 psi airline.
• Access to an ultrasonic cleaner may significantly improve the cleaning process and if thought necessary such equipment is readily available at low cost on popular auction sites.
• Press a new filter into place using a drill press or vice, protecting the pintle end of the injector with suitable hole in a hardwood block.
• Press on a new pintle cap using a small hardwood block with another small hole
to protect the pintle end, ensuring the cap starts off upright to prevent uneven fit.
• It’s probably best to think this next part through and make up a rig meeting the
following requirements.
• Temporarily connect a 6” length of hose to the input end of the injector with a hose clip, and connect a 3 volt supply to the injector connector using a switch to pulse the injector on and off.
• Note: It’s possible to use a 12 volt supply but the injector must be protected by a 6 ohm resistor wired in series with the supply and switch.
• Pour a small quantity (about one fluid ounce) of Panel Wipe into the open end of the hose and connect a 30 psi compressed air source securely to the hose sufficient to withstand the pressure.
• Ensure there is suitable lighting to the rig so that one may clearly see the resulting spray pattern.
• Pulse the injector coil briefly with the switch and observe an orderly conical spray pattern with no dribbling.
• Pulse the injector several times and see that the above is repeatable with a clean start and finish to each pulse.
• If the spray pattern is disorderly or dribbles then the injector is probably still contaminated, damaged (or blocked) and should be replaced.
• Complete the above for all the injectors.
• Cut new hose lengths for each injector and ensure there is no rubber debris contaminating the hose interior.
• Couple the new hose to each injector using the appropriate hose clips.
• Assemble the injector hoses to the fuel rail using similar clips.
• Ensure that the hose clip screws are facing in a convenient direction to provide easy access for screwdriver tightening in their final position.
• Fit the other various hose lengths to the fuel rail and the job is complete.
The above is cut and pasted from my on-line web pages archive: check it out.
http://www.vintagemodelairplane.com/pages/Rover_Te...
The Burlen parts can be obtained via the SU Carb web pages - contact them on the same tel No.
Edited by honestjohntoo on Thursday 25th September 11:09
I'm just about to send a set of Griff injectors off to these guys:
http://injectortune.co.uk/
Full clean, service and a report before and after on each one. About £12.50 each plus P&P, so around a £100 in total.
FFG
http://injectortune.co.uk/
Full clean, service and a report before and after on each one. About £12.50 each plus P&P, so around a £100 in total.
FFG
Hi,
bought this ones:
http://www.ebay.de/itm/Special-price-4-X-NEU-Einsp...
Nice guy, paid 270 € for 8 incl. delivery to Germany. These are for a flapper. Bosch Part Nr. 0280150105 matching the 350i.
Cheers
Bernd
bought this ones:
http://www.ebay.de/itm/Special-price-4-X-NEU-Einsp...
Nice guy, paid 270 € for 8 incl. delivery to Germany. These are for a flapper. Bosch Part Nr. 0280150105 matching the 350i.
Cheers
Bernd
All, I've checked with David Gerald and the injectors he has are not a direct swap and are the larger flow units for the bigger V8's rather than my standard 3.5. I've now got the injectors all out of my spare EFi set up and there's not too much to them so I've decided to keep the costs down and refurb myself using HonestJohns info.
I'm intending to put new filters, pintel caps, O rings and inlet hoses on the injectors, fix them to the spare fuel rail and then connect the fuel rail to my easi-bleed system, run off the tyre pressure, which should be about right. I can put both panel wipe and fuel into the easi-bleed container to flush and check the spray patterns look good.
One question but I'm assuming that the new rubber hoses push down over the injector inlet and into the new metal collars. Because of the shape of both the ridged connector and tapered inlet into the metal collar, I'm assuming that this forms the correct seal. As far as I can see the metal collar has not been crimped onto the end of the fuel hose either on the injectors on my engine or the spare EFi set-up. Can someone please confirm that this is indeed the case. I have seen photos of the rubber hose with jubilee clips at both ends and refurbish kits can be bought with both collars or double jubilees. Again any advice on this would be appreciated. Cheers.
I'm intending to put new filters, pintel caps, O rings and inlet hoses on the injectors, fix them to the spare fuel rail and then connect the fuel rail to my easi-bleed system, run off the tyre pressure, which should be about right. I can put both panel wipe and fuel into the easi-bleed container to flush and check the spray patterns look good.
One question but I'm assuming that the new rubber hoses push down over the injector inlet and into the new metal collars. Because of the shape of both the ridged connector and tapered inlet into the metal collar, I'm assuming that this forms the correct seal. As far as I can see the metal collar has not been crimped onto the end of the fuel hose either on the injectors on my engine or the spare EFi set-up. Can someone please confirm that this is indeed the case. I have seen photos of the rubber hose with jubilee clips at both ends and refurbish kits can be bought with both collars or double jubilees. Again any advice on this would be appreciated. Cheers.

Gassing Station | Wedges | Top of Page | What's New | My Stuff