Alloy wheels - spot sand over etch primer
Discussion


Hi everyone.
So I'm refurbing my alloys using the e-tech alloy wheel repair kit. I sanded down to metal in some areas so used autotek etch primer. I've not covered the whole wheel in this as I'm planning to go over it with autotek high build primer, then paint and lacquer.
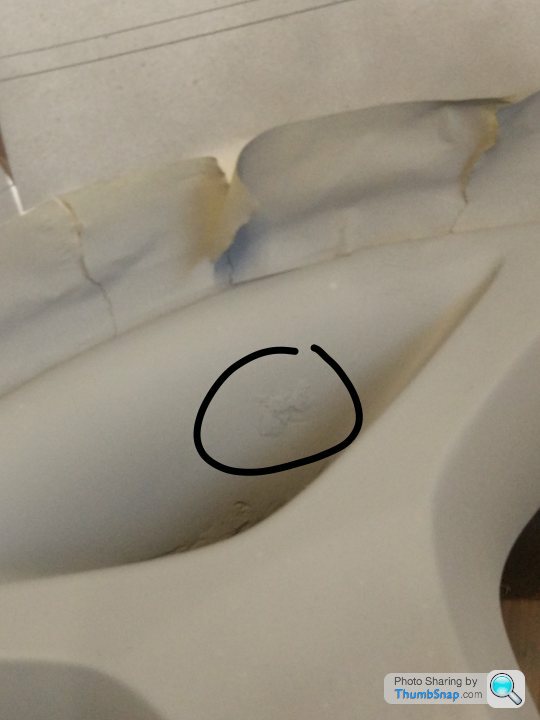
I've noticed I missed a spot of putty and it shows from far away. The etch primer says to leave it for 24 hours which will be tomorrow about 7pm. Is it okay to sand this clump down tomorrow? Then high build primer it later on. I was thinking to mask off just that area so a small square. Does this sound OK? I'm worried that I'll end up with dust from the sand as the kit said to rub down before spraying which I've done. I used the Wipes in the kit and some rubbing alcohol to rub the wheel down before etch primer. So if its fine to rub it down, should I wipe the wheel down again and with what? It's in my shed just now I might be able to take it so there's less dust when I start spraying again or will that not matter n should I just sand it where it is.
Please advise. I've added a pic of it.
Thanks
So I'm refurbing my alloys using the e-tech alloy wheel repair kit. I sanded down to metal in some areas so used autotek etch primer. I've not covered the whole wheel in this as I'm planning to go over it with autotek high build primer, then paint and lacquer.
I've noticed I missed a spot of putty and it shows from far away. The etch primer says to leave it for 24 hours which will be tomorrow about 7pm. Is it okay to sand this clump down tomorrow? Then high build primer it later on. I was thinking to mask off just that area so a small square. Does this sound OK? I'm worried that I'll end up with dust from the sand as the kit said to rub down before spraying which I've done. I used the Wipes in the kit and some rubbing alcohol to rub the wheel down before etch primer. So if its fine to rub it down, should I wipe the wheel down again and with what? It's in my shed just now I might be able to take it so there's less dust when I start spraying again or will that not matter n should I just sand it where it is.
Please advise. I've added a pic of it.
Thanks
Logic says to prep away from where you are going to paint, but if that is not possible then wet the floor when you are spraying to hold the dust down as the compressed air hits it, obviously making sure not to blow water on your work.
I would rub that spot down (and fill the other low being picky ) and re etch prime locally.
I would also caution on putting too much filler style primer on below the finish. It is very soft and will be prone to chipping if too thick on a wheel, as I once found to my cost on some particularly crappy track wheels I quickly tidied up. It actually chipped off the edge when the tyres were refitted!
I would rub that spot down (and fill the other low being picky
) and re etch prime locally.I would also caution on putting too much filler style primer on below the finish. It is very soft and will be prone to chipping if too thick on a wheel, as I once found to my cost on some particularly crappy track wheels I quickly tidied up. It actually chipped off the edge when the tyres were refitted!
Thanks for the advice. You've given me confidence that sanding it down is fine. I was going to go straight on to the high build primer after sanding. The place where the clump is is not metal, doesn't need etch. It's nearer the bottom edge that needed some, near the low. Should I wipe down the area with rubbing alcohol before spraying again?
Thanks!
Thanks!
It's isopropyl 70%. It's just rubbing alcohol so no instructions for car use.
The 2 primers I have are both by autotek. So autotek etch primer and autotek high build primer.
I have left the etch primer on for 24 hours. Do I need to wait 24 hours with the high build primer before colour?
The colour coat is etech alloy wheel paint. That also says to leave for 24 hours before lacquer(e-tech).
All cans state to leave for 24 hours before the next stage. Just wondering how important/necessary this is.
Thanks!
If that is what the instructions say, I would follow them. It is probably to do with curing times for their specific products.
I have had issues in the past (long gone past - cellulose days) where primer on filler has blistered and lifted when I have hit it with a topcoat. Basically, the primer was not fully cured because of me being in too much of a hurry. That equals start again time, not good.
I have had issues in the past (long gone past - cellulose days) where primer on filler has blistered and lifted when I have hit it with a topcoat. Basically, the primer was not fully cured because of me being in too much of a hurry. That equals start again time, not good.
Thanks a bunch for the help!
So I've put on the high build primer. I've noticed there's small bits of like dust if you like, just tiny bits of something lying on top of the wheel on some bits which I can take if off if I wipe with my finger. So I'm thinking I should give the wheel a wipe over with something before applying the colour. What would you recommend? I was thinking an old vest or something. I've got tack rags but hesitant to use as I've read they leave a sticky finish. I think if I don't wipe it down the small particles will show in the finish.
So I've put on the high build primer. I've noticed there's small bits of like dust if you like, just tiny bits of something lying on top of the wheel on some bits which I can take if off if I wipe with my finger. So I'm thinking I should give the wheel a wipe over with something before applying the colour. What would you recommend? I was thinking an old vest or something. I've got tack rags but hesitant to use as I've read they leave a sticky finish. I think if I don't wipe it down the small particles will show in the finish.
Thanks a bunch for the help!
So I've put on the high build primer. I've noticed there's small bits of like dust if you like, just tiny bits of something lying on top of the wheel on some bits which I can take if off if I wipe with my finger. So I'm thinking I should give the wheel a wipe over with something before applying the colour. What would you recommend? I was thinking an old vest or something. I've got tack rags but a hesitant to use as I've read they leave a sticky finish.
I think its covered in a bit of spray dust. If I wipe my finger over it it goes grey with the dust, not heavily but still grey.
Edited by Kazzz20 on Thursday 4th June 11:40
Sorry, not been around for a while.
Sounds like the primer has gone on to the wheel a bit dry, or overspray has landed on the wet primer as it falls from the air. Could be the high build type of product or technique, can’t tell without seeing you paint. What you are feeling on the surface are probably what are commonly called “nibs” and easy to fix with care in primer.
Your primer will require de-nibbling, which is basically a really, really light wet sand with a fine paper, just enough to remove what you feel as roughness on top of the finish but not go through. Primer is very soft. Sometimes one light pass is enough to de nib primer, don’t go back and forth merrily without feeling the progress. Do not go by sight, feel the change in smoothness with your bare hand as you sand and remember, use a really light approach. If you go through, you will have to go back a stage.
Wet 400 grade should be fine on primer but will remove it quickly as well as the nibs, if you have any worn 400 or finer grade around, all the better until you get a feel for it. Be really careful on edges, you will go through very quick. Just wipe sharp edges lightly with the paper itself, no hand pressure. As you start you will get a feel for it, hopefully before you go through anywhere.
Then panel wipe / tack off and apply your top coat. If that starts to look dry, you may need to adjust your technique to get more paint on the wheel with each pass of the gun/can and have it flow out properly - without running.
It is hard to explain in writing, but you will find a way to keep the right side of the knife edge between runs and a dry finish. It is hard to put into words on how it should look as it goes on wet. It is practice and experience that gets you there. If you have enough topcoat, practice on something to see where it looks good, and learn the point where it runs, and remember it will run quicker on edges, there are lots of edges and changes of horizontal/vertical on wheels.
If no excess materials for practice, then topcoat a little dry is probably better than runs IMHO. There are lots of videos for improving a dry finish on topcoat on YouTube - basically wet sanding followed by polishing. Runs are a pain just waiting for them to dry enough to rub out.
No probs, hope it helps you.
Once the lacquer is fully cured you can wash it with normal car shampoo, avoid any acid based wheel cleaner for as long as you can and only use it infrequently - only when you absolutely have to, hopefully never. I tend to go longer than it says on the paint tin for the first wash just in case the lacquer is a bit heavy in places (complex shapes on wheels), but I’d normally leave it 48 hours extra - it takes longer than that for the wheels to justify a wash.
You can dry the wheels with a cloth, I only use microfibre 70/30 blend from the Rag Company online - the Eagle 350 edgeless is my go to wheel dryer and have a colour that is for wheels only to keep them off the bodywork once used on wheels. I have more plush cloths for drying the body. The rubbish stuff you get in supermarkets is typically 80/20 or even 90/10 which is harder on paint and introduces micromarring.
I also use a drying aid spray on the bodywork and include that on the wheels too. Just started testing the turtle wax hybrid ceramic drying aid today, so we will see how that goes.
Sounds like you are doing a great job with lots of care. Looking forward to the pics on completion and getting some advice from you when I refurb my Freelander wheels - should I ever get any time away from cleaning her car and the boat.
Hey thanks for all the info! Fab stuff 
I'm on to the next 2 wheels.
What's not so fab is I had ordered etech lacquer to go with the etech paint. Now the lacquer has got lost in the post somehow, it should have been here today. I'm going to spray the wheels with the etech colour today. I have some lacquer from when I was doing some bodywork. It's from paints4u. I am thinking just to use this lacquer tomorrow as the paint will have dried for roughly 24 hours by then . Will it make a difference? The only other option is to get the lacquer posted out but that could take days.
Thanks
Heeeelllppp! So I went ahead and sprayed the lacquer. All looked good. I just went to check it now, about 2 hours since last coat and it looks like this 
Will it go away? When I push it, it's like it's bubbled? How can this be fixed? Also there are small patches on other parts of the wheel/the other wheel. If you look at the pic at the top you'll see what appears to be a patch, it's not seamless. This has also happened in places too. Not quite sure what's gone wrong. It looked good when I had sprayed the lacquer on, I done 4 coats.
The lacquer was still a bit tacky in places when I touched it. I waited about 24 hours after spraying the colour before spraying the lacquer and used the paints4u one, I've had the can lying around for maybe about a year if that would effect it.
Thanks
Edited by Kazzz20 on Thursday 11th June 20:50
Edited by Kazzz20 on Thursday 11th June 22:00
Oh no, that is unlucky. You have something called crazing, which will be a reaction to a number of potential circumstances. There are lots of reasons why this can happen, without getting too wordy again, the link below explains a few of them.
https://www.youtube.com/watch?v=fkgqbVAScAE
https://www.youtube.com/watch?v=fkgqbVAScAE
Gassing Station | Bodywork & Detailing | Top of Page | What's New | My Stuff