First restoration: Where to start?!?
Discussion


Hello all, first time posting on PH, looks like the far more active forum these days than the places I used to use.
I’ve got an 86 Audi Coupe Quattro. Bought it around 2006 ish, got it back on the road then for around a year, clutch started going and been dry stored since! Needs some extensive work but don’t want or have budget to go full blown like I’ve seen some, it’s not a UR so it would never justify it anyway.
I’m no welder or proper painter but I manage ok with the mechanical stuff generally.
What’s the general order of doing things?
Some photos attached. It’s suffered from lacquer peel, paint is damaged in some areas, and got the dreaded windscreen A pillar rot. I took off the under seal quite some time ago which was a mistake but can’t change it now.
Photos attached, opinions and guidance welcome!
(Won’t let me post the image links for 14 days, new account.)
Good luck. These are lovely cars and well worth saving. I'm about to embark upon a refresh of my urQuattro which will be my third restoration. First bit of advice – try to obtain a copy of this book, published by Robert Bentley in the US. You might be able to get a digital version.
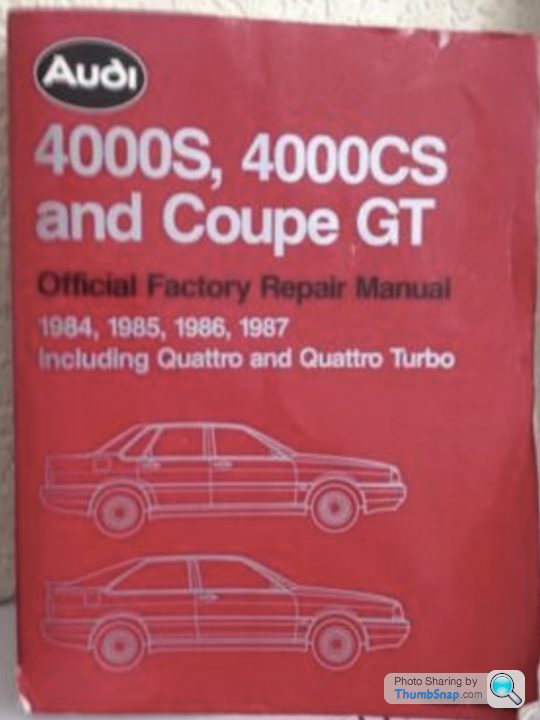
It will save a lot of heartache and although it's for US spec cars it's the best we have. Covers all the basic stuff anyway. I think there's a Haynes manual for the Coupe but I'm not sure if that covers the quattro derivative – this one does.
Second bit of advice – they need special tools for some tasks which are hard to find but worth tracking down. Eg crank locking tool and tool for unscrewing damper caps. Saves bodging stuff, and more importantly saves alot of time.
iSimmo on here has a Coupe quattro too so hopefully he'll be able to chip in.
Look forward to the pics.
For a DIY restoration I'd take the carpets and seats out for a cleaning and any repairs, you can then see the floor pan, boot floor etc.
Then get it on axle stands and take the wheels off, get a notepad, go round the suspension with a pry bar and see what's knackered and what can be salvaged.
Check floorpan, jacking points, sills etc. from underneath. Keeping a list of jobs and a shopping list. Might aswell add engine mounts, gearbox mount, complete wishbones, shock absorbers, clutch and service kit while you are at it. (Maybe steering wheel and gearknob too).
Wheels can get refurbed, while you dismantle as much as you want to restore. Everything that comes off gets either replaced or wire brushed primed and painted.
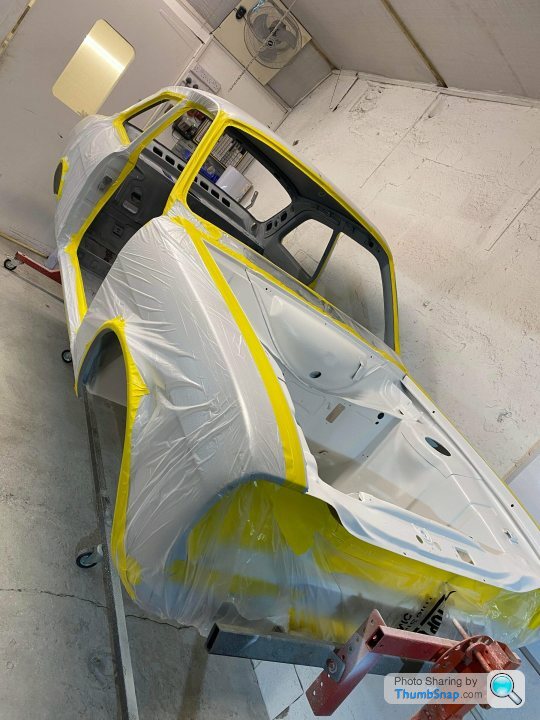
Hope you dont have to do much welding and painting but every car will be different in that respect, I'm a mechanic but I still use a more talented guy than me for the shell repairs and paint.
Then get it on axle stands and take the wheels off, get a notepad, go round the suspension with a pry bar and see what's knackered and what can be salvaged.
Check floorpan, jacking points, sills etc. from underneath. Keeping a list of jobs and a shopping list. Might aswell add engine mounts, gearbox mount, complete wishbones, shock absorbers, clutch and service kit while you are at it. (Maybe steering wheel and gearknob too).
Wheels can get refurbed, while you dismantle as much as you want to restore. Everything that comes off gets either replaced or wire brushed primed and painted.
Hope you dont have to do much welding and painting but every car will be different in that respect, I'm a mechanic but I still use a more talented guy than me for the shell repairs and paint.
I've got one of those as well, partly-restored and currently on one side while I finish something else off. Prepare yourself for disappointment when you take the plastic sill covers off, unless you're very lucky you will find some corrosion there.
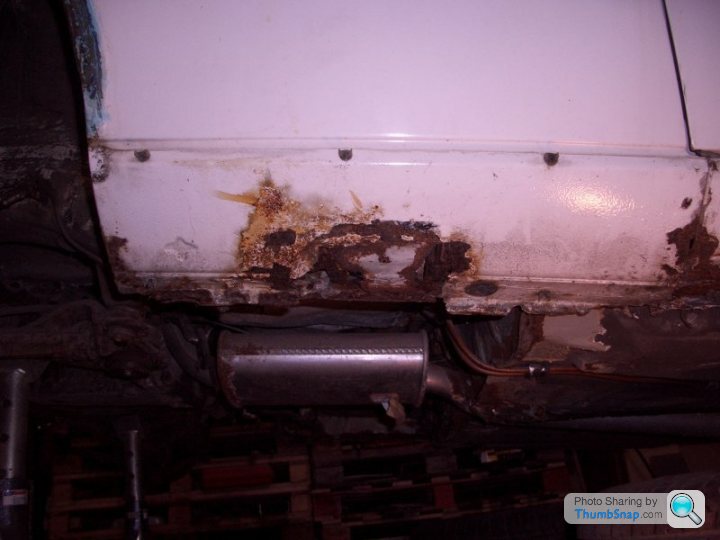
I've spent quite a lot of time chasing rust on mine - back panel (from previous badly-repaired accident damage), rear arches, sills, edge of floor to inner sill, door pillars, windscreen pillars and there's a bit on the roof near the sunroof drain. A lot if it is where the sealant around the seams has failed and allowed damp in between the spot-welded joins and it's worked outwards from there. A methodical approach is needed, I started the main repairs on mine at the drivers door pillar, moved back along the sill and floor edge, rear arch, and then started working back along the passenger side and I'm about a third of the way along it. When the clutch went on mine (which is what took it off the road), it turned out that the slave cylinder piston had worn through the clutch actuating arm.
I second Yertis' suggestion for the manual - I seem to recall the Haynes doesn't even cover how to remove and re-fit the later plastic bumpers, never mind the quattro system. As for justifying restoring it - it's all a matter of opinion of course, but I've recently seen a restoration project sold on eBay for more than I paid for mine when I first bought it as a roadworthy 2-year-old car.
I bought another project that has to take priority, but I'll be back on to the Audi soon. I did have them both uncovered with the intention of switching between them, but that wasn't working, I just got nothing done on either. Mine was my road car for about 15 years and 200,000 miles, so I have an attachment to it.
Edited by droopsnoot on Wednesday 1st November 13:25
Edited by droopsnoot on Wednesday 1st November 13:26
I had a few Audi Coupe when I was in my 20's and good ones could be had for £1000. Best one I had was a tornado red one in need of new brake pads for £310! It was all I had. 
Lovely 2.2 with that five pot sound and solid build quality.
If there's any wet carpet and/or interior I would start by getting that out of the car.
Lovely 2.2 with that five pot sound and solid build quality.
If there's any wet carpet and/or interior I would start by getting that out of the car.
Thanks for the replies see I knew this was the place to visit!
Yertis, I’ve actually got a Bentley and a Haynes manual that came with it, and bought a crank locking tool when I got it going first time around (may have been lent to a friend a few years ago thinking about it) but never heard of the strut one I’ll keep an eye out, thanks.
Decky that’s some sound advice, I’ve got it up on the stands last weekend so I’m half way there. When I can actually put the photos up you’ll see but the subframes and suspension are crusty, I’m hoping saveable(?).
Droopsnoot I didn’t even think to take off the sill covers :s
Sounds methodical but you also sound like you know what you’re doing with bodywork/welding, I’ve got a welder but no idea what I’m doing and a project shell doesn’t seem the place to practice that’s what been putting me off really.
Mark sounds like we bought at a similar time, picked this up for £450 out the Trade-It, trailered it home in friends ex army LR110 with a Ivor hay trailer with spare doors, rear screen, spare diff, box, steering wheel, mirrors, random dash bits stuffed inside from a white coupe his mrs had crashed a few years earlier. Those were the days! I can’t tell if leaking as it’s been kept in the dry.
Glassman how do you get the screen out without choosing to either cut the rubber or smash the glass? Can both be saved? Was guessing the rubber would be perished but if I can save both that would be awesome.
Thanks chaps, great advice will get to some of this over the next week.
Edited by intergraleevo on Wednesday 1st November 23:25
Before you start take loads of reference photos from every imaginable angle and then some more as you will want to check how things should look later.
Label and store all removed parts well.
Dont take more apart than you can cope with, some people can strip a car to a bare shell and enjoy the challenge whilst others then feel overwhelmed by the size of the task ahead.
It will take longer than you think and cost much more.
Above all enjoy it as restoring a car can be very therapeutic, yes there will be low moments but there will also be many highs.
Jaz2000 said:
Before you start take loads of reference photos from every imaginable angle and then some more as you will want to check how things should look later.
Label and store all removed parts well.
Dont take more apart than you can cope with, some people can strip a car to a bare shell and enjoy the challenge whilst others then feel overwhelmed by the size of the task ahead.
It will take longer than you think and cost much more.
Above all enjoy it as restoring a car can be very therapeutic, yes there will be low moments but there will also be many highs.
+1. I didn’t then ended up with a very difficult jigsaw. Oh - bag and label parts then remember where the hell you put them. I bought replacements for bits I couldn’t find when I needed them only for them to turn up in the oddest places.....Label and store all removed parts well.
Dont take more apart than you can cope with, some people can strip a car to a bare shell and enjoy the challenge whilst others then feel overwhelmed by the size of the task ahead.
It will take longer than you think and cost much more.
Above all enjoy it as restoring a car can be very therapeutic, yes there will be low moments but there will also be many highs.
Oh and don’t underestimate how much room a dismantled car takes up.......
Enjoy

Edited by StescoG66 on Thursday 2nd November 06:08
Edited by StescoG66 on Sunday 12th November 18:20
intergraleevo said:
Droopsnoot I didn’t even think to take off the sill covers :s
Sounds methodical but you also sound like you know what you’re doing with bodywork/welding, I’ve got a welder but no idea what I’m doing and a project shell doesn’t seem the place to practice that’s what been putting me off really.
I've some experience, but a long way from being great at welding. Practice on some spare steel, and prepare for it to be completely different when you actually get onto the car due to not having control of the two "sides" of the weld (welding new steel onto the original) and having to do it at weird angles. If you need to (and I hope you don't) welding repairs to the sills before tackling something like a wheelarch is good because the sill repair won't be visible when the covers are back on, so you've a little more leeway on how good it needs to be. There are plenty of tutorials and how-to threads on the MIG welding forum.Sounds methodical but you also sound like you know what you’re doing with bodywork/welding, I’ve got a welder but no idea what I’m doing and a project shell doesn’t seem the place to practice that’s what been putting me off really.
I'll also be interested to hear about the glass - I know how I do it, but everyone I've mentioned it to sucks their teeth and makes nervous noises. I once tried to remove a lovely tinted heated rear screen (mine is plain clear glass and I wanted an upgrade) at a local scrapyard, it was almost out and then - smash - a load of tiny pieces. If you have to remove the rear quarter glasses, there's a small nut holding the trim in place at the bottom of the b-pillar trim.
As well as here, I'm on the Classic Audi forum where I've had quite a lot of Audi-specific assistance. It'll be interesting to see some photos of yours when you're able to upload them.
MIG welding isn't that tricky to get the hang of. Make sure the metal is REALLY clean before you start and practice.
Best bit of advice I had was to do something on it everyday. Might just be looking something up / making a phone call but just try and keep the project rolling along.
Saying that I have failed to follow the advice. 3 years into a resto. that at times I have wanted to roll out of the garage and down the hill after setting it on fire...
droopsnoot said:
I've some experience, but a long way from being great at welding. Practice on some spare steel, and prepare for it to be completely different when you actually get onto the car due to not having control of the two "sides" of the weld (welding new steel onto the original) and having to do it at weird angles. If you need to (and I hope you don't) welding repairs to the sills before tackling something like a wheelarch is good because the sill repair won't be visible when the covers are back on, so you've a little more leeway on how good it needs to be. There are plenty of tutorials and how-to threads on the MIG welding forum.
I'll also be interested to hear about the glass - I know how I do it, but everyone I've mentioned it to sucks their teeth and makes nervous noises. I once tried to remove a lovely tinted heated rear screen (mine is plain clear glass and I wanted an upgrade) at a local scrapyard, it was almost out and then - smash - a load of tiny pieces. If you have to remove the rear quarter glasses, there's a small nut holding the trim in place at the bottom of the b-pillar trim.
As well as here, I'm on the Classic Audi forum where I've had quite a lot of Audi-specific assistance. It'll be interesting to see some photos of yours when you're able to upload them.
It is (or was) a great forum. I wish people had stuck to using it instead of flocking to the non-searchable, not archived FacebloodyBook version. Reminds me I need to ask a question on there.I'll also be interested to hear about the glass - I know how I do it, but everyone I've mentioned it to sucks their teeth and makes nervous noises. I once tried to remove a lovely tinted heated rear screen (mine is plain clear glass and I wanted an upgrade) at a local scrapyard, it was almost out and then - smash - a load of tiny pieces. If you have to remove the rear quarter glasses, there's a small nut holding the trim in place at the bottom of the b-pillar trim.
As well as here, I'm on the Classic Audi forum where I've had quite a lot of Audi-specific assistance. It'll be interesting to see some photos of yours when you're able to upload them.
Re the glass, I'd try to do everything I could to avoid removing the rear glass in particular, especially if it's the one with 'quattro' in the heating elements. Obviously completely irreplaceable, and I think the rubbers are also impossible to find. Side glass I'm going to have a go at though, to replace all the little plastic clips on the trim. Hot day, the right tools and lots of gentle persuasion. The rubber Audi used does seem to stiffen up quite a bit with age

Great project - I've always lusted after a UR Quattro, since my Dad had a white coupe when I was in my early 20's and as I spent many a cold night in Keilder forest in the 80's. A car I would still love to own but probably never will now.
I've restored a few cars on a nut and bolt basis, mainly Lotus, and what I have found is it's best to deal with each sub component as a project in itself - finish it and put it on the shelf then move to the next thing (be that engine, gearbox, suspension assembly or whatever).
This, at least for me, prevented a feeling of being overwhelmed by the scale of the overall task and kept motivation going.
Good luck with it, would love to see updates.
PS: MIG welding is not too difficult to pick up but the trick is controlling heat distortion when working on thin panels.
Yertis said:
It is (or was) a great forum. I wish people had stuck to using it instead of flocking to the non-searchable, not archived FacebloodyBook version. Reminds me I need to ask a question on there.
Seems I've jinxed it, and it's down again. I quite agree about the moving to FB, it's happening in another club I'm in and it's really frustrating. The thing with FB, though, is that it has brought us loads of contact from previous owners with their old photos who are on FB already, and probably would never have joined an individual forum. But for a restoration story thread, FB is awful.droopsnoot said:
The thing with FB, though, is that it has brought us loads of contact from previous owners with their old photos who are on FB already, and probably would never have joined an individual forum.
Yes that is true – twenty-odd years ago, when I had an RR, I bought an owners manual on eBay. It turned up in its leatherette wallet with a service history, sales order and all the handover documents and bits and bobs. I sold the RR but this wallet stayed on the shelf. Then a couple of years ago the car to which the docs referred, and its new owner, turned up on the Classic Audi FB page. Couple of PMs later he got his documents to go with the car.If you can weld and you can paint, you'll figure it out. Some like to have the car fully stripped down. Others like to work in small sections which is my preference. Just try not to set the car on fire which means keeping a fire extinguisher or two handy whenever you're welding. You might have to get creative with fixing the rust in the A pillar unless you want to rip out the wiring.
I am going to go against the majority of suggestions here (sorry for being the outlier)
I can weld to an industrial standard but I quickly decided that the juice was actually worth the squeeze for once in getting someone else to do the work.
However, I am currently £15k into that rebuild, although that work is top notch and the car will be worth more than if I just rippled a few panels whilst welding on a wheel arch or skim filling over everything.
But, others will likely have more skill than me.
Edited by Hol on Thursday 2nd November 15:29
Hol said:
However, I am currently £15k into that rebuild, although that work is top notch and the car will be worth more than if I just rippled a few panels whilst welding on a wheel arch or skim filling over everything.
But, others will likely have more skill than me.
I wouldn't say I've got more skill than anyone - but I've got more spare time than spare cash. I've seen the sort of work that some people do and I'd be forever concerned about what hidden nightmares I've got back after parting with the cash, I don't think I'd ever be able to pick somewhere that I'd trust. I'm already dreading finding out what it'll cost to have my current project painted as I've proved on the last one that painting is not my best skill, if either of the body shops I've asked ever respond. You also have an advantage in terms of available panels over the OP and myself, either for my Audi or for the Vauxhall I'm working on at the moment, presuming that's your actual car rather than an example.But, others will likely have more skill than me.
Gassing Station | Classic Cars and Yesterday's Heroes | Top of Page | What's New | My Stuff