Aston Martin DB2/4 MkIII Engine Rebuild Plus
Discussion


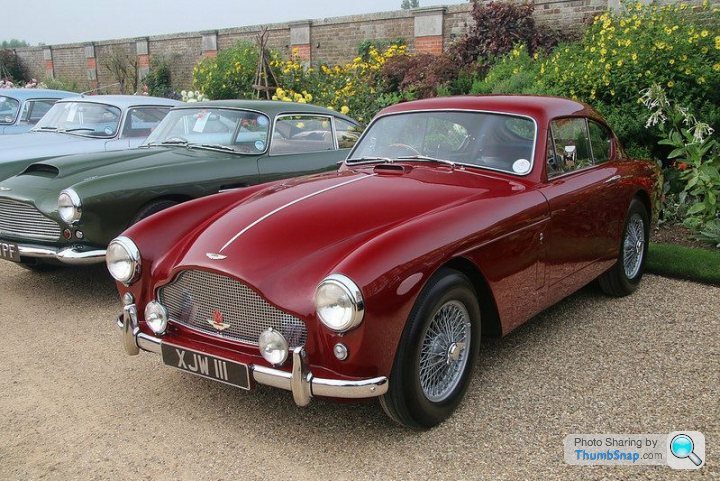
I’ve owned my Aston Martin DB 2/4 MkIII, usually known as a DB MkIII, for eight years now and had some great times with her. Road trips to France and Italy spring to mind including fun at the Le Mans Classic and a track session at Monza. During that time I have employed the theory of good mechanical maintenance and sympathetic cosmetic renovation of the body and interior. However, after 8 years and with 57k miles on the clock, 15,000 of them under my ownership it’s time for an engine rebuild.
And, you know how it is with these things they tend to escalate very quickly; while engine is out we may as well service the gearbox, at the same time we could fit an overdrive unit. May as well tidy up the engine bay, oh and the front torsion bar and steering is far more accessible now, shall we rebuild that? It looks fantastic since we repainted the chassis, you may as well have the callipers cleaned and anodised etc.
I’ll update as I get more news but here’s some pictures showing progress so far.
As she was the day I collected her back in 2007

Tired but complete leather interior (Note the Instruction Book for a DB2/4 MkIII burying the idea that they were only called the DB MkIII)

And an engine bay dominated by the non-standard brake servo plonked on top of the bulkhead.

And, you know how it is with these things they tend to escalate very quickly; while engine is out we may as well service the gearbox, at the same time we could fit an overdrive unit. May as well tidy up the engine bay, oh and the front torsion bar and steering is far more accessible now, shall we rebuild that? It looks fantastic since we repainted the chassis, you may as well have the callipers cleaned and anodised etc.
I’ll update as I get more news but here’s some pictures showing progress so far.
As she was the day I collected her back in 2007
Tired but complete leather interior (Note the Instruction Book for a DB2/4 MkIII burying the idea that they were only called the DB MkIII)
And an engine bay dominated by the non-standard brake servo plonked on top of the bulkhead.
In 2010 I displayed her at the GRRC Annual Display at Goodwood House prior to this I decided to tidy up the engine bay. Many grazed knuckles and sore fingers later I was pretty pleased with my efforts. How can you clean an engine bay without cutting yourself on a sharp corner?
Note that the brake servo is now relocated to a more discrete position inside the front wing and I replaced the dreadful pale blue battery with a traditional one from Lincon Batteries in Essex.


Here she is at Goodwood, funny thing is I forgot to open the bonnet and no one asked

Note that the brake servo is now relocated to a more discrete position inside the front wing and I replaced the dreadful pale blue battery with a traditional one from Lincon Batteries in Essex.
Here she is at Goodwood, funny thing is I forgot to open the bonnet and no one asked
As this primarily a thread about the engine I'll bring it up to date.
Returning from Goodwood last September I noticed she was smoking rather at traffic lights and upon investigation it seemed to be worse from the nearside exhaust pipe. I usually have it serviced and checked over once a year during the winter and I duly took her to Wiltshire with a list of niggly little jobs.
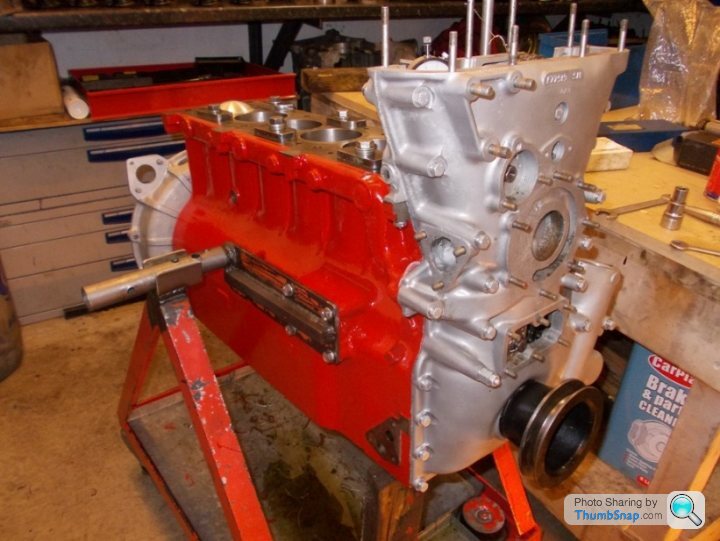
Unfortunately, a compression test revealed the smoking was probably down to a broken piston ring in no 3 cylinder. So, head off to check for sticking valve, which it wasn't, and sump off to allow the piston to be withdrawn confirmed what they thought. At this point the decision was taken to replace the pistons and liners rather than simply replace the busted ring and hone the bores. I had always suffered with the cooling system pumping up and I suspected that somewhere a cylinder liner was not sealing against the o-rings in the block. New liners and pistons would be nice after all! At the same time one has to polish the crank and replace the main and end bearings, my specialist said they were probably the originals not bad for 57k miles!
A bit of a blow was that they discovered a crack in the cylinder head running between an inlet valve seat and an exhaust valve seat extending down into the ports. Not good... This could be welded but I decided to opt for a replacement aluminium head, although all Feltham Astons ran with iron heads they did cast some ali' ones in period and experimented with them on the race cars so it's not entirely out of context. The new head will be lighter, better ported, and have an increased compression ratio which is allowed by modern fuels.
Here are some progress shots.


ETA: Just found a post I put on another forum about the cylinder head, speaks for itself; "Well since my last post the engine "refresh" continues apace with the latest news that the cylinder head has a crack between the ports running down to the valve guide. It can be welded but it's likely to crack again elsewhere and it seems like throwing good money after bad so a new head is on order. The good news is that these are aluminium not iron and so lighter and better all round. It should feel good when it's completed with it's new head and fully rebuilt bottom end. He says, in order to look on the bright side rather than think of the cost!"

Returning from Goodwood last September I noticed she was smoking rather at traffic lights and upon investigation it seemed to be worse from the nearside exhaust pipe. I usually have it serviced and checked over once a year during the winter and I duly took her to Wiltshire with a list of niggly little jobs.
Unfortunately, a compression test revealed the smoking was probably down to a broken piston ring in no 3 cylinder. So, head off to check for sticking valve, which it wasn't, and sump off to allow the piston to be withdrawn confirmed what they thought. At this point the decision was taken to replace the pistons and liners rather than simply replace the busted ring and hone the bores. I had always suffered with the cooling system pumping up and I suspected that somewhere a cylinder liner was not sealing against the o-rings in the block. New liners and pistons would be nice after all! At the same time one has to polish the crank and replace the main and end bearings, my specialist said they were probably the originals not bad for 57k miles!
A bit of a blow was that they discovered a crack in the cylinder head running between an inlet valve seat and an exhaust valve seat extending down into the ports. Not good... This could be welded but I decided to opt for a replacement aluminium head, although all Feltham Astons ran with iron heads they did cast some ali' ones in period and experimented with them on the race cars so it's not entirely out of context. The new head will be lighter, better ported, and have an increased compression ratio which is allowed by modern fuels.
Here are some progress shots.
ETA: Just found a post I put on another forum about the cylinder head, speaks for itself; "Well since my last post the engine "refresh" continues apace with the latest news that the cylinder head has a crack between the ports running down to the valve guide. It can be welded but it's likely to crack again elsewhere and it seems like throwing good money after bad so a new head is on order. The good news is that these are aluminium not iron and so lighter and better all round. It should feel good when it's completed with it's new head and fully rebuilt bottom end. He says, in order to look on the bright side rather than think of the cost!"
Edited by RichB on Sunday 24th January 19:26
We pop'ed in to see Graham Millard last Summer. He had a convertible DB2/4 in, which was interesting and rare I understand. He also talked about the various rebore options considered for the DB5 and DB6 cars he was working on.
He then showed us the TT Sunbeam, which rather over shadowed the Astons! So an interesting afternoon.
Good Luck with your rebuild.
He then showed us the TT Sunbeam, which rather over shadowed the Astons! So an interesting afternoon.
Good Luck with your rebuild.


davepen said:
We pop'ed in to see Graham Millard last Summer. He had a convertible DB2/4 in, which was interesting and rare I understand. He also talked about the various rebore options considered for the DB5 and DB6 cars he was working on. He then showed us the TT Sunbeam, which rather over shadowed the Astons! So an interesting afternoon. Good Luck with your rebuild.
Thanks. I don't know David Millard, is he in Bicester Heritage Centre now at the airfield? I just tried searching but couldn't find a web site for his business. For some reason the DB4,5,6 (Newprot Pagnell) specialists seem to separate themselves from the Feltham specialists of which there are only really three or four in the country; Davron, Four Ashes, Trinity and Aston Workshop Durham. The DB2/4 convertible is a bit of an enigma to me. While it's value at auction is 4 times that of a saloon (the hatchback was known as a saloon by Aston) to me it's not as attractive as say an XK140 as an open top sports car. The saloon, on the other hand, is to me a most graceful interpretation of the 1950s 2+2 grand tourer. 
Cerberaherts said:
Is that the original block colour? Fabulous, historic aston by the way...
Yes, look up hunting pink! David Brown was into hunting and this was his chosen tractor colour as used in the 50s. The engines were prepared up at Farsley in Yorkshire and this was also the tractor factory. Being a good Yorkshireman he wouldn't sanction different paint for the car engines so they used the same colour as on the tractors. The paint is available from the David Brown tractor club although it's RAL number is identical to a 1960s Ford engine red which readily available and what most people use. Incidentally, it's fun reading on Google the theories about about why hunting pink is not actually pink, I'm still none the wiser! Here's how it should look when completed, the red is toned down by the black SUs and manifolds. Incidentally that's a hangover from WO Bentley days whose cars (along with Rolls Royces) always had black carburettors - the engine was a Lagonda design by Willie Watson overseen by Bentley.

RichB said:
davepen said:
Graham Millard last Summer.
is he in Bicester Heritage Centre now at the airfield? I just tried searching but couldn't find a web site for his business.Was able to visit Bicester for the VSCC Driving Tests last month, good to see the progress made since Dan literarily got the keys in a bucket. The WO workshop (Kingsbury) alone was worth the visit.
davepen said:
Was able to visit Bicester for the VSCC Driving Tests last month, good to see the progress made since Dan literarily got the keys in a bucket. The WO workshop (Kingsbury) alone was worth the visit.
Think I may join the VSCC, I'd like to come along to these type of events but I never know when they are occurring. Are you a member? While up on the ramps some rust was discovered on one of the chassis members, a cruciform piece. Fortunately just on one side. They have cut out the rotted section and pieced in a new piece. Although I know where the rust was I really struggle to see the repair in these shots. The chassis has been totally cleaned and painted and in these shots you can see the front torsion bar case which has been stripped, re-bushed and reconditioned. It's an alloy, oil filled case and houses a torsion bar linking each side of the front suspension.


Edited by RichB on Friday 21st March 17:43
Great pics of the rebuild.
The next VSCC event is the New Year Driving Tests at Brooklands this coming Sunday 31st Jan.
Always good fun to see the pre-war cars being put through their paces.
https://youtu.be/puJeYjUKkdo
The next VSCC event is the New Year Driving Tests at Brooklands this coming Sunday 31st Jan.
Always good fun to see the pre-war cars being put through their paces.
https://youtu.be/puJeYjUKkdo
DBA in as much as it has twin SUs and std cams. However, the head will be a mild race spec, they set the cam timing differently to the book (exhaust/inlet overlap using the vernier adjustment) because of the modern fuels these days and it will have a higher compression ratio - oh and the twin exhaust, obviously. We are expecting somewhere around 180-190 bhp. I can always upgrade to triple SUs at a future date when my wallet recovers.
Edited by RichB on Monday 25th January 09:08
It's an interesting design in that the crank journals are encased by alloy blocks known as cheese because they resemble a cheddar cheese cut in half. The whole unit crank, bearings and cheese then slide into the block from the front, in effect the crank and cheeses form a unit meaning the block is less stress bearing. The liners are known as top-hat liners and slide down into the block but sit proud of the surface by 2 thou. This ridge is them clamped up by the cylinder head as it is torqued down. As I say, interesting to see but hard to describe.
Forums | Classic Cars and Yesterday's Heroes | Top of Page | What's New | My Stuff