Spped Six throttle body gaskets
Discussion


Thought I'd share how I made and fitted gaskets to my Tuscan Mk1 throttle bodies.
I'd recently replaced my air-box with a new one and noticed that there was an oil residue under throttle bodies 3 and 4. So I had a leak of sorts. The car drove fine and nothing untoward with the adaptives. I thought about simply cleaning up the mating surface between the throttle bodies and the head and then use RTV (or maybe Wellseal?) to reseal but decided to give gaskets a try. You can buy these from Powers but you are looking at currently ~£95 plus postage so I decided to make my own.
I bought some Flexoid 1.6mm gasket (<£5) and used a Stanley knife with some steel punches 9mm and 6mm to cut the holes. I used the technique where you take a picture of the gasket or scan it in my case, print it out and stick it lightly to the gasket material. You then cut around the image and punch out the holes. I had to adjust the printing % scale for my printer to get the printed pieces of paper the same dimensions as actual throttle bodies. I think I had to scale the pic/pdf to 98% to get it spot on. I had the benefit of spare set of throttle bodies to do this but you can easily use the ones on your car if you use the impression method of reproducing gaskets.
See below a picture of the two throttle body surfaces and the two key dimensions between the main M8 holes.
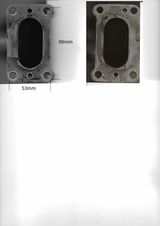
This is to print out on an A4. The two offset doweled throttle bodies are for positions 3 and 4, the others have the dowels opposite each other.
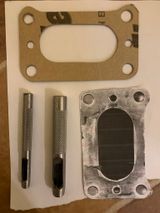
Below are the punches I used and examples of the flexoid gasket and the paper gasket template.
To remove the M8 screws from the throttle bodies requires a good quality 6mm hex bit on a 1/4" short extension or a tool like this:

Example 6mm x 100mm 1/4" hex bit
I made my own tool over Christmas from an old IKEA 6mm hex key and a 6mm socket but it was good enough for the job and didn't chew up the M8 screws as I checked first on an old cap head screw I had.
I decided to remove the throttle body assembly as a whole unit and leave everything attached to the fuel rail. What I had to disconnect to achieve this job was:
Disconnect the electrical connectors to the injectors. Found a corroded injector socket here in position 1.
Disconnect the return fuel pipe and vacuum pipes at either end of the fuel rail.
Disconnected the throttle position sensors at either end of the fuel rail but left them connected to their cables.
Disconnected the throttle cable to the arm between bodies 3 and 4.
I then undid and removed all the M8 screws. 22x 20mm x M8 and 2x 25mm x M8 for the throttle cable bracket positions. Some penetrating oil was used and they were all done up stupidly tight.
After that, I light wiggle of the fuel rail and the whole assembly was loose. I then peeled the assembly back away from the head and left it dangling, supported by the lower 2x vacuum hoses. It was fine like that and gave me enough room to clean up the throttle body mating surfaces and the head apertures. Sorry I don't have a picture of this. All mating surfaces were covered in oil and no RTV was evident. Had the last owner used Wellseal and it had washed out over the years? Or had they simply wellied the screws in and hoped for a seal?
I stuffed some tissue down each head aperture just in case and cleaned up the surfaces with brake cleaner. Easy. Next I removed the tissues, fitted the gaskets and re-fitted the throttle body assembly. Everything went back together really well and I torqued the M8 screws down in stages to bed in the gaskets evenly - 10Nm, 15Nm and finally 20Nm. I thought that would be firm enough and checked the torque settings again in the morning. All OK.
Finally, I rebalanced the throttle bodies and it didn't take much adjustment at all. I noticed less "throttle body back-fires", I'm not sure of the correct term when you get a small pop backwards from the throttle body when you give the throttle a blip. I also remembered to reset the throttle position sensors before firing up the car and ensured that their initial position % in MBE Tools was around 1% away from each other. So about 9% for my car. All good now, adaptives are both small and the same polarity (around +10 I think).
Another job done and hope this helps.
I'd recently replaced my air-box with a new one and noticed that there was an oil residue under throttle bodies 3 and 4. So I had a leak of sorts. The car drove fine and nothing untoward with the adaptives. I thought about simply cleaning up the mating surface between the throttle bodies and the head and then use RTV (or maybe Wellseal?) to reseal but decided to give gaskets a try. You can buy these from Powers but you are looking at currently ~£95 plus postage so I decided to make my own.
I bought some Flexoid 1.6mm gasket (<£5) and used a Stanley knife with some steel punches 9mm and 6mm to cut the holes. I used the technique where you take a picture of the gasket or scan it in my case, print it out and stick it lightly to the gasket material. You then cut around the image and punch out the holes. I had to adjust the printing % scale for my printer to get the printed pieces of paper the same dimensions as actual throttle bodies. I think I had to scale the pic/pdf to 98% to get it spot on. I had the benefit of spare set of throttle bodies to do this but you can easily use the ones on your car if you use the impression method of reproducing gaskets.
See below a picture of the two throttle body surfaces and the two key dimensions between the main M8 holes.
This is to print out on an A4. The two offset doweled throttle bodies are for positions 3 and 4, the others have the dowels opposite each other.
Below are the punches I used and examples of the flexoid gasket and the paper gasket template.
To remove the M8 screws from the throttle bodies requires a good quality 6mm hex bit on a 1/4" short extension or a tool like this:
Example 6mm x 100mm 1/4" hex bit
I made my own tool over Christmas from an old IKEA 6mm hex key and a 6mm socket but it was good enough for the job and didn't chew up the M8 screws as I checked first on an old cap head screw I had.
I decided to remove the throttle body assembly as a whole unit and leave everything attached to the fuel rail. What I had to disconnect to achieve this job was:
Disconnect the electrical connectors to the injectors. Found a corroded injector socket here in position 1.
Disconnect the return fuel pipe and vacuum pipes at either end of the fuel rail.
Disconnected the throttle position sensors at either end of the fuel rail but left them connected to their cables.
Disconnected the throttle cable to the arm between bodies 3 and 4.
I then undid and removed all the M8 screws. 22x 20mm x M8 and 2x 25mm x M8 for the throttle cable bracket positions. Some penetrating oil was used and they were all done up stupidly tight.
After that, I light wiggle of the fuel rail and the whole assembly was loose. I then peeled the assembly back away from the head and left it dangling, supported by the lower 2x vacuum hoses. It was fine like that and gave me enough room to clean up the throttle body mating surfaces and the head apertures. Sorry I don't have a picture of this. All mating surfaces were covered in oil and no RTV was evident. Had the last owner used Wellseal and it had washed out over the years? Or had they simply wellied the screws in and hoped for a seal?
I stuffed some tissue down each head aperture just in case and cleaned up the surfaces with brake cleaner. Easy. Next I removed the tissues, fitted the gaskets and re-fitted the throttle body assembly. Everything went back together really well and I torqued the M8 screws down in stages to bed in the gaskets evenly - 10Nm, 15Nm and finally 20Nm. I thought that would be firm enough and checked the torque settings again in the morning. All OK.
Finally, I rebalanced the throttle bodies and it didn't take much adjustment at all. I noticed less "throttle body back-fires", I'm not sure of the correct term when you get a small pop backwards from the throttle body when you give the throttle a blip. I also remembered to reset the throttle position sensors before firing up the car and ensured that their initial position % in MBE Tools was around 1% away from each other. So about 9% for my car. All good now, adaptives are both small and the same polarity (around +10 I think).
Another job done and hope this helps.
Gassing Station | Speed Six Engine | Top of Page | What's New | My Stuff