First timer(ish)
Discussion


I have built a few models before with help from my dad whilst i was a kid.
My dad has been a keen modeller all of his life. But i fancy having a proper go myself.
The team i work for have recently sold our Ford GT GT3.
Coincidentally Similr have recently brought out a 1/24 Ford GT GT1.
I have decided to go for it and want to do it properly and seeing as i have worked with the car and have hundreds of close up photos of intercity parts of the car i think i want to have a crack at detailing.
I have been looking at everything from carbon decal sheets to photo etched brakes to oil unions.
But before i get ahead of myself, what tools or "bits" will i need?
Ive looked at the tools for shaping PE parts, but don't really know what one to go for.
Any tips, tricks or other advice is more than needed.
Thanks
Oli
The car


Off she went

My dad has been a keen modeller all of his life. But i fancy having a proper go myself.
The team i work for have recently sold our Ford GT GT3.
Coincidentally Similr have recently brought out a 1/24 Ford GT GT1.
I have decided to go for it and want to do it properly and seeing as i have worked with the car and have hundreds of close up photos of intercity parts of the car i think i want to have a crack at detailing.
I have been looking at everything from carbon decal sheets to photo etched brakes to oil unions.
But before i get ahead of myself, what tools or "bits" will i need?
Ive looked at the tools for shaping PE parts, but don't really know what one to go for.
Any tips, tricks or other advice is more than needed.
Thanks
Oli
The car
Off she went
Really had to delve back into the past for this thread;
http://www.pistonheads.com/gassing/topic.asp?h=0&a...
in there, you'll find a good range of suggestions. To pluck some out though (and leaving the painting side of it to one side to start with);
The most important and most valuable thing you can do though is to make use of the mass of information here (and elsewhere) so if you get stuck, ask. If you have a query, ask. Someone will have been through it all before and will have a tip. Oh, and don't forget to keep us fed with lots of pictures. I quite fancy the Pescarolo they have recently released but the first pictures I've seen of the kit are a little dissapointing.
http://www.pistonheads.com/gassing/topic.asp?h=0&a...
in there, you'll find a good range of suggestions. To pluck some out though (and leaving the painting side of it to one side to start with);
Eric Mc said:
Regarding ordinary modelling tools, I would suggest -
a range of paintbrushes
a small selection of needle files
a selection of modelling knives
a basic range of paints (enamels, acrylics and spray cans - Halfords are quite good for a wide range of colours)
tube polystyrene cement
liquid polystyrene cement in an applicator type bottle (Revell produce it in this form)
liquid polystyrene cement in a bottle for brush application
tim-b said:
some great info on this thread, my 240z safari rally model arrived this morning and i can't wait to get my teeth into it!
it's my first model kit, and i'm not intending to spend much on it so what is the minimum toolkit I'd need to do this? I'm thinking;
halfords spray cans for large bits
1 small brush and 'zero' paints for details
1 scalpel+cutting mat
1 file
sandpaper (+ice cream sticks for home-made sanding blocks)
masking tapes (maybe 1mm + 3mm?)
liquid ps cement
pva glue
tweezers (for delicate parts/small decals etc)
does that sound sensible, or am i being a bit optimistic?
also for a good surface finish should i use some kind of filler, or would a coat of primer be enough?
thanks in advance, i might post some pics (and probably lots more noob questions ) when i get going on it!
I think we mentioned a steel rule as well in the original thread as well as a cutting mat. Also look through the build threads of Perdu, dr_gn and the various group build threads from last year. Different models, yes, but the techniques are the same.it's my first model kit, and i'm not intending to spend much on it so what is the minimum toolkit I'd need to do this? I'm thinking;
halfords spray cans for large bits
1 small brush and 'zero' paints for details
1 scalpel+cutting mat
1 file
sandpaper (+ice cream sticks for home-made sanding blocks)
masking tapes (maybe 1mm + 3mm?)
liquid ps cement
pva glue
tweezers (for delicate parts/small decals etc)
does that sound sensible, or am i being a bit optimistic?
also for a good surface finish should i use some kind of filler, or would a coat of primer be enough?
thanks in advance, i might post some pics (and probably lots more noob questions
) when i get going on it!The most important and most valuable thing you can do though is to make use of the mass of information here (and elsewhere) so if you get stuck, ask. If you have a query, ask. Someone will have been through it all before and will have a tip. Oh, and don't forget to keep us fed with lots of pictures. I quite fancy the Pescarolo they have recently released but the first pictures I've seen of the kit are a little dissapointing.
Some small p/e detail sets have pre-scored bend lines, so you don't really need anything other than a pair of smooth nosed pliers to hold the part and just bend it with whatever comes to hand (including your fingers).
For longer parts, or parts that aren't pre scored, I made a tool myself, becasue the commercially avilable ones are - or at least were - stupidly expensive:
http://www.britmodeller.com/forums/index.php?showt...
If you've got a lathe I can send you the drawings if you like. The other thing you'll need is something for picking and placing tiny p/e parts. I use a cocktail stick with a pointed blob of blutac squidged around the end. Invest in a really good pair of tweezers too. I use pva glue for sticking small p/e parts (rivets etc) onto painted surfaces - it dries clear.
I'm in the final stages of detailling a Jaguar XJR9LM at the moment:
http://www.pistonheads.com/xforums/topic.asp?h=0&a...
So I guess many of the parts I've been using (braided hose, hose end fittings, electical connectors wiring, carbon, etc etc) you'll also need. If you like any of the techniques, just ask if you're not sure how I did something.
The main requirements are a good light source and plenty of patience - and don't compromise: if you think you can do better, re-do something until you're happy with it.
ETA you've got a huge advantage in terms of reference photos: it was the hardest part of my project.
ETA: and of course RedFirecracker can make all the custom decals you need.
Edited by dr_gn on Wednesday 25th January 11:25
Thanks dr_gn massive help. I have been following your build actually and I was massively impressed.
What you have done is what I want to attempt. Love the detailed engine especially the oil lines.
Is there a website you would recommend for the detail parts? So I can just stick an order in through one company.
Unfortunately I have no lathe, so looks like I will have to buy one. Although im sure we have a contact who could make one for me.
Could you email me the plans?
olivermeads@gmail.com
Cheers
XG332 said:
Thanks dr_gn massive help. I have been following your build actually and I was massively impressed.
What you have done is what I want to attempt. Love the detailed engine especially the oil lines.
Is there a website you would recommend for the detail parts? So I can just stick an order in through one company.
Unfortunately I have no lathe, so looks like I will have to buy one. Although im sure we have a contact who could make one for me.
Could you email me the plans?
olivermeads@gmail.com
Cheers
Yes, I'll send you the plans.What you have done is what I want to attempt. Love the detailed engine especially the oil lines.
Is there a website you would recommend for the detail parts? So I can just stick an order in through one company.
Unfortunately I have no lathe, so looks like I will have to buy one. Although im sure we have a contact who could make one for me.
Could you email me the plans?
olivermeads@gmail.com
Cheers
BTW you certainly don't need a lathe for this kind of thing - you will almost certainly be able to buy a p/e folding tool cheaper than the cost of a machine tool! The inlet trumpets that I made will probably be available off the shelf for your model. My problem was trying to figure out if equivalent versions intended for a Ferrari V12 would fit / look right. In the end I had the equipment so I made my own.
I used these places for detail parts and materials:
http://www.little-cars.co.uk/pricelst.htm
http://www.grandprixmodels.com/
http://www.hiroboy.com/catalog/
I'd find out what you need and order asap - some items take weeks to get in if they're out of stock. I found the Top Studio resin electrical connectors & hose ends are great (buy all three sizes of hose, and both types of connector), and their p/e rivets and hex nuts really make a difference to detailling. Studio27 etch parts are very good if they do a version for your model (or equivalent).
ETA Scale Motorsport do the best carbon decal sheets in a range of weaves and fibre types. Buy a selection of sheets in one go and expect to have to re-do your first few parts! This isn't a cheap pastime I guess unless you are very very good and get things right first time...I certainly don't and dread to think of the total coast of my current model!
Cheers.
Edited by dr_gn on Wednesday 25th January 13:32
XG332 said:
Thanks.
Will sort out a few bits as my parents are asking what I want for my birthday.
Few other questions.
What glue do you recommend for pe parts?
Appart from the bending tool, any other tools I should look at? Such as a magnifying glass with those little claws for painting?
As I said I use pva glue for sticking small p/e parts (rivets etc) onto painted surfaces - it dries clear, but for larger bits I dry build the assembly then capillary the cyano along the joints with a cocktail stick or pin, then spray with accelerator.Will sort out a few bits as my parents are asking what I want for my birthday.
Few other questions.
What glue do you recommend for pe parts?
Appart from the bending tool, any other tools I should look at? Such as a magnifying glass with those little claws for painting?
I don't get on with magnifying glasses - they magnify everything including the tools/brushes/fingers, so it's of no benefit to me. If your eyesight is poor then fair enough. A good light is more important as IMO.
For holding small items while painting I use reverse action tweezers, lockable forceps, blutac stuck to a coffee stirrer or for things with holes in, just a cocktail stick. I find the croc clip/magnifiers pretty cumbersome to use. for large bodywork parts I sometimes araldite a stick to an unseen region and use it as a handle, then cut it off when the paint's dry.
For large parts that have tabs on them, I often use clothes pegs, they can be used as clamps as well.
I do use croc clips quite a lot and I have one of those devices which holds them in adjustable arms and also provides a magnifier. The magnifier I found was too small to be of much use and the arms only really get used to hold parts while they dry. I tend to hold the crocodile clips myself while I'm spraying parts.
I'm new to PE myself and I've learned that anything that need constructing should be painted last, as the construction process can remove the paint.
A couple of things that have really improved my models have been the use of an airbrush, filler and varnish.
You can also buy white and clear decal paper for making your own decals with a good quality laser or inkjet printer. The only real drawback is that you cannot print white.
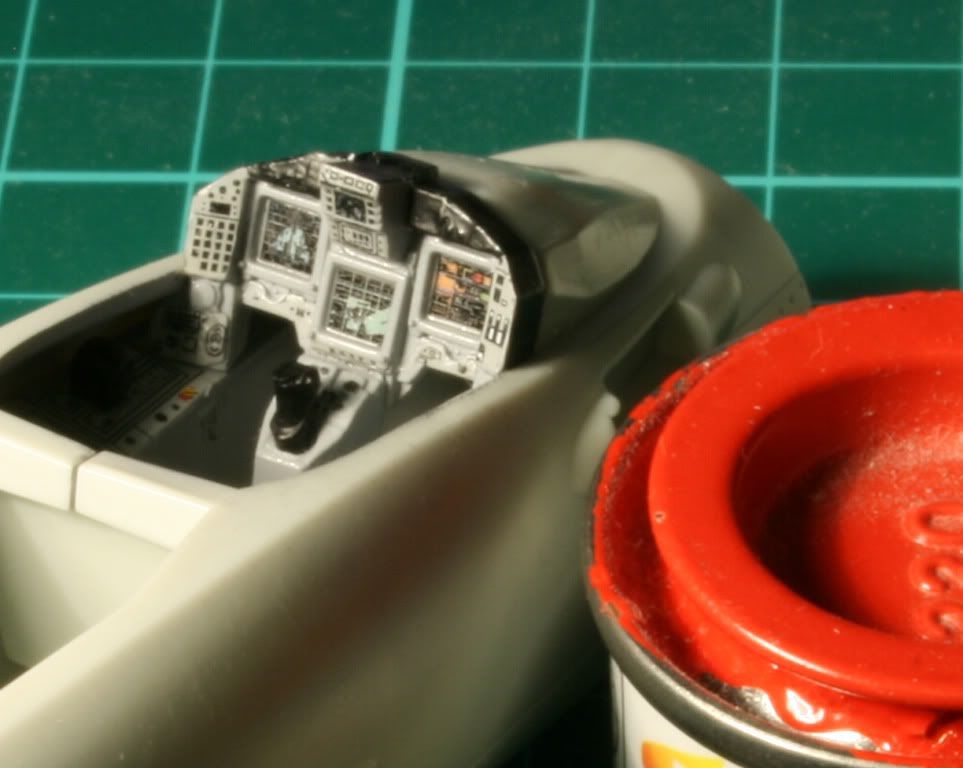
To give you an idea of the detail possible, the MFD's on this Typhoon were created in Inkscape and printed on 'Expert's Choice' decal paper using an Epson SX100.
Dr gn stated the most important things though, patience and an unwillingness to compromise.
I do use croc clips quite a lot and I have one of those devices which holds them in adjustable arms and also provides a magnifier. The magnifier I found was too small to be of much use and the arms only really get used to hold parts while they dry. I tend to hold the crocodile clips myself while I'm spraying parts.
I'm new to PE myself and I've learned that anything that need constructing should be painted last, as the construction process can remove the paint.
A couple of things that have really improved my models have been the use of an airbrush, filler and varnish.
You can also buy white and clear decal paper for making your own decals with a good quality laser or inkjet printer. The only real drawback is that you cannot print white.
To give you an idea of the detail possible, the MFD's on this Typhoon were created in Inkscape and printed on 'Expert's Choice' decal paper using an Epson SX100.
Dr gn stated the most important things though, patience and an unwillingness to compromise.
I would really really recommend painting the yellow stripes. You'll not be able to create yellow decals on an inkjet or laserjet printer that will work well, unfortunately. Printing the yellow onto clear paper will result int he yellow dissapearing when applied over the black paint, printing the yellow onto white paper will result in a stark white edge where you have cut the paper.
The benefit of painting those stripes is that especially around the front, on the bonnet vents, getting a dcal to lay well into those curves is going to be far far harder than just masking and spraying.
The benefit of painting those stripes is that especially around the front, on the bonnet vents, getting a dcal to lay well into those curves is going to be far far harder than just masking and spraying.
Gassing Station | Scale Models | Top of Page | What's New | My Stuff