Dinky 154 Hillman MInx Conversion
Discussion


Thought this might be of interest and I apologise in advance for the few external links in here, it was originally posted on a forum I host.
The new owner of one of my recent conversions has given me permission to show the model here and to detail a bit of how it came together. Although there aren't any pictures of the early parts of the conversion, I'll try to fill the gaps with words rather than pictures.
The starting point for the conversion was the Dinky 154 Hillman Minx, a lovely little model albeit completely devoid of interior detail.

Dinky 154 Hillman Minx by Red Firecracker, on Flickr
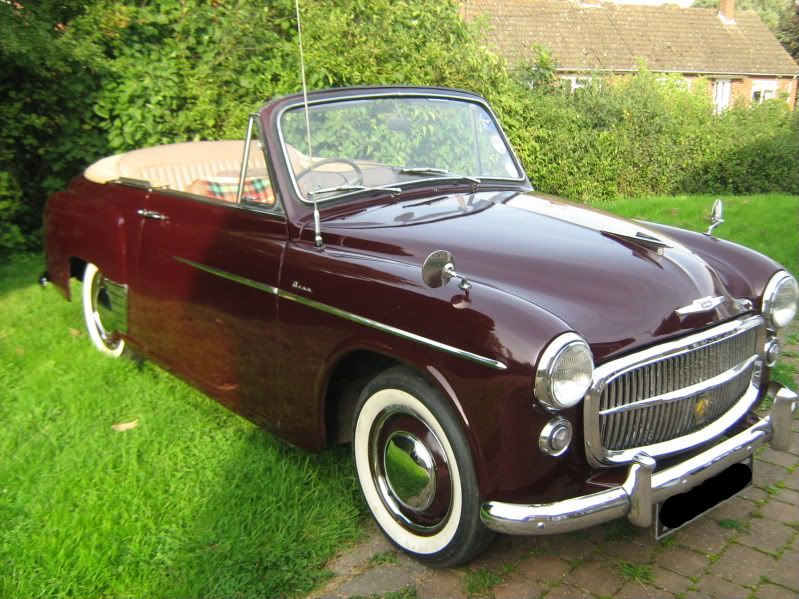
The requirement was to produce a model, keeping within the Dinky style, of the Hillman Minx Convertible, such as this;
Here's where we revert to words rather than pictures for a bit.
The first job was to remove the roof from the original model. This was done with a thin slitting disc in my minidrill, cutting a few mm away from the intended final level so as to allow for errors or mistakes. Much easier to remove more material than to add back what you have already removed. Once the roof was off and I had carefully trimmed down to the desired level, it was time to install an interior.
To keep the interior in the Dinky style, I used resin castings as detailed and produced from this Guide;
Guide 018 - Two Part Silicon Mould Resin Casting
I'd created plenty of spares in the process, so have a stock of suitable pieces left over. Taking one of the resin shells, I first of all cut the moulding in half just in front of the rear seats, so that I could access the dashboard easily as this was the first part to go in. To cut the resin I use a circular saw blade in my minidrill. A word of warning here, resin dust is very fine and very nasty. Wear a mask and protect your eyes.
To fix the resin pieces to the diecast shell I used a think superglue which also helps to fill in any little gaps. I then put that to one side to dry whilst I cut the seats out of the remainder of the resin shell.
As the shell was a Sunbeam, a car with only front seats, I obviously needed two sets of seats to be able to complete this model. Luckily I had another part casting to hand. As with the roof I always trim these parts oversize so that I can gradually thin them down to achieve a snug fit. Sometimes, as in the case of these seats, that is not always possible so I glued a piece of plastic card to the back of the seats which was then shaped to the contour of the bodyshell. Before fitting the central divide or dip was created with a set of needle files. I not fitted the baseplate to the model to ensure that I did not fix the seats too low. Once happy, they were fixed in place, again with superglue, and the whole left to the side to dry.
The rear of the model obviously has a large, undesirable hole behind where the rear seats will go and the back of the model, which needs to be covered. The easiest way of doing this is to cut the resin moulding of the seats with the rear deck of the Sunbeam intact, so that it can fill the space. It does not have to be exact as there will be a hood cover created to cover the rear section as well. The extra resin section will also help provide additional fixing to the diecast shell, so it was shaped to fit to give the correct distance and orientation for the seats and then glued in place, yet again with Superglue. Even though the baseplate was in situ for this, the rear wheel were slightly too close to the rear seats and did slightly interfere with them. To remedy this, I gently removed some of the resin from the rear of the seat moulding with a small drum sander. This also improved the side on view of the model through the rear wheel arches.
Once everything was dry, I could then fill in any gaps, which unfortunately there were a few, even though I had tried to be especially careful. This is a result of mating part from models that share differences in width and shape. My favourite tool for this is Milliput, a two part epoxy filler, specifically the fine white example. It has excellent properties for working, such as being able to be smoothed with a damp tool ( The Sunday Tip - The Humble Cocktail Stick) and also as a strengthening agent. The specific areas that needed filling were the sides of the rear seats, the sides of the dashboard and the joint between the top of the dashboard and the body. Once these were done, I could start creating the roof cover.
I could have created this from a block of Milliput and then carved and sanded it down to shape, but I wasn't confident that this would give the correct period effect, it would be a more realistic modelling effect, not what we were after. For this reason I decided to use plastic card. First of all I created a paper template of the outer edges of the area to be covered, using the simple, time honoured technique of putting some thin paper over the area and then gently rubbing with a pencil. The hard edges then showing up nicely.
I could then take that template and create the inner dimensions and keep placing it back onto the model for reference, to make sure the shape was correct. As the final piece required a curve, it is easier to laminate two or more pieces of card together than to try and use one piece. Two rectangles of plastic card, larger than the template, were glued together, with a curve, using liquid poly cement and put aside to dry. Once hardened, I could then lay the template back on them, and cur them out to size, again cutting slightly proud so that I could trim and sand to fit.
Once done and affixed with superglue, the model could be sprayed with primer for a first look and here is where we rejoin the pictures.
In the following three pictures you can see the model after being primed. After consultation with the client it was decided to thin the top of the windscreen frame down a touch more. Remember, this is an advantage of leaving a bit too much, it's easier to remove than add. Everything you can see inside the edges of the bodyshell is new as well as everything proud of the upper level of bodyshell from the rear seats backward.

Dinky 154 Hillman Minx Convertible by Red Firecracker, on Flickr

Dinky 154 Hillman Minx Convertible by Red Firecracker, on Flickr

Dinky 154 Hillman Minx Convertible by Red Firecracker, on Flickr
Once the client was happy with the windscreen frame, we then discussed livery. Originally it was to be a single colour but we agreed that a two tone livery could look more appealing and settled on cream and green as the colours, with a cream steering wheel. The next two pictures show the model after the first clear coat;

Dinky 154 Hillman Minx Convertible by Red Firecracker, on Flickr

Dinky 154 Hillman Minx Convertible by Red Firecracker, on Flickr
As this was approved, it was now time to apply the final layers of clear and also to detail paint the bumpers and grill. Also, we discussed the colours for a driver, which obviously needed to confirm tot he period Dinky look. We decided on a traditional Dinky fawn colour, which goes nicely with the car livery. I did try a blue but it was too garish for the car. So finally are are four pictures of the final result. A very enjoyable, challenging project with a very nice outcome.

Dinky 154 Hillman Minx Convertible by Red Firecracker, on Flickr

Dinky 154 Hillman Minx Convertible by Red Firecracker, on Flickr

Dinky 154 Hillman Minx Convertible by Red Firecracker, on Flickr

Dinky 154 Hillman Minx Convertible by Red Firecracker, on Flickr
The new owner of one of my recent conversions has given me permission to show the model here and to detail a bit of how it came together. Although there aren't any pictures of the early parts of the conversion, I'll try to fill the gaps with words rather than pictures.
The starting point for the conversion was the Dinky 154 Hillman Minx, a lovely little model albeit completely devoid of interior detail.
Dinky 154 Hillman Minx by Red Firecracker, on Flickr
The requirement was to produce a model, keeping within the Dinky style, of the Hillman Minx Convertible, such as this;
Here's where we revert to words rather than pictures for a bit.
The first job was to remove the roof from the original model. This was done with a thin slitting disc in my minidrill, cutting a few mm away from the intended final level so as to allow for errors or mistakes. Much easier to remove more material than to add back what you have already removed. Once the roof was off and I had carefully trimmed down to the desired level, it was time to install an interior.
To keep the interior in the Dinky style, I used resin castings as detailed and produced from this Guide;
Guide 018 - Two Part Silicon Mould Resin Casting
I'd created plenty of spares in the process, so have a stock of suitable pieces left over. Taking one of the resin shells, I first of all cut the moulding in half just in front of the rear seats, so that I could access the dashboard easily as this was the first part to go in. To cut the resin I use a circular saw blade in my minidrill. A word of warning here, resin dust is very fine and very nasty. Wear a mask and protect your eyes.
To fix the resin pieces to the diecast shell I used a think superglue which also helps to fill in any little gaps. I then put that to one side to dry whilst I cut the seats out of the remainder of the resin shell.
As the shell was a Sunbeam, a car with only front seats, I obviously needed two sets of seats to be able to complete this model. Luckily I had another part casting to hand. As with the roof I always trim these parts oversize so that I can gradually thin them down to achieve a snug fit. Sometimes, as in the case of these seats, that is not always possible so I glued a piece of plastic card to the back of the seats which was then shaped to the contour of the bodyshell. Before fitting the central divide or dip was created with a set of needle files. I not fitted the baseplate to the model to ensure that I did not fix the seats too low. Once happy, they were fixed in place, again with superglue, and the whole left to the side to dry.
The rear of the model obviously has a large, undesirable hole behind where the rear seats will go and the back of the model, which needs to be covered. The easiest way of doing this is to cut the resin moulding of the seats with the rear deck of the Sunbeam intact, so that it can fill the space. It does not have to be exact as there will be a hood cover created to cover the rear section as well. The extra resin section will also help provide additional fixing to the diecast shell, so it was shaped to fit to give the correct distance and orientation for the seats and then glued in place, yet again with Superglue. Even though the baseplate was in situ for this, the rear wheel were slightly too close to the rear seats and did slightly interfere with them. To remedy this, I gently removed some of the resin from the rear of the seat moulding with a small drum sander. This also improved the side on view of the model through the rear wheel arches.
Once everything was dry, I could then fill in any gaps, which unfortunately there were a few, even though I had tried to be especially careful. This is a result of mating part from models that share differences in width and shape. My favourite tool for this is Milliput, a two part epoxy filler, specifically the fine white example. It has excellent properties for working, such as being able to be smoothed with a damp tool ( The Sunday Tip - The Humble Cocktail Stick) and also as a strengthening agent. The specific areas that needed filling were the sides of the rear seats, the sides of the dashboard and the joint between the top of the dashboard and the body. Once these were done, I could start creating the roof cover.
I could have created this from a block of Milliput and then carved and sanded it down to shape, but I wasn't confident that this would give the correct period effect, it would be a more realistic modelling effect, not what we were after. For this reason I decided to use plastic card. First of all I created a paper template of the outer edges of the area to be covered, using the simple, time honoured technique of putting some thin paper over the area and then gently rubbing with a pencil. The hard edges then showing up nicely.
I could then take that template and create the inner dimensions and keep placing it back onto the model for reference, to make sure the shape was correct. As the final piece required a curve, it is easier to laminate two or more pieces of card together than to try and use one piece. Two rectangles of plastic card, larger than the template, were glued together, with a curve, using liquid poly cement and put aside to dry. Once hardened, I could then lay the template back on them, and cur them out to size, again cutting slightly proud so that I could trim and sand to fit.
Once done and affixed with superglue, the model could be sprayed with primer for a first look and here is where we rejoin the pictures.
In the following three pictures you can see the model after being primed. After consultation with the client it was decided to thin the top of the windscreen frame down a touch more. Remember, this is an advantage of leaving a bit too much, it's easier to remove than add. Everything you can see inside the edges of the bodyshell is new as well as everything proud of the upper level of bodyshell from the rear seats backward.
Dinky 154 Hillman Minx Convertible by Red Firecracker, on Flickr
Dinky 154 Hillman Minx Convertible by Red Firecracker, on Flickr
Dinky 154 Hillman Minx Convertible by Red Firecracker, on Flickr
Once the client was happy with the windscreen frame, we then discussed livery. Originally it was to be a single colour but we agreed that a two tone livery could look more appealing and settled on cream and green as the colours, with a cream steering wheel. The next two pictures show the model after the first clear coat;
Dinky 154 Hillman Minx Convertible by Red Firecracker, on Flickr
Dinky 154 Hillman Minx Convertible by Red Firecracker, on Flickr
As this was approved, it was now time to apply the final layers of clear and also to detail paint the bumpers and grill. Also, we discussed the colours for a driver, which obviously needed to confirm tot he period Dinky look. We decided on a traditional Dinky fawn colour, which goes nicely with the car livery. I did try a blue but it was too garish for the car. So finally are are four pictures of the final result. A very enjoyable, challenging project with a very nice outcome.
Dinky 154 Hillman Minx Convertible by Red Firecracker, on Flickr
Dinky 154 Hillman Minx Convertible by Red Firecracker, on Flickr
Dinky 154 Hillman Minx Convertible by Red Firecracker, on Flickr
Dinky 154 Hillman Minx Convertible by Red Firecracker, on Flickr

Gassing Station | Scale Models | Top of Page | What's New | My Stuff