Dinky 934 Leyland Octopus Restoration
Discussion


I thought some might be interested in a couple of in depth Dinky restorations/rebuilds I've done, so am posting this here. Please excuse some of the prose, it's cross posted from another forum so originally intended for a slightly different audience. Apologies as well if I mess up any of the editing. I'll post the whole lot over a couple of days and have a couple more detailed restorations if there is interest.
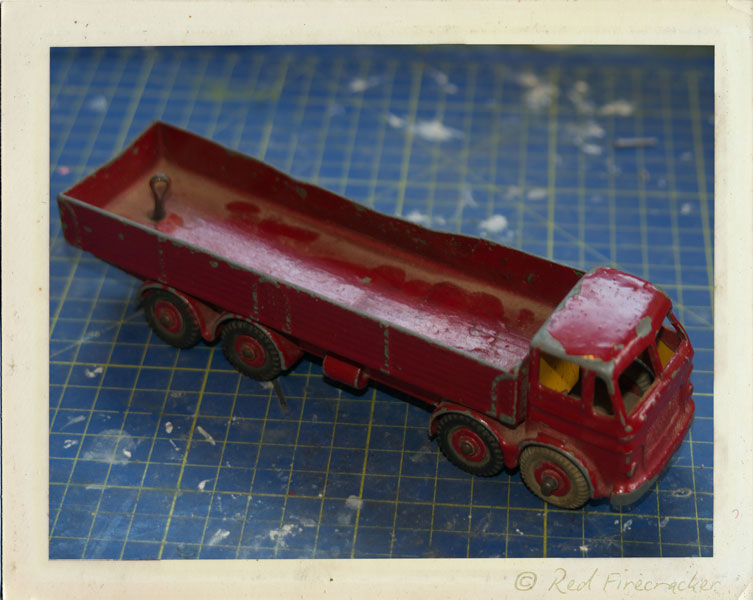
The Dinky 934 Leyland Octopus Wagon is the subject of the restoration this time and as you can see from the pictures below, it's in a bit if a state. From initial inspection the list of issues is merely;
Dinky 934 Leyland Octopus Wagon Detailed Restoration by Red Firecracker, on Flickr

Dinky 934 Leyland Octopus Wagon Detailed Restoration by Red Firecracker, on Flickr

Dinky 934 Leyland Octopus Wagon Detailed Restoration by Red Firecracker, on Flickr

Dinky 934 Leyland Octopus Wagon Detailed Restoration by Red Firecracker, on Flickr
I've now got the model fully apart so the list of jobs is becoming clearer.
The first job was to get the back off the chassis, which seeing as it was attached with an old split pin and one of the front lugs is broken off wasn;t a major undertaking;

Dinky 934 Leyland Octopus Wagon Detailed Restoration by Red Firecracker, on Flickr
Next I removed the wheels from the axles using a cutting disc in my mini drill. To do this I see which end of the axle has the smaller end ridge and then make sure that the wheels and axle move freely. By placing the cutting disc at right angle to the axle, so the flat of the disc is against the ridge on the axle, I can gently grind away the ridge. What happens is that the axle rotates against the disc, which is also rotating. What you need to be aware of is to use low pressure so that you do not create a flat spot on the axle. If you think of a locking front tyre on a Formula 1 car, if it is flat spotted, it will stop at that location every time, making the flat sport worse. Same on the axles, so to avoid this make sure that the axle spins freely and use low pressure.
Here are the bits all laid out;

Dinky 934 Leyland Octopus Wagon Detailed Restoration by Red Firecracker, on Flickr
As can be seen and as expected there is a nice crack right across the chassis.
Taking the chassis on its own, we can see in the next two pictures that there is also damage in the form of warping to the front section.

Dinky 934 Leyland Octopus Wagon Detailed Restoration by Red Firecracker, on Flickr

Dinky 934 Leyland Octopus Wagon Detailed Restoration by Red Firecracker, on Flickr
The crack in the chassis actually helps here as I can manipulate the forward section far easier without worry of any damage further down. It would be very hard to make it worse!
Looking at the bottom of the load bed, I can see that there is still some of the original paint finish evident, so I have been able to compare that to my paint charts and add it to the Diecast Models Paint Match Colour Charts;

Dinky 934 Leyland Octopus Wagon Detailed Restoration by Red Firecracker, on Flickr
The same for the main chassis after the front wheel retainer was removed;

Dinky 934 Leyland Octopus Wagon Detailed Restoration by Red Firecracker, on Flickr
Now it was time to remove the brass plate holding the two halves of the chassis together. This was riveted in place with steel rivets, so to avoid any further damage to the top of the chassis I removed the heads on the brass plate side. To do this, I took the cutting disc in my mini drill and made two incisions per rivet as shown in the picture below;

Dinky 934 Leyland Octopus Wagon Detailed Restoration by Red Firecracker, on Flickr
Once the two slots were cut in I could then put a flat bladed screw driver into the slot and snap off the outer edge of the rivet, as see by the two upper most rivets in the picture above.
Then, using a pair of pliers, I could rotate the rivets by holding onto the remaining spigot through 90 degrees so that I was cutting in the same plane as before. This avoided getting the cutting disc close to the chassis rails. Now I could slice off the remaining bits and push the rivets out;

Dinky 934 Leyland Octopus Wagon Detailed Restoration by Red Firecracker, on Flickr
Finally here is the chassis with the plate removed. The two halves were not riveted close together so there is paint on the joints so I am not totally sure yet as to whether there has been any removal of material or how well the joint will go together. The model is now in the stripping tank getting rid of all the nasty thick paint, so once it is out of there and cleaned I can finalise the list of jobs required.

Dinky 934 Leyland Octopus Wagon Detailed Restoration by Red Firecracker, on Flickr
The Dinky 934 Leyland Octopus Wagon is the subject of the restoration this time and as you can see from the pictures below, it's in a bit if a state. From initial inspection the list of issues is merely;
- Massively deformed rear section
- Broken windscreen pillar
- Original tow hook replaced with home made version
- Rear mudguards broken
- Chassis cracked in at least one place, but suspected to be in two or three locations
Dinky 934 Leyland Octopus Wagon Detailed Restoration by Red Firecracker, on Flickr
Dinky 934 Leyland Octopus Wagon Detailed Restoration by Red Firecracker, on Flickr
Dinky 934 Leyland Octopus Wagon Detailed Restoration by Red Firecracker, on Flickr
Dinky 934 Leyland Octopus Wagon Detailed Restoration by Red Firecracker, on Flickr
I've now got the model fully apart so the list of jobs is becoming clearer.
The first job was to get the back off the chassis, which seeing as it was attached with an old split pin and one of the front lugs is broken off wasn;t a major undertaking;
Dinky 934 Leyland Octopus Wagon Detailed Restoration by Red Firecracker, on Flickr
Next I removed the wheels from the axles using a cutting disc in my mini drill. To do this I see which end of the axle has the smaller end ridge and then make sure that the wheels and axle move freely. By placing the cutting disc at right angle to the axle, so the flat of the disc is against the ridge on the axle, I can gently grind away the ridge. What happens is that the axle rotates against the disc, which is also rotating. What you need to be aware of is to use low pressure so that you do not create a flat spot on the axle. If you think of a locking front tyre on a Formula 1 car, if it is flat spotted, it will stop at that location every time, making the flat sport worse. Same on the axles, so to avoid this make sure that the axle spins freely and use low pressure.
Here are the bits all laid out;
Dinky 934 Leyland Octopus Wagon Detailed Restoration by Red Firecracker, on Flickr
As can be seen and as expected there is a nice crack right across the chassis.
Taking the chassis on its own, we can see in the next two pictures that there is also damage in the form of warping to the front section.
Dinky 934 Leyland Octopus Wagon Detailed Restoration by Red Firecracker, on Flickr
Dinky 934 Leyland Octopus Wagon Detailed Restoration by Red Firecracker, on Flickr
The crack in the chassis actually helps here as I can manipulate the forward section far easier without worry of any damage further down. It would be very hard to make it worse!
Looking at the bottom of the load bed, I can see that there is still some of the original paint finish evident, so I have been able to compare that to my paint charts and add it to the Diecast Models Paint Match Colour Charts;
Dinky 934 Leyland Octopus Wagon Detailed Restoration by Red Firecracker, on Flickr
The same for the main chassis after the front wheel retainer was removed;
Dinky 934 Leyland Octopus Wagon Detailed Restoration by Red Firecracker, on Flickr
Now it was time to remove the brass plate holding the two halves of the chassis together. This was riveted in place with steel rivets, so to avoid any further damage to the top of the chassis I removed the heads on the brass plate side. To do this, I took the cutting disc in my mini drill and made two incisions per rivet as shown in the picture below;
Dinky 934 Leyland Octopus Wagon Detailed Restoration by Red Firecracker, on Flickr
Once the two slots were cut in I could then put a flat bladed screw driver into the slot and snap off the outer edge of the rivet, as see by the two upper most rivets in the picture above.
Then, using a pair of pliers, I could rotate the rivets by holding onto the remaining spigot through 90 degrees so that I was cutting in the same plane as before. This avoided getting the cutting disc close to the chassis rails. Now I could slice off the remaining bits and push the rivets out;
Dinky 934 Leyland Octopus Wagon Detailed Restoration by Red Firecracker, on Flickr
Finally here is the chassis with the plate removed. The two halves were not riveted close together so there is paint on the joints so I am not totally sure yet as to whether there has been any removal of material or how well the joint will go together. The model is now in the stripping tank getting rid of all the nasty thick paint, so once it is out of there and cleaned I can finalise the list of jobs required.
Dinky 934 Leyland Octopus Wagon Detailed Restoration by Red Firecracker, on Flickr

There is cricket on you know. Oh, and work 
The Foden is now stripped of paint and clean up after the caustic bath. I now know exactly what needs doing to the model to get it back into tip top shape. Here are all the bits laid out;

Dinky 934 Leyland Octopus Wagon Detailed Restoration by Red Firecracker, on Flickr
Now we get into a bit more detail, starting with the load bed. As seen before the paint was removed, the sides, especially one side, are deformed and one of the front locating lugs is missing;

Dinky 934 Leyland Octopus Wagon Detailed Restoration by Red Firecracker, on Flickr
However, since removing the paint, further distress has been uncovered. In the picture below you can (hopefully) see that there is cracking along the crease point of the major deformation.

Dinky 934 Leyland Octopus Wagon Detailed Restoration by Red Firecracker, on Flickr
Moving onto the chassis, the rear section is straight but the rear of the mudguards on both sides has sustained damage which will require repair.

Dinky 934 Leyland Octopus Wagon Detailed Restoration by Red Firecracker, on Flickr
The major damage (ignoring the obvious) is to the front part of the chassis. Starting at the front, specifically the cab, the central pillar is cracked at its base, the off side A pillar is deformed and the near side A pillar is deformed and cracked.

Dinky 934 Leyland Octopus Wagon Detailed Restoration by Red Firecracker, on Flickr
In these side on views of the front section, we can see that there are significant twists along most axis. There are also two further cracks to the chassis rails, one each side at the apexes of the twists;

Dinky 934 Leyland Octopus Wagon Detailed Restoration by Red Firecracker, on Flickr

Dinky 934 Leyland Octopus Wagon Detailed Restoration by Red Firecracker, on Flickr
The total job list is;
The Foden is now stripped of paint and clean up after the caustic bath. I now know exactly what needs doing to the model to get it back into tip top shape. Here are all the bits laid out;
Dinky 934 Leyland Octopus Wagon Detailed Restoration by Red Firecracker, on Flickr
Now we get into a bit more detail, starting with the load bed. As seen before the paint was removed, the sides, especially one side, are deformed and one of the front locating lugs is missing;
Dinky 934 Leyland Octopus Wagon Detailed Restoration by Red Firecracker, on Flickr
However, since removing the paint, further distress has been uncovered. In the picture below you can (hopefully) see that there is cracking along the crease point of the major deformation.
Dinky 934 Leyland Octopus Wagon Detailed Restoration by Red Firecracker, on Flickr
Moving onto the chassis, the rear section is straight but the rear of the mudguards on both sides has sustained damage which will require repair.
Dinky 934 Leyland Octopus Wagon Detailed Restoration by Red Firecracker, on Flickr
The major damage (ignoring the obvious) is to the front part of the chassis. Starting at the front, specifically the cab, the central pillar is cracked at its base, the off side A pillar is deformed and the near side A pillar is deformed and cracked.
Dinky 934 Leyland Octopus Wagon Detailed Restoration by Red Firecracker, on Flickr
In these side on views of the front section, we can see that there are significant twists along most axis. There are also two further cracks to the chassis rails, one each side at the apexes of the twists;
Dinky 934 Leyland Octopus Wagon Detailed Restoration by Red Firecracker, on Flickr
Dinky 934 Leyland Octopus Wagon Detailed Restoration by Red Firecracker, on Flickr
The total job list is;
- Chassis split in two
- Rear mudguards broken
- Cab windscreen pillars deformed and cracked
- Front section of chassis twisted in multiple planes
- Front section of chassis cracked in two places
- Front section of chassis slight bends to mudguards
- Rear load bed heavily deformed on one side
- Rear load bed cracked along deformation crease
- Locating lug missing.
- Cracked tyres
- Missing tow hook
- Missing bolt/spare wheel holder
I like this
And the paint chart has been bookmarked
Looking at the links on your chart I see that my Corgi Major Bedford Petrol Tanker isn't quite as straight forward as I thought. Bedford TK cab unit that should be a Bedford RL cab instead, with the Streamlined tanker trailer
Plot thickening there then, bought both units together at a bootsale for a pittance though and I may try a repaint and redecalisation on the trailer, Mobilgas transfer looks easy enough to print anew.
I do have a few old ones I mean to get round to refurbishing, old Lesney ERF truck too.
Glad the colour chart is useful, perdu. This is a good site for reference as well;
http://www.diecast.plus.com/
I have decided to first start the remedial work on the load bed.
A per the last post, the load bed had suffered some quite significant bending to one side;
Dinky 934 Leyland Octopus Wagon Detailed Restoration by Red Firecracker, on Flickr
The first step in repairing the casting was to straighten the long edge. For this, as I've explained previously, I use a pair of smooth bladed long nose flat pliers. I also use a piece of cardboard to further protect the casting from any potential damage from the jaws.

Dinky 934 Leyland Octopus Wagon Detailed Restoration by Red Firecracker, on Flickr
Don't be tempted to try and move the part back to its correct position straight away. What you need to do is work back and forth along the piece making small adjustments, which will eventually add up and result in a straight or unbent piece. The process is the same as described before, just ease the part in the jaws of the pliers, don't try and bend. You'll get a feel for the material and it will talk to you so you know how much pressure to use. In the picture below it is about half done.

Dinky 934 Leyland Octopus Wagon Detailed Restoration by Red Firecracker, on Flickr
and here after further gentle manipulation I have placed a straight edge against the part to show how much better it is now.

Dinky 934 Leyland Octopus Wagon Detailed Restoration by Red Firecracker, on Flickr
As you can see there is quite a difference and it now more or less matches the other side. It'll never go back to being perfectly straight and true due to the stretching of the material, but it is far far better than it was. However, that is not the end of the story. The deformation was to such an extent that the metal has cracked along the crease of the bend, as seen below
Dinky 934 Leyland Octopus Wagon Detailed Restoration by Red Firecracker, on Flickr
As will be seen later, this crack extends right through the casting.
The other issue with the casting is the missing locating lug at the front. The replace this, I have used some Oyumaru so that I can then cast a reproduction of the existing lug. As per the Oyumaru instructions, I placed some in boiling water, allowed it to become mailable, and then placed it on the model.

Dinky 934 Leyland Octopus Wagon Detailed Restoration by Red Firecracker, on Flickr
I made sure to mould it right around the lug and also to make sure that it was flat against the casting so that I could get a good finish on the new piece with ease as it will be a difficult size to sand down and shape;

Dinky 934 Leyland Octopus Wagon Detailed Restoration by Red Firecracker, on Flickr
Once the Oyumaru had gone back into its normal state (cooled down basically) I took it off the casting and the result is below;

Dinky 934 Leyland Octopus Wagon Detailed Restoration by Red Firecracker, on Flickr
As can be seen, a good recreation of the existing lug.
To make the part I decided to use Milliput two part epoxy filler, for two reasons. Firstly, mixing resin for such a small part is not easy or economical and secondly I was going to use Milliput to repair the cracks in the casting. After mixing the two elements of Milliput thoroughly, I pressed it into the Oyumaru mould making sure there were no or minimal air bubbles. After this I smoothed some into the cracks along the crease on the outer edge of the casting. Where the Milliput went into the plank gaps, I removed it with a wetted cocktail stick.

Dinky 934 Leyland Octopus Wagon Detailed Restoration by Red Firecracker, on Flickr
On the inside of the casting, I also used Milliput, this time requiring a bit more. Although there was no evidence of displacement from the outside, there was a step on the inside, hence the extra filler used. Both sides were smoothed down as much as possible with wetted down wooden tools such as cocktail sticks and coffee stirrers;

Dinky 934 Leyland Octopus Wagon Detailed Restoration by Red Firecracker, on Flickr
The Milliput serves an additional function over just being a pure filler in that it also has adhesive qualities so will tie both sides of the cracks together. Once it is dry (I always keep any unused Milliput to one side so that I can test how much longer to wait before touching, so I do not disturb the filler on the model) I can pop out the new lug and also finish off the filled in sections with a light sand.
http://www.diecast.plus.com/
I have decided to first start the remedial work on the load bed.
A per the last post, the load bed had suffered some quite significant bending to one side;
Dinky 934 Leyland Octopus Wagon Detailed Restoration by Red Firecracker, on Flickr
The first step in repairing the casting was to straighten the long edge. For this, as I've explained previously, I use a pair of smooth bladed long nose flat pliers. I also use a piece of cardboard to further protect the casting from any potential damage from the jaws.
Dinky 934 Leyland Octopus Wagon Detailed Restoration by Red Firecracker, on Flickr
Don't be tempted to try and move the part back to its correct position straight away. What you need to do is work back and forth along the piece making small adjustments, which will eventually add up and result in a straight or unbent piece. The process is the same as described before, just ease the part in the jaws of the pliers, don't try and bend. You'll get a feel for the material and it will talk to you so you know how much pressure to use. In the picture below it is about half done.
Dinky 934 Leyland Octopus Wagon Detailed Restoration by Red Firecracker, on Flickr
and here after further gentle manipulation I have placed a straight edge against the part to show how much better it is now.
Dinky 934 Leyland Octopus Wagon Detailed Restoration by Red Firecracker, on Flickr
As you can see there is quite a difference and it now more or less matches the other side. It'll never go back to being perfectly straight and true due to the stretching of the material, but it is far far better than it was. However, that is not the end of the story. The deformation was to such an extent that the metal has cracked along the crease of the bend, as seen below
Dinky 934 Leyland Octopus Wagon Detailed Restoration by Red Firecracker, on Flickr
As will be seen later, this crack extends right through the casting.
The other issue with the casting is the missing locating lug at the front. The replace this, I have used some Oyumaru so that I can then cast a reproduction of the existing lug. As per the Oyumaru instructions, I placed some in boiling water, allowed it to become mailable, and then placed it on the model.
Dinky 934 Leyland Octopus Wagon Detailed Restoration by Red Firecracker, on Flickr
I made sure to mould it right around the lug and also to make sure that it was flat against the casting so that I could get a good finish on the new piece with ease as it will be a difficult size to sand down and shape;
Dinky 934 Leyland Octopus Wagon Detailed Restoration by Red Firecracker, on Flickr
Once the Oyumaru had gone back into its normal state (cooled down basically) I took it off the casting and the result is below;
Dinky 934 Leyland Octopus Wagon Detailed Restoration by Red Firecracker, on Flickr
As can be seen, a good recreation of the existing lug.
To make the part I decided to use Milliput two part epoxy filler, for two reasons. Firstly, mixing resin for such a small part is not easy or economical and secondly I was going to use Milliput to repair the cracks in the casting. After mixing the two elements of Milliput thoroughly, I pressed it into the Oyumaru mould making sure there were no or minimal air bubbles. After this I smoothed some into the cracks along the crease on the outer edge of the casting. Where the Milliput went into the plank gaps, I removed it with a wetted cocktail stick.
Dinky 934 Leyland Octopus Wagon Detailed Restoration by Red Firecracker, on Flickr
On the inside of the casting, I also used Milliput, this time requiring a bit more. Although there was no evidence of displacement from the outside, there was a step on the inside, hence the extra filler used. Both sides were smoothed down as much as possible with wetted down wooden tools such as cocktail sticks and coffee stirrers;
Dinky 934 Leyland Octopus Wagon Detailed Restoration by Red Firecracker, on Flickr
The Milliput serves an additional function over just being a pure filler in that it also has adhesive qualities so will tie both sides of the cracks together. Once it is dry (I always keep any unused Milliput to one side so that I can test how much longer to wait before touching, so I do not disturb the filler on the model) I can pop out the new lug and also finish off the filled in sections with a light sand.
dr_gn said:
I've always had no luck with straightening wings of old Dinky aircraft, at least not without a lot of heat from a hot air gun. I guess these might have been Mazak though. Is there any way of telling what metal these model are?
I used the same technique for the Dinky Avro York I did;http://www.pistonheads.com/gassing/topic.asp?h=0&a...
(not the full description of work in the PH thread). Material wise, the later the model, the more resistant they are to corrosion, so they tend not to fall into a pile of dust as soon as you look at them (very fluid superglue is an excellent stabilising medium for models like that) and the earlier, the more likely they are to be Mazak or Zamak based. I tend to use the same technique for whatever though, just very gentle, very small movements. Takes a long time, but does work and if I need heat, either boiling water or very brief glances with a small gas torch.
Continuing work on the load bed.
The Milliput has gone off enough to be workable, as evidenced by the left over lump I kept to test for this purpose. The replacement lug has been popped out of the mould and I think it can be classed as a success.

Dinky 934 Leyland Octopus Wagon Detailed Restoration by Red Firecracker, on Flickr
Once cleaned up, here it is sitting on next of the original lug, bit of trimming around the bottom edge and all ready to go;

Dinky 934 Leyland Octopus Wagon Detailed Restoration by Red Firecracker, on Flickr
It is entirely possible to feasible to just superglue the new lug to the casting, as it isn't really a load bearing part, but I wouldn't be happy with that so pinning it is. In the picture below you will see the new lug, sitting on top of the original lug. I have drilled a hole into the new lug and a corresponding one into the correct location on the casting. No trick here, it was done by eye, casting first and then the lug.

Dinky 934 Leyland Octopus Wagon Detailed Restoration by Red Firecracker, on Flickr
I have used a section of aluminium rod of a suitable diameter and length, first superglued into the lug and then once dry the whole superglued to the casting. In the picture below you can see it secured to the casting, which once primed and painted should look like an original part.

Dinky 934 Leyland Octopus Wagon Detailed Restoration by Red Firecracker, on Flickr
I then took the time to wet and dry the filled repairs to the external and internal sides;

Dinky 934 Leyland Octopus Wagon Detailed Restoration by Red Firecracker, on Flickr

Dinky 934 Leyland Octopus Wagon Detailed Restoration by Red Firecracker, on Flickr
That about completes remedial work on the load bed, it can now be primed and then can sit in the drawer whilst I get on with the rest of the model.
The Milliput has gone off enough to be workable, as evidenced by the left over lump I kept to test for this purpose. The replacement lug has been popped out of the mould and I think it can be classed as a success.
Dinky 934 Leyland Octopus Wagon Detailed Restoration by Red Firecracker, on Flickr
Once cleaned up, here it is sitting on next of the original lug, bit of trimming around the bottom edge and all ready to go;
Dinky 934 Leyland Octopus Wagon Detailed Restoration by Red Firecracker, on Flickr
It is entirely possible to feasible to just superglue the new lug to the casting, as it isn't really a load bearing part, but I wouldn't be happy with that so pinning it is. In the picture below you will see the new lug, sitting on top of the original lug. I have drilled a hole into the new lug and a corresponding one into the correct location on the casting. No trick here, it was done by eye, casting first and then the lug.
Dinky 934 Leyland Octopus Wagon Detailed Restoration by Red Firecracker, on Flickr
I have used a section of aluminium rod of a suitable diameter and length, first superglued into the lug and then once dry the whole superglued to the casting. In the picture below you can see it secured to the casting, which once primed and painted should look like an original part.
Dinky 934 Leyland Octopus Wagon Detailed Restoration by Red Firecracker, on Flickr
I then took the time to wet and dry the filled repairs to the external and internal sides;
Dinky 934 Leyland Octopus Wagon Detailed Restoration by Red Firecracker, on Flickr
Dinky 934 Leyland Octopus Wagon Detailed Restoration by Red Firecracker, on Flickr
That about completes remedial work on the load bed, it can now be primed and then can sit in the drawer whilst I get on with the rest of the model.
Some more progress.
First of all, here is the load bed now that it has had a coat of primer;

Dinky 934 Leyland Octopus Wagon Detailed Restoration by Red Firecracker, on Flickr

Dinky 934 Leyland Octopus Wagon Detailed Restoration by Red Firecracker, on Flickr
Now onto the manipulation of the front half of the chassis. Upon close inspection, the whole cab unit is actually bent forward, which explains the cracks in all three windscreen pillars. I tried to bend the cab back with heat and pressure, but not much headway was made, so it got a few taps with a hammer. Whilst it didn't fully fix the issue, it is much better and probably as good as it is going to get. I was then able to gently locate the pillars into correct position before applying super glue top and bottom, allowing capillary action to take the glue into the crack to stabilise the joints.

Dinky 934 Leyland Octopus Wagon Detailed Restoration by Red Firecracker, on Flickr

Dinky 934 Leyland Octopus Wagon Detailed Restoration by Red Firecracker, on Flickr
There were two cracks in the chassis section, one by the fuel tank and one further forward, by the front mudguards. The chassis was twisted in these two locations, so I heated the areas up and with big gloves on gently moved the chassis around to get it back to true. This took quite a while and repeated applications of localised heat combined with very gentle and smooth applications of pressure. Eventually the result is that the load bed now sits onto the chassis without rocking and without being out of line.

Dinky 934 Leyland Octopus Wagon Detailed Restoration by Red Firecracker, on Flickr

Dinky 934 Leyland Octopus Wagon Detailed Restoration by Red Firecracker, on Flickr
As can be seen, there is still a slight bend to the rear cab wall, but to try and repair that ricks damaging the rest of the section beyond realistic repair.
The next step is to join the two chassis halves together. As can be seen in the picture below, the two halves do not quite meet up correctly, there are small gaps in the joint. This means I will need to very carefully trim some material away to get the two bits of meet which in turn will mean that the chassis will be very very slightly shorter than originally intended.

Dinky 934 Leyland Octopus Wagon Detailed Restoration by Red Firecracker, on Flickr
Finally, here is the way I clean up the wheels after stripping. I put them onto a small screwdriver and then put my mini-drill with wire brush onto it. The wheel will spin and thus be effectively cleaned. Once one side is done, turn it over and do the other. The only thing you have to be careful of is the wheel moving up the screwdriver and popping off!

Dinky 934 Leyland Octopus Wagon Detailed Restoration by Red Firecracker, on Flickr
First of all, here is the load bed now that it has had a coat of primer;
Dinky 934 Leyland Octopus Wagon Detailed Restoration by Red Firecracker, on Flickr
Dinky 934 Leyland Octopus Wagon Detailed Restoration by Red Firecracker, on Flickr
Now onto the manipulation of the front half of the chassis. Upon close inspection, the whole cab unit is actually bent forward, which explains the cracks in all three windscreen pillars. I tried to bend the cab back with heat and pressure, but not much headway was made, so it got a few taps with a hammer. Whilst it didn't fully fix the issue, it is much better and probably as good as it is going to get. I was then able to gently locate the pillars into correct position before applying super glue top and bottom, allowing capillary action to take the glue into the crack to stabilise the joints.
Dinky 934 Leyland Octopus Wagon Detailed Restoration by Red Firecracker, on Flickr
Dinky 934 Leyland Octopus Wagon Detailed Restoration by Red Firecracker, on Flickr
There were two cracks in the chassis section, one by the fuel tank and one further forward, by the front mudguards. The chassis was twisted in these two locations, so I heated the areas up and with big gloves on gently moved the chassis around to get it back to true. This took quite a while and repeated applications of localised heat combined with very gentle and smooth applications of pressure. Eventually the result is that the load bed now sits onto the chassis without rocking and without being out of line.
Dinky 934 Leyland Octopus Wagon Detailed Restoration by Red Firecracker, on Flickr
Dinky 934 Leyland Octopus Wagon Detailed Restoration by Red Firecracker, on Flickr
As can be seen, there is still a slight bend to the rear cab wall, but to try and repair that ricks damaging the rest of the section beyond realistic repair.
The next step is to join the two chassis halves together. As can be seen in the picture below, the two halves do not quite meet up correctly, there are small gaps in the joint. This means I will need to very carefully trim some material away to get the two bits of meet which in turn will mean that the chassis will be very very slightly shorter than originally intended.
Dinky 934 Leyland Octopus Wagon Detailed Restoration by Red Firecracker, on Flickr
Finally, here is the way I clean up the wheels after stripping. I put them onto a small screwdriver and then put my mini-drill with wire brush onto it. The wheel will spin and thus be effectively cleaned. Once one side is done, turn it over and do the other. The only thing you have to be careful of is the wheel moving up the screwdriver and popping off!
Dinky 934 Leyland Octopus Wagon Detailed Restoration by Red Firecracker, on Flickr
The rear mudguards are broken on both sides;

Dinky 934 Leyland Octopus Wagon Detailed Restoration by Red Firecracker, on Flickr
If this was a Foden, it would be more of an issue, but as this is an Octopus, it is easier to rectify as the mudguards are symmetrical. To aid the repair I have decided to cast new sections from the mudguard on the opposite side. To achieve this I have returned to my favourite temporary moulding material, Oyumaru, and have pushed each side of the chassis into prepared blocks;

Dinky 934 Leyland Octopus Wagon Detailed Restoration by Red Firecracker, on Flickr
Once this has gone off I can then cast the new sections.
I decided to cast the mudguards in resin as Milliput just wasn't giving me the results I wanted.
To perform the repair, I needed to remove the damaged sections of the original mudguards. To show me where to cut and to make sure I got as straight a line as possible, I masked out the desired locations of the cuts with Tamiya masking tape. The cuts are angled so as to give a greater surface area for the binding on of the resin replacements.

Dinky 934 Leyland Octopus Wagon Detailed Restoration by Red Firecracker, on Flickr
Here is the casting with the cuts made and the discarded bits;

Dinky 934 Leyland Octopus Wagon Detailed Restoration by Red Firecracker, on Flickr
Now it was time to join in the new sections. I first of all trimmed them down to just over size and then offered them up. From this I could tell if I needed to remove further resin from the rear. Once I was happy with the depth I then scored the resin across the joint to give me a line to cut to. I then sliced off the excess material and bonded the resin to the diecast with super glue;

Dinky 934 Leyland Octopus Wagon Detailed Restoration by Red Firecracker, on Flickr
Here are the side views which give a good idea of the profile;

Dinky 934 Leyland Octopus Wagon Detailed Restoration by Red Firecracker, on Flickr

Dinky 934 Leyland Octopus Wagon Detailed Restoration by Red Firecracker, on Flickr
The intention was always to use these castings as a basis for the finished items, so they have now received a thin coat of filler to blend them in and to make sure that the edges match the rest of the model.
Dinky 934 Leyland Octopus Wagon Detailed Restoration by Red Firecracker, on Flickr
If this was a Foden, it would be more of an issue, but as this is an Octopus, it is easier to rectify as the mudguards are symmetrical. To aid the repair I have decided to cast new sections from the mudguard on the opposite side. To achieve this I have returned to my favourite temporary moulding material, Oyumaru, and have pushed each side of the chassis into prepared blocks;
Dinky 934 Leyland Octopus Wagon Detailed Restoration by Red Firecracker, on Flickr
Once this has gone off I can then cast the new sections.
I decided to cast the mudguards in resin as Milliput just wasn't giving me the results I wanted.
To perform the repair, I needed to remove the damaged sections of the original mudguards. To show me where to cut and to make sure I got as straight a line as possible, I masked out the desired locations of the cuts with Tamiya masking tape. The cuts are angled so as to give a greater surface area for the binding on of the resin replacements.
Dinky 934 Leyland Octopus Wagon Detailed Restoration by Red Firecracker, on Flickr
Here is the casting with the cuts made and the discarded bits;
Dinky 934 Leyland Octopus Wagon Detailed Restoration by Red Firecracker, on Flickr
Now it was time to join in the new sections. I first of all trimmed them down to just over size and then offered them up. From this I could tell if I needed to remove further resin from the rear. Once I was happy with the depth I then scored the resin across the joint to give me a line to cut to. I then sliced off the excess material and bonded the resin to the diecast with super glue;
Dinky 934 Leyland Octopus Wagon Detailed Restoration by Red Firecracker, on Flickr
Here are the side views which give a good idea of the profile;
Dinky 934 Leyland Octopus Wagon Detailed Restoration by Red Firecracker, on Flickr
Dinky 934 Leyland Octopus Wagon Detailed Restoration by Red Firecracker, on Flickr
The intention was always to use these castings as a basis for the finished items, so they have now received a thin coat of filler to blend them in and to make sure that the edges match the rest of the model.
dr_gn said:
This is great - some new techniques for me; never tried casting before.
It's world of frustration and pain! (but when it works, it's great. Oyumaru is fantastic for simple bits)Bit more work completed.
I have applied and sanded some putty to the resin mudguards so that they are now nice and smooth. Once the first coat of primer goes on after the two chassis sections are joined together I can see if any further remedial work is required;

Dinky 934 Leyland Octopus Wagon Detailed Restoration by Red Firecracker, on Flickr

Dinky 934 Leyland Octopus Wagon Detailed Restoration by Red Firecracker, on Flickr
Previously when repairing breaks in sections I prefer to pin, but I am concerned that due to the thickness, or lack thereof, of the material I would be drilling into, the pins would be of insufficient diameter and thus strength on their own. This led me investigate alternative and additional ways of securing the two halves together. Of course, this type of model has an added advantage in that the load bed will provide an additional level of support.
What I am going to do is pin the two halves but also use some plasticard to create new side sections of the chassis that I can then blend in. These will provide additional support but also some lateral support that I'm not sure the thin pin would be able to adequately provide.
To start with I have attached the two sections of plasticard to the front section of the chassis;

Dinky 934 Leyland Octopus Wagon Detailed Restoration by Red Firecracker, on Flickr
They are cut to a length that they engage with the rear section and extend to a logical place on the rear chassis section, namely where a cross beam sits. The two halves will sit like this;

Dinky 934 Leyland Octopus Wagon Detailed Restoration by Red Firecracker, on Flickr
Once they are joined together I can then trim the plastic and blend it into the chassis. I can then take the decision as to whether any further work is required to securely fix the two sections.
For the first time in a long while, the two chassis halves are back together.
The rear section was thoroughly cleaned where the splints and pins were going to touch, as well as the snapped edge. and then adhesive was applied. The two sections were mated together and left with spring clamps holding them together until the adhesive had firmly set. Here is the chassis from both sides once the clamps had been removed.

Dinky 934 Leyland Octopus Wagon Detailed Restoration by Red Firecracker, on Flickr

Dinky 934 Leyland Octopus Wagon Detailed Restoration by Red Firecracker, on Flickr
As can be seen, I have also eased the edges of the holes with a larger drill bit to aid filling.
In the following two pictures you can see the two splints after they had been initially trimmed. The had further treatment after these pictures to further blend them in.

Dinky 934 Leyland Octopus Wagon Detailed Restoration by Red Firecracker, on Flickr

Dinky 934 Leyland Octopus Wagon Detailed Restoration by Red Firecracker, on Flickr
This last picture shows the load bed on the joined chassis. It sits true with no rocking, which shows the benefits of working on a glass surface, ensuring that that things are level.

Dinky 934 Leyland Octopus Wagon Detailed Restoration by Red Firecracker, on Flickr
I now need to fill and make good the holes and joint, which will be followed by a first coat of primer to show where further work is required. The initial fill will be with Milliput and then a layer of putty will go over the top to smooth out any remaining dips. The strength of the repair is very pleasing, the pins and splints behaving exactly as required.
The rear section was thoroughly cleaned where the splints and pins were going to touch, as well as the snapped edge. and then adhesive was applied. The two sections were mated together and left with spring clamps holding them together until the adhesive had firmly set. Here is the chassis from both sides once the clamps had been removed.
Dinky 934 Leyland Octopus Wagon Detailed Restoration by Red Firecracker, on Flickr
Dinky 934 Leyland Octopus Wagon Detailed Restoration by Red Firecracker, on Flickr
As can be seen, I have also eased the edges of the holes with a larger drill bit to aid filling.
In the following two pictures you can see the two splints after they had been initially trimmed. The had further treatment after these pictures to further blend them in.
Dinky 934 Leyland Octopus Wagon Detailed Restoration by Red Firecracker, on Flickr
Dinky 934 Leyland Octopus Wagon Detailed Restoration by Red Firecracker, on Flickr
This last picture shows the load bed on the joined chassis. It sits true with no rocking, which shows the benefits of working on a glass surface, ensuring that that things are level.
Dinky 934 Leyland Octopus Wagon Detailed Restoration by Red Firecracker, on Flickr
I now need to fill and make good the holes and joint, which will be followed by a first coat of primer to show where further work is required. The initial fill will be with Milliput and then a layer of putty will go over the top to smooth out any remaining dips. The strength of the repair is very pleasing, the pins and splints behaving exactly as required.
I've now completed the Milliput filling and also the layer for knifing putty over the top to give a nice smooth surface. The first two pictures show the model ready for an initial coat of primer. You can see where the old rivet holes have been filled with Milliput as well as the chassis join;

Dinky 934 Leyland Octopus Wagon Detailed Restoration by Red Firecracker, on Flickr

Dinky 934 Leyland Octopus Wagon Detailed Restoration by Red Firecracker, on Flickr
These final two picture for now show the model after a first, initial coat of primer. What it is showing me is that there is still a very slight discrepancy between the two sides but that it is very slight. A good block sand again and another coat of primer should see that right.

Dinky 934 Leyland Octopus Wagon Detailed Restoration by Red Firecracker, on Flickr

Dinky 934 Leyland Octopus Wagon Detailed Restoration by Red Firecracker, on Flickr
The bottom of the chassis has also had the Milliput sanded down and has had the knifing putty applied as well but not sanded down yet.
Dinky 934 Leyland Octopus Wagon Detailed Restoration by Red Firecracker, on Flickr
Dinky 934 Leyland Octopus Wagon Detailed Restoration by Red Firecracker, on Flickr
These final two picture for now show the model after a first, initial coat of primer. What it is showing me is that there is still a very slight discrepancy between the two sides but that it is very slight. A good block sand again and another coat of primer should see that right.
Dinky 934 Leyland Octopus Wagon Detailed Restoration by Red Firecracker, on Flickr
Dinky 934 Leyland Octopus Wagon Detailed Restoration by Red Firecracker, on Flickr
The bottom of the chassis has also had the Milliput sanded down and has had the knifing putty applied as well but not sanded down yet.
A little update on the underside lettering. After sanding and priming there is not enough left, for me, to be able to leave it or recreate it sufficiently without risking the integrity of the joint. This is a shame, but of you refer back to the original pictures, there was an awful lot of damage to that area, so salvaging anything was going to be very tricky.
Here is a picture;

Dinky 934 Leyland Octopus Wagon Detailed Restoration by Red Firecracker, on Flickr
What I have now done is to apply further filler to this area so that I can sand it completely flat. I have an idea for adding a suggestion of the original lettering, I will have to see how that turns out.
After sanding the filler I still was not entirely happy with the finished result, so I took the decision to remove all the filler (scalpel, screwdrivers, wire brush = mess) and then to apply a plasticard plate to the joint. The lettering was never going to be recoverable and the new plate is cut to the same shape as the aperture, so not only is it a much better visual effect but also there is an additional strength element as well.
The final result was this;

Dinky 934 Leyland Octopus Wagon Detailed Restoration by Red Firecracker, on Flickr
which is just below the lowest rib height. It was fixed with a two part epoxy adhesive.
Now I was able to start preparing to apply the colour coats of paint. As the chassis' main colour is yellow, I always choose to apply a white primer coat first, as I find that the yellow (and other light, low pigment colours) cover much better over white rather than grey, especially where there is a tendency for the paint to pull away from sharp edges. Here is the chassis and load bed in their white primer;

Dinky 934 Leyland Octopus Wagon Detailed Restoration by Red Firecracker, on Flickr
I could also paint the wheels and tin cab base as well;

Dinky 934 Leyland Octopus Wagon Detailed Restoration by Red Firecracker, on Flickr
Once that was sufficiently dry, I could apply the colour coats. The Dinky 934 Octopus has red wheels, yellow chassis with green detailing and green load bed, so using the same techniques I detail in this Reference Guide;
Guide 025 - An Exercise in Airbrushing
I first applied the yellow, then the green and then the red. Red is a very dominant colour, so applying it last ensures that there is less chance of cross contamination. The green for the chassis will be painted after everything else and also after the chassis has had a light coat of clear, so that the yellow is further protected from the masking tape.
Here are pictures of the parts in their colour coats;

Dinky 934 Leyland Octopus Wagon Detailed Restoration by Red Firecracker, on Flickr

Dinky 934 Leyland Octopus Wagon Detailed Restoration by Red Firecracker, on Flickr

Dinky 934 Leyland Octopus Wagon Detailed Restoration by Red Firecracker, on Flickr
What you can also see in the pictures above is the method I use to hold some of the parts. The helping hands stands are pretty standard, but with the Supertoys models I also combine it with a cotton bud, cut in half and pocked through the rear screw/bolt hole. The cotton wool section helps to ensure a nice secure fit and allows me to spray right around the spare wheel holder without issue.
In the lower picture you can see the wheels mounted on cocktail sticks. Due to the size of the axle hole, I wrap masking tape around the stick to create a tapered increase in thickness. I also find it wise to manually rotate the wheels after each coat of paint to avoid them sticking and ripping paint off when they are removed. The tin cab base is also mounted on one of these sticks for painting.
Next stage will be masking for the green sections on the cab (I have already applied a cleat coat in the pictures above).
Here is a picture;
Dinky 934 Leyland Octopus Wagon Detailed Restoration by Red Firecracker, on Flickr
What I have now done is to apply further filler to this area so that I can sand it completely flat. I have an idea for adding a suggestion of the original lettering, I will have to see how that turns out.
After sanding the filler I still was not entirely happy with the finished result, so I took the decision to remove all the filler (scalpel, screwdrivers, wire brush = mess) and then to apply a plasticard plate to the joint. The lettering was never going to be recoverable and the new plate is cut to the same shape as the aperture, so not only is it a much better visual effect but also there is an additional strength element as well.
The final result was this;
Dinky 934 Leyland Octopus Wagon Detailed Restoration by Red Firecracker, on Flickr
which is just below the lowest rib height. It was fixed with a two part epoxy adhesive.
Now I was able to start preparing to apply the colour coats of paint. As the chassis' main colour is yellow, I always choose to apply a white primer coat first, as I find that the yellow (and other light, low pigment colours) cover much better over white rather than grey, especially where there is a tendency for the paint to pull away from sharp edges. Here is the chassis and load bed in their white primer;
Dinky 934 Leyland Octopus Wagon Detailed Restoration by Red Firecracker, on Flickr
I could also paint the wheels and tin cab base as well;
Dinky 934 Leyland Octopus Wagon Detailed Restoration by Red Firecracker, on Flickr
Once that was sufficiently dry, I could apply the colour coats. The Dinky 934 Octopus has red wheels, yellow chassis with green detailing and green load bed, so using the same techniques I detail in this Reference Guide;
Guide 025 - An Exercise in Airbrushing
I first applied the yellow, then the green and then the red. Red is a very dominant colour, so applying it last ensures that there is less chance of cross contamination. The green for the chassis will be painted after everything else and also after the chassis has had a light coat of clear, so that the yellow is further protected from the masking tape.
Here are pictures of the parts in their colour coats;
Dinky 934 Leyland Octopus Wagon Detailed Restoration by Red Firecracker, on Flickr
Dinky 934 Leyland Octopus Wagon Detailed Restoration by Red Firecracker, on Flickr
Dinky 934 Leyland Octopus Wagon Detailed Restoration by Red Firecracker, on Flickr
What you can also see in the pictures above is the method I use to hold some of the parts. The helping hands stands are pretty standard, but with the Supertoys models I also combine it with a cotton bud, cut in half and pocked through the rear screw/bolt hole. The cotton wool section helps to ensure a nice secure fit and allows me to spray right around the spare wheel holder without issue.
In the lower picture you can see the wheels mounted on cocktail sticks. Due to the size of the axle hole, I wrap masking tape around the stick to create a tapered increase in thickness. I also find it wise to manually rotate the wheels after each coat of paint to avoid them sticking and ripping paint off when they are removed. The tin cab base is also mounted on one of these sticks for painting.
Next stage will be masking for the green sections on the cab (I have already applied a cleat coat in the pictures above).
onyx39 said:
impressive stuff...
How does this affect the value (although I am sure you are not going to sell them)
A tricky question and one to which I don;t think there is a definitive answer. Obviously, this one had very little value as it was so damaged, so the work has increased the value due to it now being in far better condition. Taking another model into consideration that is in better condition, I always advise that it is completely down to the owner of the model as to whether to restore or not. There are very very few models that are so rare that this will reduce their value. Very few. I have in the past advised clients not to have a model restored, however, and have sourced a replacement model for them to keep the original. In those cases it was due to the model being a rarity that may increase in value or a particular colour/decal set. A lot of the time, what people want to do is return the models they had as a child to the condition they received them as a child, with no intent ever to sell as the memories far outweigh the monetary value, so it is very much up to them.How does this affect the value (although I am sure you are not going to sell them)
The newspaper figures that you see occasionally for these models normally fall into two camps. Utterly mint models in mint boxes or valuations beyond reality.
I think it always worth remembering that these are toys, so their existence is to create joy or happiness for the owner. If the owner would gain more happiness from having the lump of metal and rubber restored to as new condition, then I have no problem with that.
Some people have a very different and very angrily presented view of the process however

On the subject of selling, I've kept very few of my own Dinky / Corgi models that I have worked on. I enjoy the process more than I enjoy dusting them!
And now the amazing changing colour Octopus........ (I neglected to check which version the client wanted and got it wrong. Hey ho).
The load bed is now in the correct yellow;

Dinky 934 Leyland Octopus Wagon Detailed Restoration by Red Firecracker, on Flickr
as is the front section of the cab;

Dinky 934 Leyland Octopus Wagon Detailed Restoration by Red Firecracker, on Flickr
After the yellow (RAL 1018) was dry, I could then mask up the cab ready for the coat of blue. Tamiya tape is my staple masking tape, it really is worth paying that little extra for something that you know is going to work. The masking for this livery is quite simple, the only slightly tricky bit is the lower joint from the side to the front.

Dinky 934 Leyland Octopus Wagon Detailed Restoration by Red Firecracker, on Flickr
Now I could spray the blue. It is always wise when overspraying a masked colour to lightly mist the edges of the tape first to seal the edges. This reduces the risk of excessive paint lifting the edges of the tape;

Dinky 934 Leyland Octopus Wagon Detailed Restoration by Red Firecracker, on Flickr
After the blue was dry I could then remove the tape and see what job the masking tape did. In this case, pretty good.

Dinky 934 Leyland Octopus Wagon Detailed Restoration by Red Firecracker, on Flickr

Dinky 934 Leyland Octopus Wagon Detailed Restoration by Red Firecracker, on Flickr
Next job is to clear coat and also to apply the fake lettering to see if it gives an adequate effect.
The load bed is now in the correct yellow;
Dinky 934 Leyland Octopus Wagon Detailed Restoration by Red Firecracker, on Flickr
as is the front section of the cab;
Dinky 934 Leyland Octopus Wagon Detailed Restoration by Red Firecracker, on Flickr
After the yellow (RAL 1018) was dry, I could then mask up the cab ready for the coat of blue. Tamiya tape is my staple masking tape, it really is worth paying that little extra for something that you know is going to work. The masking for this livery is quite simple, the only slightly tricky bit is the lower joint from the side to the front.
Dinky 934 Leyland Octopus Wagon Detailed Restoration by Red Firecracker, on Flickr
Now I could spray the blue. It is always wise when overspraying a masked colour to lightly mist the edges of the tape first to seal the edges. This reduces the risk of excessive paint lifting the edges of the tape;
Dinky 934 Leyland Octopus Wagon Detailed Restoration by Red Firecracker, on Flickr
After the blue was dry I could then remove the tape and see what job the masking tape did. In this case, pretty good.
Dinky 934 Leyland Octopus Wagon Detailed Restoration by Red Firecracker, on Flickr
Dinky 934 Leyland Octopus Wagon Detailed Restoration by Red Firecracker, on Flickr
Next job is to clear coat and also to apply the fake lettering to see if it gives an adequate effect.
Gassing Station | Scale Models | Top of Page | What's New | My Stuff