Starting to build models again
Discussion


Well when I was young I built lots of kits, happy days when the eyes were better and my fingers were smaller and nimble. Now I have a 7 year old and my wife bought me a Spitfire last year to build after I had literally thrown together a couple of 1:72 planes for my boy to play with. Doing this I realised how I had lost the knack, eyesight and dexterity. So having been presented with a 1:24 Spit i decided I require more practice first.
Today I put together a Revell pocket Star Destroyer for my lad to see how much practice i need. Lots. And more patience. But as I promised him I would put it on the Internet here it is.

The next project is one from my boyhood days, the Saturn 5. This will help my lad understand the stages and gain a sense of scale for the thing etc, plus I have always wanted an excuse to buy it. My wife is out buying the paint as I type. Also pictured is the spit.

I really am back at beginner hopeless level but this year I plan to (with my lads interest) to spark my interest and his.
Today I put together a Revell pocket Star Destroyer for my lad to see how much practice i need. Lots. And more patience. But as I promised him I would put it on the Internet here it is.
The next project is one from my boyhood days, the Saturn 5. This will help my lad understand the stages and gain a sense of scale for the thing etc, plus I have always wanted an excuse to buy it. My wife is out buying the paint as I type. Also pictured is the spit.
I really am back at beginner hopeless level but this year I plan to (with my lads interest) to spark my interest and his.
Hi Eric, followed your posts a lot on this forum. I guess i built my Saturn 5 in the early 80's. Bought the one pictured a few months ago. What did Airfix correct?
Can't believe how my eyes have got worse. Just painted a really simple Aston Kit for my lad, good grief. It used to be so much easier.
Can't believe how my eyes have got worse. Just painted a really simple Aston Kit for my lad, good grief. It used to be so much easier.


kellys hero said:
I guess i built my Saturn 5 in the early 80's. Bought the one pictured a few months ago. What did Airfix correct?
The original Saturn V (and the IB as well) had a Service Module that was two narrow in cross section. That made the Command Module on top too small and it also meant that the Lunar Module fairing was tapered incorrectly.The new issues ( Saturn V and IB) have a revised Service Module, which means that all the other bits mentioned above are now proportioned properly. The Service Module also now features the correct panel and radiator detailing. The old Service Module had [panels that were closer to the original Block 1 design of the Command/Service Module.
The kit is still not perfect. There are detail errors still in thr lower stages and particularly around the five F1 engines on the 1st stage. But unless you are a complete Saturn geek, you won't know this
 .
.For spraying the white sections of the Saturn - Halfords Appliance White acrylic aerosol spray is the way to go.

Hi Eric. Never realized it was actually incorrect as a kid but remember thinking it somehow seemed out of proportion to photos of the service module I had seen (I had lots of books as I was very much into space craft and space as a boy) I have just opened it up to have a look and it is certainly fatter then the one I remember.
If all goes well I will start the build tonight.
If all goes well I will start the build tonight.
Ive just started building kits again to after about 20 years. My girlfriend bought me the 1:24 Airfix Spitfire for Christmas so it will be interesting to see how you get on with it. So far I have put the engine together and cleaned up some of the ejector pin marks from the cockpit side walls. I will post some pictures up if you like?
tom_allen said:
Ive just started building kits again to after about 20 years. My girlfriend bought me the 1:24 Airfix Spitfire for Christmas so it will be interesting to see how you get on with it. So far I have put the engine together and cleaned up some of the ejector pin marks from the cockpit side walls. I will post some pictures up if you like?
Tom if you start a new thread with your progress for us I'm sure that there will be lots of advice/interference from us as you get on with it.
Only kidding about interference but really serious about any advice you might need.
You probably won't need any but we will still be around to give you moral support.
tom_allen said:
Ive just started building kits again to after about 20 years. My girlfriend bought me the 1:24 Airfix Spitfire for Christmas so it will be interesting to see how you get on with it. So far I have put the engine together and cleaned up some of the ejector pin marks from the cockpit side walls. I will post some pictures up if you like?
Look forward to seeing some pics! Im going to start the Saturn 5 This weekend as I think i need to get my eye in again as it were if I hope to do the Spit the justice it deserves. The Saturn is a much simpler kit that should inspire me rather than disillusion me. At least thats the plan. kellys hero said:
tom_allen said:
Ive just started building kits again to after about 20 years. My girlfriend bought me the 1:24 Airfix Spitfire for Christmas so it will be interesting to see how you get on with it. So far I have put the engine together and cleaned up some of the ejector pin marks from the cockpit side walls. I will post some pictures up if you like?
Look forward to seeing some pics! Im going to start the Saturn 5 This weekend as I think i need to get my eye in again as it were if I hope to do the Spit the justice it deserves. The Saturn is a much simpler kit that should inspire me rather than disillusion me. At least thats the plan. I'd get some Tamiya masking tape for the black bits - and make sure you work it into the stiffening ridges well, perhaps with a cocktail stick. It's a b
 h to stop the black paint from bleeding under the tape in those areas. Very light coats of matt black with a waft of hairdryer between each one seemed to work quite well IIRC.
Good Luck. (seems to be the accepted way of signing off on this type of post).
Yep - masking the corrugations is a real bugger.
In reality, the F1 engine bells were actually covered with an insulation material. This can be replicated by using foil. That's one handy way of covering up the inaccuracies of the kit F1 engines. There was also a lot more plumbing and pipework in and around the engines which is missing from the kit.
It's up to you to decide whether these things matter or not.

There's a chap who posts on here under the name of MartG who has actually produced resin replacement bits for both the Airfix Saturn IB and Saturn V.
http://www.pistonheads.com/gassing/topic.asp?t=125...
However, at this stage in your modelling career, I would be disinclined to get too bogged down in trying to correct the errors. I'd just get on and build the model. Absolute OCD atention to correcting everything (which all of us modellers suffer from to some extent)can be a real enemy in completing models.
In reality, the F1 engine bells were actually covered with an insulation material. This can be replicated by using foil. That's one handy way of covering up the inaccuracies of the kit F1 engines. There was also a lot more plumbing and pipework in and around the engines which is missing from the kit.
It's up to you to decide whether these things matter or not.
There's a chap who posts on here under the name of MartG who has actually produced resin replacement bits for both the Airfix Saturn IB and Saturn V.
http://www.pistonheads.com/gassing/topic.asp?t=125...
However, at this stage in your modelling career, I would be disinclined to get too bogged down in trying to correct the errors. I'd just get on and build the model. Absolute OCD atention to correcting everything (which all of us modellers suffer from to some extent)can be a real enemy in completing models.
Eric Mc said:
However, at this stage in your modeling career, I would be disinclined to get too bogged down in trying to correct the errors. I'd just get on and build the model. Absolute OCD attention to correcting everything (which all of us modellers suffer from to some extent)can be a real enemy in completing models.
I agree, as much as I would like to be accurate my current skill level and my other goal of inspiring my 7 year old may not be conducive with a long drawn out build! I had many models that went unfinished in my past due to constant OCD meticulous fettling. I am aiming to get a decent balance of as best as i can do in a reasonable time scale so i won't be winning any PH prizes! I appreciate the pointers though from everyone as it's all useful knowledge for future builds. I was hoping to start tonight but the last of the festive outings to friends is planned instead.
dr_gn said:
When I built mine I found the engine bells were the worst part to get looking good. The halves don't match up very well, nor do the convolutions around the circumference.
I'd get some Tamiya masking tape for the black bits - and make sure you work it into the stiffening ridges well, perhaps with a cocktail stick. It's a bh to stop the black paint from bleeding under the tape in those areas. Very light coats of matt black with a waft of hairdryer between each one seemed to work quite well IIRC.
Good Luck. (seems to be the accepted way of signing off on this type of post).
Thanks! I think the cocktail sticks and the hairdrier idea is a winner, hadn't actually thought that far ahead, really out of the zone with this model making lark!I'd get some Tamiya masking tape for the black bits - and make sure you work it into the stiffening ridges well, perhaps with a cocktail stick. It's a b
h to stop the black paint from bleeding under the tape in those areas. Very light coats of matt black with a waft of hairdryer between each one seemed to work quite well IIRC.Good Luck. (seems to be the accepted way of signing off on this type of post).
Well started it today. The engine bells are to put it simply shocking, if I was after a top notch build I would be looking at lots of remedial work, as it is I'm now deciding what i am prepared to live with Vs time taken to actually build it.


The rest of the panel fit is ranging from poor to passable, although some of the exterior pipework from Stage 1 to the engine skirt doesn't line up. That suprised me to be honest.

As you can see on the left hand skirt the plastic is so thin the corner simply flaked away!
I had to do a lot of sanding on the stage 1 fuel tank so that I was able to join the two halves of stage 1 together, but realy need to spend more time than anticipated making the joins acceptable even for a quick build.
Anyhow I applied the first coat of paint to the inner sections so waiting for it all to dry to add a second coat to get rid of brush marks.

So far I am just enjoying the process, which is what it's about at the moment.
The rest of the panel fit is ranging from poor to passable, although some of the exterior pipework from Stage 1 to the engine skirt doesn't line up. That suprised me to be honest.
As you can see on the left hand skirt the plastic is so thin the corner simply flaked away!
I had to do a lot of sanding on the stage 1 fuel tank so that I was able to join the two halves of stage 1 together, but realy need to spend more time than anticipated making the joins acceptable even for a quick build.
Anyhow I applied the first coat of paint to the inner sections so waiting for it all to dry to add a second coat to get rid of brush marks.
So far I am just enjoying the process, which is what it's about at the moment.
I built mine quite a few years ago, before I really started trying to get things right. It is a pretty crude kit, made worse because of the age of the moulds.
Here was my effort on the engines, I just sanded them locally to get rid of the worst mismatches, but my modelling skills weren't enough to get rid of them completely at the time:


You could get some Milliput water soluble filler and try to correct the engines, but you'd have to be prepared to spend many hours getting them right. If I were you I'd try to live with them and make the really noticable things right (ie the masking).
Here was my effort on the engines, I just sanded them locally to get rid of the worst mismatches, but my modelling skills weren't enough to get rid of them completely at the time:
You could get some Milliput water soluble filler and try to correct the engines, but you'd have to be prepared to spend many hours getting them right. If I were you I'd try to live with them and make the really noticable things right (ie the masking).
Have a look on the net to see if you can find any shots of real Saturn Vs with the insulation covering. That's one way of eliminating those unseemly gaps and ridges.
Here's a (not terribly good) image of what the engine bells REALLY looked like when the rocket was sitting on the pad -
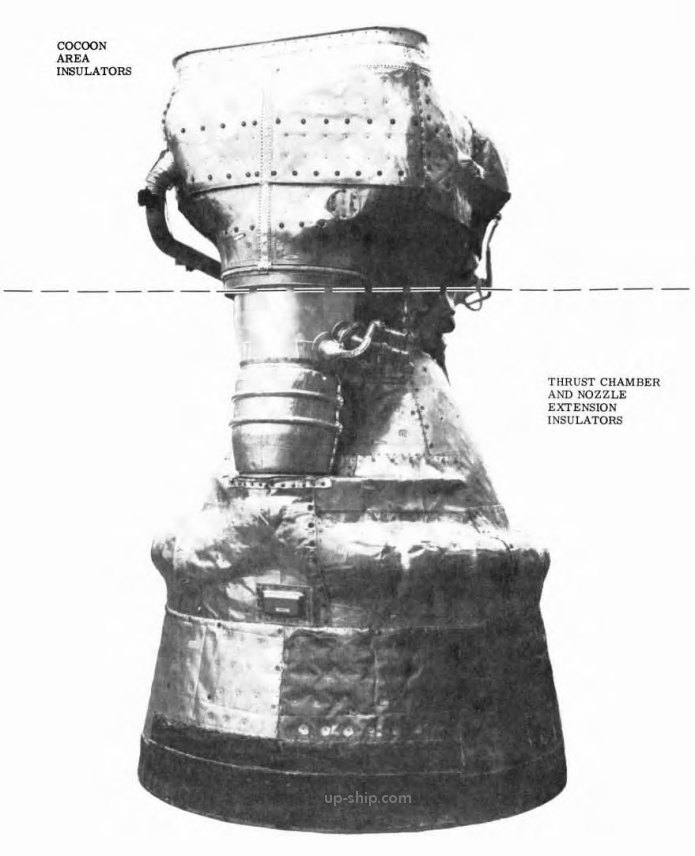
I think a few pieces of foil wrapped around the engine nozzles and held in place with some PVA glue would do the trick.
Here's a (not terribly good) image of what the engine bells REALLY looked like when the rocket was sitting on the pad -
I think a few pieces of foil wrapped around the engine nozzles and held in place with some PVA glue would do the trick.
Gassing Station | Scale Models | Top of Page | What's New | My Stuff