Customising 1:43 scale Ferrari
Discussion


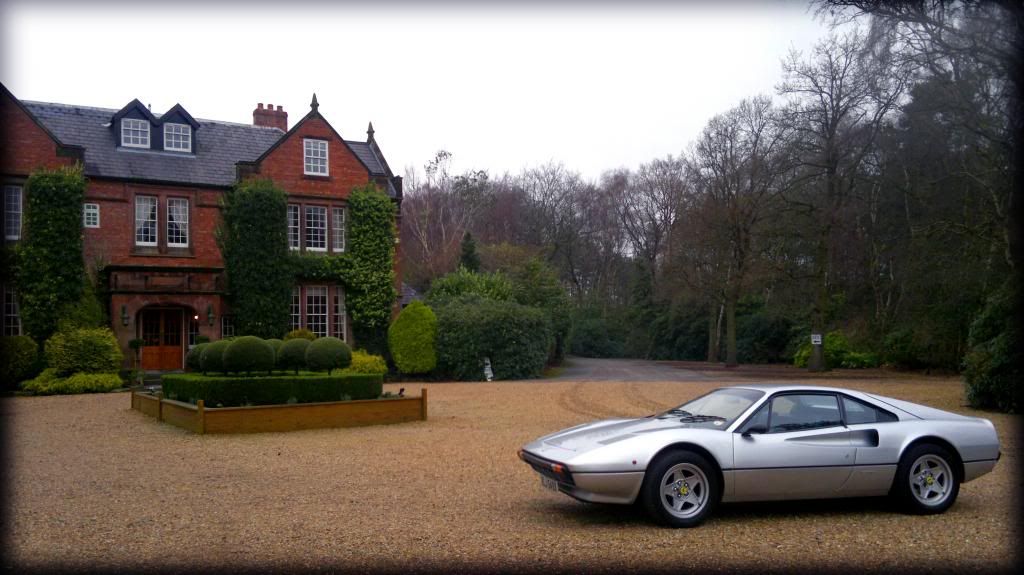
Hi guys. I'm just in the middle of customising a 1:43 scale model of a Ferrari 308 GTB from Vitesse so it looks like the car I've just bought. I've looked all over the place for a silver 308 but no one seems to do a decent model of it so decided to give it a go myself starting with one of these:

I have so far stripped the model to the bare shell and removed all of the transfers, but what is the best method of removing the paint without damaging the metal underneath?
Also, does anyone recommend a type/make of paint they'd use for a small model so as not to lose any detail once applied?
Finally, is there a company that custom makes small transfers so I can add the correct badges and numberplate?
Update on the decals, just found this stuff: http://www.craftycomputerpaper.co.uk/.-Inkjet-Wate...
Will give it a go and let you know how good it is. Might be worth a look if any of you are looking into personalising your models if you dont have it already.
Will give it a go and let you know how good it is. Might be worth a look if any of you are looking into personalising your models if you dont have it already.
To get the paint off just brush nitromors all over the body. Make sure you get it right into all the joins/body creases etc.
It'll bubble up and peel off quickly, make sure you give it a good wash in soapy water afterwards.
For painting use halfords rattle cans, 2 or 3 coats of primer with wet sanding 1500 and 2000 grit paper afterwards. When you spray your topcoat you'll get a great Finish.
If you make a mess of it, here's one
http://www.modelworld10.it/index.php?main_page=pro...
Edited by Dinoboy on Friday 21st February 16:26
Dinoboy said:
To get the paint off just brush nitromors all over the body. Make sure you get it right into all the joins/body creases etc.
It'll bubble up and peel off quickly, make sure you give it a good wash in soapy water afterwards.
For painting use halfords rattle cans, 2 or 3 coats of primer with wet sanding 1500 and 2000 grit paper afterwards. When you spray your topcoat you'll get a great Finish.
If you make a mess of it, here's one
http://www.modelworld10.it/index.php?main_page=pro...
Cheers for that, will pop and get some of that stuff. Thougt I was only going to be able to get the right stuff for stripping from a model shop.It'll bubble up and peel off quickly, make sure you give it a good wash in soapy water afterwards.
For painting use halfords rattle cans, 2 or 3 coats of primer with wet sanding 1500 and 2000 grit paper afterwards. When you spray your topcoat you'll get a great Finish.
If you make a mess of it, here's one
http://www.modelworld10.it/index.php?main_page=pro...
Edited by Dinoboy on Friday 21st February 16:26
As for the model in tyhe link, if I'm being picky thats a later QV 308 with the added bonnet vent and a deep dish front spoiler and the wrong wheels. Its also a US spec car where as mine is Euro spec. Not overly blown away by the quality of it either. Cheers for finding one. I'd been searching for weeks!
This is what I'm trying to replicate:
[URL=http://s238.photobucket.com/user/Jonty99/media/2014-01-31-389_zpsc88d5bb5.jpg.html]
Even easier than Nitormors (which has been 'European-ised'), is caustic soda. Now, be aware, it's nasty, but put the model into a plastic container and cover it with boiling water. Carefully tip some caustic soda in and it'll fizz and bubble and remove the paint. Once removed, clean water and a good brush over.
Caustic soda is available in all the big DIY shops in the kitchen cleaner area. You ideally want to be wearing gloves and goggles and do it outdoors. Do not add the water to the caustic soda, add the caustic soda to the water.
Diecast is normally an alloy called Mazac. It's a dirty metal but is quite stable.
Red Firecracker said:
You ideally want to be wearing gloves and goggles and do it outdoors. Do not add the water to the caustic soda, add the caustic soda to the water.
From my only experience of caustic soda, I'd say you MUST wear goggles and protective gloves. One splash in the eye, and that's pretty much it for your eyesight.It's not nice stuff.
Don't forget to put your no plate on it 
http://www.ebay.co.uk/itm/1-43-Numberplate-decals-...
Exactly what your looking for;
http://www.ebay.co.uk/itm/1-43-BBR-FERRARI-308-GTB...
BBR Is the best.
http://www.ebay.co.uk/itm/1-43-Numberplate-decals-...
Edited by Dinoboy on Friday 21st February 19:42
Exactly what your looking for;
http://www.ebay.co.uk/itm/1-43-BBR-FERRARI-308-GTB...
BBR Is the best.
Edited by Dinoboy on Friday 21st February 20:00
Dinoboy said:
Exactly what your looking for;
http://www.ebay.co.uk/itm/1-43-BBR-FERRARI-308-GTB...
BBR Is the best.
Not for £135 its not. Plus thats more of a grey and the wrong wheels again.http://www.ebay.co.uk/itm/1-43-BBR-FERRARI-308-GTB...
BBR Is the best.
Edited by Dinoboy on Friday 21st February 20:00
Those number plates look impressive. If my self made ones dont work then will order some.
Red Firecracker said:
Even easier than Nitormors (which has been 'European-ised'), is caustic soda. Now, be aware, it's nasty, but put the model into a plastic container and cover it with boiling water. Carefully tip some caustic soda in and it'll fizz and bubble and remove the paint. Once removed, clean water and a good brush over.
Caustic soda is available in all the big DIY shops in the kitchen cleaner area. You ideally want to be wearing gloves and goggles and do it outdoors. Do not add the water to the caustic soda, add the caustic soda to the water.
Diecast is normally an alloy called Mazac. It's a dirty metal but is quite stable.
I called and got some of that nitromus stuff on my way home from work so will play safe and try that.Caustic soda is available in all the big DIY shops in the kitchen cleaner area. You ideally want to be wearing gloves and goggles and do it outdoors. Do not add the water to the caustic soda, add the caustic soda to the water.
Diecast is normally an alloy called Mazac. It's a dirty metal but is quite stable.
Red Firecracker said:
Just to check, you've taken all the glazing out and any other plastic bits?
Same rules apply with paint stripper as caustic, at the very least gloves, ideally goggles as well. It burns a bit (or at least used to when it was proper stuff). Good luck and keep us informed of progress.
Yeah, I stripped the car back to its bare shell, all plastic bits removed.Same rules apply with paint stripper as caustic, at the very least gloves, ideally goggles as well. It burns a bit (or at least used to when it was proper stuff). Good luck and keep us informed of progress.
Safety wise its quite handy that I work in a chamical lab and so I'm going to tackle it inbetween jobs while I'm there today. I may even do it in the fume cupboard! But will be wearing necessary gloves and eye protection.
Ha, thats true.
And not patronising at all. There are plenty of people out there that wouldn't think about it at all so stressing it at every given point is always worth it.
First 2 coats of nitromors is now on so just leaving it to do its stuff. I've been taking pictures so will do a full write up at the end when completed. Hopeing to get it at least primered by the end of my day shift!
Red Firecracker said:
Good soapy wash after it's done (wire brush a well, if you have one), then get it warm to thoroughly dry off. Warm the primer rattle can as well and shake well, then light coats from about 12 inches. Don't go for heavy coats or it'll end up looking like a jelly mould!
Think I have a small wire brush somewhere. Just put some more nitromors on as it hadn't quite managed to get everywhere. Think I must have not put enough on to start with.I'll stick the car a oven we use for drying out glassware.
Is it worth drying and degreasing with a bit of alcohol? I have isopropanol?
To be honest, just a good soapy wash, dry then brush over with the wire brush should be fine. Isopropanol shouldn't react with the paint, but I personally don't bother going further than a wash and brush and I've not had any issues.
Turn some thought also to how you're going to hold the model when you paint it. I use those 'helping hands' things with the crocodile clips, but as you're in a lab, you should be able to knock something up! The mounting poles inside the model make ideal holds.
Turn some thought also to how you're going to hold the model when you paint it. I use those 'helping hands' things with the crocodile clips, but as you're in a lab, you should be able to knock something up! The mounting poles inside the model make ideal holds.
Ok, will give the alcohol a miss.
Yeah I'd just been thinking about how to hold it. Got plenty of various shape and sized samples to hold it on, but do I not need to paint the inside? Or does it not matter if I miss that bit? I guess for realism I could paint it in black afterwards to match the trim of the real car? I need to paint the seats too from red to blue.
Yeah I'd just been thinking about how to hold it. Got plenty of various shape and sized samples to hold it on, but do I not need to paint the inside? Or does it not matter if I miss that bit? I guess for realism I could paint it in black afterwards to match the trim of the real car? I need to paint the seats too from red to blue.
With the 'helping hands', there is enough space to get the paint up inside as well. I always start the spray inside and then do the outside. Remember also to spray from the bottom up and top down so that you get all the nooks and crannies of the window surrounds etc. If you just spray it side on all over, you'll miss bits.
This gives an idea of how I hold them;

Corgi 218 Aston Martin DB4 by Red Firecracker, on Flickr
This gives an idea of how I hold them;
Corgi 218 Aston Martin DB4 by Red Firecracker, on Flickr
Gassing Station | Scale Models | Top of Page | What's New | My Stuff