1/48 Tamiya F-16C Finished
Discussion


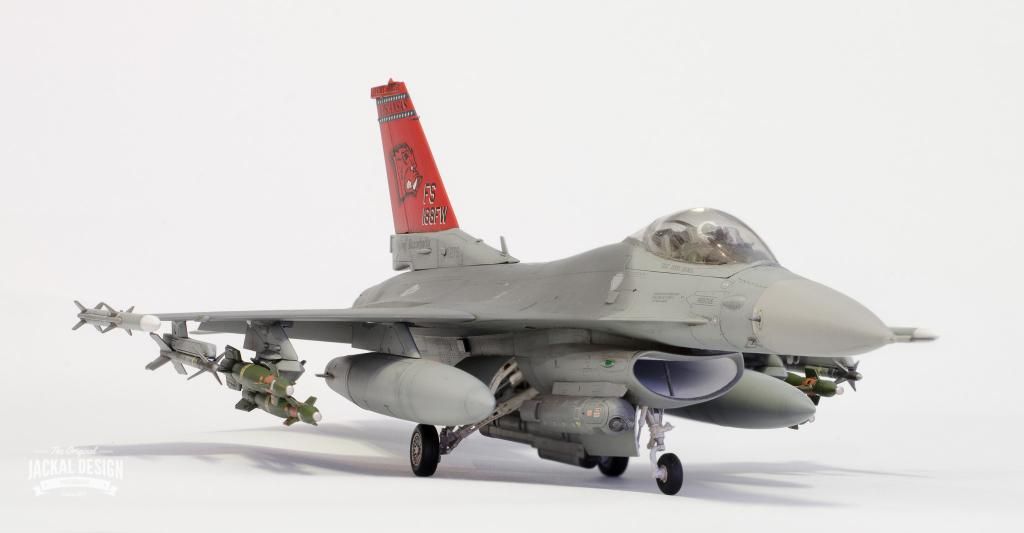
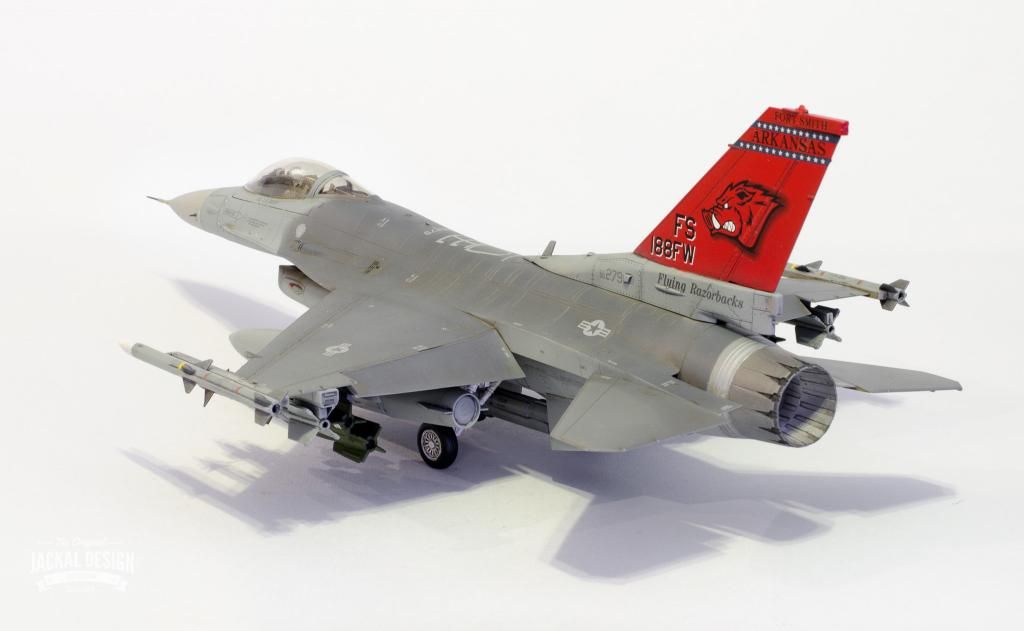
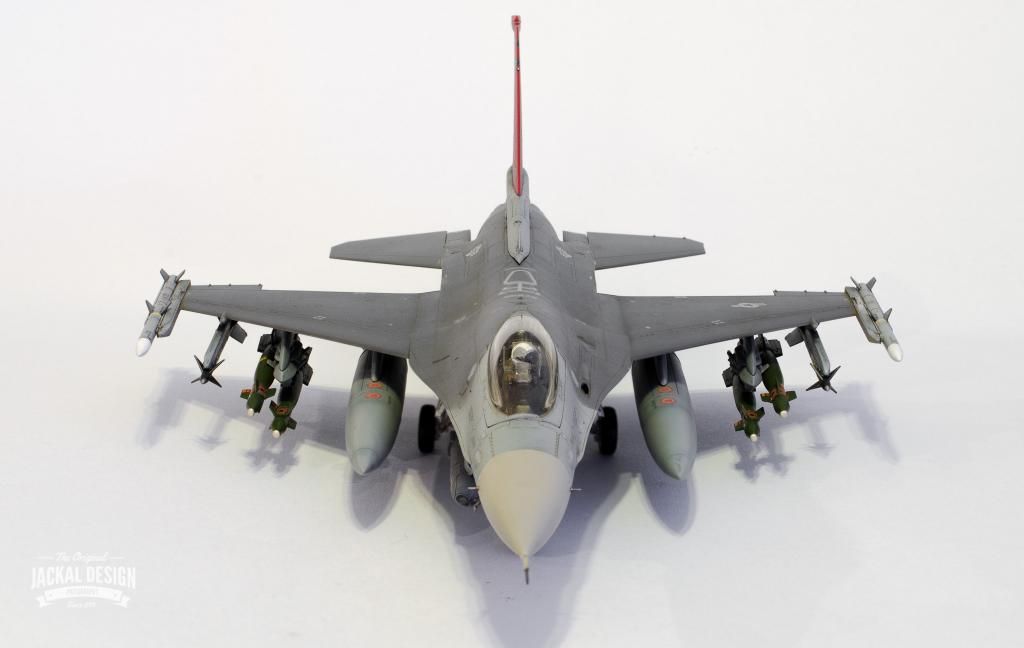
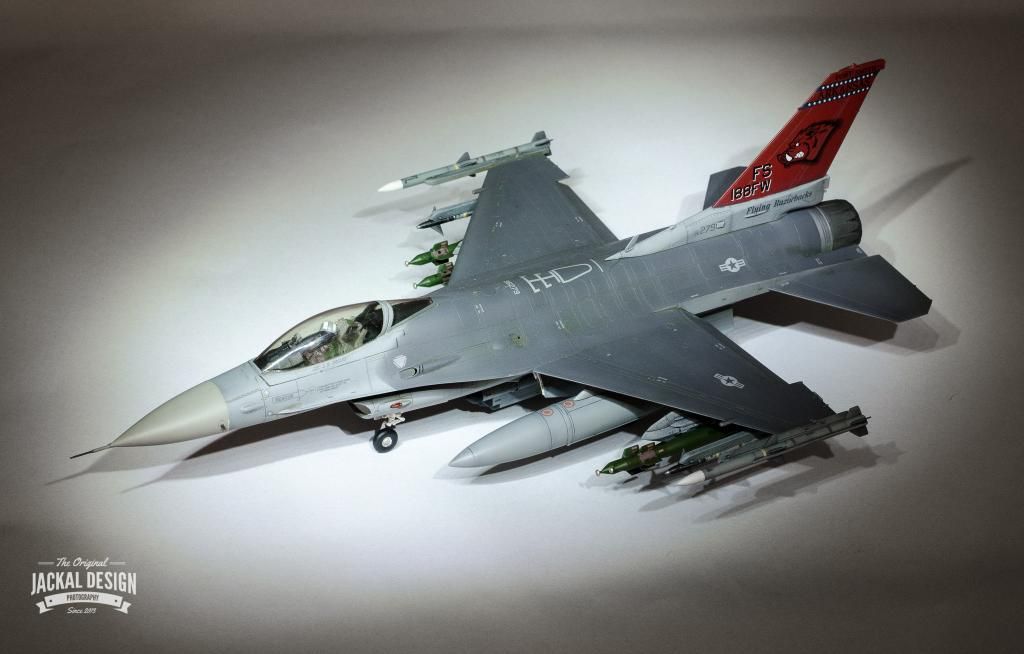
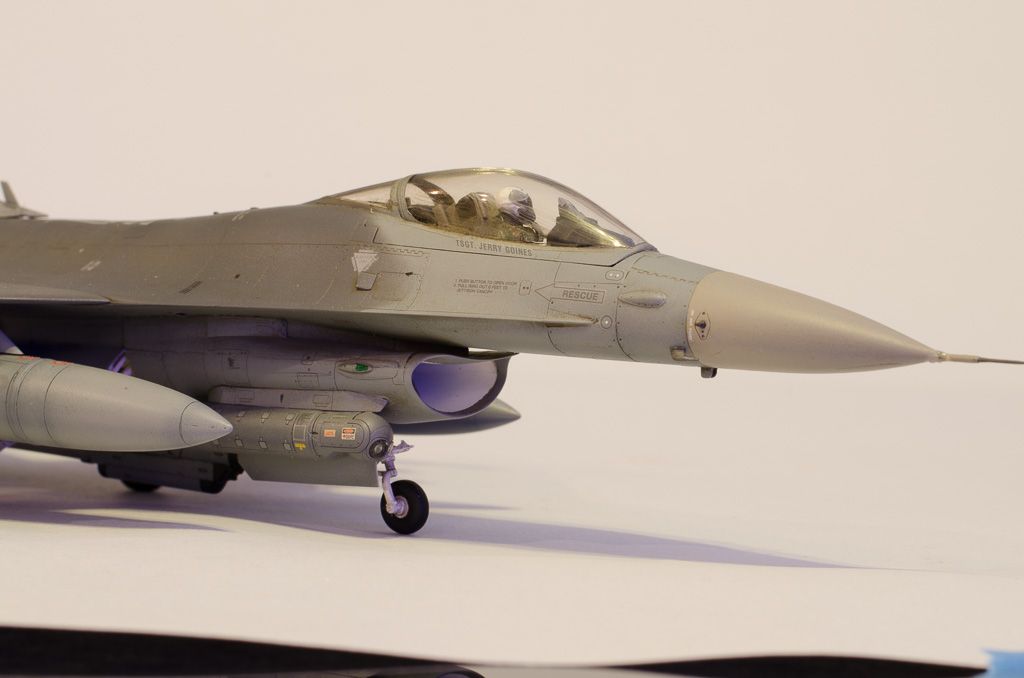
Well after getting back into the hobby about 5 years ago (45 now) since a teenager I also wanted to build one of the famous Tamiya F-16s. So about 4 years ago SWMBO (She Who Must Be Obeyed) kindly bought me this kit for my birthday.
However, wanting to do it justice I was a bit afraid to just get stuck in and muck it up. So it has been an ongoing project, only having the paint completed in the last month or so. I even forced myself to paint the pilot!
Hope the photos aren't too big.


However, wanting to do it justice I was a bit afraid to just get stuck in and muck it up. So it has been an ongoing project, only having the paint completed in the last month or so. I even forced myself to paint the pilot!
Hope the photos aren't too big.


Edited by The_Jackal on Friday 14th November 18:54
Thank you for all the great comments, especially from people who I consider to be the "experts". I hope this post isn't to long.
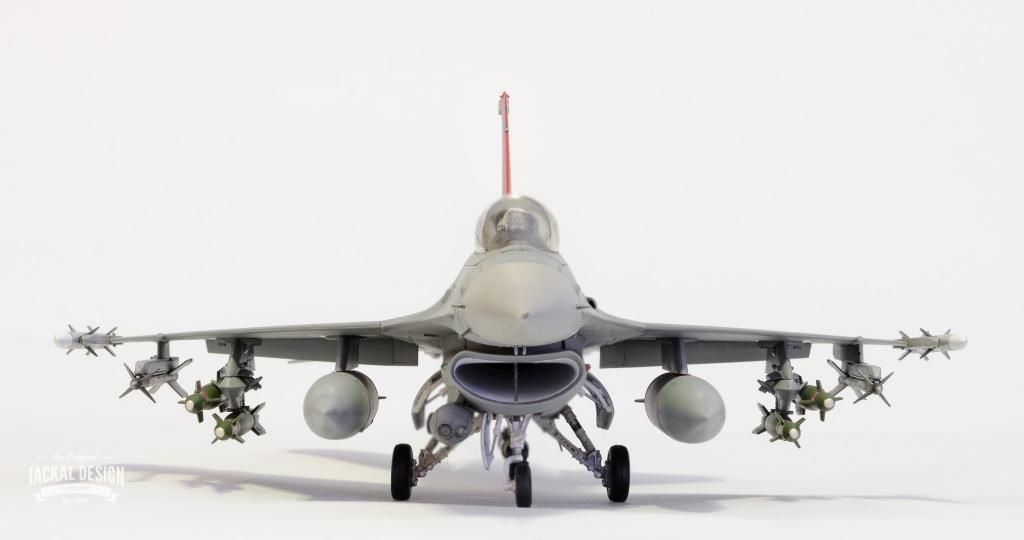
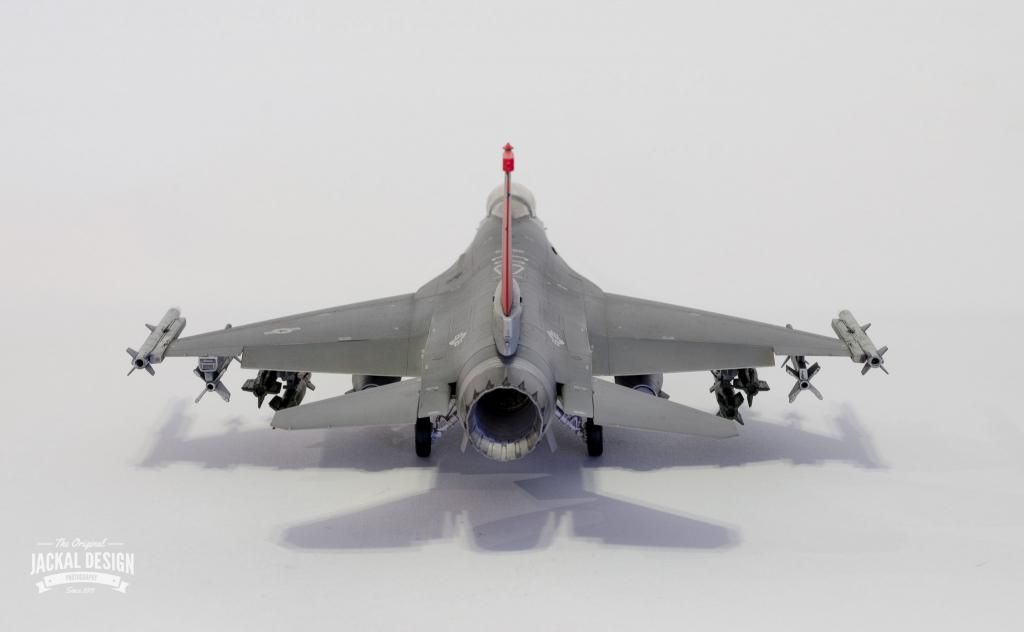
In terms of the weathering, it was actually very simply done. I did preshade but it is debatable how much this was visible after the light grey coat and then the dark grey. What I did do though was to thin and lighten each colour and try to roughly and randomly lighten the centres of the panels. I have always been taught that the more randomly you do this the more realistic. Try to avoid that grid like weathering.
After this, it was the obligatory coat of Future and left to dry for at least 24 hours. When dry I painted on a nice thick coat Flory Models Grime wash. Again, this must be totally dry to be able to rub it off in a more controlled way. Most of it is initially removed with a dry kitchen towel to see what you are left with. Then you can gently moisten the towel (by licking it if I am honest lol) and dab on the back of your hand to dry it. This will slowly remove a bit more wash in the areas you want to lighten. When you are happy the Xtracrylics Flat will also give it a realistic look, lightening it overall very slightly to the eye.
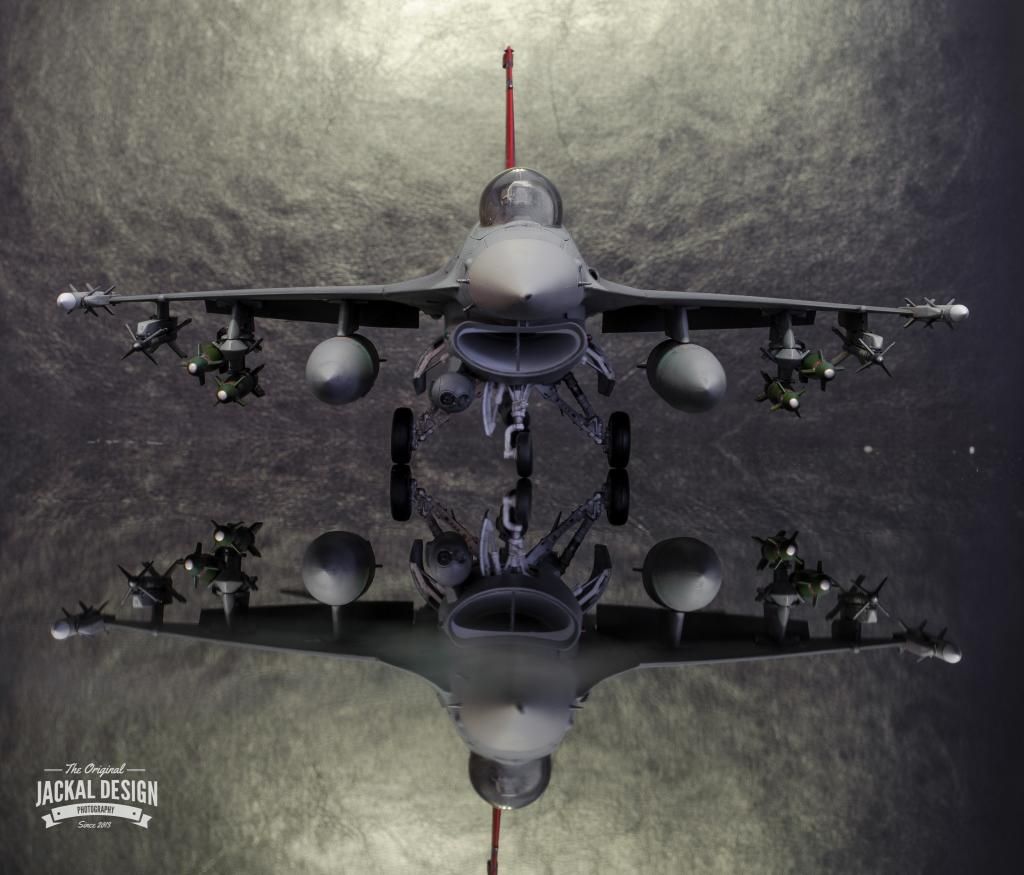
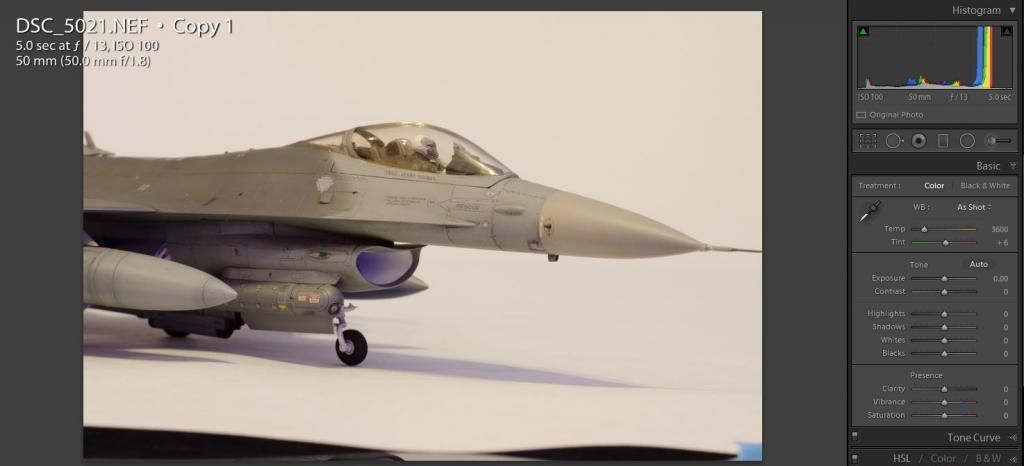
Now on to the photography, which is a personal hobby of mine.
All I use is a large piece of card from Hobbycraft as the base and background. Just tape the back half up against a wall or chair, whatever is near your table.
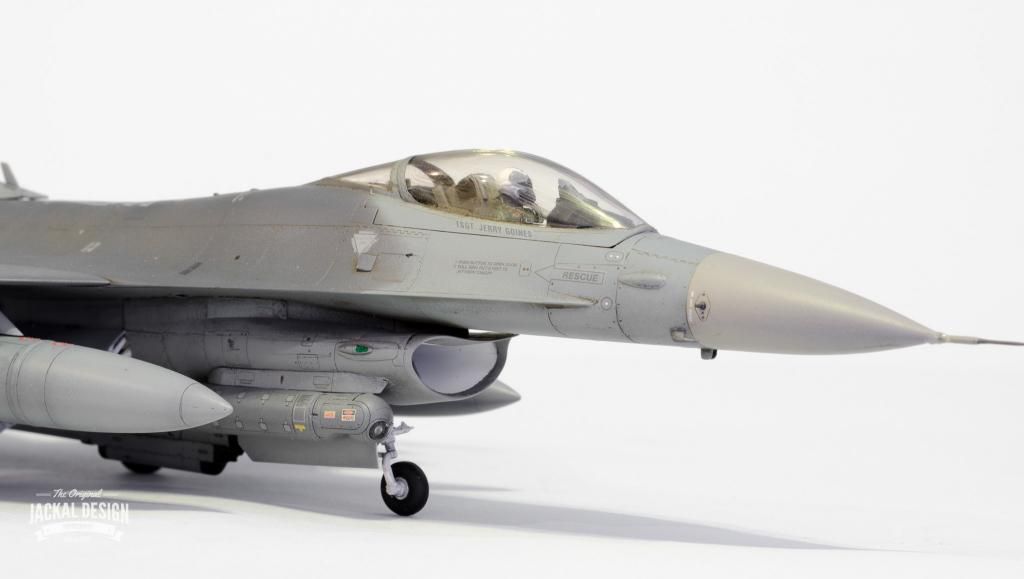
Then your main concern is light. Ideally use as much natural light as possible to light the model all around. I used an external flash and bounced it off the ceiling as I took the pictures at night.
In terms of settings I use a DSLR but this could still be applied to most compacts.
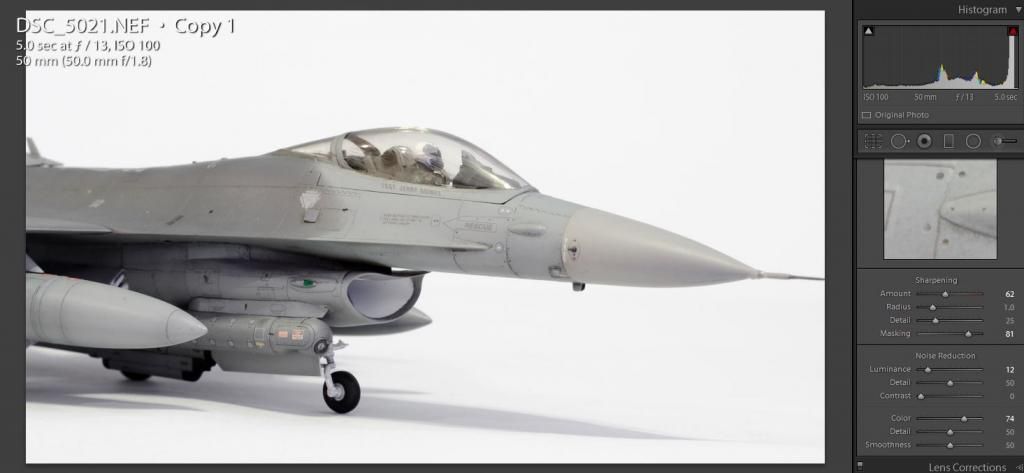
To get most of the model in focus you need to use what is called a high F Stop (around F11 or 13). Now because this actually makes the aperture smaller(the hole through which the photo is taken) less light gets through. You then have to compensate for this by increasing the time the shutter is open. To avoid camera shake you will need to use a tripod with this method.
My settings for the picture below were 5 secs @ F13 ISO 100
ISO is basically your quality setting (lower is better). High ISO introduces noise.
Just adjust your shutter speed until you get a nice well lit exposure like I did below.
This is not the end though because to get the best out of your photos you do need to develop them further in software. This is nothing new though because even in the good old days film was tweaked with chemicals and dodging and burning. I personally use Lightroom and will do another post showing what I did to this photo.
In terms of the weathering, it was actually very simply done. I did preshade but it is debatable how much this was visible after the light grey coat and then the dark grey. What I did do though was to thin and lighten each colour and try to roughly and randomly lighten the centres of the panels. I have always been taught that the more randomly you do this the more realistic. Try to avoid that grid like weathering.
After this, it was the obligatory coat of Future and left to dry for at least 24 hours. When dry I painted on a nice thick coat Flory Models Grime wash. Again, this must be totally dry to be able to rub it off in a more controlled way. Most of it is initially removed with a dry kitchen towel to see what you are left with. Then you can gently moisten the towel (by licking it if I am honest lol) and dab on the back of your hand to dry it. This will slowly remove a bit more wash in the areas you want to lighten. When you are happy the Xtracrylics Flat will also give it a realistic look, lightening it overall very slightly to the eye.
Now on to the photography, which is a personal hobby of mine.
All I use is a large piece of card from Hobbycraft as the base and background. Just tape the back half up against a wall or chair, whatever is near your table.
Then your main concern is light. Ideally use as much natural light as possible to light the model all around. I used an external flash and bounced it off the ceiling as I took the pictures at night.
In terms of settings I use a DSLR but this could still be applied to most compacts.
To get most of the model in focus you need to use what is called a high F Stop (around F11 or 13). Now because this actually makes the aperture smaller(the hole through which the photo is taken) less light gets through. You then have to compensate for this by increasing the time the shutter is open. To avoid camera shake you will need to use a tripod with this method.
My settings for the picture below were 5 secs @ F13 ISO 100
ISO is basically your quality setting (lower is better). High ISO introduces noise.
Just adjust your shutter speed until you get a nice well lit exposure like I did below.
This is not the end though because to get the best out of your photos you do need to develop them further in software. This is nothing new though because even in the good old days film was tweaked with chemicals and dodging and burning. I personally use Lightroom and will do another post showing what I did to this photo.

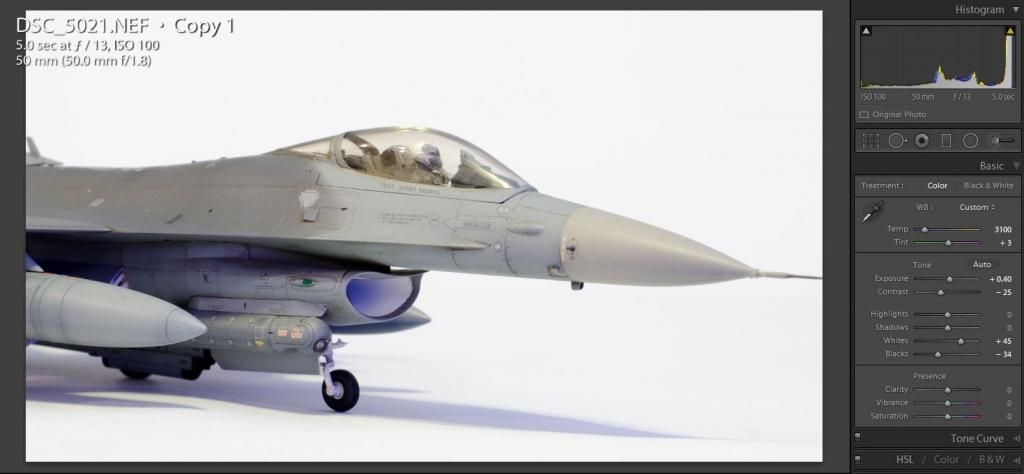
Ah now Lightroom. You can download a free trial from Adobe to try it out. If you regularly take, edit or post up photos it is well worth getting. It really does speed up the management and editing of your photos.
However, if you look at the sliders on the right, those same adjustments can be done in other graphics programs, just under different menus. This is why I like Lightroom as everything is easy to hand.
This is the original. Now would be the time to use the clone or healing tools to remove any specks or marks from the paper background and crop out messy edges.
Now set the white balance usually by selecting a middle grey area in the photo. This will be a best guess but can still be adjusted to taste with the slider. In my case is was too blue originally so I bumped it up one notch to warm it up. Then using the exposure and contrast made the background nice and white. Highlight and shadows then bring out more detail in the recesses and recover blown out highlights.
Now you may notice in the above photo there is a slight blue tinge in the air intake. This was due to a Xmas light decoration on the other side of the room. This can be removed by just lowering the saturation of the blues in the picture. The room lighting also gave a slight purple colour to the edge of the shadows and a yellowness to the highlights. Again easily corrected with the sliders.
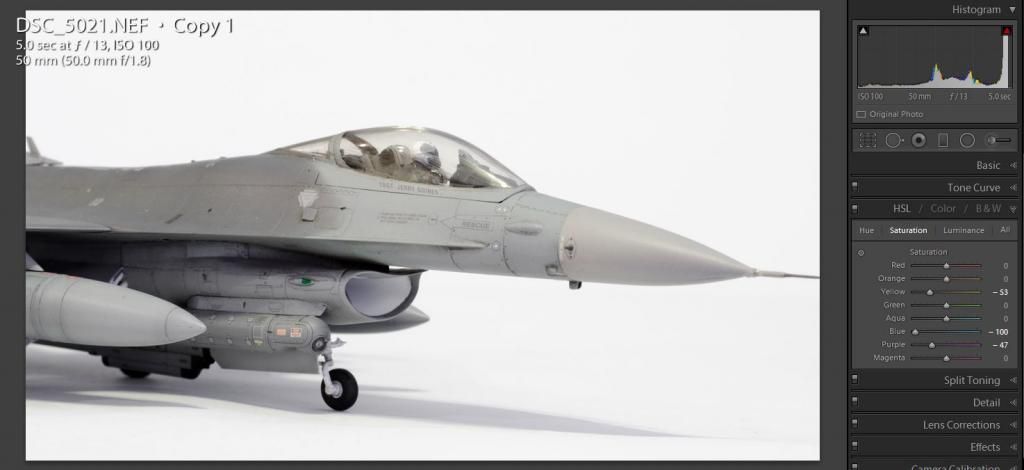
Finally a small amount of noise reduction and sharpening helps finish it off.
I hope this helps some of you who are interested in this kind of detail. As you can see it really does finish off a photo. Of course if you have a nice studio with several lights and softboxes some of the colour correction and exposure can be done in camera, but it is not practical for most.
Also, I must say if your camera shoots in RAW format use it. You will have soo much more leeway when it comes to moving the sliders as the camera will record way more detail in the file than you can see at face value.
I also used focus stacking in some of the other photos but I will leave that for another day if anyone is interested.
However, if you look at the sliders on the right, those same adjustments can be done in other graphics programs, just under different menus. This is why I like Lightroom as everything is easy to hand.
This is the original. Now would be the time to use the clone or healing tools to remove any specks or marks from the paper background and crop out messy edges.

Now set the white balance usually by selecting a middle grey area in the photo. This will be a best guess but can still be adjusted to taste with the slider. In my case is was too blue originally so I bumped it up one notch to warm it up. Then using the exposure and contrast made the background nice and white. Highlight and shadows then bring out more detail in the recesses and recover blown out highlights.

Now you may notice in the above photo there is a slight blue tinge in the air intake. This was due to a Xmas light decoration on the other side of the room. This can be removed by just lowering the saturation of the blues in the picture. The room lighting also gave a slight purple colour to the edge of the shadows and a yellowness to the highlights. Again easily corrected with the sliders.

Finally a small amount of noise reduction and sharpening helps finish it off.

I hope this helps some of you who are interested in this kind of detail. As you can see it really does finish off a photo. Of course if you have a nice studio with several lights and softboxes some of the colour correction and exposure can be done in camera, but it is not practical for most.
Also, I must say if your camera shoots in RAW format use it. You will have soo much more leeway when it comes to moving the sliders as the camera will record way more detail in the file than you can see at face value.
I also used focus stacking in some of the other photos but I will leave that for another day if anyone is interested.
Great job with the model, it looks superb but also thanks for taking the time to post about how you did the weathering and photography. I like to think that sharing info like that makes these forums a bit more worthwhile. Certainly better than vitriol and mud slinging that frequents general gassing!
MrBig said:
Great job with the model, it looks superb but also thanks for taking the time to post about how you did the weathering and photography. I like to think that sharing info like that makes these forums a bit more worthwhile. Certainly better than vitriol and mud slinging that frequents general gassing!
Generall Gassing? You go there?Braver than me, I have specific areas from which I rarely stray. To GG, very rarely indeed, it doesn't enhance my PH experience at all

Thanks you for the photography lesson M.le Jackal I think I have a better idea now, it links with general things I learnt on a course I did earlier in the year and advice from dr_gn of this parish amongst others
I will save the link to this and see if Photofun Studio has any similar tools before I commit to even more unfathomable software on board this ancient 'pooter. It came with my LUMIX DMC-LZ20 last Christmas.
I walked past the Flory stand many times at Telford, maybe I need to learn to keep an open mind there too

The F16 looks brilliant
perdu said:
MrBig said:
Great job with the model, it looks superb but also thanks for taking the time to post about how you did the weathering and photography. I like to think that sharing info like that makes these forums a bit more worthwhile. Certainly better than vitriol and mud slinging that frequents general gassing!
Generall Gassing? You go there?Braver than me, I have specific areas from which I rarely stray. To GG, very rarely indeed, it doesn't enhance my PH experience at all
Thanks you for the photography lesson M.le Jackal I think I have a better idea now, it links with general things I learnt on a course I did earlier in the year and advice from dr_gn of this parish amongst others
I will save the link to this and see if Photofun Studio has any similar tools before I commit to even more unfathomable software on board this ancient 'pooter. It came with my LUMIX DMC-LZ20 last Christmas.
I walked past the Flory stand many times at Telford, maybe I need to learn to keep an open mind there too
The F16 looks brilliant
Gassing Station | Scale Models | Top of Page | What's New | My Stuff