Changing a mixer tap...
Discussion


...how hard is it to do?
Every tutorial I look at seems to be an easy process, but they all use isolator valves with flexible connectors, enabling the old tap tails to simply unscrew; something the plumbing under the sink in my new house doesn't have:
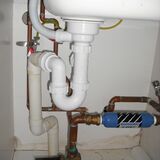
So is this something I can do as a novice DIY'er - or am I into a world of cutting pipes etc?
Every tutorial I look at seems to be an easy process, but they all use isolator valves with flexible connectors, enabling the old tap tails to simply unscrew; something the plumbing under the sink in my new house doesn't have:
So is this something I can do as a novice DIY'er - or am I into a world of cutting pipes etc?
if you don't have the unscrewable flex-connectors (i.e. soldered joints), you will be in for a little bit of cutting! My advice would be to pop to B&Q and pick up a copper pipe cutter for about a fiver, also pick up some of the flex connectors with isolator valves on them (the flat head scredriver ones are cheaper and just as good). Don't forget your wire wool too!
The isolator connectors will come with either a 'screw on' pressure type fitting with an olive in or the ones with a thread to connect onto an existing thread - you would want the first (I think they're about £10 a pair from B&Q). The pipe cutter will make a really nice clean cut that you just need to wire wool to take the burr off, just take your time cutting it and you can't really go wrong.
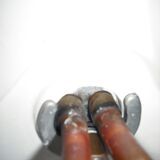
The mixer taps should have the long copper 'legs' on the underside with a straight bolt and a kind of crescent shaped washer. Put the washer onto the thread first before connecting the flex-connector to the bottom of the legs, it can sometimes be a bit of a b h to get it on in a limited space environment and having all sorts of piping connected can make it a bit more difficult.
Good luck (it's really easy if you just take your time!)
ETA - Just seen the pictures, the 'legs' and the crescent shaped washer are the things shown in the second one (you probably already knew that though!!)
The isolator connectors will come with either a 'screw on' pressure type fitting with an olive in or the ones with a thread to connect onto an existing thread - you would want the first (I think they're about £10 a pair from B&Q). The pipe cutter will make a really nice clean cut that you just need to wire wool to take the burr off, just take your time cutting it and you can't really go wrong.
The mixer taps should have the long copper 'legs' on the underside with a straight bolt and a kind of crescent shaped washer. Put the washer onto the thread first before connecting the flex-connector to the bottom of the legs, it can sometimes be a bit of a b
h to get it on in a limited space environment and having all sorts of piping connected can make it a bit more difficult.Good luck (it's really easy if you just take your time!)
ETA - Just seen the pictures, the 'legs' and the crescent shaped washer are the things shown in the second one (you probably already knew that though!!)
Thanks guys I will have a look at the new taps before I buy them to see what sort of tails & connectors they come with - a little pipe cutter jobby looks just the trick but looking in a bit more detail I think I can get my head around either a push on or compression type connector.
There is a pressure gauge on the up pipe - not sure why - and the tap there cuts off the water to the taps in the kitchen but I'm not sure about upstairs.
Will keep this thread alive seeming as I need to replace the sink and the taps yet have all the DIY ability as a blind chimpanzee - could be interesting!
The tap tails are soldered straight onto the rest of the pipework in this case. If you could sweat the tails out of the straight coupler/ 90 degree bend, I'm confident that the new tails for the new tap could be soldered back into place. Like for like.
This requires a blow torch, solder and flux though, so I can see it might not be an option.
You could cut above the solder joints and use two compression straight couplers/ isolation valves to join them. Cutting down the new tap tails to suit, but the copper on monoblock tap tails doesn't always cut as nicely as normal pipe, so beware.
All of this talk about copper tails, many monoblock taps come with flexible tails these days.
These can go straight onto isolation valves if you like. Just a spanner and grips job.
Flexible tails can also be bought as replacements for copper tails if they'd be an easier solution.
As for the pressure gauge, it's most probably a pressure reducing valve (PRV) on the incoming main. Reducing pressure to 3 bar. Too high a pressure on the main can damage taps, showers, washing machines etc... Also the small print may void the warranty if the pressure to them is too great.
Gassing Station | Homes, Gardens and DIY | Top of Page | What's New | My Stuff