My Custom Car Tables.
Discussion


Hello all,
So whilst I’m not quite in quarantine, I do find myself with a bit more time on my hands. I thought I would cave into my inner narcissist and share some of the not so recent work I have been doing.
A couple of years ago I asked the question whether there was a market for high quality car themed furniture. There was one or two responses but nothing outrageous, so I thought I would put it to the test. Turns out there is definitely not a market for it. Not at all…. But I liked doing it, so I carried on regardless.
https://www.pistonheads.com/gassing/topic.asp?h=0&...
All the links in my last post are dead so ill repost them up so you can see what the hell I’m banging on about.
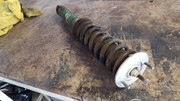
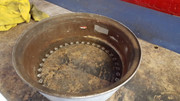
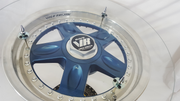
So the very first one I made came about because a friend had recently moved into a new house and I thought as a birthday present / house warming gift he would appreciate a few car parts welded together and thrust upon him to forever inconvenience his life.
So I turned these:
Into this:
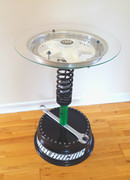
Being my first one, it was a fairly long and arduous process but the basics are:
• The glass is a cnc custom cut piece that I commissioned.
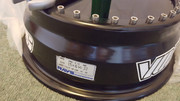
• The wheel is a Volk Racing GTC split rim in 4x114.3 (I even managed to save the build sticker :P)
• The bolts have been stripped, then zinc coated (you know for all the corrosion protection required :P).
• New tyre valves, seals and valve caps were installed.
• The barrel has been blasted and powder coated black, with the "VOLK RACING" decal around the circumference.
• The TEIN coilover has been stripped, and all the oil drained out, reassembled and painted, then the large "TEIN" decal applied. I then machined the wheel centre to bolt up to the TEIN top mount. The springs were then powdercoated black
• The spanner was then machined and bolted to the base using Inconel 12 point bolts.
• The lips have been polished and new "VOLK RACING" stickers applied.
• The centres were stripped and painted white. The centre caps were then polished and reapplied.
• The bolts on the base are stainless cap screws with stainless serrated nuts.
• The studs holding the glass up is all stainless threaded rod which I cut to length. Then finished with titanium nuts which were heat anodised.
My friend was made up with it, which was nice.
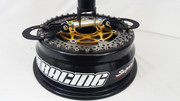
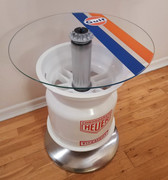
A few months later someone decided to park their car into the side of my brothers freshly painted Supra. Needless to say, he was slightly miffed. It was close to his birthday, so instead of me going out and buying him something that he actually wants, I thought I would take some parts of his damaged car to repurpose into a monument of what happened, forever reminding him of a terrible experience in his life.
So I took these:
And made them into this:
Again, this was fairly long winded to put together but the basics are:
• the glass was, yet again, custom cut to my drawings.
• The coilover is a BC Racing unit, with all the oil drained and internals removed.
• The wheel is a Volk Racing GRN (sort of like a CV-pro but not) in 15 x 6.5, 4x114.3, et25.
• The Strut brace is from the Supra, but didn’t fit anymore due to other modifications on the car.
• The brake disc is from a Kawasaki ZX10R (no reason, it just happened to be the right size and looked nice)
• The Bolts holding the strut brake in place are MIL spec, 12 point, cadmium plated with rolled threads.
• The rest of the bolts are A2-80 stainless cap head screws.
• The base is powder coated and the wheel lip was stripped and polished by moi.
• The spiked nuts holding the glass in place are Downstar Spikes on A2-80 stainless threaded bar.
He loved it, and I think it softened the blow somewhat so mission accomplished. As were brothers though, I don’t want to make him too happy so promptly issued a dead leg along with it (now that were old this might be getting dangerous? What’s the long term effects of dead legs in the elderly?)
Moving swiftly on….
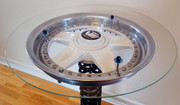
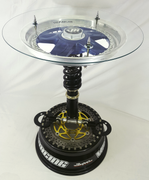
The next one I made is more traditionally when you think of wheel tables.
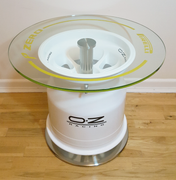
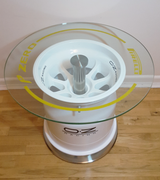
It’s based around a formula 1 OZ-Racing centrelock wheel. It’s a magnesium wheel that has been stripped and powder coated white. New decals have been applied (proper automotive wheel decals) in place of the originals which had seen better days. The base is brushed stainless and the rest is nickel plated steel with a 500mm glass top. It’s finally been topped off by a reverse printed tyre decal applied to the underside of the glass. It doesn’t come across in the pictures, but the wheel touches neither the floor, nor the glass, giving it a sort of floating effect.
Whilst this one was simpler, the cost of F1 wheels Is obviously much higher. In the end I managed to sell it for about what it cost me in parts, which is basically the best I can hope for.
So just before I sold this, a chap called Phil messaged me on Instagram about the Pirreli table above, however, having just sold it there wasn’t really anything I could. He explained that was opening an automotive themed café in the midlands and would love to display something. I said I would giver him a shout if I ever made anything again (I wasn’t being flippant, but other things took over and I genuinely wasn’t sure if I would have any time for a while). So of course, the very next day I got to work on another idea I was having…
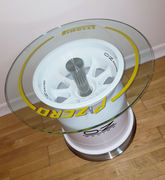
Growing up and being into cars (many, many years before youtube) you had to take what you could get when it came to films and tv. None of it was really what I wanted to watch, but there wasn’t really much option. One film that always stuck with me though was le mans. Having been raised on a diet of American hot rods and the inevitable street racing that came with it (as in, watching it on films, tv etc) motorsport never really grabbed me. I had been to a few races etc and soon got quite bored (I know its sacrilege to say this but meh) and the film le mans kind of reflects this. It really captures the fact that racing is mostly waiting around in a constant state of anxiety. I do genuinely like the film and was a fan of McQueen films as a rule (along with hot rods, my dad also raised me on 60s detective and war films) but what really stuck with me was the 917 (obviously) and his race suit. I am much younger than the film, but the logos and livery that are a constant theme, had become iconic In their own right, such was the visual impact. Anyways, I wanted to pay homage to this film, but specifically, the racing suit that Michael Delaney uses.


The wheel itself is a 13" OZ Racing magnesium alloy wheel that's been powder coated a fresh white. This rests on a pedestal welded halfway up the tube to give the illusion of the wheel floating in air without any obvious fixing.
The base was hand brushed steel with cast iron weight to ensure stability. The centre is stainless tube split to allow ease of disassembly and transport. It is specifically much smaller than the steel tube that is on display in order to go through the centre lock portion of the wheel, this gives the illusion that a much larger tube has some how penetrated the wheel, than is physically possible.
The glass was custom cut and tempered and finished with a F1 centre lock wheel nut. This is in turn held down by a 6al4v
titanium nut and washer which I have blue'd to a nice hue and on top of a custom carbon wheel nut cap.
All interior surfaces were coated in por15 to stop any moisture marking the steel.
The wheel nut itself has been left in its raw finish (but de-burred) to show it has been race used.
I also spent a long time on getting the decals correct and as close as I could to the source material. I had to search through a huge amount of photos to find high res shots of the screen worn race suit that was auctioned off. This then allowed me to get the ratio of the gulf logo to the stripe, and the Heuer to the Firestone logos correct. It also helped in getting the colours as close as I could. Most jackets made today use much darker colours for some reason, I guess because the original ones are so bright. The OZ decals are actual alloy wheel decals so are super tough and resilient and were carefully placed in the original positions.
So Phil was thrilled and wanted to display it at his not yet built café and car meeting spot, and in return, he would put it up for sale for me. I don’t do this for the money, I do it because I enjoy the process, but once it done, I just want to get rid of it. So I agreed and his business partner met up with me and I handed it over. Turns out that this café is the now famous Caffeine & Machine and the gulf table still sits proudly in the emporium. So whilst it hasn’t been sold (further cementing the fact that there is no market for this kind of thing) I’m glad my work gets to be displayed and used as intended.
So far, each table had taken me about 25-30 hours and about £400 ish in materials. This Is why I don’t make a lot of them (I’m averaging one a year at the moment) because I have other hobby’s and cant really afford to lose that kind of money that often. This next one though went a bit far, both in time and money invested. I had an idea I wanted to have one for myself (soon forgetting that after staring at these things for months on end, I get sick of looking at them once done) so it was a money no object kind of build. This, turns out was a mistake, for various reasons.
Whilst I was raised on American hot rods, when I got older, I realised my passion also lay with 90s Japanese cars (as Is reflected in my previous table builds). I wanted to create something that only drew from this era and style of car. I also wanted to include all the ideas I had had previously, but had to dismiss due to the cost or time it would take. As I was planning on keeping this one (haha) neither of these things mattered. I would drag the build out so the cost didn’t cripple me and take my time with the details so it was as good as I could make it.
So here it is, the culminated of £750 in materials and about 70 hours in labour.

And the cad renders:

This is the description from the eBay add I did shortly after it was finished. The idea was to donate all the money to a local animal rescue centre. It ended up selling for about £600 so I would have been better of just donating the material costs in the first place. Like I said, there really doesn’t seem to be a market for what I want to make. Also, please excuse the colourful language, I was in full blown salesman mode.
Okay, grab a brew as this is a long one…
To start with, let me say that this isn’t your average wheel table. I try and stay away from the generic piece of glass resting on a wheel. I believe in attention to the minutiae. This hopefully is reflected in the end product and the details of which I am trying to convey in this auction description (which is why it is so long :S)
This is the 3rd in the series of this style, and, as they were gifts to friends and family, I was somewhat limited by either the materials they provided or my own budget. At the beginning of this build I really wanted to include absolutely all the thoughts and ideas I have had from my previous 2 builds. With this table I have put absolutely all my time and effort into creating what I always wanted.
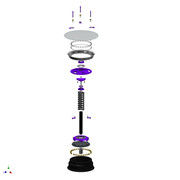
In order to do this I started in 3d CAD. I was able to fully 3d model all the individual parts I wanted to use without cutting any metal at all. I was then able to lay these parts out and understand how they might fit together in the most aesthetically pleasing way, which would still function as it’s supposed to (i.e. not falling over :P). There is about 10 hours of work in this cad model alone and you can see the 3d rendered images in the photos.
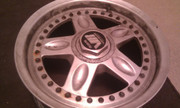
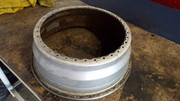
The parts I have used, I believe, are interesting, but maybe not quite as obvious or well known as others. Lets start with the base wheel. This is a 15” Volk Racing GRC split rim wheel in a 4x100 stud pattern. Now a lot of you maybe saying “that is clearly a CV-Pro” and you would be forgiven for making that mistake as they are almost the same, but for a small detail in the edge of the centre where it meets the rim.
A little bit of a history on this wheel (I know…groan, but I assure you its important for future details) is that it was the road version of the wheel used on the Toyota 90CV group c car pioneered in 1990, which most agree is the golden age of group c racing. The racing wheel is obviously a little different being a magnesium alloy and centre lock, but with a split rim and the famous dimpled face (for weight saving apparently) it did bear a striking resemblance to the road wheel. This coupled with a new technology that was “super fine rim” (read : metal spinning) made for a very 90’s wheel design that I believe has been overlooked in the JDM wheels history books.
This particular wheel centre was acid dipped to get rid of any corrosion and paint and then acid etch primed and then painted with a metallic purple that was as close to the anodising as I could get, whilst still looking pleasing by its own right. The various pin holes and small divots left by the years of corrosion and use have been left as a sign of the wheels life, hopefully having been driven up and down a touge run at 11/10ths. This I hope adds to the general theme rather than detracting from it. The entire process took some very long hours and lots of layers of paint (numbering in the teens) to get to this stage.
The centre nut and badge have been given similar treatment being stripped and painted / polished respectively. The ring surrounding this has been given a mirror polish as well in order to match the rim.
The rim has been taken back to the barest of metal and then painstaking hand polished to the finish that you see before you. I can provide you with before photos upon request, but I assure you, they had lived a very full life before I ended up with them. The original sticker, unfortunately had succumb to time and touge brake dust, so the remains had to be removed. In its place is the sticker usually reserved for the wheels face, relocated to hopefully a slightly more contrasting place on the rim, which might have ordinarily been lost in the purple paint that the centre now sports.
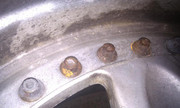
The split rim bolts were an ordeal unto themselves. Those who have daily driven a car with split rims know that dirt, grime, salt etc congregate around the bolts and leave them looking less than pretty, multiple this by 30 years (these have a 1991 build date) and you are left with bolts that look fit for the bin. In this instance, I wanted to keep the original bolts as each one (36 in total) is individually stamped with “rays engineering”. To truly make these look like new would require sanding to within an inch of there life to remove the corrosion marks, which would mean the stamping would be lost. I have instead chose to have them acid stripped and zinc coated, this has left a matt grey finish which may not have the visual impact of chromed or polished bolts, but I think is a nice juxtaposition against the polished lip and tells a story of a previous life whilst still maintaining a look that is pleasing to the eye.
Casting your eye downwards past the wheel face, there is a HKS hypermax LS+ coilover which I believe is from a Toyota Mark 2 (continuing the Toyota theme, if only temporarily). These are actually quite an interesting coilover. HKS are obviously synonymous with racing, and as such provide aftermarket parts for such. Despite how cool it is to have race parts on your street car, it does tend to create a rather un-relaxing experience. HKS therefore designed the LS+ plus to not only be slightly softer, but also quieter, which is not often advertised in a coilover system which is predominantly sold using the “race on Sunday, sell on Monday” moniker. As with most of the HKS products sold today they also came with a PNE coated base, which is a proprietary electro-deposition coating that they claim is five times more corrosion resistant than galvanisation. It certainly has held up over years, with minimal repair work aesthetically required to get this back to looking like new. The coilover itself has been stripped back to its components (of which can be provided if the buyer wants them) and all the internals drained of oil and thoroughly degreased. As much as I enjoy authenticity, fork oil on your living room carpet would not a happy wife/husband make. The bottom mount has been cut of and the base welded to the flywheel which I will touch on later. The coilover itself I acquired due to it being bent, presumably from a door to door, 100mph+ twinning manji gone wrong (we can but hope) which I have chosen to leave as is. You have to look hard to notice it’s there, but I think it’s a nice little easter egg for those who have lots of time on their hands to spend looking at furniture made from old car parts. Obviously, the glass on top has been adjusted to suit, so everything is perfectly level (more on that later……yes there’s more :S). The top mounts, spring seats and locknuts have been de-burred and re-anodised in the original purple finish. The spring itself has been bead blasted and powdercoated in black (the original finish) and the coilover has been affixed to the wheel using Din 6921 A2 stainless flanged head bolts.
So onto the clutch and flywheel portion of the evening (now there’s a sentence I never thought I would write). This is originally from a S2000 and engineered by Exedy. This is the Hyper Single clutch which has a chromoly flywheel and t5001 friciton material disc finished with a forged aluminium clutch cover, anodised in a rather striking purple. For this build I had to remove the friction disc purely for cleanliness reasons, again, I like authenticity but carbon dust on the rug is a pain to clean. The clutch cover has been re-anodised in the original finish and the laser etched “exedy” is still visible for those who look for it.
This has been mounted to the wheel base using 3 custom hand machined brackets, which have then been anodised in matching purple colour. I wanted these to be slightly visible, just peeking out behind the flywheel and wheel base. I was trying to convey how all parts of this build have been thought about and had attention applied to them. These are again fixed with Din 6921 A2 stainless flanged head bolts.
The wheel base itself has been bead blasted and powdercoated black. The stickers applied are custom sized for this project and you might notice is the old (and now un-used) Volk Racing logo, however this was correct for this period of wheel. For the HKS sticker I wanted the traditional logo and camo style graphics that were made famous by the HKS cars of the 90s. This has then been adorned with 12point head MIL Spec bolts, usually reserved for aircraft. These are specifically ms21250-04006 which retail at $4.50 each! These are quite interesting for various reasons. For example normal nuts and bolts are made from a generic bolt steel and then the threads are cut from the steel rod. These differ in that the threads are rolled into place, essentially forging them from the base material creating a more accurate and stronger thread. These are a 3a class thread so are a super fine tolerance and then on top of that are Cadmium plated. This isn’t available to normal industrial grade fasteners as the process is super harmful to the environment, but the corrosion resistance cannot be beaten. All of this basically adds up to a bolt that about 1.5 times stronger than a traditional 8.8 grade bolt. Another small detail I want to mention, the 3 brackets that hold the clutch use more 12 point MIL Spec bolts, but are Inconel instead of the steel versions. As much as I would like to use these everywhere, the shear cost of them makes it impossible. Like a lot of the superalloys, Inconel is a fairly exotic (read expensive) and interesting material used in very high temperature applications (formula 1 exhausts for example) so I like to use it where I can.
So, onto what I think is the defining feature of this piece. The glass. This Is custom cut to my dimensions and then toughened. It is in turn held up with Old school Grayson bonnet pins. The keen eyed amongst you will notice these are purple, which was never an option on these pins. They had to be stripped and then re-anodised along with the retaining flange. As you probably know, these were everywhere on modified cars in the UK in the 90s and early 2000s. If you’ve seen them/used them before you know they are of average build quality, having been stamped and pressed into shape, they are not something I usually would use. However, they have a nostalgia about them and are almost an icon unto themselves, so sue me :P.
The glass sits on Mcgill motorsport misalignment spacers for suspension rod ends, which then have a custom 3d printed spacer/washer for the glass to rest on. This was just another neat little touch that you wont ever see, but gives you a warm fuzzy feeling knowing it’s there. The adjustability of these spacers resting on M10 half nuts, enables you to level the glass to the environment in which the table lives. If you have a slightly sloping floor, the three nuts can be adjusted so your pint/bourbon/juice box doesn’t slide of the edge.
Okay, finally, onto the last piece of the puzzle. The etching on the glass. What at first might seem like a generically designed sticker applied to the top of the glass is actually a very specific layout that has been laser etched onto the surface, creating a very durable and permanent marking. This has again been designed using CAD for accuracy.
The design is taken from the latest of Michelin Pilot Sport Cup 2 R which come on some of the best track orientated cars that are produced today, the Porsche GT2 and GT3 to name just a couple. The sizing I have chosen was stolen from the Lamborghini Countach as I think it’s a most infamous tyre size (345/35/15) and it also matches the original diameter of the wheel (15”).
If you think the details have been nerdy so far, its about to get even worse. As most of you probably know, tyre size isn’t the only thing printed on a tyre. Usually you also get a manufactures part number, followed by a date stamp. In this instance, the markings hark back to the Group C car that I spoke about at the beginning. The cars only victory was seen at the Fuji 500 where it achieved a lap time of 1:16.270 on the 11th March 1990. The date stamp is marked as “1090” i.e. the tenth week of 1990. The manufacture part number is 01 16 270 to reflect the lap time….. Thank you and goodnight.
As a final detail I have prepared a small keyring with the same milspec bolt used on the wheel base as well as a matching anodised purple plaque, laser engraved with “3 of 4” (being the 3rd in the series of a possible 4). My previous two tables obviously having their own colour matched and numbered keyring.
I do apologise for the long description, I hope you made it all the way to the end and I also hope you can appreciate the level I have gone to try and make this the best I can. Over 70 hours of work and £750 in materials have gone into creating this (details can be given upon request).
So that’s basically where I have left off. I will probably make another, final table to complete the 4 of 4 but not entirely sure what I'm going to do with it yet. If I ever do it, ill update the thread with pictures thanks for reading
So whilst I’m not quite in quarantine, I do find myself with a bit more time on my hands. I thought I would cave into my inner narcissist and share some of the not so recent work I have been doing.
A couple of years ago I asked the question whether there was a market for high quality car themed furniture. There was one or two responses but nothing outrageous, so I thought I would put it to the test. Turns out there is definitely not a market for it. Not at all…. But I liked doing it, so I carried on regardless.
https://www.pistonheads.com/gassing/topic.asp?h=0&...
All the links in my last post are dead so ill repost them up so you can see what the hell I’m banging on about.
So the very first one I made came about because a friend had recently moved into a new house and I thought as a birthday present / house warming gift he would appreciate a few car parts welded together and thrust upon him to forever inconvenience his life.
So I turned these:
Into this:
Being my first one, it was a fairly long and arduous process but the basics are:
• The glass is a cnc custom cut piece that I commissioned.
• The wheel is a Volk Racing GTC split rim in 4x114.3 (I even managed to save the build sticker :P)
• The bolts have been stripped, then zinc coated (you know for all the corrosion protection required :P).
• New tyre valves, seals and valve caps were installed.
• The barrel has been blasted and powder coated black, with the "VOLK RACING" decal around the circumference.
• The TEIN coilover has been stripped, and all the oil drained out, reassembled and painted, then the large "TEIN" decal applied. I then machined the wheel centre to bolt up to the TEIN top mount. The springs were then powdercoated black
• The spanner was then machined and bolted to the base using Inconel 12 point bolts.
• The lips have been polished and new "VOLK RACING" stickers applied.
• The centres were stripped and painted white. The centre caps were then polished and reapplied.
• The bolts on the base are stainless cap screws with stainless serrated nuts.
• The studs holding the glass up is all stainless threaded rod which I cut to length. Then finished with titanium nuts which were heat anodised.
My friend was made up with it, which was nice.
A few months later someone decided to park their car into the side of my brothers freshly painted Supra. Needless to say, he was slightly miffed. It was close to his birthday, so instead of me going out and buying him something that he actually wants, I thought I would take some parts of his damaged car to repurpose into a monument of what happened, forever reminding him of a terrible experience in his life.
So I took these:
And made them into this:
Again, this was fairly long winded to put together but the basics are:
• the glass was, yet again, custom cut to my drawings.
• The coilover is a BC Racing unit, with all the oil drained and internals removed.
• The wheel is a Volk Racing GRN (sort of like a CV-pro but not) in 15 x 6.5, 4x114.3, et25.
• The Strut brace is from the Supra, but didn’t fit anymore due to other modifications on the car.
• The brake disc is from a Kawasaki ZX10R (no reason, it just happened to be the right size and looked nice)
• The Bolts holding the strut brake in place are MIL spec, 12 point, cadmium plated with rolled threads.
• The rest of the bolts are A2-80 stainless cap head screws.
• The base is powder coated and the wheel lip was stripped and polished by moi.
• The spiked nuts holding the glass in place are Downstar Spikes on A2-80 stainless threaded bar.
He loved it, and I think it softened the blow somewhat so mission accomplished. As were brothers though, I don’t want to make him too happy so promptly issued a dead leg along with it (now that were old this might be getting dangerous? What’s the long term effects of dead legs in the elderly?)
Moving swiftly on….
The next one I made is more traditionally when you think of wheel tables.
It’s based around a formula 1 OZ-Racing centrelock wheel. It’s a magnesium wheel that has been stripped and powder coated white. New decals have been applied (proper automotive wheel decals) in place of the originals which had seen better days. The base is brushed stainless and the rest is nickel plated steel with a 500mm glass top. It’s finally been topped off by a reverse printed tyre decal applied to the underside of the glass. It doesn’t come across in the pictures, but the wheel touches neither the floor, nor the glass, giving it a sort of floating effect.
Whilst this one was simpler, the cost of F1 wheels Is obviously much higher. In the end I managed to sell it for about what it cost me in parts, which is basically the best I can hope for.
So just before I sold this, a chap called Phil messaged me on Instagram about the Pirreli table above, however, having just sold it there wasn’t really anything I could. He explained that was opening an automotive themed café in the midlands and would love to display something. I said I would giver him a shout if I ever made anything again (I wasn’t being flippant, but other things took over and I genuinely wasn’t sure if I would have any time for a while). So of course, the very next day I got to work on another idea I was having…
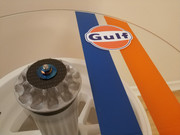
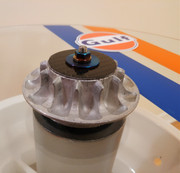
Growing up and being into cars (many, many years before youtube) you had to take what you could get when it came to films and tv. None of it was really what I wanted to watch, but there wasn’t really much option. One film that always stuck with me though was le mans. Having been raised on a diet of American hot rods and the inevitable street racing that came with it (as in, watching it on films, tv etc) motorsport never really grabbed me. I had been to a few races etc and soon got quite bored (I know its sacrilege to say this but meh) and the film le mans kind of reflects this. It really captures the fact that racing is mostly waiting around in a constant state of anxiety. I do genuinely like the film and was a fan of McQueen films as a rule (along with hot rods, my dad also raised me on 60s detective and war films) but what really stuck with me was the 917 (obviously) and his race suit. I am much younger than the film, but the logos and livery that are a constant theme, had become iconic In their own right, such was the visual impact. Anyways, I wanted to pay homage to this film, but specifically, the racing suit that Michael Delaney uses.
The wheel itself is a 13" OZ Racing magnesium alloy wheel that's been powder coated a fresh white. This rests on a pedestal welded halfway up the tube to give the illusion of the wheel floating in air without any obvious fixing.
The base was hand brushed steel with cast iron weight to ensure stability. The centre is stainless tube split to allow ease of disassembly and transport. It is specifically much smaller than the steel tube that is on display in order to go through the centre lock portion of the wheel, this gives the illusion that a much larger tube has some how penetrated the wheel, than is physically possible.
The glass was custom cut and tempered and finished with a F1 centre lock wheel nut. This is in turn held down by a 6al4v
titanium nut and washer which I have blue'd to a nice hue and on top of a custom carbon wheel nut cap.
All interior surfaces were coated in por15 to stop any moisture marking the steel.
The wheel nut itself has been left in its raw finish (but de-burred) to show it has been race used.
I also spent a long time on getting the decals correct and as close as I could to the source material. I had to search through a huge amount of photos to find high res shots of the screen worn race suit that was auctioned off. This then allowed me to get the ratio of the gulf logo to the stripe, and the Heuer to the Firestone logos correct. It also helped in getting the colours as close as I could. Most jackets made today use much darker colours for some reason, I guess because the original ones are so bright. The OZ decals are actual alloy wheel decals so are super tough and resilient and were carefully placed in the original positions.
So Phil was thrilled and wanted to display it at his not yet built café and car meeting spot, and in return, he would put it up for sale for me. I don’t do this for the money, I do it because I enjoy the process, but once it done, I just want to get rid of it. So I agreed and his business partner met up with me and I handed it over. Turns out that this café is the now famous Caffeine & Machine and the gulf table still sits proudly in the emporium. So whilst it hasn’t been sold (further cementing the fact that there is no market for this kind of thing) I’m glad my work gets to be displayed and used as intended.
So far, each table had taken me about 25-30 hours and about £400 ish in materials. This Is why I don’t make a lot of them (I’m averaging one a year at the moment) because I have other hobby’s and cant really afford to lose that kind of money that often. This next one though went a bit far, both in time and money invested. I had an idea I wanted to have one for myself (soon forgetting that after staring at these things for months on end, I get sick of looking at them once done) so it was a money no object kind of build. This, turns out was a mistake, for various reasons.
Whilst I was raised on American hot rods, when I got older, I realised my passion also lay with 90s Japanese cars (as Is reflected in my previous table builds). I wanted to create something that only drew from this era and style of car. I also wanted to include all the ideas I had had previously, but had to dismiss due to the cost or time it would take. As I was planning on keeping this one (haha) neither of these things mattered. I would drag the build out so the cost didn’t cripple me and take my time with the details so it was as good as I could make it.
So here it is, the culminated of £750 in materials and about 70 hours in labour.
And the cad renders:
This is the description from the eBay add I did shortly after it was finished. The idea was to donate all the money to a local animal rescue centre. It ended up selling for about £600 so I would have been better of just donating the material costs in the first place. Like I said, there really doesn’t seem to be a market for what I want to make. Also, please excuse the colourful language, I was in full blown salesman mode.
Okay, grab a brew as this is a long one…
To start with, let me say that this isn’t your average wheel table. I try and stay away from the generic piece of glass resting on a wheel. I believe in attention to the minutiae. This hopefully is reflected in the end product and the details of which I am trying to convey in this auction description (which is why it is so long :S)
This is the 3rd in the series of this style, and, as they were gifts to friends and family, I was somewhat limited by either the materials they provided or my own budget. At the beginning of this build I really wanted to include absolutely all the thoughts and ideas I have had from my previous 2 builds. With this table I have put absolutely all my time and effort into creating what I always wanted.
In order to do this I started in 3d CAD. I was able to fully 3d model all the individual parts I wanted to use without cutting any metal at all. I was then able to lay these parts out and understand how they might fit together in the most aesthetically pleasing way, which would still function as it’s supposed to (i.e. not falling over :P). There is about 10 hours of work in this cad model alone and you can see the 3d rendered images in the photos.
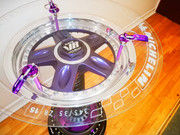
The parts I have used, I believe, are interesting, but maybe not quite as obvious or well known as others. Lets start with the base wheel. This is a 15” Volk Racing GRC split rim wheel in a 4x100 stud pattern. Now a lot of you maybe saying “that is clearly a CV-Pro” and you would be forgiven for making that mistake as they are almost the same, but for a small detail in the edge of the centre where it meets the rim.
A little bit of a history on this wheel (I know…groan, but I assure you its important for future details) is that it was the road version of the wheel used on the Toyota 90CV group c car pioneered in 1990, which most agree is the golden age of group c racing. The racing wheel is obviously a little different being a magnesium alloy and centre lock, but with a split rim and the famous dimpled face (for weight saving apparently) it did bear a striking resemblance to the road wheel. This coupled with a new technology that was “super fine rim” (read : metal spinning) made for a very 90’s wheel design that I believe has been overlooked in the JDM wheels history books.
This particular wheel centre was acid dipped to get rid of any corrosion and paint and then acid etch primed and then painted with a metallic purple that was as close to the anodising as I could get, whilst still looking pleasing by its own right. The various pin holes and small divots left by the years of corrosion and use have been left as a sign of the wheels life, hopefully having been driven up and down a touge run at 11/10ths. This I hope adds to the general theme rather than detracting from it. The entire process took some very long hours and lots of layers of paint (numbering in the teens) to get to this stage.
The centre nut and badge have been given similar treatment being stripped and painted / polished respectively. The ring surrounding this has been given a mirror polish as well in order to match the rim.
The rim has been taken back to the barest of metal and then painstaking hand polished to the finish that you see before you. I can provide you with before photos upon request, but I assure you, they had lived a very full life before I ended up with them. The original sticker, unfortunately had succumb to time and touge brake dust, so the remains had to be removed. In its place is the sticker usually reserved for the wheels face, relocated to hopefully a slightly more contrasting place on the rim, which might have ordinarily been lost in the purple paint that the centre now sports.
The split rim bolts were an ordeal unto themselves. Those who have daily driven a car with split rims know that dirt, grime, salt etc congregate around the bolts and leave them looking less than pretty, multiple this by 30 years (these have a 1991 build date) and you are left with bolts that look fit for the bin. In this instance, I wanted to keep the original bolts as each one (36 in total) is individually stamped with “rays engineering”. To truly make these look like new would require sanding to within an inch of there life to remove the corrosion marks, which would mean the stamping would be lost. I have instead chose to have them acid stripped and zinc coated, this has left a matt grey finish which may not have the visual impact of chromed or polished bolts, but I think is a nice juxtaposition against the polished lip and tells a story of a previous life whilst still maintaining a look that is pleasing to the eye.
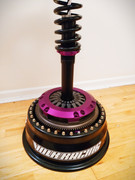
Casting your eye downwards past the wheel face, there is a HKS hypermax LS+ coilover which I believe is from a Toyota Mark 2 (continuing the Toyota theme, if only temporarily). These are actually quite an interesting coilover. HKS are obviously synonymous with racing, and as such provide aftermarket parts for such. Despite how cool it is to have race parts on your street car, it does tend to create a rather un-relaxing experience. HKS therefore designed the LS+ plus to not only be slightly softer, but also quieter, which is not often advertised in a coilover system which is predominantly sold using the “race on Sunday, sell on Monday” moniker. As with most of the HKS products sold today they also came with a PNE coated base, which is a proprietary electro-deposition coating that they claim is five times more corrosion resistant than galvanisation. It certainly has held up over years, with minimal repair work aesthetically required to get this back to looking like new. The coilover itself has been stripped back to its components (of which can be provided if the buyer wants them) and all the internals drained of oil and thoroughly degreased. As much as I enjoy authenticity, fork oil on your living room carpet would not a happy wife/husband make. The bottom mount has been cut of and the base welded to the flywheel which I will touch on later. The coilover itself I acquired due to it being bent, presumably from a door to door, 100mph+ twinning manji gone wrong (we can but hope) which I have chosen to leave as is. You have to look hard to notice it’s there, but I think it’s a nice little easter egg for those who have lots of time on their hands to spend looking at furniture made from old car parts. Obviously, the glass on top has been adjusted to suit, so everything is perfectly level (more on that later……yes there’s more :S). The top mounts, spring seats and locknuts have been de-burred and re-anodised in the original purple finish. The spring itself has been bead blasted and powdercoated in black (the original finish) and the coilover has been affixed to the wheel using Din 6921 A2 stainless flanged head bolts.
So onto the clutch and flywheel portion of the evening (now there’s a sentence I never thought I would write). This is originally from a S2000 and engineered by Exedy. This is the Hyper Single clutch which has a chromoly flywheel and t5001 friciton material disc finished with a forged aluminium clutch cover, anodised in a rather striking purple. For this build I had to remove the friction disc purely for cleanliness reasons, again, I like authenticity but carbon dust on the rug is a pain to clean. The clutch cover has been re-anodised in the original finish and the laser etched “exedy” is still visible for those who look for it.
This has been mounted to the wheel base using 3 custom hand machined brackets, which have then been anodised in matching purple colour. I wanted these to be slightly visible, just peeking out behind the flywheel and wheel base. I was trying to convey how all parts of this build have been thought about and had attention applied to them. These are again fixed with Din 6921 A2 stainless flanged head bolts.
The wheel base itself has been bead blasted and powdercoated black. The stickers applied are custom sized for this project and you might notice is the old (and now un-used) Volk Racing logo, however this was correct for this period of wheel. For the HKS sticker I wanted the traditional logo and camo style graphics that were made famous by the HKS cars of the 90s. This has then been adorned with 12point head MIL Spec bolts, usually reserved for aircraft. These are specifically ms21250-04006 which retail at $4.50 each! These are quite interesting for various reasons. For example normal nuts and bolts are made from a generic bolt steel and then the threads are cut from the steel rod. These differ in that the threads are rolled into place, essentially forging them from the base material creating a more accurate and stronger thread. These are a 3a class thread so are a super fine tolerance and then on top of that are Cadmium plated. This isn’t available to normal industrial grade fasteners as the process is super harmful to the environment, but the corrosion resistance cannot be beaten. All of this basically adds up to a bolt that about 1.5 times stronger than a traditional 8.8 grade bolt. Another small detail I want to mention, the 3 brackets that hold the clutch use more 12 point MIL Spec bolts, but are Inconel instead of the steel versions. As much as I would like to use these everywhere, the shear cost of them makes it impossible. Like a lot of the superalloys, Inconel is a fairly exotic (read expensive) and interesting material used in very high temperature applications (formula 1 exhausts for example) so I like to use it where I can.
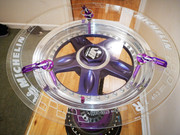
So, onto what I think is the defining feature of this piece. The glass. This Is custom cut to my dimensions and then toughened. It is in turn held up with Old school Grayson bonnet pins. The keen eyed amongst you will notice these are purple, which was never an option on these pins. They had to be stripped and then re-anodised along with the retaining flange. As you probably know, these were everywhere on modified cars in the UK in the 90s and early 2000s. If you’ve seen them/used them before you know they are of average build quality, having been stamped and pressed into shape, they are not something I usually would use. However, they have a nostalgia about them and are almost an icon unto themselves, so sue me :P.
The glass sits on Mcgill motorsport misalignment spacers for suspension rod ends, which then have a custom 3d printed spacer/washer for the glass to rest on. This was just another neat little touch that you wont ever see, but gives you a warm fuzzy feeling knowing it’s there. The adjustability of these spacers resting on M10 half nuts, enables you to level the glass to the environment in which the table lives. If you have a slightly sloping floor, the three nuts can be adjusted so your pint/bourbon/juice box doesn’t slide of the edge.
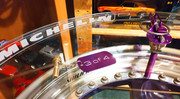
Okay, finally, onto the last piece of the puzzle. The etching on the glass. What at first might seem like a generically designed sticker applied to the top of the glass is actually a very specific layout that has been laser etched onto the surface, creating a very durable and permanent marking. This has again been designed using CAD for accuracy.
The design is taken from the latest of Michelin Pilot Sport Cup 2 R which come on some of the best track orientated cars that are produced today, the Porsche GT2 and GT3 to name just a couple. The sizing I have chosen was stolen from the Lamborghini Countach as I think it’s a most infamous tyre size (345/35/15) and it also matches the original diameter of the wheel (15”).
If you think the details have been nerdy so far, its about to get even worse. As most of you probably know, tyre size isn’t the only thing printed on a tyre. Usually you also get a manufactures part number, followed by a date stamp. In this instance, the markings hark back to the Group C car that I spoke about at the beginning. The cars only victory was seen at the Fuji 500 where it achieved a lap time of 1:16.270 on the 11th March 1990. The date stamp is marked as “1090” i.e. the tenth week of 1990. The manufacture part number is 01 16 270 to reflect the lap time….. Thank you and goodnight.
As a final detail I have prepared a small keyring with the same milspec bolt used on the wheel base as well as a matching anodised purple plaque, laser engraved with “3 of 4” (being the 3rd in the series of a possible 4). My previous two tables obviously having their own colour matched and numbered keyring.
I do apologise for the long description, I hope you made it all the way to the end and I also hope you can appreciate the level I have gone to try and make this the best I can. Over 70 hours of work and £750 in materials have gone into creating this (details can be given upon request).
So that’s basically where I have left off. I will probably make another, final table to complete the 4 of 4 but not entirely sure what I'm going to do with it yet. If I ever do it, ill update the thread with pictures
thanks for reading Edited by hkz286 on Friday 20th March 09:18

twing said:
Fair play that man!  loving the one with spring and spanner!
thanks dude loving the one with spring and spanner! that was my first onep4cks said:
I definitely reckon there's a market for tables made from classic alloy wheel designs like the Clio Williams, 205 GTI etc etc
thats not a bad shout, the dimma 205 came with split rims that i always thought were very pleasent to look atantspants said:
Love the Le Mans table, very cool! Talented man 
im not sure about talented, but thanks Fantastic, both horrendous and beautiful in equal measures!
I’d have thought there might be a micro market for those sort of things in America rather than the U.K.
Have you seen;
https://mailchi.mp/mementoexclusives.com/home-comf...
It might be worth getting in touch with them and asking about commission work. You clearly have talent, could things be built around F1 where you’d imagine there were people willing to spend big on random F1 related stuff?

Gassing Station | Homes, Gardens and DIY | Top of Page | What's New | My Stuff