Rendering and damp ingress on an 1880s terraced house
Discussion


Wondering if anyone has any advise or has seen something similar especially around cement rendering and lime rendering? I've read some articles on concrete vs lime rendering and seen a couple of topics where PH'ers like Jagnet have mentioned lime render and damp problems and have also read this article on cement render; https://www.homebuilding.co.uk/causes-of-damp
Our issue is; we live in a 1880s terraced house (which was converted to flats 1992-ish and now shared ownership so maintenence is split 50:50). We have got a considerable 'dampness problem' in the rear wall.
In the rear wall it is damp throughout the height of the building. Having had a look when a 1st floor window was replaced, the damp in the cavity (filled with gravel, I think) was present on the internal faces of the brickwork (reaching my hand in and touching it was camparable to touching a cotton flannel or cloth that has been wrung out to dry but is still wet).
In the front wall, this dampness is not present (not detectable in the wall which is stone but has been repointed with cement at some point) as when I've had floorboards up, I can touch the unplastered parts of wall which repin dry.
However in our situation I've found the following:
1. Rear wall very damp (which is evident where it has not been plastered/covered with drylining) for example, under floor or where pipe holes go through (and when the window was replaced I could reach the internal brickwork of the wall which was either damp or very damp.)

2. Ground floor flat rear wall is showing visible damness at top of ceiling (see photos). This flat does not appear to have been dry-lined. It belongs to someone else. In our flat (upstairs maisonette of 2 levels) both the 1st floor and 2nd floor rear walls have been dry lined hiding but not fixing the problem.
 .
. 
3. There are Velux windows. One meeting the rear wall had a mis-cut slate which a roofer has since fixed with a piece of lead, shaped to fully cover the gap and direct any water into the gutter.

4. The rear wall joists have been repaired or replaced at some point (guessing since 1985 because the underlying plasterboard has this date on it but other work like drylining may have taken place in the 2000s)
5. An extension was built (again assuming around 1985-ish) with those aerated-concrete blocks and cement render but does not suffer damp except perhaps in the abutement (?) where the extension joins onto the original wall (which could be due to the ingress behind the render on that part of the building anyway) however the damp starts further up than the abutement and also affects the opposite side of the window to where the extension ends.
Our issue is; we live in a 1880s terraced house (which was converted to flats 1992-ish and now shared ownership so maintenence is split 50:50). We have got a considerable 'dampness problem' in the rear wall.
In the rear wall it is damp throughout the height of the building. Having had a look when a 1st floor window was replaced, the damp in the cavity (filled with gravel, I think) was present on the internal faces of the brickwork (reaching my hand in and touching it was camparable to touching a cotton flannel or cloth that has been wrung out to dry but is still wet).
In the front wall, this dampness is not present (not detectable in the wall which is stone but has been repointed with cement at some point) as when I've had floorboards up, I can touch the unplastered parts of wall which repin dry.
However in our situation I've found the following:
1. Rear wall very damp (which is evident where it has not been plastered/covered with drylining) for example, under floor or where pipe holes go through (and when the window was replaced I could reach the internal brickwork of the wall which was either damp or very damp.)
2. Ground floor flat rear wall is showing visible damness at top of ceiling (see photos). This flat does not appear to have been dry-lined. It belongs to someone else. In our flat (upstairs maisonette of 2 levels) both the 1st floor and 2nd floor rear walls have been dry lined hiding but not fixing the problem.
. 3. There are Velux windows. One meeting the rear wall had a mis-cut slate which a roofer has since fixed with a piece of lead, shaped to fully cover the gap and direct any water into the gutter.
4. The rear wall joists have been repaired or replaced at some point (guessing since 1985 because the underlying plasterboard has this date on it but other work like drylining may have taken place in the 2000s)
5. An extension was built (again assuming around 1985-ish) with those aerated-concrete blocks and cement render but does not suffer damp except perhaps in the abutement (?) where the extension joins onto the original wall (which could be due to the ingress behind the render on that part of the building anyway) however the damp starts further up than the abutement and also affects the opposite side of the window to where the extension ends.
Water is getting in from the top. That lead doesnt look brilliant to me (seems not to go very high?)
Water is clearly running down the wall below the window but tbh I think you need to get up on the roof and see how water is actually running. Is the gutter taking water away or dumping it into the top of the wall?
Water is clearly running down the wall below the window but tbh I think you need to get up on the roof and see how water is actually running. Is the gutter taking water away or dumping it into the top of the wall?
Despite my dislike of heights, I got up on to the extension flat roof to take some photos. There's a repair that has been done that seems to have cracked again with moss growing in the crack (1st/2nd pictures)

Back wall on top of extesnion roof

Velux window and crack in rendering

Some streaks/staining under the fascia.

Small window left edge.

Small window right edge.

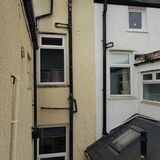
Far edge (right hand side) of building. This is above where the damp ingress is evident on the ground floor. The ground floor window is in line with the first floor window however the damp in the original post was right to the edge of the wall where it joins the next property!?
Back wall on top of extesnion roof
Velux window and crack in rendering
Some streaks/staining under the fascia.
Small window left edge.
Small window right edge.
Far edge (right hand side) of building. This is above where the damp ingress is evident on the ground floor. The ground floor window is in line with the first floor window however the damp in the original post was right to the edge of the wall where it joins the next property!?
- # edit ###
- ####
Edited by CardiffHywel on Sunday 5th April 18:29
Edited by CardiffHywel on Sunday 5th April 18:30
Hard to tell but given that the issues seem to be along the whole wall I would want to have a good look at how the guttering sits - you've got water running down the wall behind the guttering and the guttering looks to be a bit high to me.
I would want to check how the roof actually feeds the guttering and how high the guttering sits - what happens whrn the gutters overflow in torrential rain?
Personally I'd fit deeper guttering, make sure that the roof edge properly empties into the gutters and that the gutters can't overflow into the top of the wall.
Tidy up the render while you're at it and check all the flashings around the velux.
TooLateForAName said:
Hard to tell but given that the issues seem to be along the whole wall I would want to have a good look at how the guttering sits - you've got water running down the wall behind the guttering and the guttering looks to be a bit high to me.
I would want to check how the roof actually feeds the guttering and how high the guttering sits - what happens whrn the gutters overflow in torrential rain?
Personally I'd fit deeper guttering, make sure that the roof edge properly empties into the gutters and that the gutters can't overflow into the top of the wall.
Tidy up the render while you're at it and check all the flashings around the velux.
Update: It took a over a month but I've had a more thorough look at it since. It hasn't rained much in that time, which is quite unprecedented for SE Wales!I would want to check how the roof actually feeds the guttering and how high the guttering sits - what happens whrn the gutters overflow in torrential rain?
Personally I'd fit deeper guttering, make sure that the roof edge properly empties into the gutters and that the gutters can't overflow into the top of the wall.
Tidy up the render while you're at it and check all the flashings around the velux.
There is definitely water ingress when it rains via the Velux flashings, but possibly due to the gutters too.
- The Velux flashings have been cut too short and drain onto the roof rather that into the guttering. The gap around the window was stuffed with a bin bag and newspaper - October 1993 - which coincides with the manufacturing date of the Velux "GGL3" windows.
- When I had some slipped tiles replaced the guy made a little "lead cover" for the mess at the bottom of the Velux where water was getting behind the render. This hadn't really worked because;
- Turns out the slates/tiles don't fully cover the roof and there is a gap of about 1cm square at the bottom of the Velux. This is higher up than the roofer's lead fabrication so water was still getting in (after the Velux flashing/at base of Velux/before the lead fabrication)
- The gutters lean towards the house, the longer one does not have it's own downpipe - it joins the next neighbours gutter and it looks/feels like the entire roof line meeting the gutter has been siliconed or fillered in some way - with a roof overhang of 0.3 to 1.5 centimetres along its length.

- Now I've used sticky flashing tape to bridge or seal the gaps around the Velux flashings and replace the crap piece of fascia green-gripped onto the eaves on one side.
- Await rain to check if this was the problem (or if no rain soon fake it with a hose pipe)
Updated the photos in a Flickr album to show what I found/what I did (22 photos):
https://www.flickr.com/photos/penarthhywel/albums/...
Gassing Station | Homes, Gardens and DIY | Top of Page | What's New | My Stuff