Laying engineered wood floor on existing concrete
Discussion


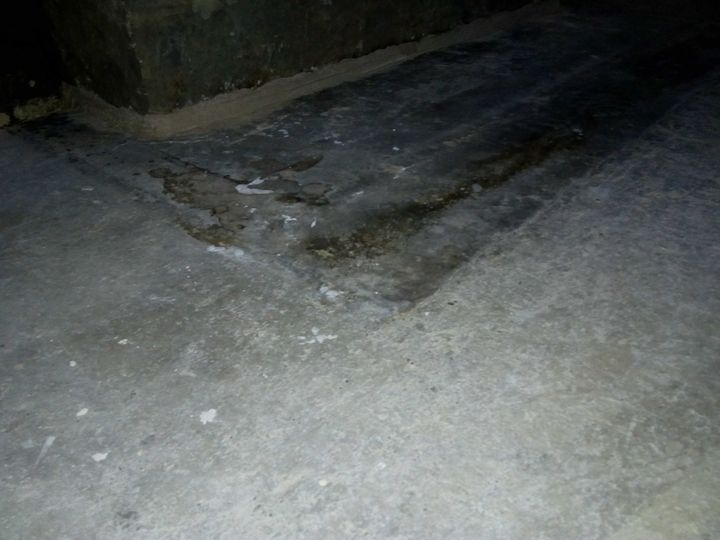
Having cleared the room and ripped out the manky carpet and underlay, its clear the floor is a bit uneven near the hearth. There's a small (3mm) step between the slab and hearth stone which makes the new boards rock. The slab is old, dry and well polished.
A floor grinder would be really dusty if you use them dry. Or do you use them wet ?
If using self leveling compd, how do you control the thickness to guarantee a flat floor.
The room is 3.5m by 4.5m
A floor grinder would be really dusty if you use them dry. Or do you use them wet ?
If using self leveling compd, how do you control the thickness to guarantee a flat floor.
The room is 3.5m by 4.5m
Not a complete answer
1) If using self levelling compound pour water onto the slab and see where it pools
Enough to see the low spots, where you can then concentrate the pour onto and then spread
That works well for me
Let the water soak / evaporate first before pouring the compound
It might or might not be conventional but I've had success with that
2) Make the mix wetter than manufacturer recommended and it will spread much easier and it cures just as well
Mapei is my go to
You perhaps shouldn't expect a perfectly flat floor. Self leveler fills low points and smooths out high spots, but if you're aiming for snooker table flat, you're unlikely to achieve it, unless you can mix a decent quantity of it and pour in one go. if however, the floor falls say from one side to another, it will be quite deep. If you want perfectly flat, you need to liquid screed it, but the minimum thickness of this is 25-30mm and can be costly.
I would advise against the "flooding it with water to see where the water pools", as porosity may skew the results, but it will dramatically extend the time between leveling and laying the floor, as even if it looks dry, what is below the surface can still be "wet" and may come back to bite you when laying the finished floor.
As said above, prime the floor, but also use a spiked roller and spiked shoes if you can, so that you're not under pressure to not stand in it, before you've finished working it and you get rid of any air bubbles. Also paddle mix it for speed and best consistency.
If you remember that you're looking to smooth it, not get +/- 1mm level, then you should be OK
Prep aside, the trick to getting a decent finish is to not mess about with a drill attachment to mix it and instead get a proper paddle mixer (~£50 screwfix own brand one is fine) and plastering bucket, that will take all of the water and a full bag of screed, to mix in. Then it’s a two person job. One getting the water ready (and measured) in buckets ready for the next mix, one mixing and pouring.
You really want to be adding material to an existing pour (rather than making several pours and trying to get the boundaries to combine) then gently giving the self-leveller a helping hand using a trowel to nudge it in the right direction. A roller can help make it flow but the issue is often finding a convenient place to stand!
Choose the correct product too. Some are designed for very thin fills, others for where deeper fills are needed. There’s nothing stopping you use a less precise/deep fill product first and then going over it with an freeer flowing mix that will find its level better.
I actually used that one earlier in the year for a product on my own house (prepping a rough poured concrete slab for final surface finish) and it was very easy to work with and gave a very good finish indeed.
Always buy more than you think you’ll need and then take back the surplus. Getting part way though and discovering that you’ve not gone enough would be inconvenient.
You really want to be adding material to an existing pour (rather than making several pours and trying to get the boundaries to combine) then gently giving the self-leveller a helping hand using a trowel to nudge it in the right direction. A roller can help make it flow but the issue is often finding a convenient place to stand!
Choose the correct product too. Some are designed for very thin fills, others for where deeper fills are needed. There’s nothing stopping you use a less precise/deep fill product first and then going over it with an freeer flowing mix that will find its level better.
Pistaaah said:
If you want perfectly flat, you need to liquid screed it, but the minimum thickness of this is 25-30mm and can be costly.
You can go down to 2mm with some self-levelling products, eg: https://www.wickes.co.uk/Setcrete-Latex-Floor-Leve...I actually used that one earlier in the year for a product on my own house (prepping a rough poured concrete slab for final surface finish) and it was very easy to work with and gave a very good finish indeed.
Always buy more than you think you’ll need and then take back the surplus. Getting part way though and discovering that you’ve not gone enough would be inconvenient.
Thanks all.
The boards are 20 mm thick and stiff so the floor needs to be very flat. The underlay hasn't got much compliance.
Low points we could maybe cope with, but high spots NEAR the end of a board make it lift and rock
Thanks for the tip about the paddle mixer. Tell me about spiked shoes ?
The boards are 20 mm thick and stiff so the floor needs to be very flat. The underlay hasn't got much compliance.
Low points we could maybe cope with, but high spots NEAR the end of a board make it lift and rock
Thanks for the tip about the paddle mixer. Tell me about spiked shoes ?
Think I’d be taking down the high spots at the hearth rather than bringing the whole floor up to that level.
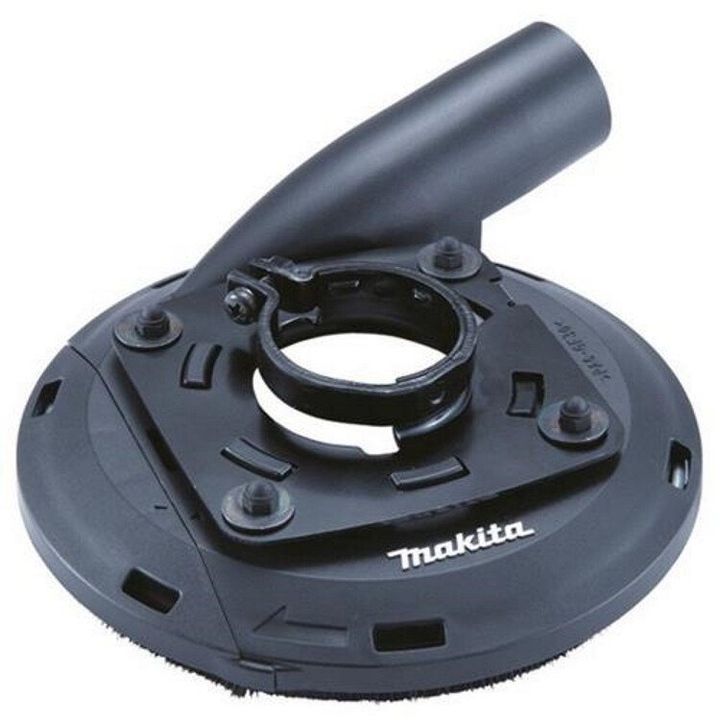
I’ve used one of these on a bog standard LXT angle grinder to great effect
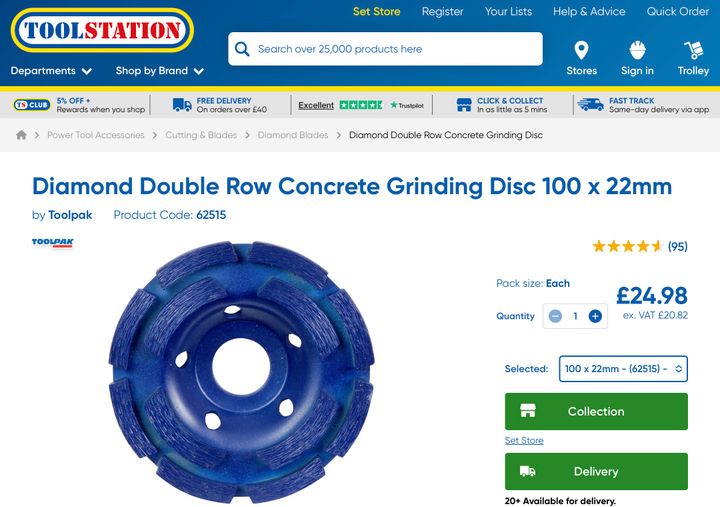
Dust wasn’t much of an issue when using something like this on the grinder with a Henry sucking away (the one I had wasn’t even a perfect fit, needed a bit of modification)
If you do then need self levelling compound that is user friendly for DIY’ers on smaller areas then I can recommend this stuff.

I’ve used one of these on a bog standard LXT angle grinder to great effect
Dust wasn’t much of an issue when using something like this on the grinder with a Henry sucking away (the one I had wasn’t even a perfect fit, needed a bit of modification)
If you do then need self levelling compound that is user friendly for DIY’ers on smaller areas then I can recommend this stuff.
How does the flooring need fitting?
Is it glue down to the slab, float on underlay and glue the joints or float on underlay and click together?
If glueing down, make sure your slab is perfectly flat, +/- 1mm over 2m. Also make sure there is a DPM present in the slab, if not, you will need to add a liquid DPM like F.Ball F77 or F78, prime, then use the smoothing compound (self levelling compound but all you need to do is make the floor flat).
If you are floating the floor, you can get good quality underlay with built in DPM and thick enough to get away with your floor prep not being 100%. It’s still advisable to do all of the above still but it’s your call. The best underlay I have used has got a gold foil DPM and 5-7mm black foam, 15m2 is about £30 on Amazon, google sonic gold underlay.
With the issue around the fireplace, if you have got a 4 1/2” grinder and a vacuum, you can get a floor grinder kit from Amazon, again about £30. Set up correctly you won’t get any dust.
woodypup59 said:
Tell me about spiked shoes ?
In theory they’re used to get rid of bubbles. You don’t need them if you go with the product I linked to and mix it properly (correct ratios etc), might do with others. One other thing to bear in mind with old properties is that floors might not be flat or level. Put a long spirit level down to see how out of level the floor is in order to help calculate the max fill depth and amount you’re going to need.
Gridding off high spots is a good call if there are only a few of them/covering a limited area. It can save you a lot of compound.
woodypup59 said:
Thanks. We're floating the boards on 7mm gold dpm underlay.
We laid a length of underlay., and put some boards down and found that the high edge round the hearthstone makes the boards rock. Now admittedly when the boards are glued and t/g'd together, they should rock less.
Get the prep right or you will regret it forever more. They shouldn’t rock at all, not rock less. We laid a length of underlay., and put some boards down and found that the high edge round the hearthstone makes the boards rock. Now admittedly when the boards are glued and t/g'd together, they should rock less.
I have fitted hundreds of m2 of flooring (joiner) and I always make sure the prep is 100%.
I didn’t at my own house. Time was against me, I had encountered other issues, wife and kids had moved out and I needed to be back at work. The floor needed another go with the latex and the supplier had sent the wrong glue.
I ignored both of these things, thinking I could work around them. It didn’t work.
I wouldn’t have done that at a customers house so I shouldn’t have done it at mine. It took a couple of years of chasing before I was finally happy with it. Another couple of days would have prevented this happening.
Tell me about spiked shoes ?
[/quote]
The spiked shoes (cheap ones tie under your existing shoes/good ones are like big flip-flops without the big toe bit that you slip your boot into) allow you to walk on the already laid compound if you need to trowel it/roll with the spiked roller. Without them, you will make a terrible mess. Don't rely on them to get rid of the air, a spiked roller will be your best friend here.
if you pour a decent bucketful of compound on the floor, it can be hard to trowel the area that's first out off the bucket - spiked shoes remove that problem.
In terms of thickness, you can get a 0mm - Xmm meaning that you can feather it to nothing, so you don't get an edge. The "screed" that I mentioned in my previous post is not self-leveler, it is a completely different product hence the minimum thickness stipulation.
woodypup59 said:
Thanks all.
The boards are 20 mm thick and stiff so the floor needs to be very flat. The underlay hasn't got much compliance.
Low points we could maybe cope with, but high spots NEAR the end of a board make it lift and rock
Thanks for the tip about the paddle mixer. Tell me about spiked shoes ?
Use the fibreboard installation on the floor and drop to thinner where floor is raised?The boards are 20 mm thick and stiff so the floor needs to be very flat. The underlay hasn't got much compliance.
Low points we could maybe cope with, but high spots NEAR the end of a board make it lift and rock
Thanks for the tip about the paddle mixer. Tell me about spiked shoes ?
LooneyTunes said:
In theory they re used to get rid of bubbles. You don t need them if you go with the product I linked to and mix it properly (correct ratios etc), might do with others.
One other thing to bear in mind with old properties is that floors might not be flat or level. Put a long spirit level down to see how out of level the floor is in order to help calculate the max fill depth and amount you re going to need.
Gridding off high spots is a good call if there are only a few of them/covering a limited area. It can save you a lot of compound.
This is incorrect. Spiked shoes are to walk over the just poured self levelling compound to get it all the corners etc.One other thing to bear in mind with old properties is that floors might not be flat or level. Put a long spirit level down to see how out of level the floor is in order to help calculate the max fill depth and amount you re going to need.
Gridding off high spots is a good call if there are only a few of them/covering a limited area. It can save you a lot of compound.
A spiked roller is what is used to get rid of bubbles.
Gtom said:
Get the prep right or you will regret it forever more. They shouldn t rock at all, not rock less.
.
Amen to this. coming from someone who didn't quite get the levelling compound right and tried to fix it with underlay tricks. Drove me mad for the 10 years I lived there. It slowly but surely broke the joins between boards in the slightly uneven areas. Creating all kinds of uneven and moving boards. In the end I hammer-screwed the buggers down to stop the movement..
That's the floor down. A bit of floor grinding, a bit of self leveling. A week to let that dry. A day to lay the underlay. 2 days to dry fit the boards. Just over a day to glue up.
About 200 m glue squeezed out.
Our tips include ;-
Get the toolkit of wedges, plastic hammer and knocking bracket.
Two people and 2 tubes of glue,one doing the bottom of the grooves, one doing the top of the tongues.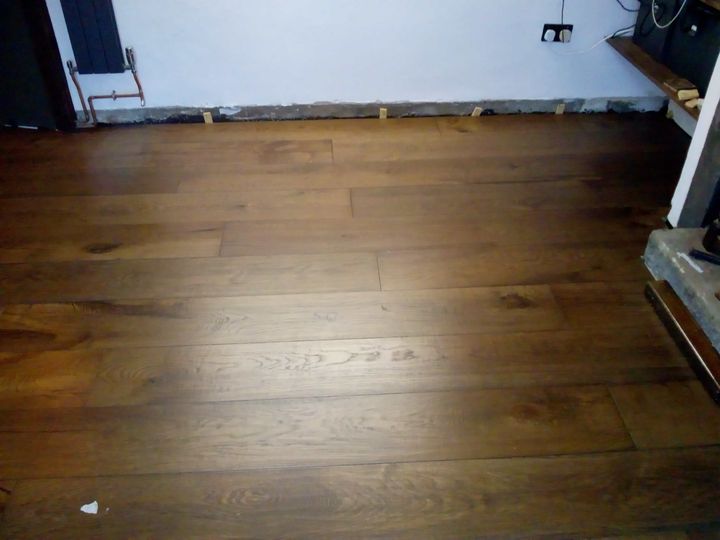
About 200 m glue squeezed out.
Our tips include ;-
Get the toolkit of wedges, plastic hammer and knocking bracket.
Two people and 2 tubes of glue,one doing the bottom of the grooves, one doing the top of the tongues.
Gassing Station | Homes, Gardens and DIY | Top of Page | What's New | My Stuff