Shower - flow valve replacement
Discussion


We have this Roper Rhodes concealed shower that was installed in our en suite about ten years ago.
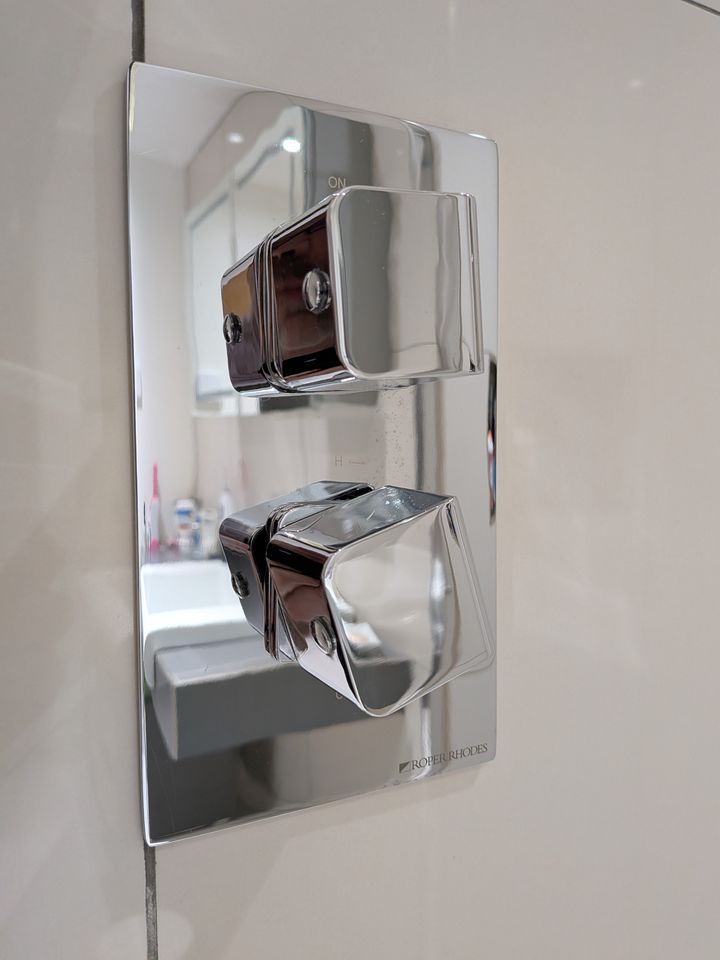
It has recently started dripping when the flow valve is fully off. No idea what the model is called but according to Roper Rhodes it's discontinued. They did give me the part number and I've managed to obtain a replacement flow valve. I removed the outer handle of the flow valve, hoping I'd be able to remove the valve from there but it doesn't seem to turn. I suspect I may have to dismantle it further - anyone know if the face plate has to come off? If so, how is it likely to be fixed in place? Any other parts to remove first?
It has recently started dripping when the flow valve is fully off. No idea what the model is called but according to Roper Rhodes it's discontinued. They did give me the part number and I've managed to obtain a replacement flow valve. I removed the outer handle of the flow valve, hoping I'd be able to remove the valve from there but it doesn't seem to turn. I suspect I may have to dismantle it further - anyone know if the face plate has to come off? If so, how is it likely to be fixed in place? Any other parts to remove first?
The face plate will need to come off. It just pushes over the valve but will be sealed with silicone sealant behind it.
If you use a thin blade like a palette knife you should be able to slide it behind and wiggle it about enough to break the silicone seal, then gently prise it off by lifting each side bit by bit.
You can then unscrew the valve. As said above turn the water supply off first !!
If you use a thin blade like a palette knife you should be able to slide it behind and wiggle it about enough to break the silicone seal, then gently prise it off by lifting each side bit by bit.
You can then unscrew the valve. As said above turn the water supply off first !!
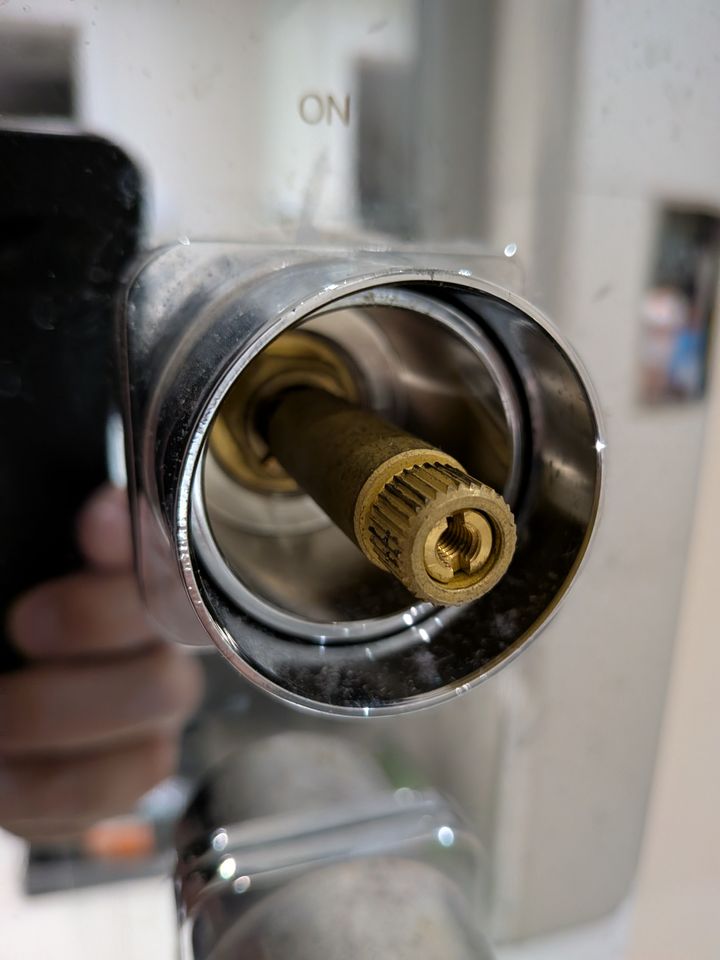
Many thanks. So the outer cylinder bits appear to be the same part as the square pieces right in front of the main plate. Do they need removing before the plate can come off? They turn but don't appear to be threaded, at least after a few quarter turns don't seem to be any easier to turn or moving out away from the plate.
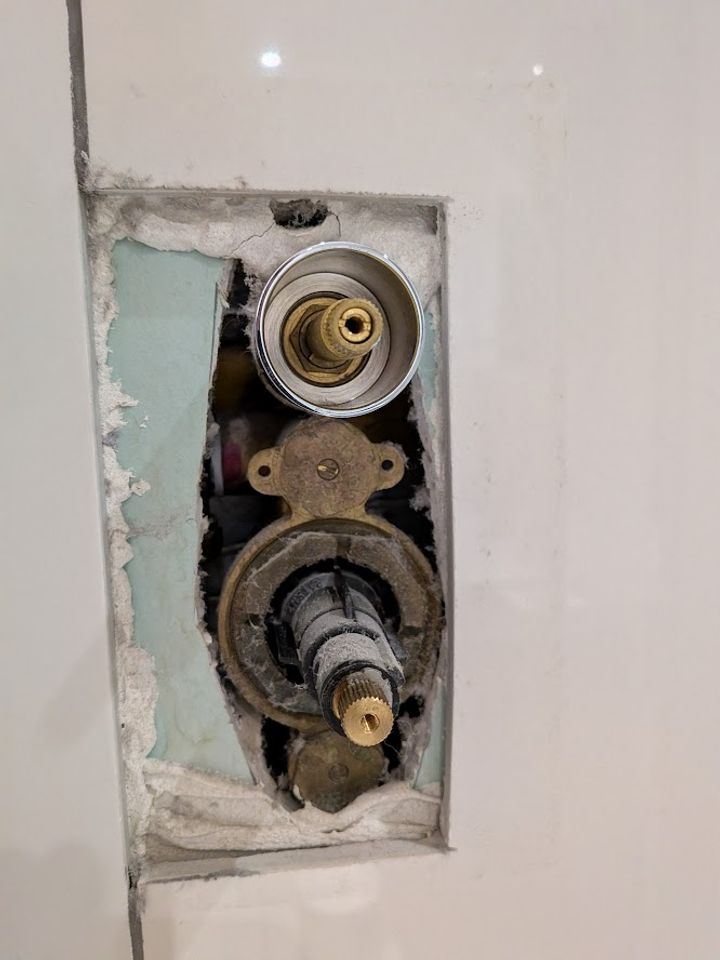
Had another quick look after work. Seems the face plate just pulls free once the handles are off the valves - no silicone or anything. This is where I'm at right now:
The valve I want to replace is the upper one. It seems very tight. The outer, chrome section I think screws onto the front of the valve then that and the valve screw into the body of the mixer itself. I take it the unit will be securely attached to something sturdy in the wall?
The valve I want to replace is the upper one. It seems very tight. The outer, chrome section I think screws onto the front of the valve then that and the valve screw into the body of the mixer itself. I take it the unit will be securely attached to something sturdy in the wall?
I've just done a similar repair to my shower as the valve was incredibly hard to turn and even harder to position to off. Couldn't find a suitable valve replacement but a descale sorted it out.
Mine was horrible behind the face plate so I'm glad that's been cleaned.
The chrome piece should just screw onto the body of the valve.
Once that's off you'll see a hex or some way of removing the valve.
It should be very securely attached to the wall if it's been installed right!
Mine was horrible behind the face plate so I'm glad that's been cleaned.
The chrome piece should just screw onto the body of the valve.
Once that's off you'll see a hex or some way of removing the valve.
It should be very securely attached to the wall if it's been installed right!
MyM2006 said:
I've just done a similar repair to my shower as the valve was incredibly hard to turn and even harder to position to off. Couldn't find a suitable valve replacement but a descale sorted it out.
Mine was horrible behind the face plate so I'm glad that's been cleaned.
The chrome piece should just screw onto the body of the valve.
Once that's off you'll see a hex or some way of removing the valve.
It should be very securely attached to the wall if it's been installed right!
Thanks for that!Mine was horrible behind the face plate so I'm glad that's been cleaned.
The chrome piece should just screw onto the body of the valve.
Once that's off you'll see a hex or some way of removing the valve.
It should be very securely attached to the wall if it's been installed right!
We are sorted. Went to the garage and got a long breaker bar and a suitable socket to go on the end of a long box spanner and got the valve out. I don't think it was installed very well in the first place - there was a screw missing off the spline extension which explains why I had to keep removing the handle to tighten the extension. Also, whilst applying force to the breaker bar to undo the valve I noticed the whole mixer unit rotating around a point above the top valve, so I think the clown that installed the unit probably only attached it at the top.
Valve replaced, no apparent leaks (I did check before reassembling everything), and the original drip is resolved. I may go back and put some silicone on the back of the facia plate, but it's been like this for ten years without issue so far.
Thanks all for the input!
Gassing Station | Homes, Gardens and DIY | Top of Page | What's New | My Stuff