Help - how to remove toilet cistern valve!!!
Discussion


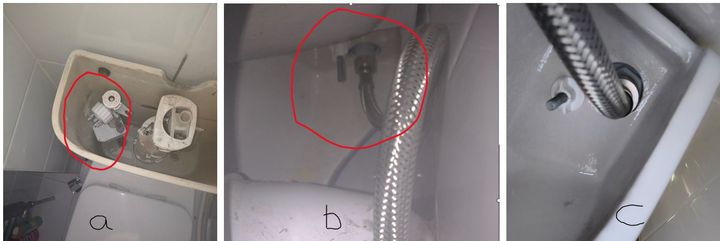
Thought this would be simple. Undo supply pipe to valve (b), remove broken valve (a), replace valve, reconnect pipe
BUT is seems impossible to get any tools onto the water supply pipe (b) due to the shape of the toilet and the position of the sewer outlet. Access from the left side is next to impossible and from the right you cannot get onto the nut (b) unless had a 3 inch long spanner maybe
Also in picture (c) which was taken from bottom, it appears that the fixing nut of the actual valve is inside the hole recess (you can just see part of the hexagon shape), so even if i remove the nut for the water supply pipe (not sure what size the nut even is !) i dont know if i can get at the nut that secures the valve to the cistern
It kinda looks like the original installer may have connected everything up and then fixed the cistern in place....however the screws/bolts are all as rusty as bugger so not sure its gonna come out very easily
Any ideas from better DIY-ers than me please?
retired plumber here. You have 2 options:-
Remove the cistern, as you've realised, and you'll have the problem of the rusty fixings to overcome, and may well need a new doughnut (rubber ring between the cistern and pan)
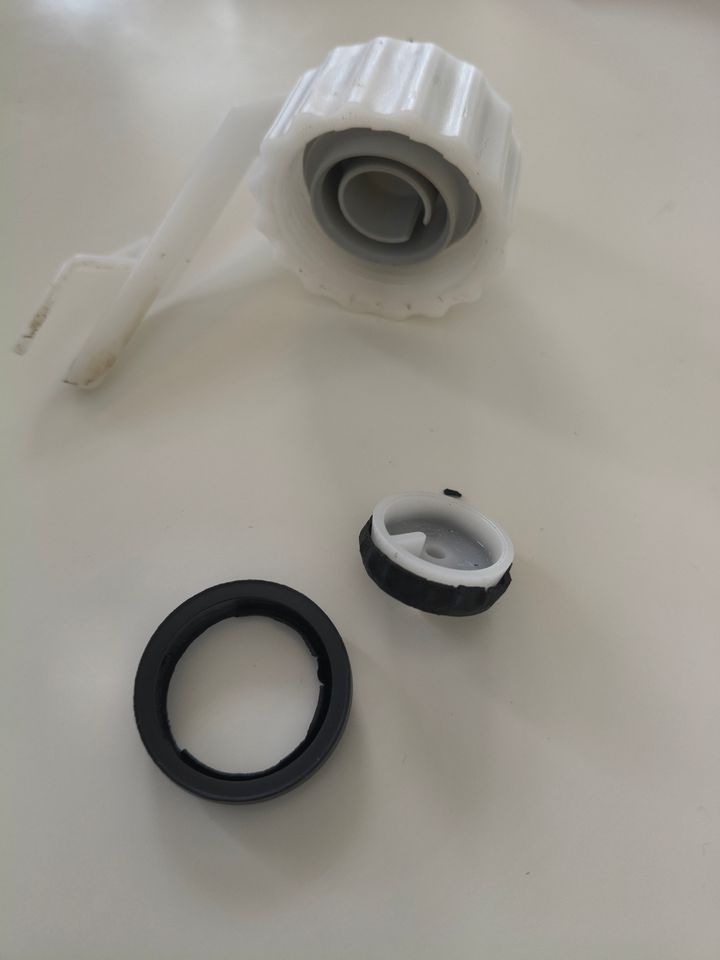
The first option (and the one I'd favour in your circumstances) is to replace the diaphragm washer in the filler valve. That may not be something you can source locally/easily. It's a fiddle to get access, but the easiest fix. If you have great difficulty getting the part I can sell you a couple (I still have lots of parts I need to sell after retirement) - just p.m. me
Remove the cistern, as you've realised, and you'll have the problem of the rusty fixings to overcome, and may well need a new doughnut (rubber ring between the cistern and pan)
The first option (and the one I'd favour in your circumstances) is to replace the diaphragm washer in the filler valve. That may not be something you can source locally/easily. It's a fiddle to get access, but the easiest fix. If you have great difficulty getting the part I can sell you a couple (I still have lots of parts I need to sell after retirement) - just p.m. me
tim0409 said:
I would just bite the bullet and remove the cistern and replace the inlet valve. The bolts and plastic wing nuts look in decent condition so shouldn t be that difficult to remove. As previously mentioned, I would replace the doughnut when you reassemble.
This x 10; having had the same issue the OP had, I removed the cistern and I'd strongly recommend you change all the internal parts and seals whilst you're at it - you'll thank yourself in futurep4cks said:
tim0409 said:
I would just bite the bullet and remove the cistern and replace the inlet valve. The bolts and plastic wing nuts look in decent condition so shouldn t be that difficult to remove. As previously mentioned, I would replace the doughnut when you reassemble.
This x 10; having had the same issue the OP had, I removed the cistern and I'd strongly recommend you change all the internal parts and seals whilst you're at it - you'll thank yourself in futureThe fill valves have replaceable diaphragm, and the flush valves are in two parts so the body and seal can be replaced without removing the cistern.
Fluidmaster PRO45 Bottom Entry Fill Valve (Brass Shank)
SKU: PRO45B-1
https://www.fluidmasteruk.com/products/pro-bottom-...
Alternatively this one is their standard valve with a brass shank
Fluidmaster 400 Bottom Entry Fill Valve (Brass Shank)
SKU: 400LB074
https://www.fluidmasteruk.com/products/400-bottom-...
Side Entry Fill Valve
Fluidmaster PRO75B Side Entry Fill Valve (Brass Shank)
SKU: PRO75B
https://www.fluidmasteruk.com/products/pro-side-en...
Handle Flush
Fluidmaster PRO750 Lever Dual Flush Valve
SKU: PRO750UK
https://www.fluidmasteruk.com/products/pro-lever-d...
Button Flush
Fluidmaster PRO550 Dual Button Cable Flush Valve
SKU: PRO550UK
https://www.fluidmasteruk.com/products/pro-dual-bu...
One golden rule is always get fill valves with brass shanks. Plastic shanks are easy to cross thread
Edited by 98elise on Saturday 21st February 11:37
3anascooter said:
thanks all for replies...seems the washer in the fill control is indeed knackered
I have squirted WD40 on everything just in case i try the whole cistern removal route !
Take it to a plumbers merchant and they may do replacement ones. They are not all the same, and often hard to get spares for unusual brands.I have squirted WD40 on everything just in case i try the whole cistern removal route !
That's an ideal standard one - The two major outlets don't sell them, you may have to hunt or use Ebay
I had a customer with holiday lets - I had to keep about 5 of these in stock as they regularly needed replacement - Average for each toilet was about 18 months, but they did get a lot of use. The taps got the abuse!
On one occasion, I arrived to find the guy on holiday had decided it would be a good idea to 'try to repair it', resulting in even more work! - Why would someone do that?
ETA - don't get WD40 near any plastic parts!
 .
. Gassing Station | Homes, Gardens and DIY | Top of Page | What's New | My Stuff